Download presentation
Presentation is loading. Please wait.

1
Drum Brake Overhaul Roger Bortignon

2
Drum Removal hubless drums slide right off
often they may have to be tapped with a hammer to free them up some imports have 2 threaded holes install two 8mm bolts to pull the drum off drums with integral hubs remove dust cap unlock retaining nut remove washer & bearing

3
Drum Brake Replacement & Overhaul
items that will need inspection, service or replacement include… Friction parts brake shoes brake drum Hydraulic parts wheel cylinder & brake fluid Hardware emergency brake cables brake return springs

4
this is NOT a step-by-step procedure
every vehicle is slightly different experience & personal preference dictates the order for re & re

5
Brake Shoe Removal clean brake assembly by wet washing – use a dust mask use brake washer – if on the hoist or use spray bottle with soapy solution set to mist do NOT use compressed air on dry brake assembly! remove upper return springs

6
Brake Shoe Removal – Special Tools
use brake spring pliers, not screwdrivers or general purpose pliers – easier, safer & quicker

7
Brake Shoe Removal remove hold down springs (may require special tool – fig.a) unhook e-brake cable (see next slide) remove shoes fig. a

8
Emergency Brake Cable Removal

9
Wheel Cylinders – what should I do with it?
has the brake fluid been flushed out every 2 years? is it leaking? how old is the vehicle? should I leave it alone? rebuild or replace?

10
Rebuilding Wheel Cylinders
loosen the bleeder screw – this is important cast iron cylinders can be honed aluminum cylinders should only be cleaned & not honed use brake fluid when honing hone only enough to clean cylinder (≈10 seconds) ensure there is no pitting where the cup seals slide
 ensure there is no pitting where the cup seals slide.")
11
Rebuilding Wheel Cylinders
replace cup seals (note diameter) & dust boots use clean brake fluid or rubber lubricant to assemble reassembly – cups on seals face inward
 & dust boots. use clean brake fluid or rubber lubricant to assemble. reassembly – cups on seals face inward.")
12
New Wheel Cylinders notice new brake line – olds ones often twist when you loosen them use a flare nut wrench to loosen & install hydraulic lines

13
Lubricate Shoe Support Pads
use anti-seize compound on the 6 shoe support pads this will reduce/eliminate brake squeal if the pads are grooved replace backing plate, or… mig weld grooves then grind smooth

14
Test Emergency Brake Cables
apply & release e-brake while watching the cable move in & out of its’ housing any “laziness” or binding = cable needs replacing

15
Service Brake Adjuster
disassemble, clean threads & lubricate with anti-seize compound some imports use a wedge to spread the shoes apart pay attention to the ends of the adjusters ensure you understand how they are to be assembled brake adjusters are side-specific – don’t mix up the left & right sides!

16
Reinstall Brake Shoes install new shoes
use new hold down pins & springs if needed dual-servo brakes (p ) will have unequal length brake shoes short shoe (primary) on the front side of the axle long shoe (secondary) on the back side of the axle
 will have unequal length brake shoes. short shoe (primary) on the front side of the axle. long shoe (secondary) on the back side of the axle.")
17
Install Upper Return Springs
non-servo (leading-trailing) brakes will have a solid anchor at the bottom and equal length brake shoes replace the springs if rusted, kinked, bent
 brakes will have a solid anchor at the bottom and equal length brake shoes. replace the springs if rusted, kinked, bent.")
18
Drum Inspection & Reconditioning
conditions that require drum machining…

19
Drum Inspection & Reconditioning
use a drum micrometer and check for oversize if drum is smooth and in otherwise good condition, simply deglaze the brake surface with emery paper machine drum if it is not oversize

20
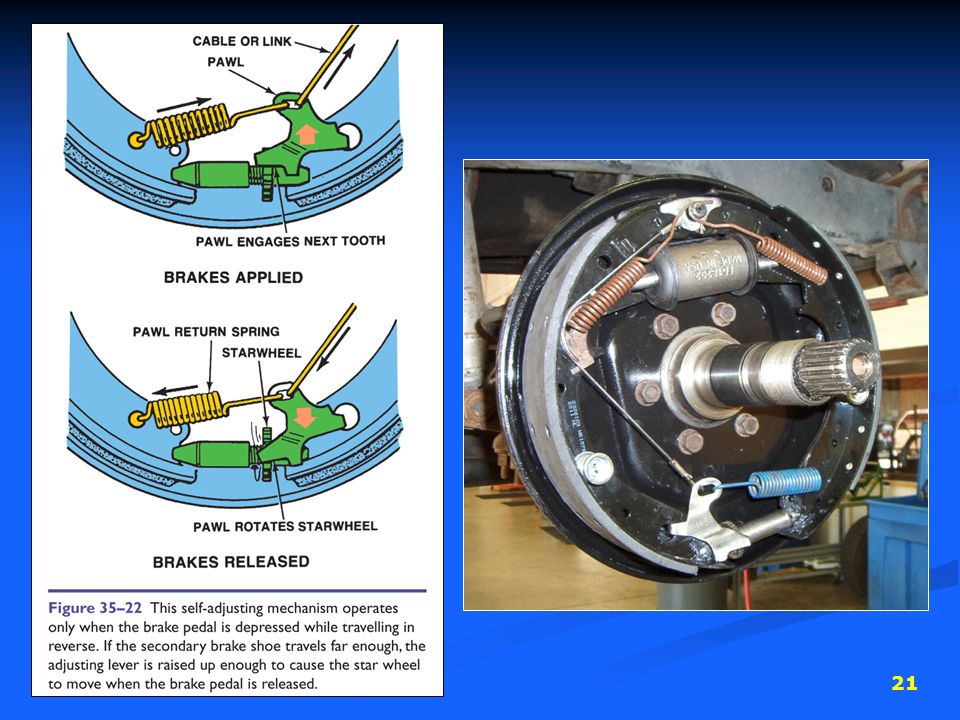
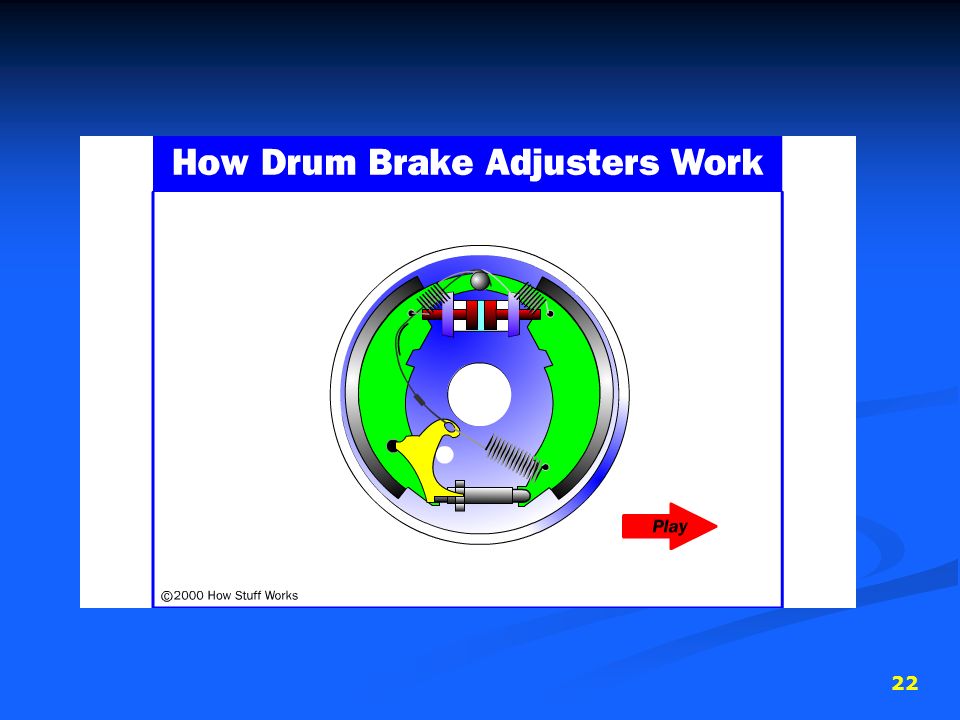
Adjusting Brake Shoes brake shoes will self-adjust for wear during normal operation some self-adjust when you back-up the vehicle others self-adjust when you apply the hand brake use a brake shoe setting gauge for initial adjustment after replacing the brake shoes manipulate the adjuster (screw type or wedge) so that the shoes will just contact the drum
 so that the shoes will just contact the drum.")
23
Adjusting the E-brake after the brake shoe-to-drum clearance has been adjusted, the e-brake cables can be adjusted if needed

24
Wheel Bearing Service if bearings were removed, repack them with fresh wheel bearing grease & replace the grease seals refer to chapter 34 in Halderman

25
Bleed / Flush Brake Fluid
if the hydraulic lines were disconnected or the wheel cylinder was replaced/overhauled air has to be removed from the brake system as well as flushing out the old brake fluid

26
Road Test the Vehicle ensure the pedal is high & firm
no noises or squeaks e-brake travel is correct amount no brake fluid leaks at the wheel cylinder, line or bleeder valve

27
In the High School take a digital picture of the brakes before disassembly place the pic on shop computer’s desktop for reference print a diagram from Mitchell finish one side, then start the other side ensure you have sufficient time to complete the repairs

Similar presentations