Download presentation
Presentation is loading. Please wait.

1
LOGO www.yeastar.com Yeastar Technology Co., Ltd. Enterprise Communication

2
Yeastar – IP PBX Embedded Hybrid IP-PBX

3
MyPBX Technical Training Introduction 1 Advanced settings 3 Basic settings 2 Solution 4

4
MyPBX – Embedded Hybrid IP PBX MyPBX SOHO MyPBX StandardMyPBX Pro MyPBX E1 MyPBX E1 Plus MyPBX Enterprise M1 MyPBX Enterprise M2 300 users 60 concurrent calls Call recording 100 users 22 concurrent calls 100 users 15 concurrent calls E1 /T1 trunk 30 users 8 concurrent calls

5
Module Types O2 ModuleS2 ModuleSO ModuleGSM ModuleUMTS ModuleBRI Module Pictures Ports 2 FXO2 FXS 1 FXO 1 FXS 112 BRI MyPBX SOHO √√√XX √ MyPBX Standard √√√√√√ MyPBX Pro √√√√√√ MyPBX E1/ E1 Plus √√√XXX MyPBX Enterprise √√√√√ √ You start with the MyPBX main-board and then just plug-in FXS, FXO, GSM, UMTS(3G) and BRI modules as your project needs. Below are modules that can be used in MyPBX. Introduction- Modules

6
FXO: Analog trunk ports, one module supports two trunk ports. FXS: Analog extension ports, one module supports for two extension ports. SO: SO module is a combined module with one FXS port and one FXO port. This module can help you to get lifeline port. GSM: GSM trunk port UMTS (3G):3G trunk port BRI: ISDN BRI trunk ports. One BRI module supports for two BRI ports. One BRI port supports for 2 B channels.
:3G trunk port BRI: ISDN BRI trunk ports. One BRI module supports for two BRI ports. One BRI port supports for 2 B channels..")
7
MyPBX SOHO – SMBs & Home Office Users Product NameSpecificationRemark MyPBX SOHO 30 SIP Extensions 8 Concurrent Calls 4 Telephone Interfaces 1 LAN Port 4 telephone interfaces means: a) max. 4 analog ports (FXS&FXO) b) max. 4 ISDN BRI ports External View Internal View
 b) max. 4 ISDN BRI ports External View Internal View.")
8
System LED Phone lines LED Ethernet LED Power LED Face Plate Power Port Rear Plate RJ11 Port (for phones) RJ45 Port (for Ethernet) Reset Key MyPBX SOHO – SMBs & Home Office Users
 RJ45 Port (for Ethernet) Reset Key MyPBX SOHO – SMBs & Home Office Users")
9
ProductSpecificationRemark MyPBX Standard 100 SIP Extensions 22 Concurrent Calls 16 Telephone Interfaces 1 LAN Port 1WAN Port 16 Telephone Interface : 1 ) Max.16 analog ports( FXS&FXO) 2 ) Max. 8 BRI ports 3 ) Max. 4 GSM ports 4 ) Max. 4 UMTS ports MyPBX Standard – Small IP PBX Phone System External View Internal View
 Max. 4 GSM ports 4 ) Max. 4 UMTS ports MyPBX Standard – Small IP PBX Phone System External View Internal View.")
10
System LED Phone lines LED Ethernet LED Power LED Face Plate Power Rear Plate RJ11 Port (for phones) LAN Port (RJ45) Reset Key WAN Port (RJ45) MyPBX Standard – Small IP PBX Phone System
 LAN Port (RJ45) Reset Key WAN Port (RJ45) MyPBX Standard – Small IP PBX Phone System")
11
ProductSpecificationRemark MyPBX Pro 100 SIP Extensions 22 Concurrent Calls 16 Telephone Interfaces 1 LAN Port 1WAN Port 16 Telephone Interface 1 ) Max.16 analog ports 2 ) Max. 8 BRI ports 3 ) Max. 8 GSM ports 4 ) Max. 8UMTS ports MyPBX Pro – Small IP PBX Phone System ■ Differences between MyPBX Pro and MyPBX Standard : 1 ) MyPBX Pro is 1U Rack Mount metal case; 2 ) MyPBX Pro can supports 8 GSM or 8 UMTS ports. External View Internal View
 Max. 8 GSM ports 4 ) Max. 8UMTS ports MyPBX Pro – Small IP PBX Phone System ■ Differences between MyPBX Pro and MyPBX Standard : 1 ) MyPBX Pro is 1U Rack Mount metal case; 2 ) MyPBX Pro can supports 8 GSM or 8 UMTS ports. External View Internal View.")
12
System LED Phone lines LED Ethernet LED Power LED MyPBX Pro – Small IP PBX Phone System 1U 19’’ Power RJ11 Port ( for phones) LAN Port(RJ45) Reset Key WAN Port (RJ45) For Antennas Face Plate Rear Plate
 LAN Port(RJ45) Reset Key WAN Port (RJ45) For Antennas Face Plate Rear Plate")
13
ProductSpecificationRemark MyPBX E1 100 SIP Extensions 15 Concurrent Calls 1 E1/T1/J1 Port 8 Telephone Interfaces 1 LAN Port 1 WAN Port 8 Telephone Interfaces : Max. 8 analog ports (FXS&FXO) MyPBX E1 - Small IP PBX Phone System External View Internal View
 MyPBX E1 - Small IP PBX Phone System External View Internal View.")
14
Power RJ11 Port ( for phones) LAN Port(RJ45) Reset Key WAN Port (RJ45) E1/T1 Port System LED Phone Lines LED Ethernet LED Power LED E1/T1 LED MyPBX E1 - Small IP PBX Phone System Face Plate Rear Plate
 LAN Port(RJ45) Reset Key WAN Port (RJ45) E1/T1 Port System LED Phone Lines LED Ethernet LED Power LED E1/T1 LED MyPBX E1 - Small IP PBX Phone System Face Plate Rear Plate")
15
ProductSpecificationRemark MyPBX E1 Plus 100 SIP Extensions 15 Concurrent Calls 1 E1/T1/J1 Port 8 Telephone Interfaces 1 LAN Port 1 WAN Port 8 Telephone Interfaces Max. 8 analog ports (FXS&FXO) MyPBX E1 Plus– Small IP PBX Phone System External View Internal View
 MyPBX E1 Plus– Small IP PBX Phone System External View Internal View.")
16
MyPBX E1 Plus – Small IP PBX Phone System System LED Phone Lines LED Ethernet LED Power LED E1/T1 LED 1U 19’’ Power RJ11 Port (for phones) LAN Port(RJ45) Reset Key WAN Port (RJ45) E1/T1 Port Face Plate Rear Plate
 LAN Port(RJ45) Reset Key WAN Port (RJ45) E1/T1 Port Face Plate Rear Plate")
17
ProductModelSpecificationRemark MyPBX Enterprise M1 300 SIP Extensions 60 Concurrent calls 1 E1/T1 Port 8 telephone interfaces 1 LAN port 1 WAN port 1) 8 Telephone Interfaces Max. 8 analog ports (FXS&FXO) or max. 4 GSM ports or max. 4 UMTS ports or max. 8 ISDN BRI ports; 2) The only difference between M1 and M2 is M1 has E1/T1 port but M2 doesn’t have it. 3) Call Recording – available. M2 300 SIP Extensions 60 Concurrent calls 8 Telephone interfaces 1 LAN port 1 WAN port MyPBX Enterprise – Medium sized IP PBX External View Internal View
 or max. 4 GSM ports or max. 4 UMTS ports or max. 8 ISDN BRI ports; 2) The only difference between M1 and M2 is M1 has E1/T1 port but M2 doesn’t have it. 3) Call Recording – available. M2 300 SIP Extensions 60 Concurrent calls 8 Telephone interfaces 1 LAN port 1 WAN port MyPBX Enterprise – Medium sized IP PBX External View Internal View.")
18
MyPBX Enterprise – Medium sized IP PBX Phone Lines LED System LED Power LED 1U 19’’ Power RJ11 Port (for phones) LAN Port(RJ45) Reset Key WAN Port (RJ45) E1/T1 Port Face Plate Rear Plate For Antennas
 LAN Port(RJ45) Reset Key WAN Port (RJ45) E1/T1 Port Face Plate Rear Plate For Antennas")
19
MyPBX Series Comparison MyPBX SOHOMyPBX StandardMyPBX ProMyPBX E1MyPBX Enterprise Dimension& Weight 193x153x30mm(0.5 Kg) 280x175x33mm (0.7 Kg) 280x175x33mm (2.5 Kg) 280x175x33 mm (0.6Kg) 440x200x45 mm (3.5Kg) Analog ports(MAX) 416 88 PRI ports (E1/T1/J1) 00011 GSM ports(MAX)04804 UMTS04804 BRI48808 Ethernet ports1 LAN 1 WAN 1 LAN 1 WAN 1 LAN 1 WAN 1 LAN 1 WAN CPU BF533 400 MHz BF537 600 MHz BF537 600 MHz BF561 600 MHz TMS320C6A8168ACYG (dual core) 1 G MHz RAM64 MB128 MB 1 GB ROM512 MB Hard DiskN/A 500 GB(Optional) User(MAX)30100 300 Concurrent calls (MAX) 822 1560 Voicemail & Recording 4000min Depends on Hard disk ProtocolSIPSIP, IAX, T.38
 280x175x33mm (0.7 Kg) 280x175x33mm (2.5 Kg) 280x175x33 mm (0.6Kg) 440x200x45 mm (3.5Kg) Analog ports(MAX) PRI ports (E1/T1/J1) GSM ports(MAX)04804 UMTS04804 BRI48808 Ethernet ports1 LAN 1 WAN 1 LAN 1 WAN 1 LAN 1 WAN 1 LAN 1 WAN CPU BF MHz BF MHz BF MHz BF MHz TMS320C6A8168ACYG (dual core) 1 G MHz RAM64 MB128 MB 1 GB ROM512 MB Hard DiskN/A 500 GB(Optional) User(MAX) Concurrent calls (MAX) Voic & Recording 4000min Depends on Hard disk ProtocolSIPSIP, IAX, T.38")
20
Task Here is the requirement from a customer, can you please recommend him a most suitable MyPBX model? Please check which model of MyPBX is the best choice and what are the necessary modules. There are 50 workers, 7 PSTN lines, 2 GSM trunks, a legacy fax machine must be reserved to receive and send faxes.

21
MyPBX Technical Training Introduction 1 Advanced settings 3 Basic settings 2 Solution 4

22
MyPBX quick start guide

23
Basic settings of MyPBX 2.1 Warming up 2.2 Logical configuration steps in WEB GUI 2.2.1 Network & System settings 2.2.2 Extensions 2.2.3 Trunks 2.2.4 Outbound Calls 2.2.5 Inbound Calls 2.2.6 Other settings 2.2.7 Security

24
2.1 Warming up – Part 1 Unpack your MyPBX – don’t power on Unscrew the case of the MyPBX and insert the module cards according to your requirements Attention: Please ensure that the pins are aligned and the module is inserted correctly. Please check the ‘MyPBX Operation Instructions’ on the next page. Basic settings – Warming up

25
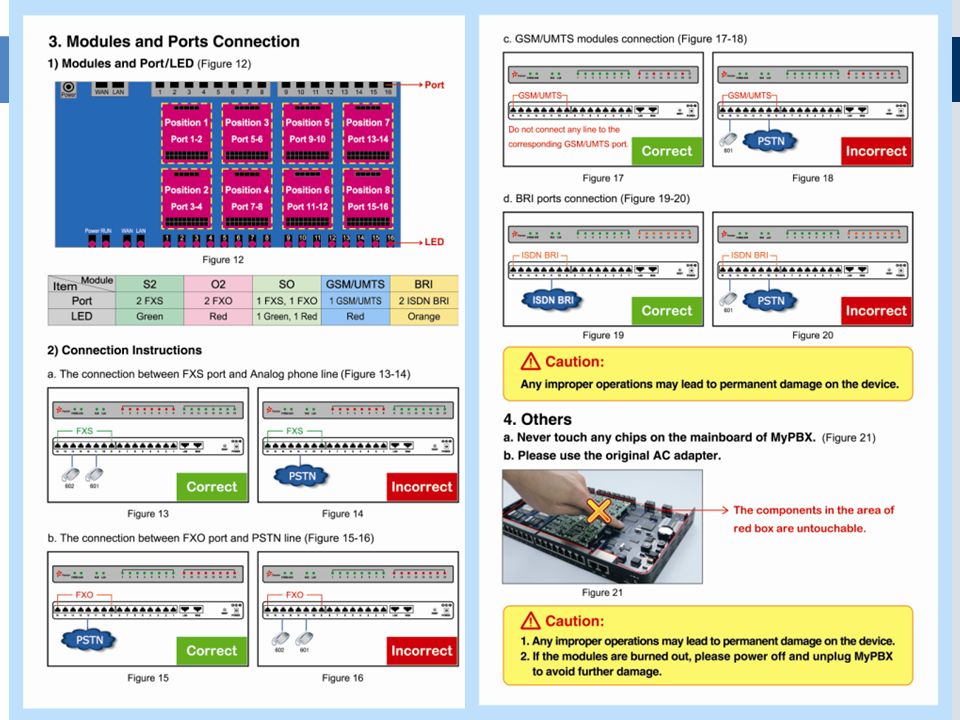
Introduction– Operation Instructions

27
Let’s see how to connect Switch, IP phones, router and MyPBX in a same network. Basic settings – Warming up

28
2.1 Warming up – Part 2 Power on your Laptop/PC and log in Set the Nic (Ethernet Port) of your Laptop/PC to match the telephone system subnet. Example: Set the Nic IP Address to 192.168.5.XXX and set the Subnet Mask to 255.255.255.0 Turn on the MyPBX and wait until system initialized correctly, which will cost few minutes. Once the RUN LED flickers in green light, then it means the system is working normally. Open your browser and go to http://192.168.5.150http://192.168.5.150 Basic settings - Warming up

29
Login web GUI and change a new IP address Factory default IP address: 192.168.5.150 Default username: admin Password: password Basic settings - Warming up

30
Basic Settings - Logical steps 2.2 Logical steps – Overview

31
Basic Settings – System & Network Step 1 Change a new IP address for MyPBX Step 2 Change Date and Time for MyPBX Step 3 Change a new password for the web GUI Step 4 Download the system prompts for MyPBX 2.2.1 System and network setting

32
2.2.1 Step 1 Change a new IP address for MyPBX Basic Settings – System & Network

33
2.2.1 Step 2 Change Date and Time Basic Settings – System & Network

34
2.2.1 Step 3 Change a new password for the web GUI Basic Settings – System & Network

35
2.2.1 Step 4 Download the system prompts for MyPBX Basic Settings – System & Network

36
2.2.2 Extensions Step 5 Change the extension preferences Step 6 Setup analog and SIP extensions Step 7 To quick configure the IP phones through phone provisioning Basic Settings – Extensions

37
2.2.2 Step 5 Change the extension preferences Basic Settings – Extensions

38
2.2.2 Step 6 Setup FXS and SIP extensions Basic Settings – Extensions

39
2.2.2 Step 7 To quick configure quantity IP phones through phone provisioning Basic Settings – Extensions

40
Basic Settings - SIP extension Register SIP extension - Manually

41
Basic Settings – SIP extension

42
2.2.3 Trunks - Step 8 Setup various kinds of trunks Basic Settings – Trunks

43
Configure PSTN trunk

44
Basic Settings – Trunks Configure E1/T1 trunk

45
Configure ISDN BRI trunk Basic Settings – Trunks

46
Configure GSM trunk

47
Configure SIP trunk Basic Settings – Trunks

48
2.2.4 Outbound route - Step 9 Setup outbound routes Basic Settings – Outbound Route

49
phone number To match pattern Check the next route Transform digits Send to destination trunk Yes No Input numbers – The numbers dialed through phones Pattern - Special characters have special meanings Transform digits – Copy from input / Remove / Insert digits Send to destinations - Send to different trunks / branch offices Basic Settings – Outbound Route

50
Dial Pattern examples Dial pattern will match from the beginning to the last one We can choose different trunks for different calls For 911, we can choose PSTN For Local 7 digits calls, we might choose BRI or GSM For Long Distance calls, we can choose VoIP trunk X : Any Digit from 0-9 Z : Any Digit from 1-9 N : Any Digit from 2-9 [12345-9] : Any digits in the brackets (in this example, 1,2,3,4,5,6,7,8,9) The ‘.’ character will match any remaining digits. For example, 9011. will match any phone number that starts with 9011, excluding 9011 itself. Basic Settings – Outbound Route
![Dial Pattern examples Dial pattern will match from the beginning to the last one We can choose different trunks for different calls For 911, we can choose PSTN For Local 7 digits calls, we might choose BRI or GSM For Long Distance calls, we can choose VoIP trunk X : Any Digit from 0-9 Z : Any Digit from 1-9 N : Any Digit from 2-9 [ ] : Any digits in the brackets (in this example, 1,2,3,4,5,6,7,8,9) The ‘.’ character will match any remaining digits.](http://images.slideplayer.com/22/6358777/slides/slide_50.jpg "For example, will match any phone number that starts with 9011, excluding 9011 itself. Basic Settings – Outbound Route.")
51
Basic Settings – Incoming Calls 2.2.5 Incoming calls Step 10 Setup business hours Step 11 Upload or customize prompts Step 12 Setup IVR Step 13 Setup call queue Step 14 Setup ring groups Step 15 Setup DISA Step 16 Setup conferences Step 17 Setup inbound routes

52
2.2.5 Incoming call - Step 10 Setup business hours Basic Settings – Incoming Calls

53
2.2.5 Incoming call - Step 11 Upload or record prompts Basic Settings – Incoming Calls

54
2.2.5 Incoming call - Step 12 Setup IVR Play IVR prompt and wait for key Key Press? Reach Repeat count? Wait for Key time out Valid key? Time out destination Key event destination Invalid destination Yes No Basic Settings – Incoming Calls

55
2.2.5 Incoming call - Step 13 Setup call queue Basic Settings – Incoming Calls

56
2.2.5 Incoming call - Step 14 Setup ring groups

57
Basic Usage – Logical Steps 2.2.5 Incoming call - Step 15 Setup DISA

58
2.2.5 Incoming call - Step 16 Setup Conference Basic Settings – Incoming Calls

59
2.2.5 Incoming call - Step 17 Setup inbound routes Basic Settings – Incoming Calls

60
2.2.5 Incoming call - Step 17 Setup inbound routes Input Match Resource? Match caller ID / DID Yes Mobility extension Match business hours Give Dial Tone Go to configured destination Yes No Match holiday Go to holiday destination Yes Go to non-office destination Check Next rules No Basic Settings – Incoming Calls Yes

61
Caller 501 502 503 504505 Phone Number: 13806048464 E1 5503301 5503302 5503303 5503304 5503305 5503306 5503307 5503308 5503309 Basic Settings – DID

62
2.2.6 Other settings Step 18 Setup feature codes Step 19 Setup SIP settings Step 20 Setup voicemail Step 21 Setup music on hold Basic Settings – Others

63
2.2.6 Other settings – Step 18 Setup feature codes Basic Settings – Others # + Ext.Leave voice message *1One touch record *2Read voice message *02Voicemail Main Menu *3Attended transfer *03Blind transfer *4Pick up the call *04Pick up a specific extension *5Intercom *6Parking call *70Reset to defaults Note: When reset to defaults, the call forward default value will be 1) Always forward: Disable 2) Busy forward to voice mail: Enable 3) No answer forward to voice mail: Enable 4) Do not disturb: Disable *71Enable always forward *071Disable always forward *72Enable busy forward *072Disable busy forward *73Enable no answer forward *073Disable no answer forward *74Forward to number(*74+phone number) e.g.: *74501, it will forward the call to extension 501. *074Forward to Voicemail *75Enable do not disturb *075Disable do not disturb

64
Basic Settings – Others 2.2.6 Other settings – Step 18 Setup feature codes

65
2.2.6 Other settings – Step 19 Setup SIP settings Basic Settings – Others

66
2.2.6 Other settings – Step 19 Setup SIP settings Basic Settings – Others

67
2.2.6 Other settings – Step 19 Setup SIP settings Basic Settings – Others

68
2.2.6 Other settings – Step 20 Setup voicemail Basic Settings – Others

69
2.2.6 Other settings – Step 21 Setup music on hold Basic Settings – Others

70
2.2.7 Security Step 22 Setup IP restriction on extensions page Step 23 Firewall settings Step 24 Backup and Restore Basic Settings – Security

71
2.2.7 Security- Step 22 Enable IP Restriction for extensions Basic Settings – Security For local extensions For remote extensions

72
Hacker Firewall Sip attack packets Basic Settings – Security 2.2.7 Security– Step 23 Firewall & Blacklist are available Our MyPBX can detect that huge amount SIP packets in short time is an abnormal for a SIP station. MyPBX will add the IP address of the host, which send too many SIP packets in a very short time, into blacklist automatically. Once the IP being added into blacklist, the host will not be able to send any packets to MyPBX unless the administrator deletes the IP from blacklist manually. The normal SIP packets speed can be defined on IP blacklist rule section. Sometimes, when the IP phone subscribe a lot BLF status on their phone, the operator's IP phone for example, it will send a lot SIP packets as well. Then MyPBX might add the normal SIP extension into blacklist by mistake as well. Therefore we need to define white list by adding common rules to accept trusted network/hosts.

73
2.2.7 Security- Step 23 Firewall configurations Basic Settings – Security

74
2.2.7 Security– Step 24 Backup and restore Basic Settings – Security

75
General Limitations General Limitations of MyPBX General limitations

76
MyPBX Technical Training Introduction 1 Advanced settings 3 Basic settings 2 Solution 4

77
Advanced Settings – Call control 3.1 Call control – Option 1 Only the selected extension can dial out

78
3.1 Call control – Option 2 Setup a password for the outbound route Advanced Settings – Call control

79
3.1 Call control – Option 3 Setup PIN user for the outbound route Advanced Settings – Call control

80
Advanced Settings – Call recording 3.2 Call Recording – only available in MyPBX Enterprise Note that you need a hard disk installed in MyPBX before you can enable the call recording feature. Below are suggested hard disk: (Seagate)500G ST9500325AS 5400RPM 8MB SATAII interface laptop hard-disk (Seagate)500G ST9500420AS 7200RPM 16MB SATAII interface laptop hard-disk (Seagate)320G ST9320325AS 5400RPM 8MB SATAII interface laptop hard-disk
500G ST AS 5400RPM 8MB SATAII interface laptop hard-disk (Seagate)500G ST AS 7200RPM 16MB SATAII interface laptop hard-disk (Seagate)320G ST AS 5400RPM 8MB SATAII interface laptop hard-disk.")
81
Advanced Settings – Call recording 3.2 MyPBX Enterprise- Recording Interface for administrator

82
3.2 MyPBX Enterprise- Recording Interface for extension users Advanced Settings – Recording

83
3.3 Update firmware in MyPBX through two ways: HTTP & TFTP Advanced Settings – Firmware Upgrade

84
Advanced Settings – Auto Provision Get configurations files from MyPBX 3.4 MyPBX act as an Auto Provision server

85
Advanced Settings – Call through Outlook 3.5 Call out through Outlook contacts

86
Task – Establish a small network

87
MyPBX Technical Training Introduction 1 Advanced settings 3 Basic settings 2 Solution 4

88
Solutions– Remote extension 4.1 Remote working solution

89
4.2 Remote office solution Solutions– Remote office

90
Solutions– Traditional PABX 4.3 Connect MyPBX with traditional PABX You may note that we can connect using BRI or PRI channels as well

91
Solutions – Skype Connect 4.4 Connect MyPBX to Skype world

Similar presentations


. Smart Personal Console Overview SPC allows users more control over their personal communications settings. Users can view/set:>")


>")


