Download presentation
Presentation is loading. Please wait.

1
Chapter 10 Thin Maintenance Overlays
From… Maintenance Technical Advisory Guide (MTAG)
")
2
From… Maintenance Technical Advisory Guide (MTAG)
Manager’s Overview From… Maintenance Technical Advisory Guide (MTAG) The intent of the Manager’s Overview is to give a basic understanding of each application or process available. This overview should be 5-8 minutes maximum. ANYTHING IN RED NEEDS TO BE CHANGED TO FIT THE SURFACE TREATMENT THAT YOU ARE WORKING ON. Slides with “Permanent” will be the same for all presentations and should not be changed.
 The intent of the Manager’s Overview is to give a basic understanding of each application or process available. This overview should be 5-8 minutes maximum. ANYTHING IN RED NEEDS TO BE CHANGED TO FIT THE SURFACE TREATMENT THAT YOU ARE WORKING ON. Slides with Permanent will be the same for all presentations and should not be changed.")
3
Introduction to Thin Maintenance Overlays
What are thin maintenance overlays ? Why use thin maintenance overlays ? When to use thin maintenance overlays ? Where to use thin maintenance overlays ? May want to include Module numbers for each section.

4
What Are Thin Maintenance Overlays?
Defined as thin treatment using a hot mix system Non-structural layer Applied as a maintenance treatment (corrective or preventive) Thickness: Caltrans: 1.2 in (30 mm) Nationally: less than 1½ in (37.5mm)
 Thickness: Caltrans: 1.2 in (30 mm) Nationally: less than 1½ in (37.5mm)")
5
What Are Thin Maintenance Overlays?
a) Dense Graded b) Gap Graded c) Open Graded
 Dense Graded. b) Gap Graded. c) Open Graded.")
6
Why Use Thin Overlays? Restores the surface conditions (smoothness, noise, and skid) Improves the appearance of the roadway Extends the life of the pavement

7
I-77 Columbia, SC Dry, Oxidized, Slightly Rutted Pavement, 60,000 ADT
When to Use? Structurally sound pavement Rut depth < 1/2” Minor cracking cracking Minor to moderate bleeding Raveled surface

8
When NOT to use! Poor Candidates
High Severity Block Cracking When NOT to use! Poor Candidates High Severity Alligator Cracking Rutting >1/2” High Severity “D” Cracking

9
Where to Use? As a surface treatment over asphalt concrete pavements and on portland cement concrete pavements Over structurally sound pavements Oxidation Reduction: Successfully used as a protection layer to prevent asphalt aging in the main structural layers. Mitigation of Cracking: Thin Overlays can be used to mitigate cracking. Dense-graded overlays required a SAMI or fabric interlayer. Skid Resistance: Use in sections with poor frictional properties. A skid test should be conducted to determine the existing coefficient of friction of the pavement surface (CT 342).
.")
10
Where to Use? Open- and Gap-Graded Overlays
Wet Weather Accidents: Use in sections with high frequency of wet weather accidents or when recommended to minimize wet weather accident occurrences.

11
End Overview Begin Project Design, Materials & Specifications
This has to be a separate title slide. Use template from slide. Request to change color red to something else. Request to have a closing slide (i.e., thanks any questions, etc.)
")
12
Design, Materials & Specifications
Module 10-1 Design, Materials & Specifications From… Maintenance Technical Advisory Guide (MTAG)
")
13
Topics to be covered Project Selection Design Considerations
Distress and Other Application Considerations Performance Cost Design Considerations Mobilization Typical Materials Items Quantity Calculations Production Rates Roadway Widths Roadway Geometry Traffic Control Miscellaneous Items Sample Project Materials and Specifications (including SSP’s) Summary Request to include cost as another item. Possibly include cost in Project Cost. Keep in mind cost changing. Possibly adding date to this information. What is the normal cost, night cost, and etc. Need to get cost from local agencies (MTC). Re-number training Modules. This should be a treatment module 2. Delete first two lines. Training Module 1: Design, Materials & Specifications - Technical Training
 Summary. Request to include cost as another item. Possibly include cost in Project Cost. Keep in mind cost changing. Possibly adding date to this information. What is the normal cost, night cost, and etc. Need to get cost from local agencies (MTC). Re-number training Modules. This should be a treatment module 2. Delete first two lines. Training Module 1: Design, Materials & Specifications - Technical Training.")
14
Project Selection Distress and Application Considerations Performance
Traffic loading Existing pavement conditions Environment

15
Factors to Consider When Choosing a Maintenance Treatment
Will the treatment address the distresses present? (i.e., Will it work?) Can the required preparation for the treatment be carried out? Is the treatment affordable and cost effective? Will the treatment be performed before the situation being addressed changes?
 Can the required preparation for the treatment be carried out Is the treatment affordable and cost effective Will the treatment be performed before the situation being addressed changes")
16
Three Basic Steps In The Selection Process
Assess the existing conditions. Determine the feasible treatment options. Analyze and compare the feasible options with each other.

17
Initial Site Assessment – Distress Identification
Types of Distresses and Definitions Definitions from Caltrans Pavement condition survey manual or the FHWA“DISTRESS IDENTIFICATION MANUAL for the Long-Term Pavement Performance Program” PUBLICATION NO. FHWA-RD JUNE 2003

18
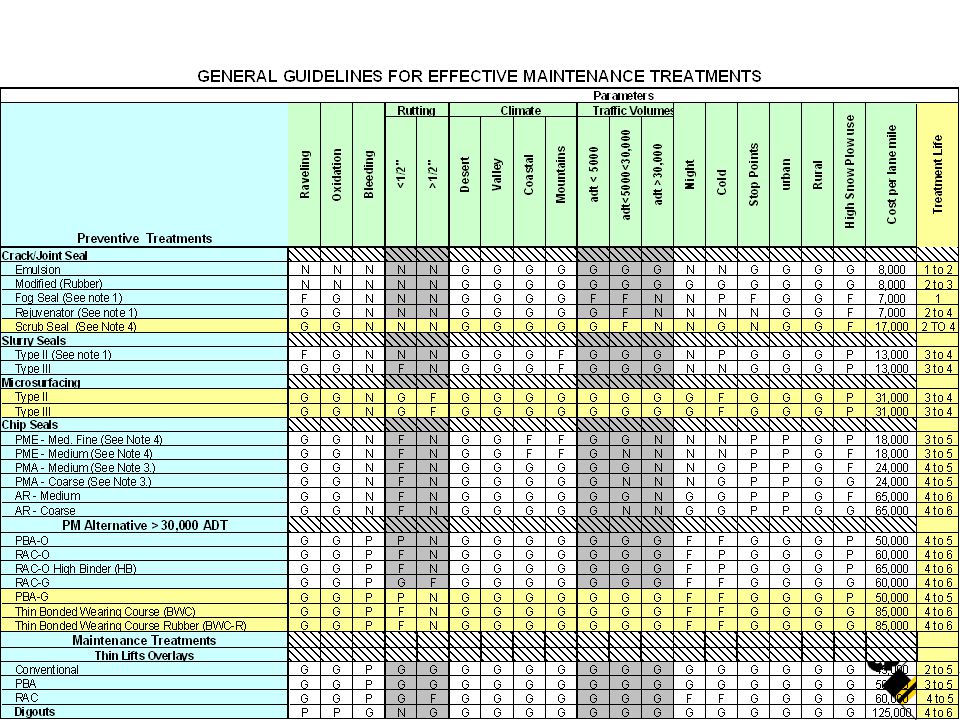
Caltrans Maintenance Treatment Matrix
MTAG Chapter 3 Figure 3-3 Rutting Treatment Raveling Oxidation Bleeding <1/2" >1/2" Urban Rural Slurry Seals Type II (Note 1) F G N Type III Chip Seal PME - Med. Fine P PME - Medium PMA -Medium (Note 3.) PMA - Coarse (Note 3.) AR - Medium AR - Coarse
 F. G. N. Type III. Chip Seal. PME - Med. Fine. P. PME - Medium. PMA -Medium (Note 3.) PMA - Coarse (Note 3.) AR - Medium. AR - Coarse.")
20
Distress Types and Levels that can be addressed by Thin Overlays
Perform Visual Site Inspection. Identify types, quantity and levels of distress For example on a 2 lane highway (Route xxx from PM 0.0 to PM 10.8)with <30,000 ADT: 10% Alligator B Cracking Minor Transverse Cracking An area of isolated base failure 1000 ft x 4 ft Heavy raveling and oxidation Rutting < ½”
with <30,000 ADT: 10% Alligator B Cracking. Minor Transverse Cracking. An area of isolated base failure 1000 ft x 4 ft. Heavy raveling and oxidation. Rutting < ½")
21
DISTRESS AND APPLICATION CONSIDERATIONS
TMO is a viable application for treating structurally sound, worn pavements Cracking Patching/ Potholes Surface Deformation Surface Defects Longitudinal & Transverse (Medium) Block (Moderate) Edge (Moderate) Patches: Moderate Potholes: Rutting: <0.5 in (12.5 mm) Shoving: No Bleeding Polished Agg: OK Raveling: Severe
 Block (Moderate) Edge (Moderate) Patches: Moderate. Potholes: Rutting: <0.5 in (12.5 mm) Shoving: No. Bleeding. Polished Agg: OK. Raveling: Severe.")
22
Other Application Considerations
Traffic Control Safety Night Work Returns/Hand Work Turn Pockets Milling Job Quantities Prep Work Required Quick return to traffic- Reduced Work Zone Time (Workers’ Safety) Noise Reduction- Open/Gap Graded Mix Night Work- Min Temp 45º F (More working days) Reduced Backspray- Open/Gap Graded Mix High Volume Roadways- Faster Paving Process (Get In- Get Out)
 Noise Reduction- Open/Gap Graded Mix. Night Work- Min Temp 45º F (More working days) Reduced Backspray- Open/Gap Graded Mix. High Volume Roadways- Faster Paving Process (Get In- Get Out)")
23
Performance Expectations
Life and Costing Improved skid resistance Reduced traffic noise (Open-Graded) Spray Reduction (Open Graded) Improved ride quality (Smoothness) Preventive Maintenance Activities Recommended
 Spray Reduction (Open Graded) Improved ride quality (Smoothness) Preventive Maintenance Activities Recommended.")
24
Application Cost and Life Cycle Data (from Handout)
Expected Life and Cost Data from Strategy Selection Group Need to include handout from Gary H.

25
Improved Ride Quality -(Smoothness)
Minor ruts and depressions can be filled with Thin Maintenance Overlays to improve ride quality

26
Future Maintenance Activities Recommended
Crack Sealing Patching Re-Striping Changed Preventive to Future.

27
Design Considerations
Mobilization Typical Materials Items Quantity Calculations Production Rates Roadway Widths Roadway Geometry Traffic Control Miscellaneous Items Sample Project

28
Mobilization Typical Asphalt Paving On-site Staging Required –
Rubberized Asphalt Binder will require additional equipment for its production On-site Staging Required – Area for Tanker and Distributor exchange

29
Typical Materials Items
Asphalt Concrete Tons Use maximum lbs/SY for selected aggregate size 3/8” PMA OG or GG (9.5mm) = 85 lbs/SY ½” PMA OG or GG (12.5mm) = 100 lbs/SY 3/8” AR OG of GG (9.5mm) = 85 lbs/SY Emulsion Tons Use 0.2 gallons/SY for emulsion application
 = 85 lbs/SY. ½ PMA OG or GG (12.5mm) = 100 lbs/SY. 3/8 AR OG of GG (9.5mm) = 85 lbs/SY. Emulsion Tons. Use 0.2 gallons/SY for emulsion application.")
30
Quantity Calculations
Lane Mile (LM) (Centerline to Fog Line) 5280 ft x 12 ft = 63,360 SF = 7040 SY When calculating quantities, application should extend beyond fog line Shoulder quantities need to be calculated independently Shoulder application may vary from mainline application Typical Shoulder calculation: 3 ft wide x 5280 ft length = 15,840 SF = 1760 SY Typical 2 Lane Roadway Calculation (2 x 7040) + (2 x 1760) = 17,600 SY Need to verify fog line. One or two words.
 (Centerline to Fog Line) 5280 ft x 12 ft = 63,360 SF = 7040 SY. When calculating quantities, application should extend beyond fog line. Shoulder quantities need to be calculated independently. Shoulder application may vary from mainline application. Typical Shoulder calculation: 3 ft wide x 5280 ft length = 15,840 SF = 1760 SY. Typical 2 Lane Roadway Calculation. (2 x 7040) + (2 x 1760) = 17,600 SY. Need to verify fog line. One or two words.")
31
Quantity Calculations
When calculating quantities for each application use highest application rate per SY for estimate purposes Example: Specification Spreading of screenings for chip seal application. Range is lb per SY. Use 20 lb for estimating quantities Request to reword the first bullet item.

32
Production Rates and Paving Days
Mainline Paving tons per hour Returns/Turnpockets tons per hour (# of Paving Days) Minimum 5 days to make cost effective
 Minimum 5 days to make cost effective.")
33
Roadway Geometry and Widths
Urban Milling contour edge grind required to match curb and gutter and existing pavement Drainage Minimal water trapped against curb due to emulsion filling void structure and thin lift Less water intrusion to pavement interface due to emulsion membrane Rural Cross-slopes Shoulder Generally best used for Travel Lane with 1 foot beyond fog line For Grade differential greater than 2% from Mainline to Shoulder, the shoulder must be paved separately in order to maintain the grade Edge drop-off will be less than ¾” (consider bicycle traffic material can not be feather down lower then top size agg.) Varying Width Typical Paving machine width 8-14 feet variable Under Rural moved the first bullet item to shoulder. Recommendation change to two slides one for Urban and one for Rural.
 Varying Width. Typical Paving machine width 8-14 feet variable. Under Rural moved the first bullet item to shoulder. Recommendation change to two slides one for Urban and one for Rural.")
34
Traffic Control Typical release to traffic 10-20 minutes behind paver
Multi-lane highways, consider moving lane closure Two-lane roadways ½ to ¾ mile closure Thinner lift allows faster production Comments to change photo to match traffic control.

35
Miscellaneous Items Edge grinding
Crack seal hot applied min one month prior Patching - hot mix only, cold mix continues to rut Utilities – Adjustments most likely necessary Loops may need to be replaced if doing edge grinding Dig Outs – Prior to paving Signing and Striping Deleted the word will and included may to the fifth bullet item.

36
Material Specifications
Binders PG Grade spec Polymer modified asphalt spec Rubberized Asphalt spec Aggregates Gradations Physical Properties Mix Design Asphalt Emulsion Application Specifications

37
PG Grade Specs Binder Climatic Region Conventional Asphalt
Rubberized Asphalt Open Graded Gap Graded PG PBA(1) South Coast Central Coast Inland Valleys 64-10 6a 64-16 North Coast Low Mountain South Mountain High Mountain High Desert 64-28 58-22 Desert 70-10 6a (mod) May need to change photo on this slide. Need to update binder grade GGB1 to PG… Need to speak to Scott’s with information.
 South Coast. Central Coast. Inland Valleys a North Coast. Low Mountain. South Mountain. High Mountain. High Desert Desert a (mod) May need to change photo on this slide. Need to update binder grade GGB1 to PG… Need to speak to Scott’s with information.")
38
Polymer Modified Binders
Binder Grade General Climatic Region Criteria GGB1 (PG ) Desert or Hot Valley Areas and Coastal Areas Areas below 1,050 m (3,445 ft) elevation with average 7-day maximum and 1-day minimum pavement temperatures between 70C and -22C (158F and -8F), respectively. GGB2 (PG ) Coastal Areas Areas below 1,050 m (3,445 ft) elevation with average 7-day maximum and 1-day minimum pavement temperatures between 64C and -22C (147F and -8F), respectively. GGB3 (PG ) Cool Coastal or Mountain Areas Areas below 1,500 m (4,920 ft) and above 1,050 m (3,445 ft) elevation with average 7-day maximum and 1-day minimum pavement temperatures between 64C and -28C (147F and -18F), respectively. GGB4 (PG ) Mountain Areas Areas above 1,500 m (4,920 ft) elevation with average 7-day maximum and 1-day minimum pavement temperatures between 58C and -34C (136F and -29F), respectively. May need to change photo on this slide. Need to update binder grade GGB1 to PG… Need to speak to Scott’s with information. Maintenance Technical Advisory Guide Chapter 8 Page 2
 Desert or Hot Valley Areas and Coastal Areas. Areas below 1,050 m (3,445 ft) elevation with average 7-day maximum and 1-day minimum pavement temperatures between 70C and -22C (158F and -8F), respectively. GGB2. (PG ) Coastal Areas. Areas below 1,050 m (3,445 ft) elevation with average 7-day maximum and 1-day minimum pavement temperatures between 64C and -22C (147F and -8F), respectively. GGB3. (PG ) Cool Coastal. or Mountain Areas. Areas below 1,500 m (4,920 ft) and above 1,050 m (3,445 ft) elevation with average 7-day maximum and 1-day minimum pavement temperatures between 64C and -28C (147F and -18F), respectively. GGB4. (PG ) Mountain Areas. Areas above 1,500 m (4,920 ft) elevation with average 7-day maximum and 1-day minimum pavement temperatures between 58C and -34C (136F and -29F), respectively. May need to change photo on this slide. Need to update binder grade GGB1 to PG… Need to speak to Scott’s with information. Maintenance Technical Advisory Guide Chapter 8 Page 2.")
39
Specification Designation
Polymer Modified Binder Testing Specification Designation Test Method GGB Grades 1 2 3 4 Flash Point, Cleveland Open Cup, ˚C, min., original binder AASHTO T48 230 Brookfield Viscosity, max. 2.0 Pa s test temperature, ˚C ASTM D 4402 135 Elastic Recovery after RTFO test % min AASHTO T 60 Mass Loss after RTFO test, % max AASHTO T240 0.6 Dynamic Shear, G*/sin˚, min. 2.2 kPa RTFO aged residue, test temperature at 10 rad/sec, ˚C California Test 381 Part 3 70 64 58 Residue from PAV, test temperature, ˚C AASHTO TP1-98 110 100 Creep Stiffness, 300 MPa, Max. and M-value, 0.30, Min. residue from PAV, test temperature ˚C -12 -18 -24 Report Only Dynamic Shear, SSD > 30 x (0.6 + SSV)3 original binder, ˚C California Test 381 Part 1 25 Dynamic Shear, SSD > -115 x (SSV) On PAV aged residue, from AASHTO PP1, ˚C Modify GGB Grades information. Maintenance Technical Advisory Guide Chapter 8 Page 3
3 original binder, ˚C. California Test 381 Part Dynamic Shear, SSD > -115 x (SSV) On PAV aged residue, from AASHTO PP1, ˚C. Modify GGB Grades information. Maintenance Technical Advisory Guide Chapter 8 Page 3.")
40
Rubberized Binders A paving asphalt blended with a crumb rubber modifier Shall conform to : SSP (Type G) SSP (Type D-MD) SSP (Type G-MB) SSP (Type D) SSP (Type O) Out of order slide.
 SSP (Type G-MB) SSP (Type D) SSP (Type O) Out of order slide.")
41
Aggregate Gradations with PMA
Dense Graded: ¾” Maximum, Coarse and Medium ½” Maximum, Coarse and Medium 3/8” Maximum No. 4 Maximum Open Graded ½” Maximum Out of order slide. Scott and Scott needs to consider order of slides for gradation. Change english units first.

42
Aggregate Gradations with PMA
Gap Graded: ¾” Maximum ½” Maximum Out of order slide. Scott and Scott needs to consider order of slides for gradation. Change english units first.

43
¾” Gradation Table for Gap Graded Overlays
Aggregate Grading Requirements Percentage Passing, ¾ inch Maximum Sieve Sizes Limits of Proposed Gradation Operating Range Contract Compliance 1” (25 mm) — 100 ¾” (19 mm) 90‑100 90-100 ½” (12.5 mm) 83-87 X5 X7 3/8” (9.5 mm) 65-70 No 4 (4.75 mm) 33-37 No 8 (2.36 mm) 18-22 X4 No 30 (600 µm) 8-12 No 200 (75 µm) 2-7 0-8
 — 100. ¾ (19 mm) 90‑ ½ (12.5 mm) X5. X7. 3/8 (9.5 mm) No 4 (4.75 mm) No 8 (2.36 mm) X4. No 30 (600 µm) No 200 (75 µm)")
44
Aggregate Physical Properties Polymer Modified Asphalt
Test California Test Asphalt Concrete Type Open Graded Asphalt Concrete A B Percentage of Crushed Particles: Coarse Aggregate (Min.) Fine Aggregate Passing No 4, Retained on No 8 (Min) 205 90% 70% 25% 20% Los Angeles Rattler: Loss at 100 Rev. (Max) Loss at 500 Rev. (Max) 211 10% 45% - 50% 40% Sand Equivalent: Contract Compliance (Min) Operating Range (Min) 217 47 50 42 45 Film stripping (Max) 302 Kc Factor (Max) 303 1.7 Kf Factor (Max)
 Fine Aggregate Passing No 4, Retained on No 8 (Min) % 70% 25% 20% Los Angeles Rattler: Loss at 100 Rev. (Max) Loss at 500 Rev. (Max) % 45% - 50% 40% Sand Equivalent: Contract Compliance (Min) Operating Range (Min) Film stripping (Max) 302. Kc Factor (Max) Kf Factor (Max)")
45
Aggregate for use with Rubberized Asphalt Concrete
The aggregate for rubberized asphalt concrete (Type O) shall conform to the 9.5 mm maximum grading conforming to the provisions in Section 39‑2.02, "Aggregate," of the Standard Specifications. The aggregate for rubberized asphalt concrete (Type O) shall be lime treated in conformance with the specifications. Out of order slide.
 shall conform to the 9.5 mm maximum grading conforming to the provisions in Section 39‑2.02, Aggregate, of the Standard Specifications. The aggregate for rubberized asphalt concrete (Type O) shall be lime treated in conformance with the specifications. Out of order slide.")
46
Gap Graded AR Aggregate Grading Requirements
PERCENTAGE PASSING, ½” (12.5 MM) MAXIMUM Sieve Size Limits of Proposed Gradation Operating Range Contract Compliance 19‑mm — 100 12.5‑mm 90-100 9.5‑mm 83-87 X±5 X±7 4.75‑mm 33-37 2.36‑mm 18-22 X±4 600‑µm 8-12 75‑µm 2-7 0-8
 MAXIMUM. Sieve Size. Limits of Proposed Gradation. Operating Range. Contract Compliance. 19‑mm. — ‑mm ‑mm X±5. X± ‑mm ‑mm X±4. 600‑µm ‑µm")
47
Aggregate Physical Properties For Rubberized Gap Graded Mix
The aggregate for Type G rubberized asphalt concrete shall conform to the following grading and shall meet the quality provisions specified for Type A asphalt concrete in Section 39‑2.02, "Aggregate," of the Standard Specifications, except as follows: A. California Test 211, Los Angeles Rattler loss at 500 revolutions shall be 40 percent maximum. B.California Test 205, Section D, definition of a crushed particle is revised as follows: "A particle having 2 or more fresh mechanically fractured faces shall be considered a crushed particle." C.The swell and moisture vapor susceptibility requirements shall not apply. The symbol "X" in the following table is the gradation which the Contractor proposes to furnish for the specific sieve.

48
Open Graded Aggregate Gradations with AR or PMA
Gradation, Maximum 12.5 mm (½ inch) PERCENTAGE PASSING, 12.5 MM MAXIMUM Sieve Sizes Limits of Proposed Gradation Operating Range Contract Compliance ¾” (19 mm) — 100 ½” (12.5 mm) 95‑100 92-100 3/8” (9.5 mm) 78-89 X4 X7 No. 4 (4.75 mm) 28‑37 No. 8 (2.36 mm) 7-18 X5 No. 16 (1.18 mm) 0-10 0-13 No. 200 (75 µm) 0-3 0-4 Make two slides Ref: Caltrans Standard Specifications 2006 Section 39 Page 282
 PERCENTAGE PASSING, 12.5 MM MAXIMUM. Sieve Sizes. Limits of Proposed. Gradation. Operating Range. Contract Compliance. ¾ (19 mm) — 100. ½ (12.5 mm) 95‑ /8 (9.5 mm) X4. X7. No. 4 (4.75 mm) 28‑37. No. 8 (2.36 mm) X5. No. 16 (1.18 mm) No. 200 (75 µm) Make two slides. Ref: Caltrans Standard Specifications 2006 Section 39 Page 282.")
49
Open Graded Aggregate Gradations with AR or PMA
Gradation, Maximum 9.5 mm (3/8 inch) (1) PERCENTAGE PASSING, 9.5 MM MAXIMUM Sieve Sizes Limits of Proposed Gradation Operating Range Contract Compliance ½” (12.5 mm) — 100 3/8” (9.5 mm) 90‑100 88-100 No. 4 (4.75 mm) 29‑36 X4 X7 No. 8 (2.36 mm) 7-18 X5 No. 16 (1.18 mm) 0-10 0-12 No. 200 (75 µm) 0-3 0-4 Make two slides Ref: Caltrans Standard Specifications 2006 Section 39 Page 282
 (1) PERCENTAGE PASSING, 9.5 MM MAXIMUM. Sieve Sizes. Limits of Proposed. Gradation. Operating Range. Contract Compliance. ½ (12.5 mm) — /8 (9.5 mm) 90‑ No. 4 (4.75 mm) 29‑36. X4. X7. No. 8 (2.36 mm) X5. No. 16 (1.18 mm) No. 200 (75 µm) Make two slides. Ref: Caltrans Standard Specifications 2006 Section 39 Page 282.")
50
Mix Design for Polymer Modified HMA
The performance of a bonded wearing course depends on the quality of the materials and how they interact during application, rolling and after opening to traffic. The amount of polymer modified asphalt binder to be mixed with the aggregate for gap-graded polymer modified asphalt concrete shall be determined by the Contractor using Asphalt Institute MS 2 Table 6.1.

51
Rubberized Type O Mix Design
The amount of asphalt‑rubber binder to be mixed with the aggregate for rubberized asphalt concrete (Type O) shall be determined by California Test 368 with the following exceptions: The aggregate shall be mixed with PG paving asphalt and the optimum bitumen content shall be determined in conformance with the test procedure. The optimum binder content for rubberized asphalt concrete Type O shall then be determined using the following formula: OBC2 = (OBC1) x 1.20 where: OBC1 = Optimum bitumen content using Pg paving asphalt OBC2 = Optimum bitumen content using asphalt‑rubber binder Changed 0 to O.
 shall be determined by California Test 368 with the following exceptions: The aggregate shall be mixed with PG paving asphalt and the optimum bitumen content shall be determined in conformance with the test procedure. The optimum binder content for rubberized asphalt concrete Type O shall then be determined using the following formula: OBC2 = (OBC1) x 1.20 where: OBC1 = Optimum bitumen content using Pg paving asphalt. OBC2 = Optimum bitumen content using asphalt‑rubber binder. Changed 0 to O.")
52
Rubberized Gap -Graded Mix Design
SCOTT METCALF TO SUPPLY!!!!! Changed 0 to O.

53
End Project Design, Materials & Specifications Begin Construction Inspection
This has to be a separate title slide. Use template from slide. Request to change color red to something else. Request to have a closing slide (i.e., thanks any questions, etc.)
")
54
Construction and Inspection
Module 10-2 Construction and Inspection From… Maintenance Technical Advisory Guide (MTAG) Change to specific Surface Treatment
 Change to specific Surface Treatment.")
55
Topics to be covered Understand/Review Specifications
Safety and Traffic Control SWPPP Surface Preparation Equipment Requirements Calibrations Approved Mix design Sampling and Testing Binder Mix Emulsion Mix Production and Handling Required Application Conditions Application of Materials Production Rates Roadway Geometry and Paving Widths Application Problems and Solutions Training Module 2 : Construction and Inspection - Technical Training

56
Understand/Review Specifications
Review Construction Manual Chapter 4 Section 94 emulsion (emulsion membrane) Section 39 Asphalt Concrete (mix and placement) Review RE file notes Project special provisions Header corrections throughout rest of document.
 Section 39 Asphalt Concrete (mix and placement) Review RE file notes. Project special provisions. Header corrections throughout rest of document.")
57
Safety and Traffic Control
Traffic control is required both for the safety of the traveling public and the personnel performing the work. It is also used to ensure the new surface is compacted and allowed to cool to below 70°C (158°F) prior to reopening the surface to traffic. Traffic control includes placing construction signs, construction cones and/or barricades, flag personnel, and pilot cars required to direct traffic clear of the maintenance operation.
 prior to reopening the surface to traffic. Traffic control includes placing construction signs, construction cones and/or barricades, flag personnel, and pilot cars required to direct traffic clear of the maintenance operation.")
58
Traffic Control Typical release to traffic 10-20 minutes behind paver
Multi-lane highways, consider moving lane closure Two-lane roadways ½ to ¾ mile closure Thinner lift allows faster production Emulsion Membrane eliminates need for Tack Coat May need to change picture.

59
OPENING TO TRAFFIC Traffic can be allowed onto the new surface once rolling is completed and the mix temperature has fallen below 70°C (158°F). Typically, no post sweeping is required unless the mix begins to ravel.

60
SWPPP Review the storm water requirements for the project. Any questions should be directed to the construction storm water coordinator.

61
Surface Preparation Cracks greater than 6 mm wide (1/4 in) should be filled or sealed prior to application The use of over-banding methods of crack sealing is not recommended for this treatment Manhole covers, drains, grates, catch basins, and other utility services must be covered prior to application with roofing paper or equivalent Any surface irregularities deeper than 25 mm (1 in) should be filled with dense graded hot mix before applying the mix. Prior to application, the pavement should be swept with a rotary broom equipped with metal or nylon broom stock.
 should be filled with dense graded hot mix before applying the mix. Prior to application, the pavement should be swept with a rotary broom equipped with metal or nylon broom stock.")
62
CRACK PREPARATION & MATERIAL APPLICATION PROCESS
Sterilize Weeds 3 weeks prior Remove Weeds Grind out weeds Blow out Cracks (If moisture exists) Heat Lance cracks to remove moisture Need to rework this slide. Need to speak to Scott and scott. Material Application Apply sealer in cracks
 Heat Lance. cracks to remove moisture. Need to rework this slide. Need to speak to Scott and scott. Material Application. Apply sealer in cracks.")
63
CRACK PREPARATION 185 cfm @ 110 PSI 1/4” nozzle ratios 1:1 optimum
sterilants 3 weeks prior 3000 F Velocity Heat Lance Specialty Blades 3/8” wide removes vegetation

64
Prep Work Needed Results of not sealing joint

65
Minimum one month ahead of paving

66
Preparation Milled Joints Consider hot-mix tapers
Beware of Quarter Crown Issues transverse cuts should be 2X paving depth Consider hot-mix tapers

67
Roadway Cleanliness

68
Construction Entrance Not Swept Prior to Mix Application

69
Miscellaneous Items Edge grinding
Crack seal hot applied min one month prior Patching - hot mix only, cold mix continues to rut Utilities – Adjustments Loops Dig Outs – Prior to paving Signing and Striping

70
Equipment Requirements
The most significant requirement is that the binder application and hot mix spreading function are combined into a single unit. HMA Membrane

71
Spray Paver Calibration Procedure
1. Once proper nozzles sizes have been selected, make sure all nozzles are clean and working. 2. Measure pad width and length to the nearest 0.1 of an inch and record. 3. Weigh calibration pads to the nearest 0.1g and record. 4. Place plastic container on balance. Either record the weight of the plastic container or zero out the weight of the plastic container. 5. Place calibration pads a minimum of 5 feet in front of the emulsion spray bar in the direction of travel. Use two calibration pads to get an average representative distribution. Place the second pad a minimum of 1 foot behind the first pad. 6. Make sure the emulsion pump and bar pressure is set to optimal manufactures operating range. Need to rework this slide. What’s the intent? This data should be in handout, so need to be specific items of need for calibration proedure.

72
Spray Paver Calibration Procedure (Cont.)
7. Engage the paver in automatic mode and allow the paver to come up to full paving speed before passing over the calibration pads. 8. Once the spray bars has passed over the calibration pads, carefully fold the edges of the calibration pads towards the center and roll the pad up so no emulsion will be lost when picked up. 9. Bring the plastic container to the calibration pad and place the pad in the container. 10. Record weight of the calibration pads. 11. It will be necessary to clean the plastic container before the second calibration pad is weighed or the weight of the plastic container will have to be re-zeroed as emulsion from the first pad will increase the weight of the container. Need to rework this slide. What’s the intent? This data should be in handout, so need to be specific items of need for calibration proedure.

73
Spray Bar Calculation Procedure

74
Spray Bar Calculation Sheet for Spray Paver

75
Spray Bar Shot Rate Calculation

76
Approved Mix Design

77
Sampling and Testing Required
California Test July 2002 METHODS FOR SAMPLING HIGHWAY MATERIALS AND PRODUCTS USED IN THE ROADWAY STRUCTURAL SECTIONS ASPHALT CONCRETE Aggregates Part 1, Sections 1-2 Asphalt Part 6, Sections 1-3 Modified Asphalt Concrete Part 7, Section 4 BITUMINOUS SEAL Polymer Modified Asphalt Emulsion . Part 6, Section 4 Two slides 1) Sampling 2) Testing May want to include reference to Caltrans SSP
 Sampling. 2) Testing. May want to include reference to Caltrans SSP.")
78
Required Application Conditions
May be applied on damp, but not wet, surfaces. Minimum air and pavement temperature requirements are 7°C (45°F) and rising, although it is recommended that the surface temperature be above 15°C (59°F). No freezing conditions are allowed in the first 24 hours, the emulsion-based tack coat requires about one day to fully cure.
 and rising, although it is recommended that the surface temperature be above 15°C (59°F). No freezing conditions are allowed in the first 24 hours, the emulsion-based tack coat requires about one day to fully cure.")
79
Construction Rolling operation showing traffic control.
Trimming necessary. No overlap during construction due to emulsion membrane.

80
Application A minimum of one steel drum tandem roller is required for compacting the mix. Rollers must be operated in static mode only. Usually two passes using a 12 to 15 ton roller is sufficient to properly seat the aggregates. Rolling must be carried out before the temperature, at mid layer of the mix, falls below 90°C (194°F).
.")
81
Production Rates and Paving Days
Mainline Paving tons per hour Returns/Turnpockets tons per hour

82
Roadway Geometry and Widths
Urban Milling ¾ - 1” contour edge grind required to match curb and gutter and existing pavement Drainage Minimal water trapped against curb due to emulsion filling void structure and thin lift Less water intrusion to pavement interface due to emulsion membrane Rural Cross-slopes Shoulder Generally best used for Travel Lane with 1 foot beyond fog line For Grade differential greater than 2% from Mainline to Shoulder, the shoulder must be paved separately in order to maintain the grade Edge drop-off will be less than ¾” (consider bicycle traffic material cant not be feather down lower then top size agg.) Varying Width Typical Paving machine width 8-14 feet variable Moved the first bullet item for shoulder from Cross-slopes.
 Varying Width. Typical Paving machine width 8-14 feet variable. Moved the first bullet item for shoulder from Cross-slopes.")
83
Application Problems and Solutions
Surface Waves Ensure the head of material in front of the paver screed is at the correct height and does not fluctuate (i.e., rise and fall). Ensure the screed is not worn or set incorrectly. Ensure the mix is not too stiff or has not fallen below 275F (135C). Ensure the dump trucks do not bump the paving unit as this can cause long frequency waves resulting in increased pavement roughness. Ensure grade control equipment (if in use) is functioning properly Wash Boarding Slow roller down.
. Ensure the screed is not worn or set incorrectly. Ensure the mix is not too stiff or has not fallen below 275F (135C). Ensure the dump trucks do not bump the paving unit as this can cause long frequency waves resulting in increased pavement roughness. Ensure grade control equipment (if in use) is functioning properly. Wash Boarding. Slow roller down.")
84
Application Problems and Solutions
Tearing Ensure the paving unit is being operated correctly. Ensure the mix is not too cold (i.e., below 275F (135C)) or too stiff. May be fixed by adjusting the degree of crown and ensuring mix temperature is correct. Ensure application is not too thin Non Uniform Texture-Segregation Ensure the mixture is not separating in the hopper or during transportation. Ensure the paving unit is set up properly. Ensure the mix temperature is at least 275F (135C). Check the mix design for poor grading. Adjust if necessary.
) or too stiff. May be fixed by adjusting the degree of crown and ensuring mix temperature is correct. Ensure application is not too thin. Non Uniform. Texture-Segregation. Ensure the mixture is not separating in the hopper or during transportation. Ensure the paving unit is set up properly. Ensure the mix temperature is at least 275F (135C). Check the mix design for poor grading. Adjust if necessary.")
85
Application Problems and Solutions
Screed Marks Ensure the paving unit is set up correctly and that the screed in not worn or dirty. Ensure the mix temperature is at least 275F (135C). Check the mix design for poor grading. Adjust if necessary. Ensure mix is in specification. Roller Checking & Marks Ensure the roller does not cause a wave in the mat in front of the roller (i.e., mix too hot). Wait until the mix cools further. Check the mix design for too much asphalt in the mix, or too much middle size sand in the gradation. Adjust design if necessary.
. Check the mix design for poor grading. Adjust if necessary. Ensure mix is in specification. Roller Checking & Marks. Ensure the roller does not cause a wave in the mat in front of the roller (i.e., mix too hot). Wait until the mix cools further. Check the mix design for too much asphalt in the mix, or too much middle size sand in the gradation. Adjust design if necessary.")
86
Application Problems and Solutions
Bleeding & Fat Spots Ensure the mix temperature is not too hot (greater than 351F (177C). Check the mix design for too much asphalt or for too coarse an aggregate grading. Adjust design if necessary. Ensure there is no moisture in the mix or on the pavement. Ensure the tack coat application rate is not too high for the surface to which it is applied. Tight, smooth surface require less tack coat than do more open surfaces. Reduce application rate on existing surfaces that exhibit bleeding. Ensure spray bar equipment is operating properly. Ensure aggregates are dry before mixing with asphalt in the hot mix plant, that pavement is not bleeding, that pavement is dry, and that mix is correctly designed for traffic and aggregate. Delamination Ensure adequate tack coat is applied. Ensure the mix is above minimum application temperature (275F (135C)). Ensure the mix is not below the minimum compaction temperature (194F (90C)). Ensure the existing pavement surface temperature is above the minimum (i.e., 45F (7C)) before paving. Ensure the surface is cleaned immediately before paving. Ensure roller drums are not dirty and have working spray systems.
. Check the mix design for too much asphalt or for too coarse an aggregate grading. Adjust design if necessary. Ensure there is no moisture in the mix or on the pavement. Ensure the tack coat application rate is not too high for the surface to which it is applied. Tight, smooth surface require less tack coat than do more open surfaces. Reduce application rate on existing surfaces that exhibit bleeding. Ensure spray bar equipment is operating properly. Ensure aggregates are dry before mixing with asphalt in the hot mix plant, that pavement is not bleeding, that pavement is dry, and that mix is correctly designed for traffic and aggregate. Delamination. Ensure adequate tack coat is applied. Ensure the mix is above minimum application temperature (275F (135C)). Ensure the mix is not below the minimum compaction temperature (194F (90C)). Ensure the existing pavement surface temperature is above the minimum (i.e., 45F (7C)) before paving. Ensure the surface is cleaned immediately before paving. Ensure roller drums are not dirty and have working spray systems.")
87
Application Problems and Solutions
Poor Transverse Joints Ensure butt joints are properly constructed. Poor Longitudinal Joints Ensure proper joint construction practices are followed, especially when compacting thin layers. Excessive Ravel Ensure the mix design meets project specifications, particularly that the mix contains sufficient binder. Ensure compaction is carried out above the minimum temperature (i.e., 194F (90C)). Roadmap for each treatment is needed. (Written instructions) Time frame be included. Need closing slide.
). Roadmap for each treatment is needed. (Written instructions) Time frame be included. Need closing slide.")
Similar presentations

 Chapter 7 Fog and Rejuvenating Seals.>")
 Chapter 5 Diamond Grinding and Grooving.>")


 The surface course is the layer in contact with traffic loads and normally contains the highest quality materials. It provides characteristics.>")


>")


 Team Overlay Asphalt Debaters Presented by Basem Muallem (CT) - Tony Limas (Industry) April 19, 2005.>")

 n Longitudinal Joint Spec and other methods for longitudinal.>")
