Download presentation
Presentation is loading. Please wait.

1
Support Training Module

2
Support Manual 1.“On The Lot” – How it all works… 2.Craigslist Settings 3.Post to Craigslist 4.Backpage Settings 5.Post to Backpage 6.eBay Settings 7.Post to eBay 8.Social Media (Facebook and Twitter) 9.Banners 10.User Management 11.Call Tracking / Communications Package 12.Craigslist Best Practices 13.Most Popular Questions 14.Q & A 15.Contact Information
 9.Banners 10.User Management 11.Call Tracking / Communications Package 12.Craigslist Best Practices 13.Most Popular Questions 14.Q & A 15.Contact Information")
3
“On the Lot” – Home Page

4
On The Lot - Detail Primary Sort Secondary Sort Sort By: New / Used / All Sorting on All Columns Market Status Vehicle Overview Post to Any Portal

5
Getting Started – Craigslist Settings

6
SettingsCraigslist

7
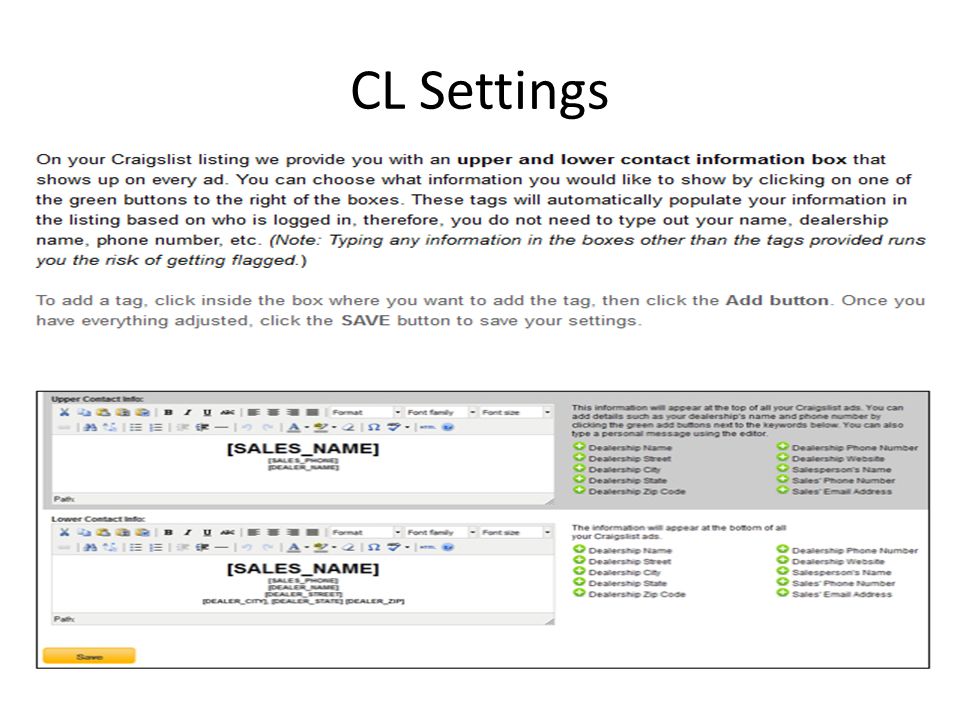
CL Settings

9
Posting To Craigslist From “Select an Action” Click Post to Craigslist

10
Step 2 – Click “Post to Craigslist”

11
Step 3 – Login to Craigslist (only required 1 st time / per session)
")
12
Step 4 – Enter Captcha Code (if / when craigslist requires captcha code)
")
13
Posting to Craigslist Complete Automatically returned to “On the Lot” – Ready to list your next vehicle.

14
“Quick Renew” Craigslist Feature Once a craigslist ad has been live for 48 Hours, it becomes eligible for renew. 1.Click the Renew button individually under each eligible vehicle 2.Click on the “Quick Renew” button and renew up to 25 ads at a time!

15
Quick Renew Button Select the Craigslist account Click “Quick Renew” Button Up to 25 Ads will be renewed No Captcha Code required

16
Getting Started – Backpage Settings

17
Backpage Settings 2

18
Backpage Settings 3

19
Posting to Backpage - Manually From “Select an Action” Select “Post to Backpage”

20
Posting to Backpage Ensure vehicle details and description are correct – Click Save and Continue

21
Manual Post to Backpage 2 Preview Ad – then click “Send to Backpage”

22
Manual Post to Backpage 3 Confirm Email Address Confirm Phone Click Continue

23
Manual Post to Backpage 4

24
Manual Backpage Post - Confirmation Click Yes – Ad was successfully posted You will return to “On the Lot” – Notice Post Confirmation – and your ready for next action.

25
Getting Started – eBay Settings

26
eBay Settings 2

27
eBay Settings - Info Section

28
eBay Settings – First Time

29
eBay Settings/ Confirm Identity

30
Posting to eBay From “Select an Action” Click “Post to eBay”

31
Posting to eBay 2 Confirm vehicle details – Click Save and Continue

32
Posting to eBay 3 Choose listing options and available upgrades – Select Save and Preview

33
Posting to eBay Preview your Ad – Scroll to the bottom – Click “Post to eBay” and you’re done!

34
Social Media From “Select an Action” Click “Post to Social”

35
Social Settings/ FB and Twitter (the 1 st time you attempt to post, you will be prompted to link your Facebook and Twitter accounts)
")
36
Posting to Facebook / Twitter Once you have set up your tokens and linked your Facebook and/or Twitter accounts, Simply select which site you want to send your vehicle to: Facebook, Twitter or Both. Next, select “Post”

37
Social Media Manager The “Social” tab on the Navigation Menu opens the Social Media Manager You can view posts, generate coupons, and search the web for relevant posts from the SMM.

38
Banners

39
Banner Options Banners are found on all dealer ads. The system will automatically generate a banner with the dealer’s information. You may update and/or create additional banners. You may upload a banner into the system (950 x 150 pixels) If you need help, simply CLICK HERE (below) and we will make a customer banner for you!
 If you need help, simply CLICK HERE (below) and we will make a customer banner for you!.")
40
Adding System Users From the Reseller Admin View: Select Settings > Users Select “Add User” to add additional users to a dealers account

41
New User Set-up Select a new User Name, Email Address, Name, Phone Number (Call Tracking phone # will forward to this number), Unique Password, and choose Role: Dealer, Sales + Finance, or Sales. Dealer Role = All system permissions (unrestricted) Sales + Finance = Access all system functions and Credit Application viewing ability. Sales = System access to Post and Repost only. Click “Add” and the new user has been added.
 Sales + Finance = Access all system functions and Credit Application viewing ability. Sales = System access to Post and Repost only. Click Add and the new user has been added..")
42
Call Tracking Communications Package Settings Extensions are used for tracking purposes. Although not recommended, they can be disabled. From the Reseller Admin View, Select Settings > Call Tracking. Check “Turn off Extensions”

43
Craigslist Best Practices

44
Most Popular Questions How do I find my ads on craigslist? – Craigslist pushes ads live every 15 minutes. Make sure you’re logged in and following best practices. From “On the Lot” > Active on CL will display all listed vehicles. How do I post to multiple craigslist markets? – You must have a separate Craigslist account for each market. Clear cookies on your machine prior to switching accounts / markets. Make sure you’re logged in and following craigslist best practices. How many ads can I post a day on craigslist? – Every CL account is different. We find that posting 20-30 ads per day throughout an 8 hour period is acceptable. Make sure you’re following best practices.

Similar presentations