Download presentation
Presentation is loading. Please wait.

1
Dental raduology د. باسم الاعسم

2
Intraoral radiographic techniques

3
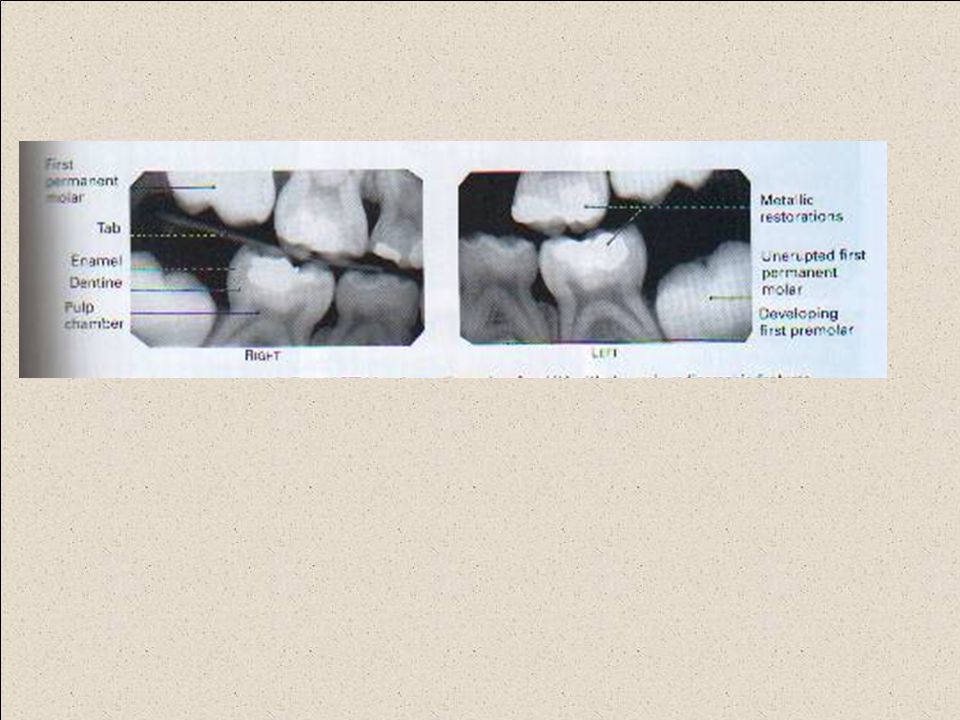
Bitewing radiography

4
Bitewing radiography is that intraoral technique which allows the clinicians to evaluate initial lesions by passing the primary ray perpendicular to the long axis of the respective teeth

5
Indications for bitewing technique:
In the diagnosis of interproximal caries. Detection of secondary caries under the restoration. To study the height of the pulp chamber. To check the health of inter-dental alveolar bone in health and periodontal disease. In the diagnosis of pulp stone. To study occlusion of the teeth. To detect calculus deposits in inter-dental areas. To determine if restoration is fractured. Relationship of deciduous to the permanent teeth in children with mixed dentition.

6
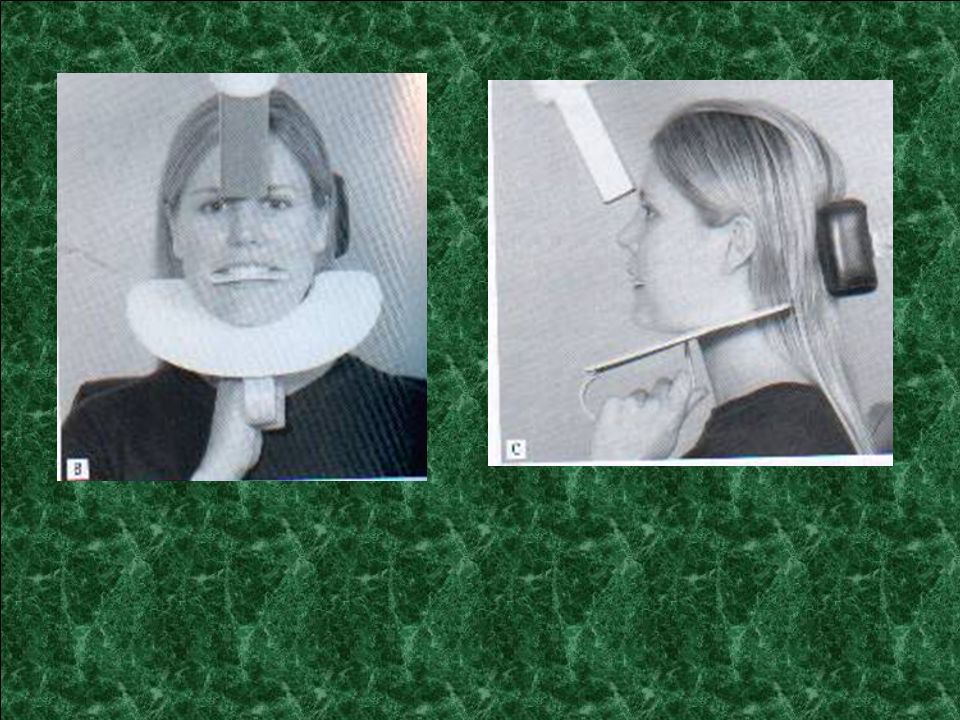
Technique requirements when using image receptor holders
An appropriate image receptor holder with beam aiming device should be used. The image receptor should be positioned centrally within the holder with the upper and lower edges of the image receptor parallel to the bite-platform.

7
The image receptor should be positioned with its long axis horizontally for horizontal bitewing or vertically for vertical bitewing

8
The posterior teeth and the image receptor should be in contact or close together as possible.

9
posterior teeth and the image receptor should be parallel, the shape of the dental arch may be necessitate two separate image receptor positions to achieve this requirement for both the premolar and the molar teeth

10
The beam aiming device should ensure that in the horizontal plane, the X-ray tubehead is aimed so that the beam meets the teeth and the image receptor at right angles and passes directly through all the contact areas

11
The beam aiming device should ensure that in the vertical plane, the X-ray tubehead is aimed downwards (approximately 5o-8o). The positioning should be reproducible.

12
A mechanism for holding the image receptor parallel to the teeth.
A bite-platform that replace the wing. An X-ray beam-aiming device.

13
The radiographic technique as follows:
The desired holder is selected together with an appropriate sized image receptor, typically a 31*41 mm film packet phosphor plate. The patient is positioned with the head supported and with the occlusal plane horizontal. The holder is inserted carefully into the lingual sulcus opposite the posterior teeth.

14
The anterior edge of the image receptor should be positioned opposite the distal aspect of the lower canine, in this position the image receptor extends usually just beyond the mesial aspect of the lower 3rd molar

15
The X-ray tubehead is aligned accurately using the beam aiming device to achieve optimal horizontal and vertical angulations

16
Advantages: Relatively simple and straight forward. Image receptor is held firmly in position and cannot be displaced by the tongue. Position of X-ray tubehead is determined by the beaming device so assisting the operator in ensuring that the X-ray beam is always at right angles to the image receptor. Avoids coning off or cone cutting of the anterior part of the image receptor. Holders are autoclavable or disposable.

17
Disadvantages: Position of the holder in the mouth is operator dependent, therefore images are not 100% reproducible, so still not ideal for monitoring progression of caries. Positioning of the film holder and image receptor can be uncomfortable for the patient particularly when using solid-state digital sensors. Some holders are relatively expensive. Holders not usually suitable for children.

18
Technique requirements when using a tab attached to the image receptor
The appropriate sizes film packet or phosphor plate is selected and the tab attached, orientated appropriately for horizontal or vertical projections: Large film (31*41) or long film (53*26) is used for adult, and small film (22*35) for children under 12 years.
 or long film (53*26) is used for adult, and small film (22*35) for children under 12 years.")
19
The patient is positioned with the head supported and with the occlusal plane horizontal.
The shape of the dental arch and the number of film required are assessed. The operator holds the tab between thumb and forefinger and insets the image receptor into the lingual sulcus opposite the posterior teeth.

20
The anterior edge of the image receptor should be positioned opposite the distal aspect of the lower canine

21
The tab is placed on to close the teeth firmly together on the tab.
The patient closed the teeth firmly together on the tab. The operator assesses the horizontal and vertical angulations and positions the X-ray tubehead so that the X-ray beam is directly through the contact areas, at rught angles to the teeth and image receptor, with an approximately 5o-8o downward vertical angulation

22
Advantages: Simple. Inexpensive. The tabs are disposable, so no extra cross infection control procedures required. Can be used easily in children.

23
Disadvantages: Arbitrary, operator dependent assessment of horizontal and vertical angulations of the X-ray tubehead. Images not accurately reproducible, so not ideal for monitoring the progression of caries. Coning off or cone cutting of anterior part of image receptor is common. Not compatible with using solid-state digital sensors. The tongue can easily displace the image receptor.

26
Occlusal radiography

27
Occlusal radiography is intraoral radiographic techniques taken using a dental (X-ray) set where the image receptor is placed in the occlusal plane. The film packet 5.7*7.6cm.

28
Indications of occlusal radiography
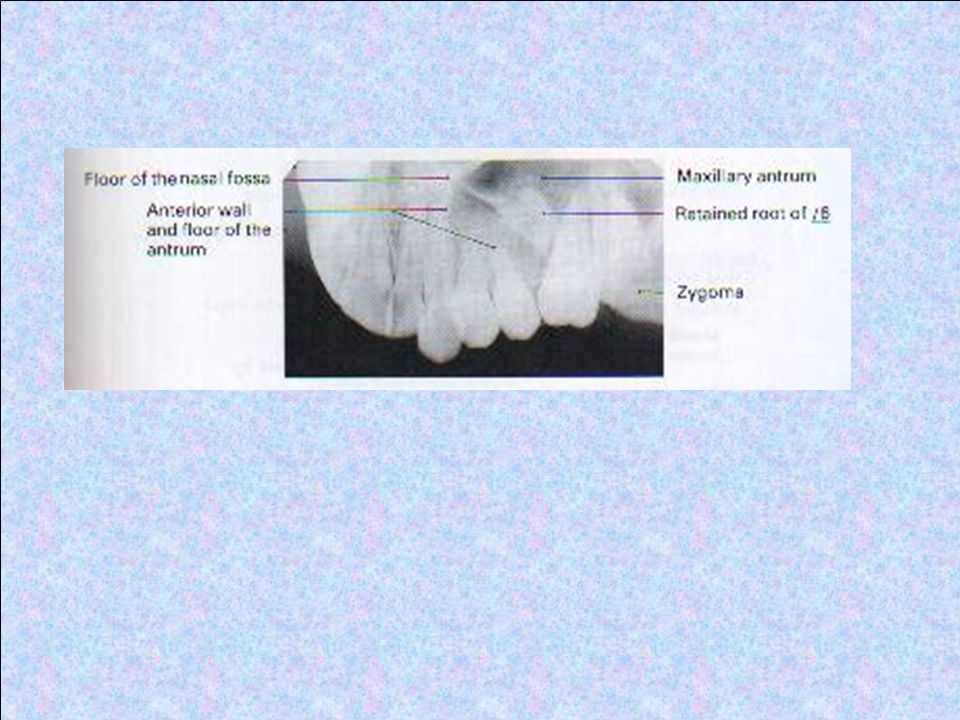
Periapical assessment of the upper anterior teeth for children unable to tolerate periapical holder. Detecting the presence of unerupted teeth, supernumeraries and odontomes. To visualize a relatively large segment of a dental arch. To precisely located roots, supernumerary, unerupted, and impacted teeth especially canine and 3rd molar. To identify expansion of cortical plate in case of any pathology such as cysts, tumors, and osteomyelitis. Assessment of fractures of anterior teeth, alveolar bone, and maxilla and mandible. To demonstrate and evaluate the integrity of the outline of maxillary sinus, and localization of object. To aid in examining patients with Trismus who can open their mouth only a few millimeters. To study expansion of palatal arch during orthodontic jaw expansion procedure. To locate salivary stones in the duct of the submandibular gland.

29
Classification of Occlusal radiography
Maxillary occlusal projections: Upper standard occlusal Upper oblique occlusal. Vertex occlusal (no longer used).
.")
30
Mandibular occlusal projections: (Fig. 46
Lower 90o occlusal (true). Lower 45o or anterior occlusal (standard). Lower oblique occlusal.
. Lower 45o or anterior occlusal (standard). Lower oblique occlusal.")
31
Upper standard or anterior occlusal
The patient is seated with the head supported and with the occlusal plane horizontal and parallel to the floor. The image receptor is placed flat into the mouth on to the occlusal surfaces of the lower teeth. The patient is asked to bite together gently. The image receptor is placed centrally in the mouth with long axis crossways in adult and anteroposeriorly in children. The X-ray tubehead is positioned above the patient in the midline, among downwards through the bridge of the nose at angle of 65o-70o to the image receptor

36
Upper oblique occlusal
The patient is seated with the head supported and with the occlusal plane horizontal and parallel to the floor. The image receptor is placed flat into the mouth on to the occlusal surfaces of the lower teeth. The patient is asked to bite together gently. The image receptor is placed anteroposeriorly. It is placed to the side of the mouth under investigation. The X-ray tubehead is positioned to the side of the patient, among downwards through the cheek at angle of 65o-70o to the image receptor

39
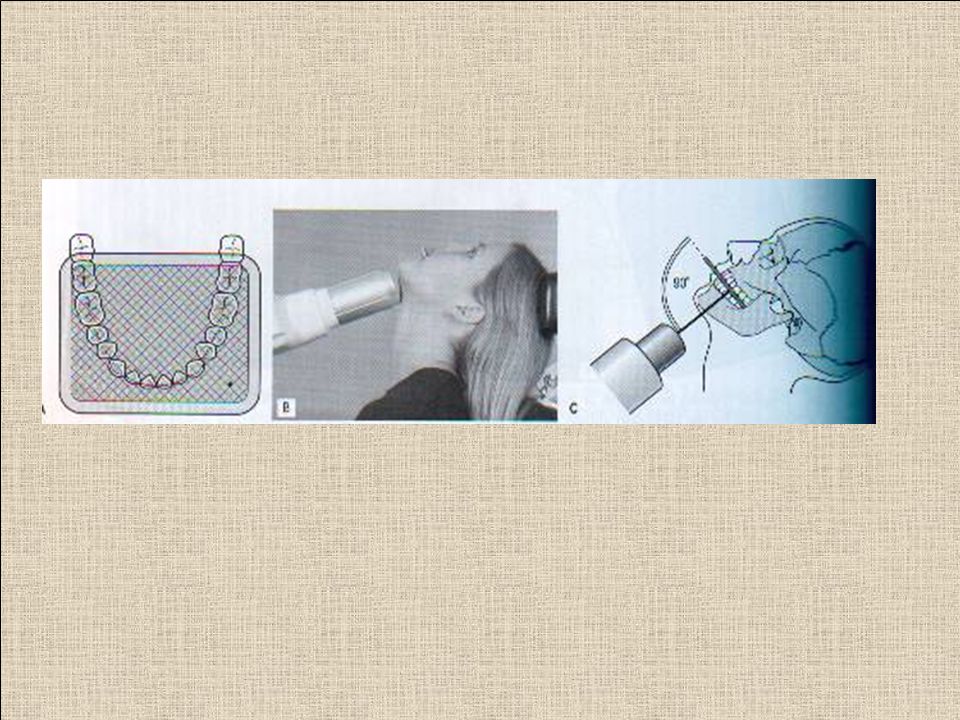
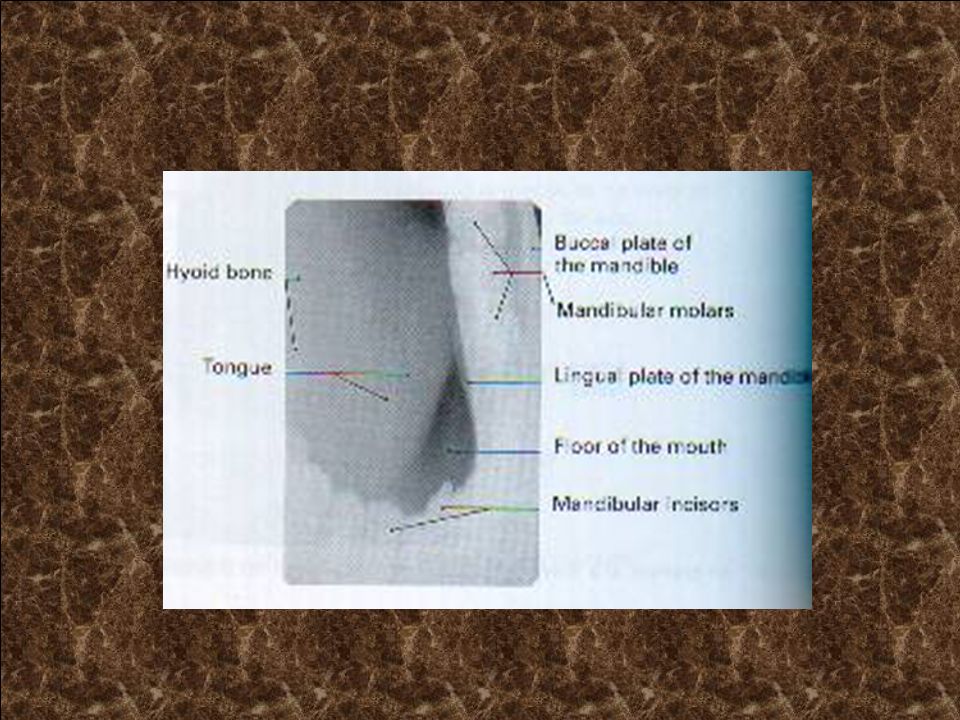
Lower 90o occlusal The image receptor facing downwards is placed centrally into the mouth, on the occlusal surface of the lower teeth, with long axis crossways. The patient is asked to bite together gently. If wanted to examine other part of mandible, the image receptor is placed with its long axis anteroposeriorly over the area of interest. The patient then leans forwards and then tips the head backwards as far as is comfortable, where its supported. The X-ray tubehead with circular collimator fitted is placed below the patient's chin in the midline centring on an imaginary line joining the 1st molars at angle of 90o to the image receptor.

42
Lower 45o (anterior) occlusal
The patient is seated with the head supported and with the occlusal plane horizontal and parallel to the floor. The image receptor facing downwards is placed centrally into the mouth, on the occlusal surface of the lower teeth, with long axis anteroposeriorly. The patient is asked to bite together gently. The X-ray tubehead is position in the midline centering through the chin point at angle of 45o to the image receptor.

45
Lower oblique occlusal
The image receptor facing downwards is inserted into the mouth, on the occlusal surface of the lower teeth, over the side under investigation, with long axis anteroposeriorly. The patient is asked to bite together gently. The patient is seated with the head supported, then rotated away from the side under investigation and the chin is raised. The rotated positioning allows the subsequent positioning of the X-ray tubehead. The X-ray tubehead with circular collimator is aimed upwards and forwards towards the image receptor, from below and behind the angle of the mandible and parallel to the lingual surface of the mandible

48
THANK YOU FOR LISTENING

Similar presentations


, you see the mouse holding an x-ray tubehead (see below),>")


>")


. All rights reserved. No part of this product may be reproduced or transmitted.>")


