Download presentation
Presentation is loading. Please wait.

1
Airway Management

2
Airway Physiology

3
Upper Airway Begins at mouth and nose Jaw Throat / Pharynx
Air is warmed and humidified in nasal turbinates Jaw Throat / Pharynx Oropharynx Epiglottis Larynx/voice box Ends at glottic opening

4
Upper Airway

5
Lower Airway Begins at glottic opening Trachea / Windpipe
Hollow tube which passes air to the lower airways Supported by cartilage rings Bronchi – branches at the carina Lungs Bronchioles Thin hollow tubes that lead to alveoli Remain open through smooth muscle tone Alveoli

6
Alveoli The end of the airway
Millions of tiny sacs in grapelike bunches at the end of the airway Surrounded by capillary blood vessels Oxygen and carbon dioxide diffuse through pulmonary capillary membranes

7
Lower Airway

8
The Path of Oxygen Oropharynx/Nasopharynx Epiglottis Larynx
Trachea – main tube that carries oxygen to the lungs Right/Left Main Stem Bronchus Bronchi Alveoli

9
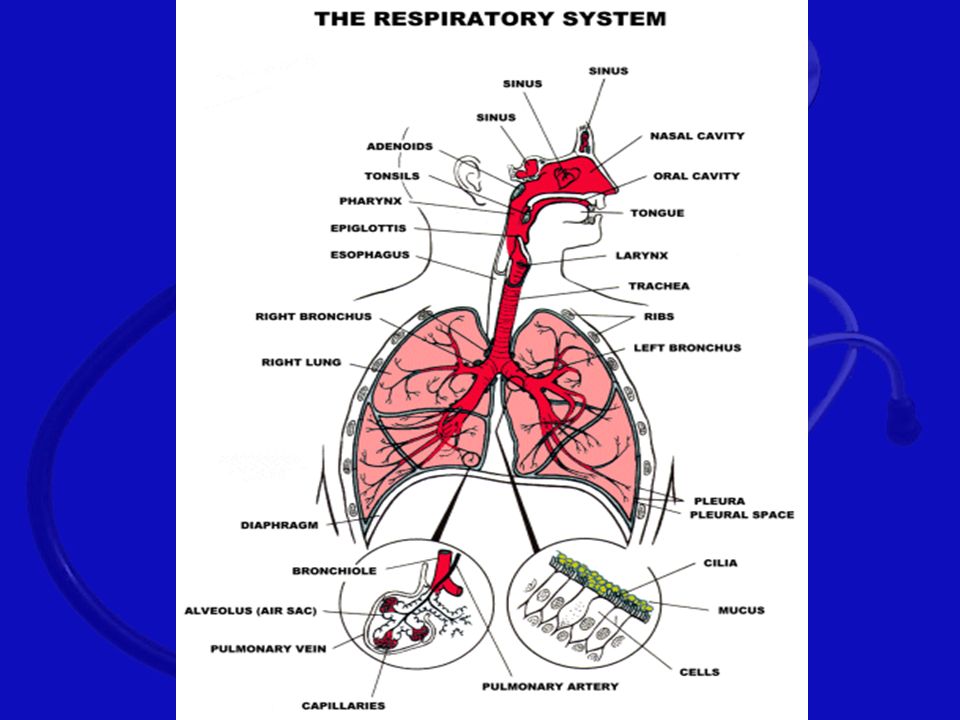
The Respiratory System

10
Purpose Takes in oxygen Disposes of wastes Carbon dioxide Excess water
O2 + Glucose The Cell CO2 + H2O

12
Respiratory System Anatomy
Chest cage Ribs Muscles Intercostal Diaphragm Pleura Phrenic nerve innervation Originates in C4 Sends motor function to the diaphragm

13
Respiratory System Anatomy
Pleura Double-walled membrane Visceral layer covers lung Parietal layer lines inside of chest wall, diaphragm

14
Respiratory System Anatomy
Diaphragm Muscular structure that allows the body in inhale and exhale

15
Respiratory System Anatomy
Lung Right lung 3 lobes Left lung 2 lobes

16
Respiratory System Physiology
Pulmonary Ventilation Ventilation is defined as the movement of air into and out of the lungs Oxygenation The amount of oxygen dissolved in blood and body fluids

17
Respiratory System Physiology
Respiration Process by which the body captures and uses oxygen and disposes of carbon dioxide External respiration Exchange of oxygen and carbon dioxide between alveoli and the blood in the pulmonary capillaries Internal respiration Exchange of oxygen and carbon dioxide between the capillaries of the body tissues and the individual cells Cellular respiration Each cell of the body performs a specific function Oxygen and sugar are essential to produce energy for cells to perform their function Produce carbon dioxide as a waste product

18
Respiration Terminology
Tidal volume — amount of air moved in one breath Dead space air — air moved in ventilation not reaching alveoli Alveolar ventilation — air actually reaching alveoli Ventilation — both inhaling and exhaling Diffusion — movement of gases from high concentration to low concentration Point to Emphasize: Alveolar ventilation refers to the amount of air that actually reaches the alveoli. This volume of air is responsible for gas exchange. Any problem that minimizes air flow to the alveoli diminishes alveolar ventilation. Talking Points: For the purposes of tidal volume, one breath implies one cycle of inhalation and exhalation. A normal tidal volume is typically 5–7 mL per kg of body weight. Dead space air occupies the trachea, bronchioles, and other parts of the airway. Normal dead space air volume is roughly 150 mL. Alveolar ventilation depends on tidal volume. Decreases in either rate or volume can impact alveolar ventilation. Discussion Topics: Discuss the role of rate and tidal volume with regard to minute volume. Using examples, explain how changes to either of these elements affect minute volume. Define alveolar ventilation. Give examples of how changes in rate and volume impact alveolar ventilation.

19
Respiratory System Physiology
Inspiration Active process Chest cavity expands Negative pressure pulls air into the lungs Air flows in until pressure equalizes Diaphragm lowers and contracts

20
Respiratory System Physiology
Expiration Passive process Muscles relax; size of chest decreases Intrathoracic pressure rises Air flows out until pressure equalizes Diaphragm rises and relaxes

21
Respiratory System Physiology
Automatic Function Primary drive: stimulus to breathe is based on high levels of arterial CO2 Secondary (hypoxic) drive: stimulus to breathe is based on low levels of oxygen Normally we breathe to remove CO2 from the body, NOT to get oxygen in
 drive: stimulus to breathe is based on low levels of oxygen. Normally we breathe to remove CO2 from the body, NOT to get oxygen in.")
22
Vascular Structures That Support Respiration
Pulmonary capillary structures The heart Right Heart Receives system circulation Drives pulmonary circulation Left Heart Receives pulmonary circulation Drives system circulation Arteries, arterioles, capillaries, venules, veins Tissue/cellular beds

23
Respiratory Pathophysiology
Airway Obstructions Tongue Foreign body airway obstruction Anaphylaxis-severe allergic reaction Upper airway burn Epiglottitis - children Croup - children Drowning Aspiration-crud going into the lungs Asthma Pneumonia Pulmonary edema Chronic Obstructive Airway Disease Emphysema Chronic bronchitis

24
Respiratory Failure Reduction of breathing to the point where oxygen intake is not sufficient to support life.

25
Respiratory Arrest Breathing stops completely.

26
Signs of Adequate Breathing
Look – bilateral chest expansion. Adequate & equal expansion on both sides. Listen – Auscultate – to listen. Should be free of abnormal sounds (crackles or wheezing) Feel – as the air is expelled from the nose and mouth. Skin – normal color and tone
 Feel – as the air is expelled from the nose and mouth. Skin – normal color and tone.")
27
Pulse Oximetry Assesses oxygenation Quantify hemoglobin saturation
Complications (inaccurate readings) shock patients carbon monoxide poisoning cold extremity
 shock patients. carbon monoxide poisoning. cold extremity.")
28
Normal Breathing Rates
Adult – breaths per minute Child – breaths per minute Infant – breaths per minute Rhythm – regular rate, rhythm and quality Quality – breath sounds present and equal - chest expansion adequate Depth - adequate

29
Signs of Inadequate Breathing
Chest movements absent, minimal or uneven. Abdominal breathing Noises – wheezing, stridor, crackles, snoring respirations, silent chest. Cyanosis – skin color is blueish/gray Rate is too fast or too slow Breathing is shallow, very deep and labored or irregular respiratory pattern

30
Signs of Inadequate Breathing
7. Inspirations are prolonged (possible upper respiratory obstruction). Expirations are prolonged (possible lower airway obstruction). Can not speak or can not speak in complete sentences. Nasal flaring (infants & children) Tripod Position – starving for oxygen Changes in mental status - hypoxia
. Expirations are prolonged (possible lower airway obstruction). Can not speak or can not speak in complete sentences. Nasal flaring (infants & children) Tripod Position – starving for oxygen. Changes in mental status - hypoxia.")
31
IF THE PATIENT DEMONSTRATES INADEQUATE VENTILATION (RESPIRATIONS OF LESS THAN 10 PER MINUTE OR GREATER THAN 29 PER MINUTE) AND THE PATIENT IS CONFUSED, RESTLESS, OR CYANOTIC THEN YOU MUST CONSIDER PROVIDING OXYGEN WITH A BAG-VALVE-MASK OR POCKET-MASK
 AND THE PATIENT IS CONFUSED, RESTLESS, OR CYANOTIC THEN YOU MUST CONSIDER PROVIDING OXYGEN WITH A BAG-VALVE-MASK OR POCKET-MASK")
32
A. Methods for Opening an Airway
Head-tilt, chin lift – used in a non-trauma patient. One hand should be placed on the forehead with the fingertips of the other hand under the lower jaw. Jaw-thrust - used in a trauma patient where spinal precautions are a concern. Moves the mandible forward.

33
Head-Tilt Chin-Lift Maneuver
Point to Emphasize: The head-tilt, chin-lift maneuver is used to open the airway of a patient who does not have a spinal injury. Talking Points: The head-tilt, chin-lift maneuver uses head position to align the structures of the airway and provide for the free passage of air. By moving the jaw in an anterior fashion, the tongue is drawn forward, moving the tissues of the larynx off the glottic opening, thus clearing the airway.

34
Jaw-Thrust Maneuver Point to Emphasize: The jaw-thrust maneuver is used to open the airway of a patient who has a potential spinal cord injury.

35
Pediatric Note for Opening the Airway
Infants and small children often have larger occipital regions of their heads Lying flat may cause hyperflexion of neck and airway occlusion Evaluate need to pad behind patient’s shoulders to achieve neutral airway position Talking Points: Because of the large occiput and a collapsible trachea, some children will suffer airway occlusion due to hyperflexion. Not every child has this issue. Evaluate each patient individually. Many children are able to lie flat without occluding their airway; in fact, in many cases the supine position may actually be a perfect sniffing position. Altered mental status can frequently exacerbate the positional problem. In cases of a potential spinal injury, padding must be uniformly applied to the entire torso, not just the shoulders.

36
Pediatric Note: Opening the Airway
Talking Points: Some children will suffer airway occlusion due to hyperflexion. Not every child has this issue. Evaluate each patient individually.

37
B. Responsibilities of the EMT
a. Be sure all equipment is clean and operating properly. b. Select proper equipment for patient care. c. Must monitor the patient closely. d. Must properly clean, discard and test all equipment after use.

38
C. Airway Adjuncts Most common airway obstruction is the tongue.

39
1. Oropharyngeal airway

40
1. Oropharyngeal airway -ONLY use on an unconscious patient.
-Device used to move tongue forward as it curves back to pharynx If there is a gag reflex, REMOVE IMMEDIATELY!!! - If the patient is unconscious assume a spinal cord injury based on the mechanism of injury. - Practice only on a manikin. - Can induce vomiting and/or bronchospasms. - Made in different sizes - you must measure for correct size. - Correct Size is the distance from the corner of the patient’s mouth to the tip of the earlobe on the same side of the face. (Alternate: measure from the center of the patient’s mouth to the angle of the lower jaw bone.)
")
41
Sizing Oropharyngeal Airways
Point to Emphasize: Sizing of airway adjuncts is important. The principles are important, but so is the value of sizing adjuncts. Talking Points: An airway of proper size will extend from the corner of the patient’s mouth to the tip of the earlobe on the same side of the patient’s face. An alternative method is to measure from the center of the patient’s mouth to the angle of the lower jaw bone. Discussion Topic: Describe the technique for sizing an oropharyngeal airway. Knowledge Application: Ask students why sizing an airway adjunct is important. Discuss their answers.

42
Using Oral Airways If the patient becomes conscious, remove the airway and have suction ready. Insert the airway upside down with the tip facing the roof of the mouth. When resistance is encountered, turn the airway 180 degrees so that it comes to rest with the flange on the patient’s lips. You may also insert the airway right side up, using a tongue depressor to press the tongue down. This is preferred in infants and children

43
Figure : S0205 Title: ORO: rotate it Caption: Inserting An Oropharyngeal Airway

44
2. Nasopharyngeal Airways
- does not stimulate the gag reflex so it may be used on a patient with a reduced level of consciousness but still has an intact gag reflex. - can be used when teeth are clenched or patient has an oral injury - do not use if clear cerebrospinal fluid is coming from the ears or nose – look for the halo effect - made in different sizes - you must measure for correct size. - Correct Size is to measure from the tip of the nose to the earlobe or from the patient’s nostril to the angle of the jaw. Also, use the patient’s pinky finger to determine the diameter of the airway to be used.

45
Using Nasal Airways 1. Establish and maintain an open airway.
2. Lubricate with a water-based lubricant. 3. Insert into right nostril first, bevel of the airway toward the septum 4. If you feel resistance remove. Do not force! Try the other nostril. 5. Slide into the nose until the lip is against the nostril. 6. Remain ready to suction the patient if needed.

46
Figure : S0302 Title: NASO: apply lubricant Caption: Inserting a Nasopharyngeal Airway

47
Figure : S03 Title: NASO: flange rests on nostrils Art Caption: Inserting a Nasopharyngeal Airway

48
D. Suctioning Units A. Types - Oxygen or air powered
- Electrically powered units (Current or battery) - Manual (bulb syringe)
 - Manual (bulb syringe)")
49
Suction Systems Fixed or portable
Point to Emphasize: Both portable and wall-mounted suction devices exist. Various types of tips and catheters enable suctioning under different circumstances. Talking Points: Mounted systems, often called “on-board” units, create a suctioning vacuum produced by the engine’s manifold or an electrical power source. Discussion Topic: Compare and contrast the capabilities and limitations of portable suction devices compared to wall-mounted units. Knowledge Application: Tour an ambulance or a hospital. Identify the various types of suction devices.

50
Suction Device Requirements
Must furnish air intake of at least 30 Lpm at open end of collection tube Must generate vacuum of no less than 300 mmHg when collecting tube is clamped Teaching Tip: Assure that you have working suction. Consider simulating realistic suctioning situations using water, soup, and other realistic simulation aids.

51
B. Techniques for suctioning
Position yourself at the patient’s head. Use a hard or rigid suction catheter : yankauer. (“tonisil sucker”) 3. Measure the suction catheter: corner of the mouth to the earlobe or center of the mouth to the angle of the jaw. 4. Turn the unit on. The gauge should generate 300 mmHg of vacuum. 5. Open the mouth using the crossed finger technique (index finger and thumb) 6. Suction only after the catheter is in place. Suction on the way out, not on the way in. 7. Use great care when suctioning a conscious patient - GAG REFLEX! Never lose sight of the pharyngeal curve
 3. Measure the suction catheter: corner of the mouth to the earlobe or center of the mouth to the angle of the jaw. 4. Turn the unit on. The gauge should generate 300 mmHg of vacuum. 5. Open the mouth using the crossed finger technique (index finger and thumb) 6. Suction only after the catheter is in place. Suction on the way out, not on the way in. 7. Use great care when suctioning a conscious patient - GAG REFLEX! Never lose sight of the pharyngeal curve.")
52
DO NOT suction the patient for greater than 15 seconds - the time it takes for a normal breath. You may stimulate the vegus nerve. If the patient has secretion or emesis that cannot be removed quickly and easily by suctioning, the patient should be log rolled and the oropharynx should be cleared If the patient produces frothy secretions as rapidly as suctioning can remove, suction for 15 seconds, artificially ventilate for 2 minutes, then suction for 15 seconds If necessary, rinse the catheter and tubing with sterile water to prevent obstruction of the tubing Hyperventilate the patient before and after suctioning.

53
Continuous Positive Airway Ventilation (CPAP)
Forcing air or oxygen into lungs when a patient is still breathing on their own, but has inadequate breathing Uses force exactly opposite of how the body normally draws air into the lungs

54
Negative Side Effects of Positive Pressure Ventilation
Decreasing cardiac output/dropping blood pressure Gastric distention Hyperventilation Talking Points: Negative pressure ventilation assists the filling of the heart. Positive pressure defeats this filling assistance. Gastric distention is the filling of the stomach with air that occurs when air is pushed through the esophagus during positive pressure ventilation. The esophagus is a larger opening than the trachea and air is frequently diverted there during PPV. Side effects include vomiting and restriction of the diaphragm. Hyperventilation causes too much CO2 to be blown off. This causes a vasoconstriction in the body and can limit blood flow to the brain. Discussion Topic: Discuss the negative impact of poor artificial ventilation technique. Consider the outcome of the following problems: rate too fast; too much volume; inadequate mask seal.

55
Key Concerns with PPV Do not ventilate patient who is vomiting or has vomitus in airway — PPV will force vomitus into patient’s lungs Watch chest rise and fall with each ventilation Ensure rate of ventilation is sufficient Talking Points: Make sure the patient is not actively vomiting and suction any vomitus from the airway before ventilating. Ventilation rates: 10–12 per minute in adults; 20 per minute in children; minimum of 20 per minute in infants. Knowledge Applications: Discuss scenarios with the class. Ask the class to determine the need for artificial ventilation. Discuss the decision-making process. Divide the class into two groups. Use a scenario to review the cost-benefit analysis of a “ventilate vs. not ventilate” decision. Have students debate both arguments. Discuss.

56
Ventilating a Breathing Patient
Explain procedure to patient After sealing mask on patient’s face, squeeze bag with patient’s inhalation Point to Emphasize: Ventilating a breathing patient may be difficult. The goal is not necessarily to take over breathing, but rather to increase tidal volume. Talking Points: Calm reassurance and a simple explanation such as, “I’m going to help you breathe,” are essential in the conscious patient. When ventilating, watch as the patient’s chest begins to rise and deliver the ventilation with the start of the patient’s own inhalation. The goal will be to increase the volume of the breaths you deliver. Over the next several breaths, adjust the rate so you are ventilating fewer times per minute but with greater volume per breath (increasing the minute volume).
.")
57
E. Techniques for Artificial Ventilation
In order of preference, the methods for ventilating a patient by the EMT are as follows: Mouth-to-mask Two-person bag-valve-mask Flow restricted, oxygen powered ventilation device One-person bag-valve-mask

58
Pocket Face Mask a. conforms to facial features.
b. carries in rescuer’s pocket. c. Most can be fitted to an Oxygen tank. d. delivers 16% oxygen using just mask without oxygen. (there is 21% oxygen saturation in the atmosphere) e. Delivers 40-45% with Oxygen at 10 L.P.M. f. Does allow you to maintain an airway.
 e. Delivers 40-45% with Oxygen at 10 L.P.M. f. Does allow you to maintain an airway.")
59
2. Bag-valve Mask a. Used to ventilate a non-breathing patient or a patient who has shallow or failing respirations. b. Sizes: infant, child, adult c. Will deliver Oxygen at 21% when used alone. When connected to oxygen tank at 15 L.P.M. and reservoir bag it can deliver up to 100% Oxygen. d. Most will fit a variety of masks e. Atmospheric air delivered thru one-way valve, adult bag delivers ml of air

60
Ventilation Procedures for BVM
1. Position yourself at the patient’s head. Establish an open airway. 2. Insert an oropharyngeal airway. 3. Use the correct mask size for the patient. 4. Hold mask firmly in position - C and E finger positions. 5. With other hand, squeeze bag once every five seconds. 6. Release bag. Allow patient to exhale. Allow bag to refill. 7. The most reliable sign that your patient is being adequately ventilated is the patient’s chest rises

61
Bag-Valve-Mask Face mask should be clear to allow the rescuer to see vomitus. When ventilating an unconscious patient, a bag-valve-mask system is only complete if a reservoir bag, oral airway and oxygen are in place.

62
Standard Features of BVM

63
Bag-Valve-Mask Artificial ventilation is adequate when:
The rate is sufficient, approx. 12 per minute for adults and 20 times per minute for infants and children The most reliable sign that your patient is being adequately ventilated is the patient’s chest rises. Note: Heart rate may return to normal with successful artificial ventilation Artificial ventilation is inadequate when: The chest does not rise and fall with artificial ventilation The rate is too fast or too slow Note: Heart rate may not return to normal with artificial ventilation

64
Sellick’s Maneuver (cricoid pressure)
Use during positive pressure ventilation Reduces the amount of air in the stomach Procedure: identify cricoid cartilage apply firm backward pressure to cricoid cartilage with thumb and index finger Do not use if: pt. is vomiting or starts to vomit patient is responsive

65
3. Flow restricted, Oxygen Powered Ventilation Device
- Uses Oxygen under pressure, delivered through a mask. - Peak flow rate of 100% at up to 40 L.P.M. - Has a pressure relief valve with alarm. - CAUTION: DO NOT OVERINFLATE. - Use only on adults.

66
Using Flow-Restricted, Oxygen-Powered Ventilation Device

67
4. Mask to Stoma Ventilation
Definition of a tracheostomy – artificial permanent opening in the trachea If unable to artificially ventilate, try suction, then artificial ventilation through mouth and nose; sealing stoma may improve ability to artificially ventilate. Need to seal the mouth and nose when air is escaping when artificially ventilating the stoma

68
5. Bag-valve-mask to Stoma
Use pediatric size mask Leave head in the neutral position. Ventilate at appropriate rates. If unable to artificially ventilate through stoma, seal stoma and attempt artificial ventilation through mouth and nose

69
6. Automatic Transport Ventilator (ATV)
Provides automated ventilations Can adjust ventilation rate and volume Provider must assure appropriate respiratory rate and volume for patient’s size and condition Knowledge Application: Describe a variety of patient scenarios. Ask students to choose a method to artificially ventilate the patient in each scenario. Discuss why the chosen method would be appropriate or inappropriate. Critical Thinking: If using a BVM was ineffective at ventilating a patient, what would the next step be? What are the alternatives?

70
F. Oxygen Therapy A. Safety considerations in the use of Oxygen -
1. Never drop a cylinder or let it fall. 2. Never smoke! Post signs. 3. Never use Oxygen around an open flame. 4. Never use grease or adhesive tape on tanks or gauges. 5. Always use original pressure gauges and regulators. 6. Always use non-ferrous metal 7. Always make sure gaskets are in good condition. 8. Always use medical Oxygen. 9. Always open valve fully then close half a turn. 10. Test cylinders hydrostatically every 5 years

71
B. Medical Hazards of Oxygen Therapy
1. Oxygen toxicity or air sac collapse – destruction of the lung tissue due to high concentration of oxygen provided for a long period of time.

72
Medical Hazards of Oxygen Therapy
2. Infant eye damage – occurs when infants are given too much oxygen. It is not too much oxygen in the eye directly, but too much oxygen in the bloodstream. Scar tissue will develop behind the lens of the eye (retrolental fibroplasias). 3. Respiratory depression or Respiratory arrest – this problem occurs with patients having COPD (chronic obstructive pulmonary disease). When the patient is given too high a dosage of oxygen. These patients can develop respiratory depression or arrest – hypoxic drive. In patients who are chronically maintained on oxygen and who are being transported for a condition other than the one requiring high concentration oxygen by the protocols, continue administering oxygen at the previously prescribed rate flow.
. 3. Respiratory depression or Respiratory arrest – this problem occurs with patients having COPD (chronic obstructive pulmonary disease). When the patient is given too high a dosage of oxygen. These patients can develop respiratory depression or arrest – hypoxic drive. In patients who are chronically maintained on oxygen and who are being transported for a condition other than the one requiring high concentration oxygen by the protocols, continue administering oxygen at the previously prescribed rate flow.")
73
~~~~~~~~~~~~~~~~~~~~~~~~~~~~~~~~~~~
OXYGEN SHOULD NEVER BE WITHHELD FROM PATIENTS REQUIRING IT, EVEN THOUGH THEY MAY HAVE COPD! ~~~~~~~~~~~~~~~~~~~~~~~~~~~~~~~~~~~ Airway management and ventilation take precedence over other life-support skills because: The body needs oxygen to survive Skills are easiest to perform Oxygen is the most readily available drug

74
C. Oxygen Cylinders 1. Sizes: D – contains 350 liters of Oxygen (19 min) E – contains liters of Oxygen M – contains 3000 liters of Oxygen G – contains 5300 liters of Oxygen H – contains 6900 liters of Oxygen

75
Oxygen Cylinders 2. Colors : - green/white
- aluminum & stainless steel - not painted **ALWAYS READ LABELS TO BE SURE!!!** 3. PSI – pounds per square inch – pressure created by the oxygen inside an oxygen tank. 4. LPM – liters per minute 5. Full tank has approximately 2000 psi 6. NYS DOH guidelines require that oxygen tanks must be changed at 500 PSI.

76
G. Oxygen delivery devices
Nasal cannula - - Flow rate 1 to 6 LPM.(4 – 6 LPM is most common in emergency situations) - Delivers 24 to 44% oxygen. - Used with patients that cannot tolerate a mask or COPD patients who are not in breathing distress.
 - Delivers 24 to 44% oxygen. - Used with patients that cannot tolerate a mask or COPD patients who are not in breathing distress.")
77
B. Non-rebreather mask – Flow rate 12 to 15 LPM
- Delivers 80 – 100% oxygen - Best way to deliver high levels of oxygen, used on all patients in our protocol. Very useful in heart attacks and shock, monitor COPD patients carefully.

78
C. Venturi mask - Delivers specific concentrations of oxygen by mixing oxygen with inhaled air - Flow rate 4 to 8 LPM - Delivers 24 – 40 % oxygen on a variable rate) - Designed for low levels of oxygen
 - Designed for low levels of oxygen.")
79
D. Partial Rebreather Mask
Very similar to nonrebreather mask No one-way valve in opening to reservoir bag Delivers 40%–60% oxygen at 9–10 Lpm

80
E. Tracheostomy Mask Placed over stoma or tracheostomy tube to provide supplemental oxygen Connected to 8–10 Lpm

81
F. Humidifier Connected to flow meter
Provides moisture to dry oxygen from supply cylinder

82
IF THE PATIENT REQUIRES OXYGEN THERAPY, WHICH MOST OF THEM DO ADMINISTER HIGH CONCENTRATION OXYGEN
First choice – non-rebreather mask 1. Fill the bag to its capacity initially. 2. Adjust the air flow of oxygen (15 LPM) so that the bag remains 1/3 full during inspiration. B. Second choice – nasal cannula (6 L.P.M.) (used only if a mask is not tolerated).
 so that the bag remains 1/3 full during inspiration. B. Second choice – nasal cannula (6 L.P.M.) (used only if a mask is not tolerated).")
83
IF THE PATIENT DEMONSTRATES INADEQUATE VENTILATION (RESPIRATIONS OF LESS THAN 10 PER MINUTE OR GREATER THAN 29 PER MINUTE) AND THE PATIENT IS CONFUSED, RESTLESS, OR CYANOTIC:
 AND THE PATIENT IS CONFUSED, RESTLESS, OR CYANOTIC:")
84
If you are working with a PARTNER:
Assist the patient’s ventilations with 100% oxygen using a positive pressure adjunctive device If you are working with a PARTNER: First choice – Bag-valve mask with reservoir and Oxygen (15 LPM) If you are working ALONE: First choice – Pocket mask with supplemental oxygen. ( 15 LPM)
 If you are working ALONE: First choice – Pocket mask with supplemental oxygen. ( 15 LPM)")
85
THE END

86
Respiratory System Anatomy
Nasopharynx Oropharynx Epiglottis Larynx Trachea Carina Bronchi Bronchioles

87
Ventilation Procedures
1. Place patient in supine position (unconscious patient insert an airway) 2. Place mask firmly over mouth and nose (can be used on a facial injury) 3. Maintain airway – keep a good seal on the face. 4. 2 breaths – 1000 cc of air. 5. Remove, allow patient to exhale – continue ventilations
 2. Place mask firmly over mouth and nose (can be used on a facial injury) 3. Maintain airway – keep a good seal on the face breaths – 1000 cc of air. 5. Remove, allow patient to exhale – continue ventilations.")
Similar presentations


 into the atmosphere Filter, moisten,>")


