Download presentation
Presentation is loading. Please wait.

1
Digital Video Faculty Innovating with Technology project Gateway Technical College Spring, 2007

2
Shoot Transfer to computer to edit Edit Transfer to media and enjoy Common Video Steps Publish

3
Shooting “Get it right in the camera” –#1 time-saving and effort-saving technique Video camera microphones often pick up too much extra noise –Can buy an external mic at Radioshack If your camera has a microphone input –Built-in microphone might work fine for you

4
Shooting: Shot Types Wide shot/establishing shot –Shows the subject in its entirety and usually includes background images Medium long shot –Shows the subject from head to toe Medium shot –Shows the subject from chest to head

5
Shooting: Shot types Medium close-up –Shows the subject from chest to head Regular close-up –Shows the subject’s head and shoulders Big close-up –Subjects face fills the screen

6
Shooting Tips Off-center subjects –Rule of thirds Vary long, medium and close shots Zoom = BAD –A little very slow zoom – ok If not using a tripod, prop yourself on furniture and walls for stability Use camera motion sparingly

7
Shooting: Tips Unintended motion can ruin your video For stability –Sit –Lean against a wall –Hold the camera with both hands –Find a level place to park your camera –Use motion stabilization, if this is a feature of your camera

8
Shooting: Rules for Motion 1.Don’t use motion to move from shot to shot In recording mode: stop; reframe the video, and then reshoot – don’t pan

9
Shooting: Rules for Camera Motion If you must use motion (Pan): 1.Never pan back and forth 2.Pan from the waist and move your body Don’t use your hands or wrists 3.When following a subject, try to keep him in the back third of the frame 4.Shoot for a few seconds while stable at both the beginning and end of the motion shot 5.Use the horizon as a horizontal cue
: 1.Never pan back and forth 2.Pan from the waist and move your body Don’t use your hands or wrists 3.When following a subject, try to keep him in the back third of the frame 4.Shoot for a few seconds while stable at both the beginning and end of the motion shot 5.Use the horizon as a horizontal cue")
10
Shooting: Tilt Never tilt up and down –Tilt in one direction and then stop Tilt at the waist –Using your hands will introduce shake into the picture

11
Shooting: Zoom Get to know your zoom controls in advance Zoom slowing to the desired framing, and then stop, even if it’s not ideal Disable digital zoom

12
Shooting: Lighting Shoot with the sun to your back whenever possible Use camera’s preprogrammed AE modes for sunlight, sports, spotlight and similar environments Avoid backlit subjects

13
Shooting: Sound Turn off all background noise you can –TV off! Use headphones to better gauge sound quality Use a directional microphone

14
Shooting: Sound There are several reasons why the built-in camera microphone may not be adequate –Omni-direction –Attached to the camera, it can pick up camera noise –Headphones can help you hear what the camera is picking up

15
Shooting Audio –Can split from the video and “overlayed” over another part of the video –[example]
![Shooting Audio –Can split from the video and overlayed over another part of the video –[example]](http://images.slideplayer.com/18/6080400/slides/slide_15.jpg "Shooting Audio –Can split from the video and overlayed over another part of the video –[example]")
16
What camera to buy? Depends what you’re planning to use it for Check reviews at http://www.cnet.comhttp://www.cnet.com

17
Transferring to your computer Also called Capturing From camera, usually by cable –Firewire (IEEE) or USB Sony calls firewire i-Link Confirm the camera is on Switch the camera from “record” to “vcr” mode –Mode is also called play, review …
 or USB Sony calls firewire i-Link Confirm the camera is on Switch the camera from record to vcr mode –Mode is also called play, review …")
18
Cables USB or –More common these days Firewire (also known as iLink) –Used often when USB was slower than it is today The cable type depends upon your camera –Check that your computer has a compatible connection!
 –Used often when USB was slower than it is today The cable type depends upon your camera –Check that your computer has a compatible connection!")
19
Video File Formats Captured video is usually saved as an.avi –High quality uncompressed –Unless the capture program asks you how to save it first Your editing program will save as a “project” –Separate from the video files –Contains all your edits and additions “Publishing” your video will save it in a compressed format of your choosing –usually

20
Editing Generally for assembling and transitioning multiple pieces of video Many different video editing software programs –Both Macintosh and PC From basic to exceedingly complex and feature-filled

21
Entry-Level editing programs Windows Movie Maker (incl with Windows) PC Adobe Premiere Elements ($99 or less) PC, probably Mac iMovie and iDVD Mac Roxio Movie Creator Pinnacle Studio Ulead Video Studio Easiest? –Mac iMovie and iDVD are easiest combination if you can get comfortable with the platform (incl with Macs)
.")
22
Profession Editing Software Adobe Premiere Apple Final Cut Pro

23
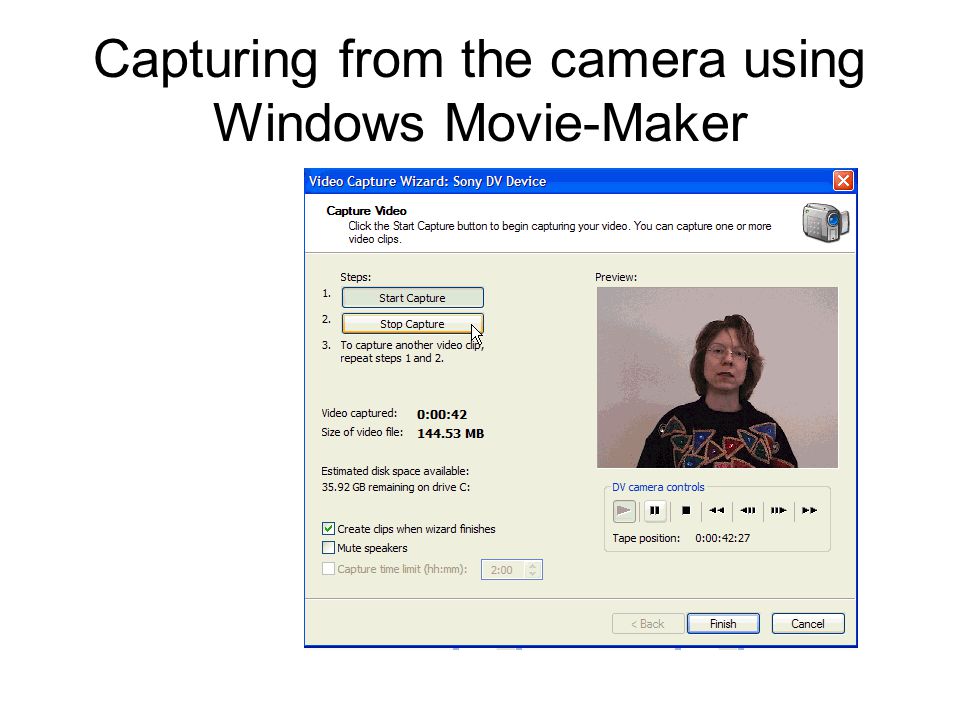
Capturing from the camera using Windows Movie-Maker

26
Capturing

27
Capturing from the camera using Windows Movie-Maker

32
Capturing

33
Viewing Captured Clips in Windows Movie-Maker

34
Editing - Trimming the beginning and ending of clips

36
Editing – changing from Clip to Timeline view

37
Editing – Saving the Project

39
Splitting the clip

40
Splitting a clip

42
Titles, Transitions and Effects

43
Adding Titles in Windows Movie Maker

44
Transitions

45
Adding a Transition

46
Transcoding Most editing programs are able to output your final video into a format your audience can view (i.e. DVD) The process of transforming video from one format into another is called transcoding The most common transcoding that most people will do is to transform captured digital video into a DVD-compliant MPEG-2 format
 The process of transforming video from one format into another is called transcoding The most common transcoding that most people will do is to transform captured digital video into a DVD-compliant MPEG-2 format.")
47
Publishing Most entry level and some profession programs have VCD and DVD mastering tools Programs designed specifically for these tasks: –Apple iDVD –Roxio DVD Creator –Nero

48
Editing Steps 1.Add clips to timeline Choose parts of the clips to include 2.Add transitions 3.Add titles 4.Publish 5.Transfer to media Sometimes done while publishing Can also often add music Compress either in Save or Export step

49
Editing: Publishing Allows you to pick options for –Output formats –media Media –Back to camera –CD –VCD –DVD –To VHS tape –Can store small video files on a flash drive

50
Compression takes awhile Think about how much data we are manipulating –A single picture (frame) has hundreds of thousands of pixels 640*480=307,200 –29.97 frames per second for television
 has hundreds of thousands of pixels 640*480=307,200 –29.97 frames per second for television")
51
Other Video Techniques Webcams Adding to PowerPoint –Linking, not inserting Using Gateway’s streaming server Screencast videos

Similar presentations


 ETT 555.>")


 Multimedia ComputingMedia Technologies Video Capture and Editing.>")


 Any other.>")
