Download presentation
Presentation is loading. Please wait.

1
BIOE 220/RAD 220 REVIEW SESSION January 23, 2011

2
Your TAs Physics TA: Michael Marx, mikemarx@stanford.edumikemarx@stanford.edu Anatomy TA: Shubhra Jain, jainshubhr@gmail.comjainshubhr@gmail.com We will have weekly review sessions, Mondays at 5:30 in the Lucas Learning Center. We will review the material from the previous lectures and then have time for questions and homework help. Please feel free to email us with any questions. We will reply within 24 hours to email, and can make time for additional meetings outside of the review sessions if there’s demand. If you would like us to cover something specific at the weekly review session, please email us both by Sunday night.

3
Today’s Schedule 1. Course Overview – Setting expectations 2. Basics of MRI, MRI Review 3. Imaging Conventions 4. Neuro-Anatomy Review 5. Time For Questions

4
Course Overview - Outline Jan 9 – Introduction, MR Signal, CNS Overview Jan 11 – MR Relaxation, Brain Anatomy 1(Lobes, Gyri, Sulci) Jan 18 – Radiography, DSA, CT Jan 23 – Contrast Agents, MR Gradients, DWI, 1D Localization, Brain Anatomy 2 (Deeper Structures, Cerebellum, Pituitary) Jan 25 – MRA, Orbits, Brain Coverings, Neurovascular Anatomy Jan 30 – MR Slice Selection, Sampling, SNR Feb 1 – Ultrasound Feb 6 – Brain Development Feb 8 – MR Image Formation Feb 13 – Rendering Lab Feb 15 – Midterm Feb 22 – US Doppler, Carotid Anatomy, US Lab Feb 27 – Spine and Spinal Cord Feb 29 – MR Pulse Sequences, Angiography, Quantitative Flow Applications Mar 5 – Perfusion Imaging, Cranial Nerves Mar 7 – fMRI, Oxygenation, Brain Autoregulation in Health and Disease Mar 12 – MR Lab Mar 14 – DTI, Functional Neuroanatomy & Review Mar 23 – Friday – 8:30 Final Exam
 Jan 18 – Radiography, DSA, CT Jan 23 – Contrast Agents, MR Gradients, DWI, 1D Localization, Brain Anatomy 2 (Deeper Structures, Cerebellum, Pituitary) Jan 25 – MRA, Orbits, Brain Coverings, Neurovascular Anatomy Jan 30 – MR Slice Selection, Sampling, SNR Feb 1 – Ultrasound Feb 6 – Brain Development Feb 8 – MR Image Formation Feb 13 – Rendering Lab Feb 15 – Midterm Feb 22 – US Doppler, Carotid Anatomy, US Lab Feb 27 – Spine and Spinal Cord Feb 29 – MR Pulse Sequences, Angiography, Quantitative Flow Applications Mar 5 – Perfusion Imaging, Cranial Nerves Mar 7 – fMRI, Oxygenation, Brain Autoregulation in Health and Disease Mar 12 – MR Lab Mar 14 – DTI, Functional Neuroanatomy & Review Mar 23 – Friday – 8:30 Final Exam")
5
Course Overview - Expectations The course is split about 50/50 between physics and anatomy when it comes to class time, homework problems, and exam questions Engineering students are often stronger with the physics and weaker with anatomy Science or medical students are often the reverse Differences in student backgrounds should mostly balance out, so don’t worry too much about it The first physics lectures (MRI intro) are about as difficult as they get this quarter, so don’t extrapolate difficulty and get worried Movies on the web site should help with MRI intuition For anatomy, repetition is key to memorization. Make sure to review the slides, videos, and other resources You will be given a list of terms that you’re responsible for on an exam, so you don’t need to memorize spelling

6
Basics of MRI – B 0 MRI measures oscillating magnetic fields created by spinning water protons A large magnetic field B 0 is applied in the ẑ direction This magnetic field is always on, created by a superconducting electromagnet (cooled by liquid helium) The ẑ direction points through the magnet, which will generally be P/I direction Left at rest, net magnetization M 0 will align in the ẑ direction We can’t measure magnetization in the same direction as B 0, so it’s necessary to rotate the magnetization into the transverse (xy) plane to measure it
 The ẑ direction points through the magnet, which will generally be P/I direction Left at rest, net magnetization M 0 will align in the ẑ direction We can’t measure magnetization in the same direction as B 0, so it’s necessary to rotate the magnetization into the transverse (xy) plane to measure it")
7
Basics of MRI – Precession Frequency Protons rotate at a frequency determined by the gyromagnetic ratio 0 ≣ Larmor frequency = γB 0 γ = 42.58 MHz/T for water hydrogen Typical clinical scanners will be 1.5T or 3.0T In “lab frame,” our coordinate system is stationary, so the spins rotate at the Larmor frequency In “rotating frame,” the coordinate system rotates about ẑ at the Larmor frequency, so spins (magnetization) appear stationary
 appear stationary")
8
Basics of MRI – RF Pulses To measure M 0, it must be tipped into xy plane In rotating frame, we can apply a magnetic field B 1 to apply a torque to M Rotation due to B 1 can be calculated using Larmor frequency τ = M x B, so you can figure out direction of rotation using right hand rule (point fingers towards M, curl them towards B, your thumb points in the direction of the torque)
")
9
Basics of MRI – Relaxation Protons that aren’t perfectly on-resonance (rotating at expected Larmor frequency) will rotate in rotating frame Magnetization in the transverse plane decays quickly due to dephasing Fast dephasing is T 2 ’ decay, which contributes to T2* This is imaged with GRE – Gradient Recalled Echoes Transverse magnetization can be refocused with a 180 degree pulse, which refocuses some of the off resonance Refocused intensity decays with T 2 This is imaged with SE – Spin Echoes As long as the spins are in the presence of B 0, T 1 recovery will be occurring Magnetization in the ẑ direction will be recovering towards M 0
 will rotate in rotating frame Magnetization in the transverse plane decays quickly due to dephasing Fast dephasing is T 2 ’ decay, which contributes to T2* This is imaged with GRE – Gradient Recalled Echoes Transverse magnetization can be refocused with a 180 degree pulse, which refocuses some of the off resonance Refocused intensity decays with T 2 This is imaged with SE – Spin Echoes As long as the spins are in the presence of B 0, T 1 recovery will be occurring Magnetization in the ẑ direction will be recovering towards M 0")
10
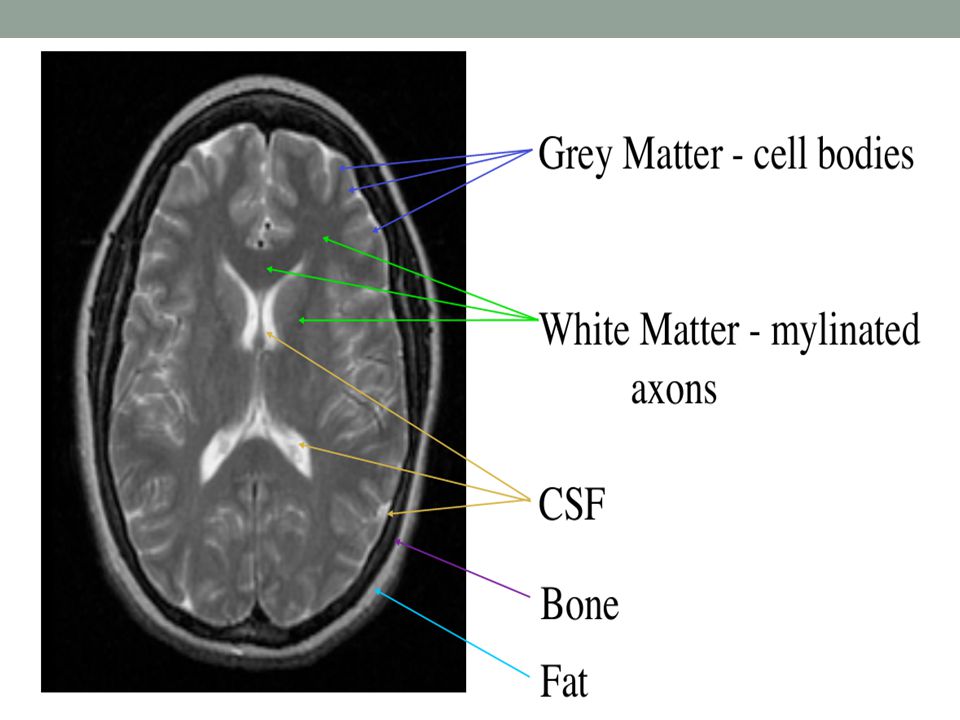
Basics of MRI – Relaxation Coefficients Different tissues in the body will have different T 1 and T 2 coefficients These differences are what provide contrast in MRI images Images can be given different weighting (contribution from T 1, T 2, and M 0 ) based on the pulse sequence timings Materials with a longer T 2 tend to have longer T 1 Stationary fluid has very long recover times, so it will appear very bright in T2 weighting and dark in T1 weighting… easiest way to figure out weighting You should memorize this equation, and understand it well enough to re-derive it:
 based on the pulse sequence timings Materials with a longer T 2 tend to have longer T 1 Stationary fluid has very long recover times, so it will appear very bright in T2 weighting and dark in T1 weighting… easiest way to figure out weighting You should memorize this equation, and understand it well enough to re-derive it:")
11
MRI Basics – Contrast Summary

12
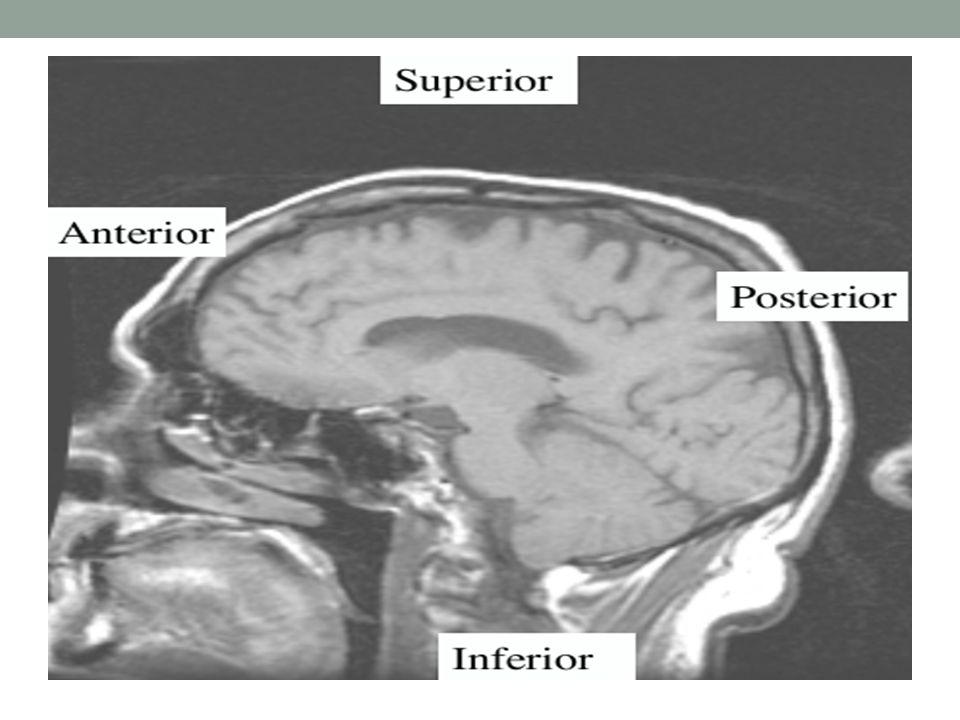
Imaging Conventions

13
Axial Plane ( CT, MR)
")
26
CT v/s MRI If cortical bone is bright, it’s CT. If cortical bone is dark, it’s MRI. If fat is bright, it’s MRI. Fat can be dark or bright on MRI. Hints: MRI is really good for looking at the musculature. Abdominal imagers really like CT.

27
CT Knee Cortical bone is bright Fat is dark Proton Density-Weighted MRI Knee Fat is bright. Cortical bone is dark, fluid is bright

28
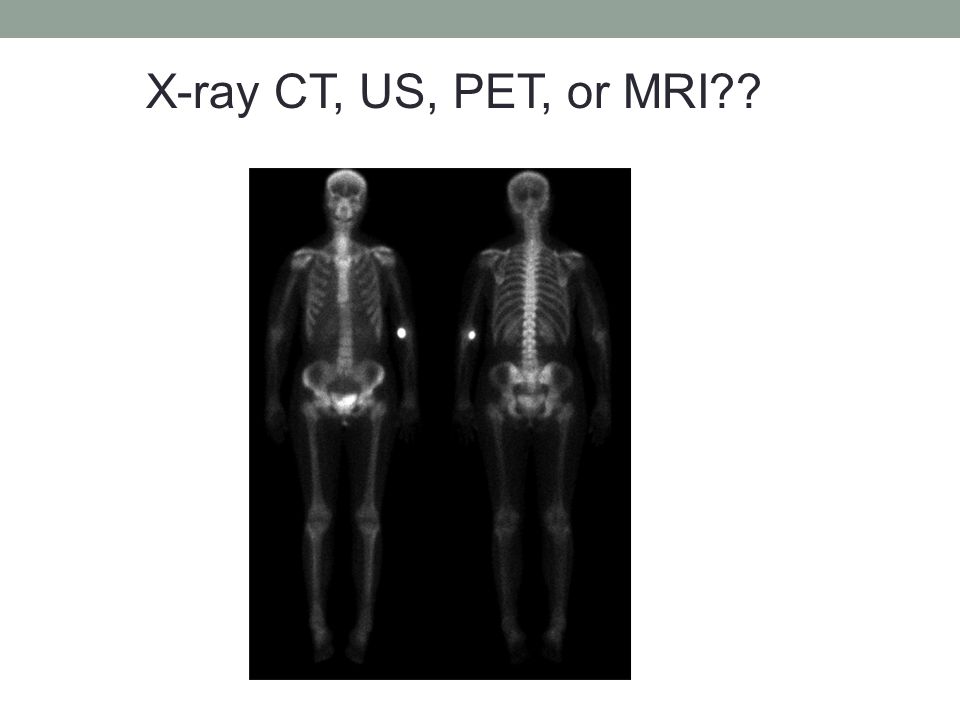
X-ray CT, US, PET, or MRI??

30
X-RAY, CT, US, PET, OR MRI??

31
X-ray CT, US, PET, or MRI??

33
Overview of the nervous system Central nervous System Brain Spinal Cord Cranial Nerves Peripheral Nervous System Peripheral Nerves

34
Lobes temporal parietal occipital frontal Ipsilateral vs contralateral

37
Limbic Lobe

39
Ventricles Lateral Third Fourth

41
Neuro Anat - Practice 1, Sylvian fissure. 2, Globe. 3, Superior temporal gyrus. 4, Middle temporal gyrus. 5, Inferior temporal gyrus. LF, Frontal Lobe. LP, Parietal Lobe.

42
1, Amygdale. 2, Optic nerve. 3, Globe. 4, Inferior rectus muscle. 5, Right maxillary sinus. 6, Hippocampus. 7, Cerebellar hemisphere. 8, Transverse sinus. 9, Occipito-temporal gyri. 10, Lateral ventricle. Neuro Anat - Practice

43
1, Sphenoid sinus. 2, Genu of corpus callosum. 3, Lateral ventricle. 4, Superior sagittal sinus. 5, Straight sinus. 6, IVth ventricle. 7, Cerebellomedullary cistern (cisterna magna). Neuro Anat - Practice
. Neuro Anat - Practice.")
44
1, Superior frontal gyrus. 2, Middle frontal gyrus. 3, Inferior frontal gyrus. 4, Medial orbital gyrus. 5, Turbinate. 6, Gyrus rectus. Neuro Anat - Practice

45
1, Hippocampus. 2, Inferior frontal gyrus. 3, Middle frontal gyrus. 4, Superior frontal gyrus. 5, Cingulate gyrus. 6, Lateral ventricle. 7, Third ventricle. 8, Middle cerebellar peduncle. 9, Medulla. Neuro Anat - Practice

46
1, Superior sagittal sinus. 2, Calcarine fissure. 3, Cerebellar hemisphere. 4, Transverse sinus. 5, Straight sinus. 6, Interhemispheric fissure. Neuro Anat - Practice

47
1, Optic nerve. 2, Medial rectus muscle. 3, Globe. 4, Lateral rectus muscle. 5, Right temporal lobe. 6, Pons. 7, Right occipital lobe. 8, Left occipital lobe. Neuro Anat - Practice

48
1, Frontal sinus. 2, Sylvian fissure. 3, Insula. 4, 3rd ventricle. 5, Lateral ventricle. LF, Frontal Gyri. LT, Temporal gyri. LO, Occipital Gyri. Neuro Anat - Practice

49
1, Genu corps callosum. 2, Superior frontal gyrus. 3, Lateral ventricle. 4, Central sulcus. Neuro Anat - Practice

Similar presentations


>")
>")
 changes in the environment (light, sound, smell, taste, touch, heat) Detect (sense) changes in the.>")


>")