Download presentation
Presentation is loading. Please wait.

1
Workshop 2A – Workplace Surveillance Part B – Case Studies Milestone XProtect at Abbotsleigh James Stewart IT Systems Administrator Abbotsleigh BA, LTCL, MCSE (Messenging)
")
2
Overview History of Video Surveillance at Abbotsleigh Foundations of the IP Video Surveillance System Why Milestone XProtect? Features at a Glance Live Demo Installing and maintaining an IP video surveillance system on both the network and physical fronts Where are we now? Questions

3
History of Video Surveillance at Abbotsleigh In 1999, Abbotsleigh embarked upon its staff laptop program with the purchase of 50 laptops, followed by 2 more batches of 50 laptops every 6 months (total of 150). By the end of 2001, Abbotsleigh had lost a significant number of staff laptops that had been stolen from staffrooms. The school suspected that the thieves had inside assistance. School faced increased insurance premiums due to large number of thefts. School Insurance Policy was (and still is) such that the excess is $10,000, so in 2001 four or more laptops had to be stolen for it to be worth making a claim.
 such that the excess is $10,000, so in 2001 four or more laptops had to be stolen for it to be worth making a claim..")
4
History of Video Surveillance at Abbotsleigh School also facing a history of smaller petty thefts from staffrooms and girl’s locker areas – usually of money from wallets. Problem came to a head in late 2001 when the Bursar and Property Manager asked the IT Department and allocated $20- 25K of funds to setup the foundations of a school security system (Phase I). Team of four employees setup (Bursar, Property Manager, Director of IT and IT Systems Administrator) to plan new system and IT Department tasked with its installation, operation and maintenance.
. Team of four employees setup (Bursar, Property Manager, Director of IT and IT Systems Administrator) to plan new system and IT Department tasked with its installation, operation and maintenance..")
5
Foundations of the IP Surveillance System (Phase I) Maximum bang for your buck dictated that the school implement the entire system without outside consultants. System had to be expandable and reliable Had to be at least 9 cameras operating at end of Phase I covering problem staffrooms and some main corridors. Staff and students had to have a sense that the system was bigger than just 9 cameras Workplace Surveillance Act and Staff concerns dictated that system would be overt and only operate between 7am and 6pm, and only the Bursar, Property Manager and a select few from the IT Department would have access to live and recorded video footage.

6
Foundations of the IP Surveillance System (Phase I) Budget Breakdown 9 x Axis 2100 Video cameras$6,500.00 18 x Camera mounts$350.00 Network points$4,500.00 Surveillance Server$5,000.00 Surveillance Software (inc 1 year maint.)$2,500.00 9 x dummy cameras$500.00 Misc$200.00 $19,950.00
 Budget Breakdown 9 x Axis 2100 Video cameras$6, 18 x Camera mounts$ Network points$4, Surveillance Server$5, Surveillance Software (inc 1 year maint.)$2, 9 x dummy cameras$ Misc$ $19,950.00")
7
Why Milestone XProtect? Axis cameras were selected as the network cameras due to their reputation. Axis only listed two IP surveillance products that were recommended for use with their cameras – Argus and Milestone Milestone XProtect was easy to download and trial, and school was impressed with its functionality. Milestone XProtect could be purchase in bundles of 4, 9, 16, 32 and 50+ camera licences, and licence upgrade was easy. Milestone had a local reseller whereas Argus did not in 2001.

8
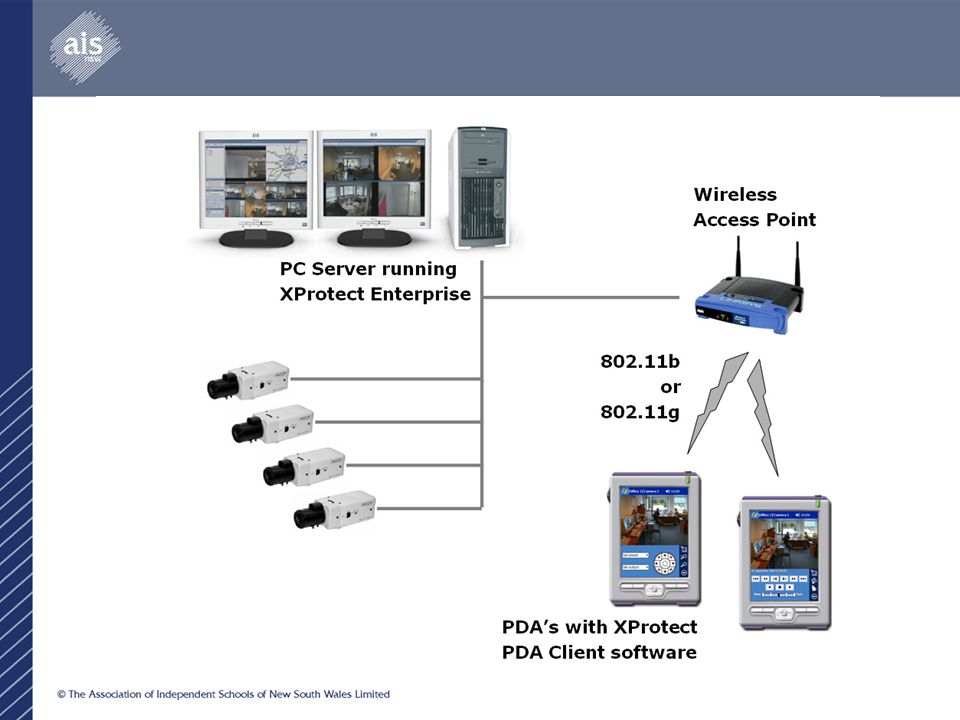
Why Milestone XProtect?

9
Features at a Glance Server Requirements – XProtect Enterprise Windows 2000 Pro, Windows 2000 Server, Windows XP Pro or Windows Server 2003 1Ghz Processor or faster (multiple CPUs highly recommended for 16+ cameras and Intel CPUs recommended) 1GB RAM minimum 100Mb NIC card for up to 9 cameras, 1Gb for over 9 1024x768 AGP Video Card with at least 24bit colour Hard Disk: 7200rpm ATA minimum, SCSI RAID recommended
 1GB RAM minimum 100Mb NIC card for up to 9 cameras, 1Gb for over 9 1024x768 AGP Video Card with at least 24bit colour Hard Disk: 7200rpm ATA minimum, SCSI RAID recommended")
10
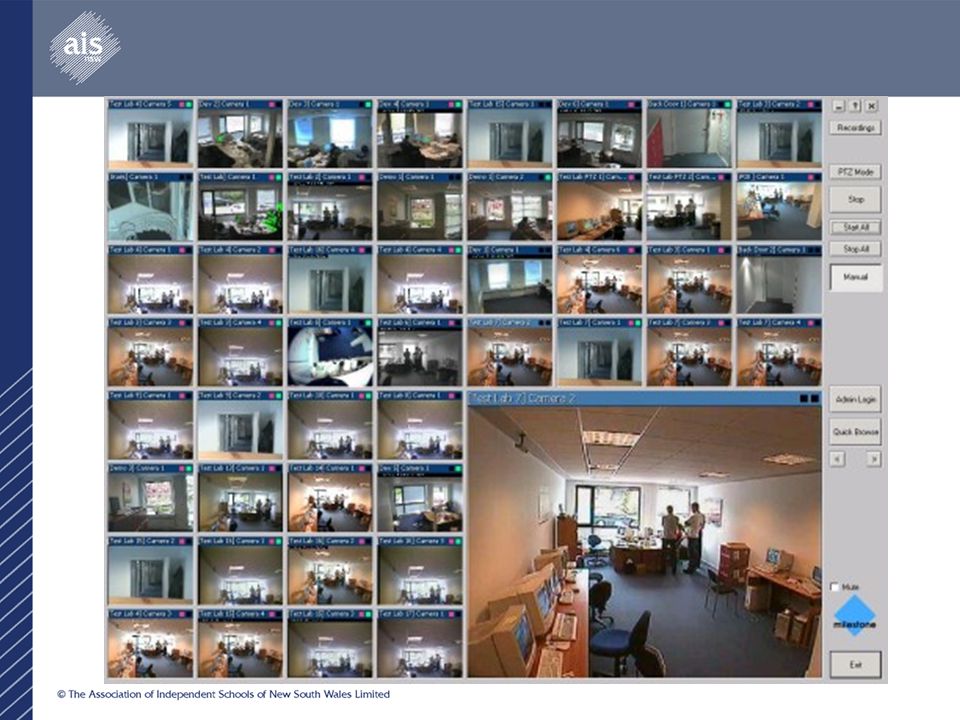
Features at a Glance Compatible with around 150 network cameras Unlimited number of cameras (dependant upon Server hardware) – max of 64 can be viewed and recorded at once. Can be integrated with XProtect Transact or XProtect Retail where photos/video surveillance is recorded whenever a transaction is made – useful for school uniform shops and bookrooms. Can be integrated into XProtect Central and Matrix so that multiple XProtect Enterprise sites can be managed and viewed from a central console – useful for remote campuses. Unlimited number of remote/smart clients (i.e. PDA clients, web clients, etc)
.")
11
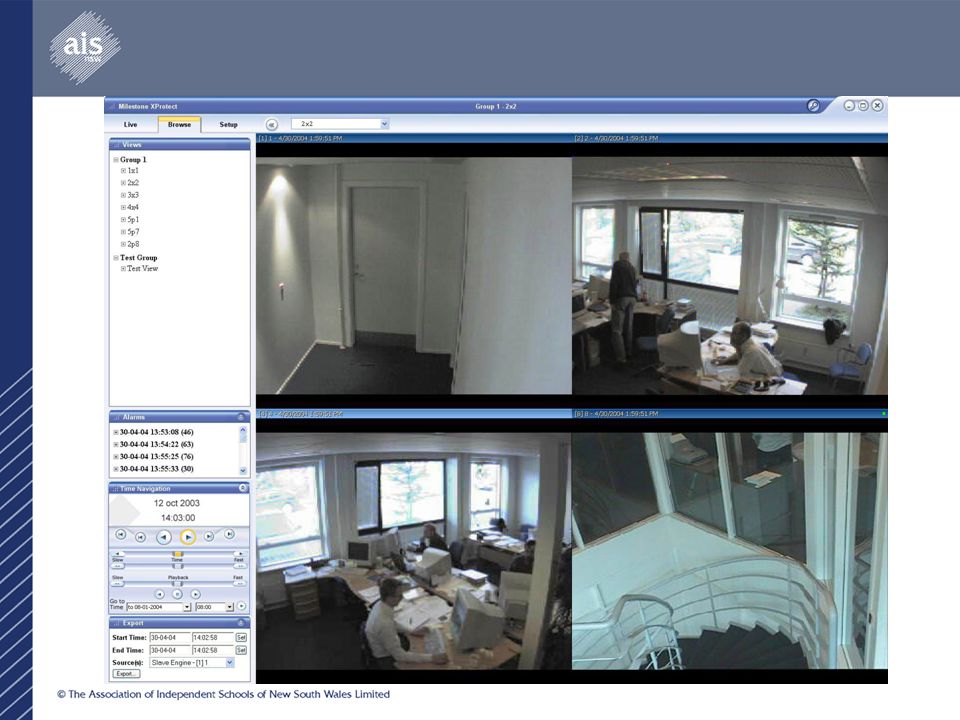
Features at a Glance Video and Audio Recording Simultaneous recording, viewing and playback Can record up to 30+ frames per second – dependant upon camera capabilities Recording technology: secure high speed database holding JPEG images or MPEG4 streams. Dual or triple computer monitor viewing with HotSpot window and Carousel display. Archiving to network drives.

12
Features at a Glance Video Motion Detection (VMD) Built-in, real time, fully adjustable, camera independent VMD. VMD exclude zones. VMD activated recording. VMD activated frame rate speed up. VMD activated alerting through email, SMS message or audio alarm.

13
Features at a Glance Search, Export and Secure data Instant search on recordings based on date/time and activity/alarm (Video Motion Detection). ‘Smart Search’ for specified image zones and objects. Evidence can be generated as a printed report with time and date stamp, as a JPEG image, or as an AVI film. Export audio recordings in WAV format or included in AVI film. Export of ‘Evidence CD’ contains native database export and configured Recordings Viewer for instant, easy viewing by authorities. Encryption & password protection option for exported recordings and files. Ability to add comments to exported evidence, also encrypted. Audit logs of exported evidence by user & file. Audit logs of Remote Client user activity by time, locations and cameras.

14
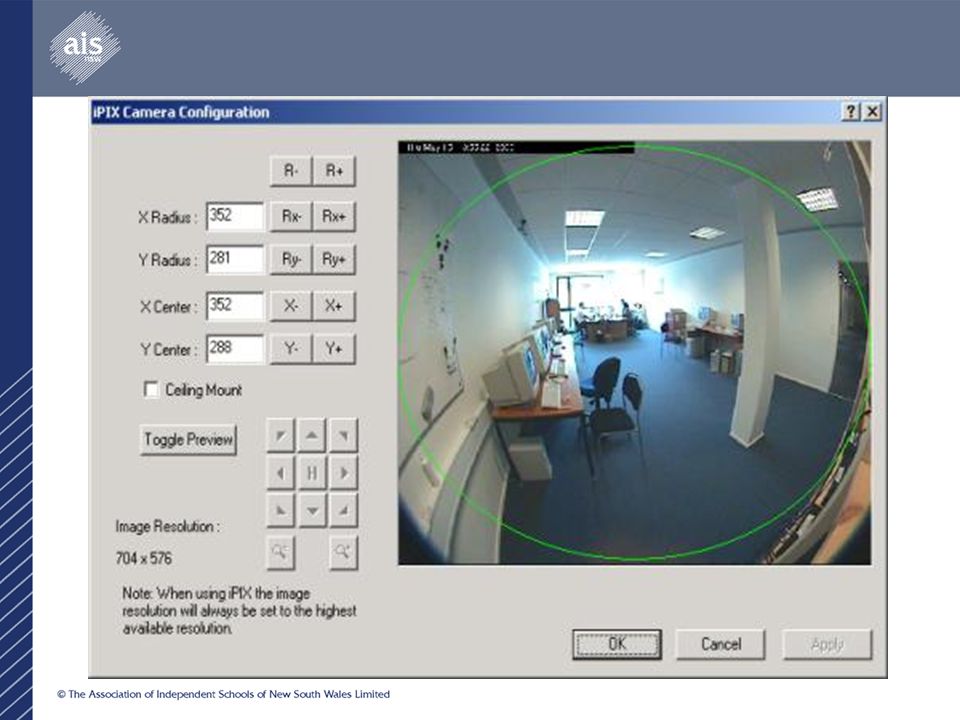
Features at a Glance Advanced PTZ Contol Pan Tilt Zoom pre-set positions, up to 50 positions per camera. Combine PTZ patrolling and go-to positions on events. Set multiple patrolling schedules per camera per day: i.e. different for day/night/weekend. Pause PTZ patrolling and control the movement manually, after which the scheduled patrolling resumes automatically. Take manually control over a PTZ camera while viewing through the Remote Client. After which the camera reverts to its scheduled patrolling. PTZ scanning on supported devices: viewing or recording while moving slowly from one position to another. VMD-sensitive PTZ patrolling among selected presets. Joystick functionality for supported cameras. IPIX technology for PTZ in 360° recorded images.

15
Features at a Glance Administration On-the-fly’ configuration changes while recording is in operation. Create & name manual event buttons, up to 8 per camera, global (all cameras) or camera-specific. Hourly to daily database archiving options. (up to 24 archives per day) Archiving can be automatically moved to a network drive for more savings in storage capacity on the local server – with images still available transparently for playback. Option to hide Administrator button from other users. DNS support (Dynamic Name Server lookup). Licensing structure: Flexible multi-site, multi-server license charged per camera.
 or camera-specific. Hourly to daily database archiving options. (up to 24 archives per day) Archiving can be automatically moved to a network drive for more savings in storage capacity on the local server – with images still available transparently for playback. Option to hide Administrator button from other users. DNS support (Dynamic Name Server lookup). Licensing structure: Flexible multi-site, multi-server license charged per camera..")
23
Live Demo Milestone Administrator Milestone Administrator Milestone Monitor Milestone Monitor Web Server Web Server Live Feed Server Live Feed Server Remote Client Image Server Administrator Remote Client Image Server Administrator Remote Client Remote Client

24
Installing and maintaining an IP video surveillance system Physical Security Requirements Switch/Data cabinet security. Who can access your cabinets? Most cabinets have common keys that are shared amongst thousands of sites. Fibre / Cat 5 runs – are they secure, or can they be easily cut? Internal camera security – ensuring that your cameras don’t get bumped, unplugged, moved out of the way or stolen themselves.

25
Installing and maintaining an IP video surveillance system Network Requirements Cameras must be secured from general access. Default ports and username/password changed, and surveillance system installed on a dedicated VLAN to prevent users viewing the camera data Network reliability – if your network is unreliable, so is your IP Video surveillance system Quality of Service (QoS) inc 802.1p, 802.1q and 802.1D – make sure that the video cameras have priority over other applications (except VoIP) UPS and PoE – If your switches go out in a power outage, so do your cameras. Installation of UPS in every switch/data cabinet
 inc 802.1p, 802.1q and 802.1D – make sure that the video cameras have priority over other applications (except VoIP) UPS and PoE – If your switches go out in a power outage, so do your cameras. Installation of UPS in every switch/data cabinet.")
26
Installing and maintaining an IP video surveillance system Placing the Camera Sunlight – facing cameras into the sun results in a very poor image (seen as poor white balance and/contrast), so don’t position cameras looking directly into a window/door where the sun rises and sets. Some camera CCDs (especially cameras marked as internal use only) are easily damaged irreparably if the are continuously exposed to direct sunlight. Generally, it is best to place the camera in a corner covering the entrance to a room so that the camera can’t be tampered without seeing who approached it. Light levels – if recording at night is there enough light for a clear image? Is a sensor light required to illuminate at night? What is the minimum lux level for the camera being used in night-time conditions?
 are easily damaged irreparably if the are continuously exposed to direct sunlight. Generally, it is best to place the camera in a corner covering the entrance to a room so that the camera can’t be tampered without seeing who approached it. Light levels – if recording at night is there enough light for a clear image. Is a sensor light required to illuminate at night. What is the minimum lux level for the camera being used in night-time conditions .")
27
Installing and maintaining an IP video surveillance system Placing the Camera Cameras placed very high are great for corridors and cameras located outside covering wide areas as this gives a wide field of view Careful of placing cameras too high when you want facial shots for evidence, as the angle is too great. Mix the locations of your cameras around areas you want to protect. In the case of Abbotsleigh, this is a combination of staff and class rooms, corridors and outside areas. Determine which lens is needed for the camera (zoom, wide-angle, standard).
..")
28
Installing and maintaining an IP video surveillance system Placing the Camera Camera housings – Internal and External. www.communitech.com.au – Kaye Hillis www.communitech.com.au

29
Installing and maintaining an IP video surveillance system Using dummy cameras How do you prevent people from determining which cameras are real and which are not Be careful with delivery of dummy cameras Are your dummy cameras using mains power or batteries. What happens when the battery runs out, or when you remove a dummy camera for maintenance What to do when staff ask for video footage from a dummy camera Mix them up continuously

30
Where are we now? Since installation of Phase I, thefts of staff laptops dropped 95% and petty thefts in staffrooms and girl’s locker rooms have dropped significantly. Staff have now become very accustomed to Video Surveillance, and have asked for surveillance areas and times to be increased as they feel safer with cameras in operation. Cameras now record at all times, and live footage is only viewed when maintenance is being carried out on the system by IT staff. Recorded footage is only viewed when requested by the Headmistress, Head of Senior or Junior School, Director of IT or Bursar. Video Surveillance passwords are different to network passwords for security purposes.

31
Where are we now? Due to its success in reducing theft at Abbotsleigh, the Video Surveillance System is now at Phase III with 40 live cameras and 20 dummy cameras in operation. XProtect upgraded to Enterprise Edition with 64 camera licences – total purchase cost of XProtect to the school so far as been around $9,000 (less than the cost of the excess for one insurance claim). Abbotsleigh is purchasing no further dummy cameras, and is slowly replacing all dummy cameras with real ones. Camera housings are being slowly added to all Internal cameras. Current server is a dedicated dual P4 Xeon with 2GB RAM and a 300GB HDD SCSI data array which is 90% full. Video recording are kept for 14 days and fully backed every week, so all recordings can be retrieved from backup at any time.
. Abbotsleigh is purchasing no further dummy cameras, and is slowly replacing all dummy cameras with real ones. Camera housings are being slowly added to all Internal cameras. Current server is a dedicated dual P4 Xeon with 2GB RAM and a 300GB HDD SCSI data array which is 90% full. Video recording are kept for 14 days and fully backed every week, so all recordings can be retrieved from backup at any time..")
34
What camera to use? Abbotsleigh started with Axis 2100 cameras for internal and 2110 for external (both now obsolete), and we have been unhappy with the image quality over the long term, reliability, and have had issues getting cameras to keep focus. Sony SNC-CS3P cameras now preferred camera both internally and externally due to their superior image quality and focus, and their cost benefit over the Axis equivalent (Axis 210). Axis 2100 cameras being relocated to Internal areas where image quality is of lesser importance. Abbotsleigh has elected to not use cheaper cameras such as the DLink cameras for reliability and peace of mind purposes. However, our testing of these cameras have shown that they do provide a fairly good picture and would be an option if cost was a larger factor.
, and we have been unhappy with the image quality over the long term, reliability, and have had issues getting cameras to keep focus. Sony SNC-CS3P cameras now preferred camera both internally and externally due to their superior image quality and focus, and their cost benefit over the Axis equivalent (Axis 210). Axis 2100 cameras being relocated to Internal areas where image quality is of lesser importance. Abbotsleigh has elected to not use cheaper cameras such as the DLink cameras for reliability and peace of mind purposes. However, our testing of these cameras have shown that they do provide a fairly good picture and would be an option if cost was a larger factor..")
35
Questions?

36
Contact Details Jason Arruzza Education Consultant – ICT Across the Curriculum Level 4, 99 York Street, Sydney NSW 2000 Phone (02) 9299 2845 Fax (02) 9290 2274 Web aisnsw.edu.au Email jarruzza@aisnsw.edu.au ABN 96 003 509 073
 Fax (02) Web aisnsw.edu.au ABN")
Similar presentations