Download presentation
Presentation is loading. Please wait.

1
Solms & Hawes Halls Classroom Multimedia Systems Overview & Operations Guide

2
Large-Screen Projection for Tiered Lecture Halls Room #108 and #110 Each Lecture Hall has dual-projection screens and a single LCD Projector for display of ½” VHS video tape, DVD, and computer graphics and text.

3
Each Lecture Hall has the choice of using an AKG Wireless Handheld Microphone or an AKG Wireless Lavaliere Microphone for vocal amplification. Hand-Held Transmitter Body-Pack Transmitter Wireless VHF Receiver mounted in the equipment rack NOTE: THE CLASSROOMS DO NOT OFFER MICROPHONES FOR VOICE AMPLIFICATIONS

4
Each Lecture Hall has an A/V Cabinet that houses all the audio and video equipment. PANASONIC ½” VHS VCR W/S- VHS PLAYBACK PIONEER DVD PLAYER Plays back CD/CD-R/CD- RW (MP2) audio formats CRESTRON A/V CONTROL PROCESSOR EXTRON MULTIPLE INPUT MATRIX SYSTEM SWITCHER LOCKABLE STORAGE DRAWER FOR HOUSING LOOSE EQUIPMENT ETC. AKG VHF WIRELESS MICROPHONE RECEIVER SYMETRIX STEREO AUDIO MIXER PEAVEY STEREO POWER AMPLIFIER
 audio formats CRESTRON A/V CONTROL PROCESSOR EXTRON MULTIPLE INPUT MATRIX SYSTEM SWITCHER LOCKABLE STORAGE DRAWER FOR HOUSING LOOSE EQUIPMENT ETC. AKG VHF WIRELESS MICROPHONE RECEIVER SYMETRIX STEREO AUDIO MIXER PEAVEY STEREO POWER AMPLIFIER.")
5
All Lecture Halls and Classrooms offer two laptop computer inputs and one auxiliary video input to LCD projection system. The laptop connection to the LCD Projector is a VGA Input (15-pin HD) with Stereo (3.5mm Mini) Audio Input
 with Stereo (3.5mm Mini) Audio Input.")
6
The auxiliary video input plate to the LCD Projector offers one RCA Phono Jack for Composite Video sources (i.e. Doc Cam, Camcorder, Digital Cam with A/V output etc.) It also offers one 4-Pin MINI Din Jack for S-Video sources (i.e. Doc Cam, Camcorder w/S-Video output etc.) S-Video input Composite Video input RCA Phono audio inputs
 It also offers one 4-Pin MINI Din Jack for S-Video sources (i.e. Doc Cam, Camcorder w/S-Video output etc.) S-Video input Composite Video input RCA Phono audio inputs.")
7
High-Resolution XGA (1024x768 pixel) High Brightness (3300 ANSI lumens) LCD Projector suspended from the ceiling of each room. Sharp XG-P20X

8
Wireless Color LCD Touchpanel Remote Control Operates all Audio-Visual Equipment When you first touch the blank surface of the touch panel the “START PAGE” appears with AASU Logo. NOTE: This page also appears when system power is turned off. Touch the surface of the “START PAGE” and you will go directly to the “SYSTEM OPTIONS PAGE”

9
1 st DEPRESS System “POWER ON” to activate the equipment rack “ON”. 2 nd DEPRESS Projector “POWER ON” to activate the LCD Projector “ON”. NOTE: When you depress System “POWER OFF” the screens will raise and the LCD projector will be turned “OFF”

10
DEPRESS the “SOURCE MENU” button to select the equipment you want to operate. The “SOURCE MENU” will appear and provide you with the various choices of equipment you can operate during your presentation.

11
This is the “SOURCE MENU” as you can see you have various types of equipment and inputs to the LCD projection and sound system that you can utilize to present your information electronically to the students. NOTE: Only the Lecture Halls provide “Lighting” & “Screen” controls. The Classroom “SOURCE MENU” does not provide “Screen” or “Lighting” controls.

12
Select Source by depressing the surface of the touchpanel. Available sources for visual display: VCR DVD Computer– Input 1 Aux Computer – Input 2 Aux Video Available sources and/or inputs for audio playback: CD playback through DVD Player L/R Audio Inputs of AV-1 or AV-2 selection Color LCD Touchpanel Remote Control: A/V Equipment & Computer Source Select Page Note: Source is highlighted when selected by depressing touchpanel surface. When you depress the “VCR” button the “VCR Functions” will appear.

13
Color LCD Touchpanel Remote Control: VCR Function Page PLAY: Starts playback of ½” VHS/SVHS video tape. STOP: Stops playback of tape. PAUSE: Displays “still” framed image from video tape. FAST FORWARD: While in PLAY, FFWD provides high speed visual search. Depressed after STOPPING tape provides high speed forward advance of tape. REWIND: While in PLAY, REW provides high speed visual search. Depressed after STOPPING tape provides high speed reversal of tape. Note: Volume Control appears on all pages where it is required

14
Select Source by depressing the surface of the touchpanel. Available sources for visual display: VCR DVD Computer– Input 1 Aux Computer – Input 2 Aux Video Available sources and/or inputs for audio playback: CD playback through DVD Player L/R Audio Inputs of AV-1 or AV-2 selection Color LCD Touchpanel Remote Control: Source Menu Page When you depress the “DVD & CD” button the “DVD Functions” will appear. NOTE: The same function buttons can be used to operate CD playback when a Compact Disc is loaded into the DVD Player.

15
Color LCD Touchpanel Remote Control: DVD Function Page Note: Volume Control appears on all pages where it is required DVD PLAY: Starts playing the DVD selected. STOP: Stops playback of DVD. PAUSE: Displays “still frame” image from DVD. CHAPTER FWD: Advances DVD to next chapter or track. CHAPTER REV: Reverses DVD to previous chapter or track. MORE DVD CONTROLS: Used to display DVD Menu screen.

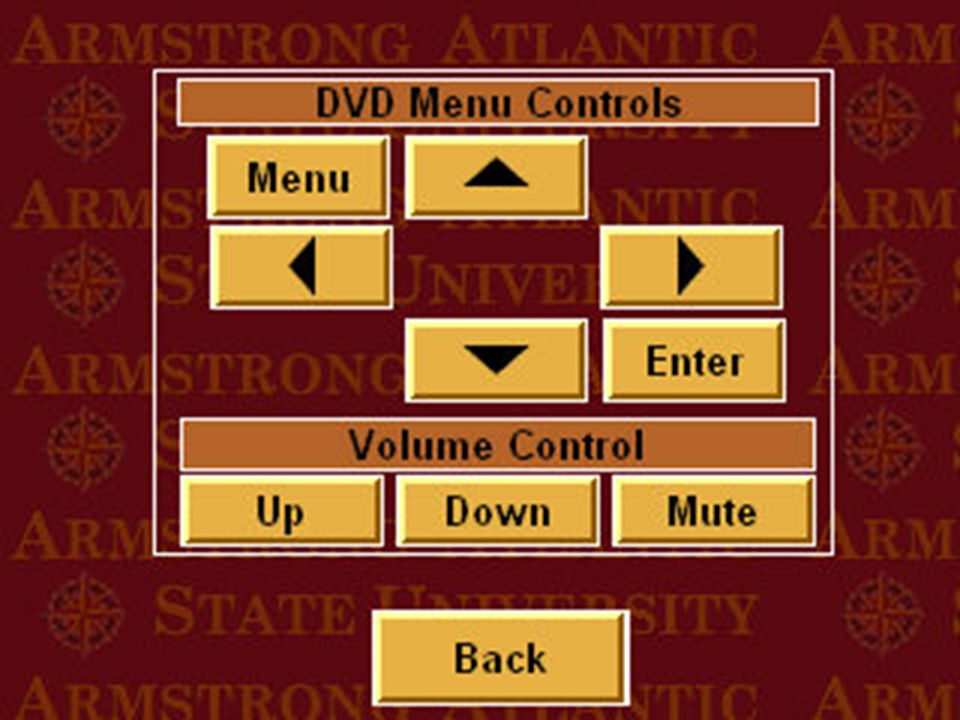
17
Color LCD Touchpanel Remote Control: DVD Menu Controls Page CURSOR BUTTON: Used to move through the options on menu screens. ENTER: Used to implement settings selected by cursor buttons. BACK BUTTON: Return to previous DVD Function page Note: Volume Control appears on all pages where it is required

18
Select Source by depressing the surface of the touchpanel. Available sources for visual display: VCR DVD Computer– Input 1 Aux Computer – Input 2 Aux Video Available sources and/or inputs for audio playback: CD playback through DVD Player L/R Audio Inputs of AV-1 or AV-2 selection Options Page Color LCD Touchpanel Remote Control: Source Menu Page When you depress the “OPTIONS” button the you will be returned back to the “SYSTEM OPTIONS PAGE”.

19
You can depress the “A-V SET-UP OPTIONS” button to perform the following functions: 1. MIC Volume --- Up/Down/Mute 2. Program Volume --- Up/Down/Mute

20
Note: Mic Volume only appears on Lecture Hall “A-V-Set-Up PAGE”

21
Color LCD Touchpanel Remote Control: “A-V-Set-Up PAGE” DEPRESS the “SOURCE MENU” button to Return to that Menu for source selection.

22
Depress the “COMPUTER” button to select which Computer Input (1 or 2) you want to connect your laptop to for display through the LCD projection system. Note: Lighting & Screen controls are only available in the Lecture Halls

23
When you depress the “Computer-1” or “Computer-2” button the system switches to that particular input jack for connection to the LCD projection system.

24
Depress the “Audio & Video” button to return to the selection of those types of inputs to the LCD projection and/or sound system

25
When you depress the “AV-1” or “AV-2” button the system switches to that particular input jack for connection to the LCD projection system.

26
Remember… when you depress the AV-1 or AV-2 button on the Touchpanel the system switches to the corresponding input plate and routes that selection to the LCD projection and/or sound system. The auxiliary video input plate offers two additional video and audio inputs to the LCD projection and sound systems. Aux Video (AV-1) is a 4-pin DIN S-Video jack and (AV-2) is an RCA phono jack for Composite video. RCA Phono Jacks for the left & right channel audio outputs of those same type sources. S-Video input Composite Video input RCA Phono audio inputs
 is a 4-pin DIN S-Video jack and (AV-2) is an RCA phono jack for Composite video. RCA Phono Jacks for the left & right channel audio outputs of those same type sources. S-Video input Composite Video input RCA Phono audio inputs.")
27
Depress the “Lighting” button to select the “LIGHTING PRESETS” page.

28
Choose the desired lighting preset or switch the lights off by depressing that particular button.

29
Depress the “Screen” button to select the “SCREEN CONTROLS” Page.

30
Once again you can return to the “Systems Options Page” by depressing the “Options” button.

31
Depress the “SYSTEM POWER” button to return to that Menu for powering the equipment “OFF”. DEPRESS the “SYSTEM HELP” button should you require technical assistance. HELPFUL HINT: When you depress System “POWER OFF” the screens will raise and the LCD projector will be turned “OFF”

33
System Overview for 1 st and 2 nd Floor Smart Classrooms and Computer Labs “FIRST THINGS FIRST”

34
System Overview for 1 st and 2 nd Floor Smart Classrooms and Computer Labs Each of these rooms has a manual pull-down screen

35
System Overview for 1 st and 2 nd Floor Smart Classrooms and Computer Labs Pull the screen all the way down and hold it in place until it locks in position.

36
System Overview for 1 st and 2 nd Floor Smart Classrooms and Labs Each room has an A/V Cabinet that houses all the equipment.

37
Steel A/V Cabinet houses all the audio and video source equipment. PANASONIC ½” VHS VCR W/S- VHS PLAYBACK PIONEER DVD/CD PLAYER CRESTRON A/V CONTROL PROCESSOR BEHIND SECURITY COVER EXTRON MULTIPLE INPUT AUDIO/VIDEO/DATA SYSTEM SWITCHER

38
System Overview for 1 st and 2 nd Floor Smart Classrooms and Computer Labs Each room has two laptop computer and one auxiliary video and audio input to the LCD projection & sound system.

39
Wall-Mounted Laptop Computer Input Plates, Auxiliary Video & Audio Input Plates Where there were existing concrete block walls these inputs are made available on a surface-mounted cable raceway.

40
Wall-Mounted Laptop Computer Input Plates, Auxiliary Video & Audio Input Plates Where “New” walls were built these input plates were mounted flush inside the wall.

41
High-Resolution XGA (1024x768 pixel) High Brightness (3300 ANSI lumens) LCD Projector
 High Brightness (3300 ANSI lumens) LCD Projector")
42
Wall-Mounted Satellite Speakers and Sub-woofer provide amplification of all program audio.

43
The same Crestron Wireless Color LCD Touchpanel Remote Control Operates all Audio- Visual Equipment.

Similar presentations


 Control.>")


 Help Desk CSITS Help Desk: (248) 370 2461 Emergency: (248) 370 3331 or 911 Key user information:>")


 1.>")
 Cinesonic Audio Visual Pvt. Ltd.>")