Download presentation
Presentation is loading. Please wait.

1
Chest X-ray Interpretation
Bucky Boaz, ARNP-C

2
Introduction Routinely obtained Pulmonary specialist consultation
Inherent physical exam limitations Chest x-ray limitations Physical exam and chest x-ray provide compliment In the United States, chest x-rays are routinely obtained for hospitalized adults. Pulmonary specialists will almost never provide a consultation without having seen a chest x-ray. In under developed countries chest x-rays are obtained very selectively and physicians rely mostly on physical exam and history for diagnosis. Physical examination of the chest has inherent limitations. Lesions located in the mediastinum, interstitium, and in the center of the lung are rarely picked up by physical exam. Ease of availability of chest x-ray has made many physicians avoid time consuming physical exam which in most cases fails to reveal all of the problems. As a result, physicians have lost the skill of physical exam. Just as physical examination has limitations, chest x-ray also has limitations, and it should be recognized that a normal chest x-ray does not rule out pulmonary problems. Interstitial, airway and pulmonary vascular disease in certain cases cannot be recognized by chest x-ray while it is easily evident on physical exam, e.g. asthmatics can have normal chest x-rays. Physical exam and chest x-ray provide a compliment of any information and they are not mutually exclusive. Physical exam in general is good for acute illness, while chest x-ray is better for chronic illness.

3
Essentials Before Getting Started
Exposure Overexposure Underexposure Sex of Patient Male Female Overexposure causes a film to be too dark. Under these circumstances, the thoracic spine, mediastinal structures, and retrocardiac areas are well seen, but small nodules and the fine structures in the lung cannot be seen. Underexposure causes the film to be quite white. This is a major problem for adequate interpretation. It will make small pulmonary blood vessels appear prominent and may lead you to think that there are generalized infiltrates when none is really present. The major difference between male and female chest x-rays is caused by differences in the amount of breast tissue. Breast tissue absorbs some of the x-ray beam, essentially causing underexposure of the tissues in the path. This is not a problem if the inferior aspect of the breasts is above the hemidiaphragms.

4
Essentials Before Getting Started
Path of x-ray beam PA AP Patient Position Upright Supine Chest x-rays on ambulatory patients are usually done with the patient’s chest up against the film holder. The x-ray tube is behind the patient, and the beam passes from the back and exits in front of the chest. This is referred to as a PA (posterior to anterior) projection. If the patient is lying down, it is standard practice to take an AP (anterior to posterior) chest x-ray. For interpretive purposes, the main difference is that the heart will be magnified on an AP projection. This is because in the AP projection the heart is farther from the film and the x-ray beam diverges as it goes farther from the tube. The amount of inspiration is greater in an upright film, which allows for spreading of the pulmonary vessels and allowing clearer visualization. Another reason for preferring upright films is that small pleural effusions tend to run down into the normally deep costophrenic angles. A patient lying down is unable to take a full inspiration; the liver and abdominal contents are pushing up on the lungs and heart, and the result is that the pulmonary vessels are crowded. On a supine film, the standard AP projection combined with the cephalic push of the abdominal contents will make a normal heart appear large.
 projection. If the patient is lying down, it is standard practice to take an AP (anterior to posterior) chest x-ray. For interpretive purposes, the main difference is that the heart will be magnified on an AP projection. This is because in the AP projection the heart is farther from the film and the x-ray beam diverges as it goes farther from the tube. The amount of inspiration is greater in an upright film, which allows for spreading of the pulmonary vessels and allowing clearer visualization. Another reason for preferring upright films is that small pleural effusions tend to run down into the normally deep costophrenic angles. A patient lying down is unable to take a full inspiration; the liver and abdominal contents are pushing up on the lungs and heart, and the result is that the pulmonary vessels are crowded. On a supine film, the standard AP projection combined with the cephalic push of the abdominal contents will make a normal heart appear large.")
5
Essentials Before Getting Started
Breath Inspiration Expiration The degree of inspiration is important not only for assessing the quality and limitations of the examination but also for diagnosing different diseases. When standing, most adults can easily take an inspiration that brings the domes of the hemidiaphragms down to the kevel of the tenth posterior ribs. When sitting down, often the level is between the eighth and tenth ribs. If the radiograph has the domes of the diaphragms at the seventh posterior ribs, the chest should be considered hypoinflated, and you need to be very careful before diagnosing basilar pneumonia or cardiomegaly.

6
Systematic Approach Bony Framework Soft Tissues Lung Fields and Hila
Diaphragm and Pleural Spaces Mediastinum and Heart Abdomen and Neck

7
Systematic Approach Bony Fragments Ribs Sternum Spine Shoulder girdle
Clavicles First, inspect the BONY FRAMEWORK of the chest You should be able to count and number the ribs, inspect the capulae, humeri and shoulders, and clavicles, and seethe diaphragms overlying the posterior aspects of the 10th or 11th ribs (in a normal adult)> The spine and sternum are generally difficult to visualize in detail on standard PA films due to overlying shadows.
> The spine and sternum are generally difficult to visualize in detail on standard PA films due to overlying shadows.")
8
Systematic Approach Soft Tissues Breast shadows Supraclavicular areas
Axillae Tissues along side of breasts Next, inspect the soft the SOFT TISSUES that overlie the thoracic cage Note the breast shadows,supraclavicular areas, axillae, and tissues along the sides of the chest.

9
Systematic Approach Lung Fields and Hila Hilum Lungs Blood vessels
Pulmonary arteries Pulmonary veins Lungs Linear and fine nodular shadows of pulmonary vessels Blood vessels 40% obscured by other tissue Examine the LUNG FIELDS and HILA The hilum ("lung root") is the shadow of pulmonary artery and vein adjacent the heart shadow. Normal lung markings are the linear and fine nodular shadows of pulmonary vessels. Abnormalities in the lung fields are marked by excessive radiolucency, excessive radiopacity, or opacified areas.
 is the shadow of pulmonary artery and vein adjacent the heart shadow. Normal lung markings are the linear and fine nodular shadows of pulmonary vessels. Abnormalities in the lung fields are marked by excessive radiolucency, excessive radiopacity, or opacified areas.")
10
Systematic Approach Diaphragm and Pleural Surfaces Diaphragm
Dome-shaped Costophrenic angles Normal pleural is not visible Interlobar fissures Next, examine the DIAPHRAGM and PLEURAL SURFACES Diaphragmatic images in the lung bases are dense, radiopaque shadows made principally by the liver on the left and the spleen on the right. The normal pleura is not visible on the chest x-ray, except where two layers come together to form the interlobar fissures.

11
Systematic Approach Mediastinum and Heart Heart size on PA Right side
Inferior vena cava Right atrium Ascending aorta Superior vena cava Finally, examine the MEDIASTINUM and and HEART Displacement of the mediastinum is an important clue to disease in on or the other hemithorax. On the PA chest film, the normal right heart and mediastinal border is made up (from bottom to top) of the 1) inferior vena cava; 2) the right atrium; 3)ascending aorta; and 4) superior vena cava. The normal left heart and mediastinal border consists (from bottom to top) of the 1) left ventricle; 2) left atrium; 3)pulmonary artery; 4) aortic arch; and 5) subclavian artery and vein
 of the 1) inferior vena cava; 2) the right atrium; 3)ascending aorta; and 4) superior vena cava. The normal left heart and mediastinal border consists (from bottom to top) of the 1) left ventricle; 2) left atrium; 3)pulmonary artery; 4) aortic arch; and 5) subclavian artery and vein.")
12
Systematic Approach Mediastinum and Heart Left side Left ventricle
Left atrium Pulmonary artery Aortic arch Subclavian artery and vein The normal left heart and mediastinal border consists (from bottom to top) of the 1) left ventricle; 2) left atrium; 3)pulmonary artery; 4) aortic arch; and 5) subclavian artery and vein
 of the 1) left ventricle; 2) left atrium; 3)pulmonary artery; 4) aortic arch; and 5) subclavian artery and vein.")
13
Systematic Approach Abdomen and Neck Abdomen Neck Gastric bubble
Air under diaphragm Neck Soft tissue mass Air bronchogram

14
Summary of Density Air Water Bone Tissue Tissue

15
Pitfalls to Chest X-ray Interpretation
Poor inspiration Over or under penetration Rotation Forgetting the path of the x-ray beam Poor inspiration results in high diaphragms and crowding of normal lung markings. Over- or under-penetration of the x-ray beam can obliterat or exaggerate important findings. On a properly-penetrated PA chest rafiograph, one can just make out the thoracic vertebrae overlying the image of the heart. Rotation from the true perpendicular on the PA chest film distorts normal structures. Check proper orientation by noting equal distances from the vertebral spines to the medial ends of the clavicles.

16
Lung Anatomy Trachea Carina Right and Left Pulmonary Bronchi
Secondary Bronchi Tertiary Bronchi Bronchioles Alveolar Duct Alveoli

17
Lung Anatomy Right Lung Left Lung Superior lobe Middle lobe
Inferior lobe Left Lung

18
Lung Anatomy on Chest X-ray
PA View: Extensive overlap Lower lobes extend high Lateral View: Extent of lower lobes

19
Lung Anatomy on Chest X-ray
The right upper lobe (RUL) occupies the upper 1/3 of the right lung. Posteriorly, the RUL is adjacent to the first three to five ribs. Anteriorly, the RUL extends inferiorly as far as the 4th right anterior rib The right upper lobe (RUL) occupies the upper 1/3 of the right lung. Posteriorly, the RUL is adjacent to the first three to five ribs. Anteriorly, the RUL extends inferiorly as far as the 4th right anterior rib.
 occupies the upper 1/3 of the right lung. Posteriorly, the RUL is adjacent to the first three to five ribs. Anteriorly, the RUL extends inferiorly as far as the 4th right anterior rib. The right upper lobe (RUL) occupies the upper 1/3 of the right lung. Posteriorly, the RUL is adjacent to the first three to five ribs. Anteriorly, the RUL extends inferiorly as far as the 4th right anterior rib.")
20
Lung Anatomy on Chest X-ray
The right middle lobe is typically the smallest of the three, and appears triangular in shape, being narrowest near the hilum The right middle lobe is typically the smallest of the three, and appears triangular in shape, being narrowest near the hilum.

21
Lung Anatomy on Chest X-ray
The right lower lobe is the largest of all three lobes, separated from the others by the major fissure. Posteriorly, the RLL extend as far superiorly as the 6th thoracic vertebral body, and extends inferiorly to the diaphragm. Review of the lateral plain film surprisingly shows the superior extent of the RLL. Posteriorly, the RLL extend as far superiorly as the 6th thoracic vertebral body, and extends inferiorly to the diaphragm. Review of the lateral plain film surprisingly shows the superior extent of the RLL; there is considerable overlap between the more anterosuperiorly located RUL and the RLL. Similarly, the deep posterior gutters extend considerably inferiorly; with full inspiration, the lower lobe can extend may as low as L2, becoming superimposed over the upper poles of the kidneys.

22
Lung Anatomy on Chest X-ray
These lobes can be separated from one another by two fissures. The minor fissure separates the RUL from the RML, and thus represents the visceral pleural surfaces of both of these lobes. Oriented obliquely, the major fissure extends posteriorly and superiorly approximately to the level of the fourth vertebral body. Grossly, these lobes can be separated from one another by two fissures which anatomically correspond to the visceral pleural surfaces of those lobes from which they are formed. The minor fissure separates the RUL from the RML, and thus represents the visceral pleural surfaces of both of these lobes. The minor fissure is oriented horizontally, extending ventrally from the chest wall, and extending posteriorly to meet the major fissure. Generally, the location of the minor fissure is approximately at the level of the fourth vertebral body and crosses the right sixth rib in the midaxillary line. The right major fissure is more expansive in size than the minor fissure, separating the right upper and middle lobes from the larger right lower lobe. Oriented obliquely, the major fissure extends posteriorly and superiorly approximately to the level of the fourth vertebral body. The major fissure extends anteroinferiorly, intersecting the diaphragm at the anterior cardiophrenic angle

23
Lung Anatomy on Chest X-ray
The lobar architecture of the left lung is slightly different than the right. Because there is no defined left minor fissure, there are only two lobes on the left; the left upper The lobar architecture of the left lung is slightly different than the right. Because there is no defined left minor fissure, there are only two lobes on the left; left upper

24
Lung Anatomy on Chest X-ray
Left lower lobes and left lower lobes

25
Lung Anatomy on Chest X-ray
These two lobes are separated by a major fissure, identical to that seen on the right side, although often slightly more inferior in location. The portion of the left lung that corresponds anatomically to the right middle lobe is incorporated into the left upper lobe. These two lobes are separated by a major fissure, identical to that seen on the right side, although often slightly more inferior in location. The portion of the left lung that corresponds anatomically to the right middle lobe is incorporated into the left upper lobe. It is important to understand that in most individuals, interlobar fissures are usually not completely formed; in some individuals there may be complete absence of a fissure thus losing the demarcation between lobes on gross examination. In general, fissures are not readily identifiable on plain films, with only small portions typically visualized at best. This is because fissures which are composed of only two layers of visceral pleura, may not present a significant radiographic interface and will not produce a shadow. However, if there is fluid within the pleural space or if the visceral pleura is thickened, fissures may be seen in their entirety.

26
The Normal Chest X-ray PA View: Aortic arch Pulmonary trunk
Left atrial appendage Left ventricle Right ventricle Superior vena cava Right hemidiaphragm Left hemidiaphragm Horizontal fissure

27
The Normal Chest X-ray Lateral View: Oblique fissure
Horizontal fissure Thoracic spine and retrocardiac space Retrosternal space

28
The Silhouette Sign An intra-thoracic radio-opacity, if in anatomic contact with a border of heart or aorta, will obscure that border. An intra-thoracic lesion not anatomically contiguous with a border or a normal structure will not obliterate that border.

29
Putting It All Together

31
Understanding Pathological Changes
Most disease states replace air with a pathological process Each tissue reacts to injury in a predictable fashion Lung injury or pathological states can be either a generalized or localized process Each tissue reacts to injury in a predictable fashion. Multiple etiology can evoke a similar pathological reaction. Let us just exam the pathological process that can occur in the lung. Lung injury or pathological states can be either a generalized or localized process.

32
Liquid Density Liquid density Increased air density Generalized
Localized Diffuse alveolar Diffuse interstitial Mixed Vascular Infiltrate Consolidation Cavitation Mass Congestion Atelectasis Localized airway obstruction Diffuse airway obstruction Emphysema Bulla

33
Consolidation Lobar consolidation:
Alveolar space filled with inflammatory exudate Interstitium and architecture remain intact The airway is patent Radiologically: A density corresponding to a segment or lobe Airbronchogram, and No significant loss of lung volume Consolidation: In the lobar consolidation, a lobe is involved. The alveolar space is filled with inflammatory exudate made up of WBC, bacteria, plasma, and debris. In Pneumococcal pneumonia, the most common cause for lobar consolidation, the lobe goes through red hepatization and gray hepatization stage. In the stage of resolution, some secretions can be in the airway. The interstitium and architecture of the lung remain intact and complete recovery occurs. The lobe swells up initially and may shrink slightly later if there is significant secretions in the airway causing some obstruction. The airway is patent. Radiologically this transcribes to: 1. a density corresponding to a segment or lobe 2. airbronchogram, and 3. no significant loss of lung volume.

34
Atelectasis Loss of air Obstructive atelectasis:
No ventilation to the lobe beyond obstruction Radiologically: Density corresponding to a segment or lobe Significant loss of volume Compensatory hyperinflation of normal lungs Atelectasis: Atelectasis means loss of air. In absorptive Atelectasis there is an obstructive lesion on the bronchus. There is no ventilation to the lobe beyond the obstruction. Gradually the air gets absorbed by pulmonary circulation. The involved lobe eventually is devoid of air and becomes atelectatic. Radiologic criteria for absorptive Atelectasis is 1. a density corresponding to a segment or lobe, 2. significant signs of loss of volume, and 3. compensatory hyperinflation of normal lungs.

35
Stages of Evaluating an Abnormality
1. Identification of abnormal shadows 2. Localization of lesion 3. Identification of pathological process 4. Identification of etiology 5. Confirmation of clinical suspension Complex problems Introduction of contrast medium CT chest MRI scan STAGES OF EVALUATING AN ABNORMALITY: In reading chest x-rays, I recommend that you do it in 4 steps: Step: 1. Identify the abnormal shadows 2. Anatomically localize the lesion 3. Identify pathological process 4. Identify the etiology Step 1: Identification of abnormal shadows You have to know what is normal before you recognize abnormalities. Let us identify the normal structures in the thorax (heart, aorta, pulmonary artery, lung fields, costophrenic angles, diaphragm, trachea, etc.). Which lung is larger? Which diaphragm is higher and why? What is the normal size of the heart? What is the normal size and shape of the aorta? You need to know normal and variations before you can detect and recognize abnormal shadows on chest x-ray.
. Which lung is larger Which diaphragm is higher and why What is the normal size of the heart What is the normal size and shape of the aorta You need to know normal and variations before you can detect and recognize abnormal shadows on chest x-ray.")
36
Putting It Into Practice

37
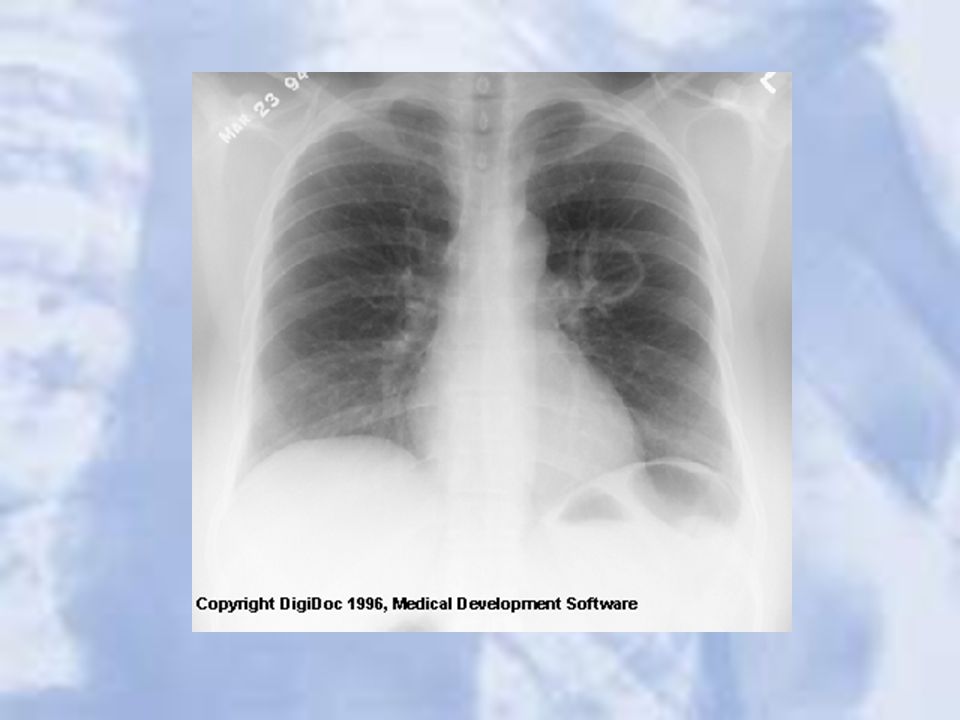
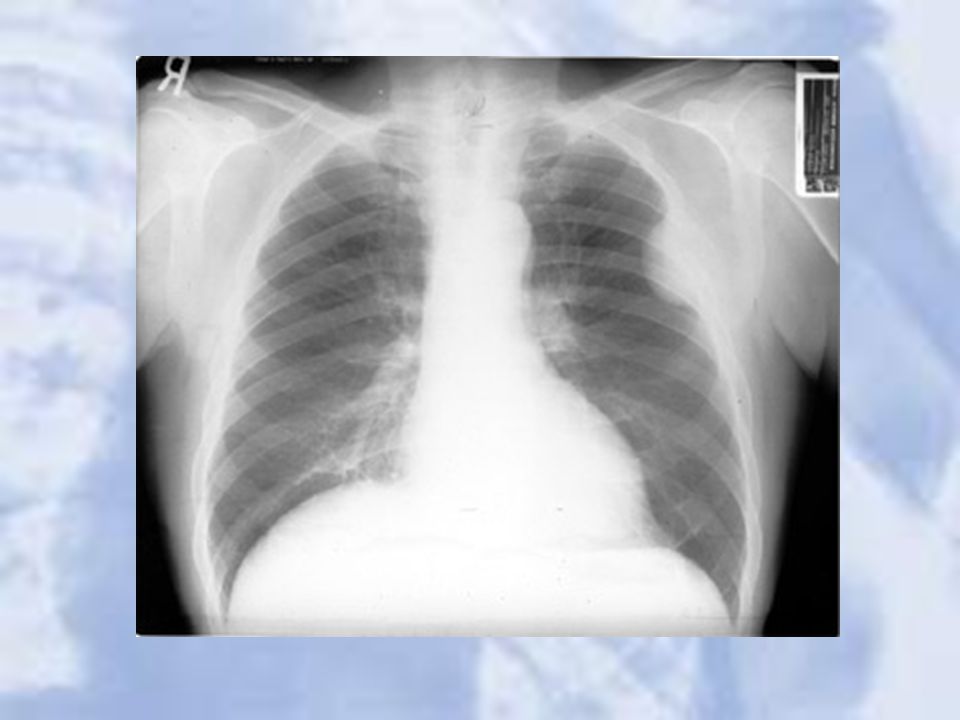
Case 1

39
A single, 3cm relatively thin-walled cavity is noted in the left midlung. This finding is most typical of squamous cell carcinoma (SCC). One-third of SCC masses show cavitation
. One-third of SCC masses show cavitation.")
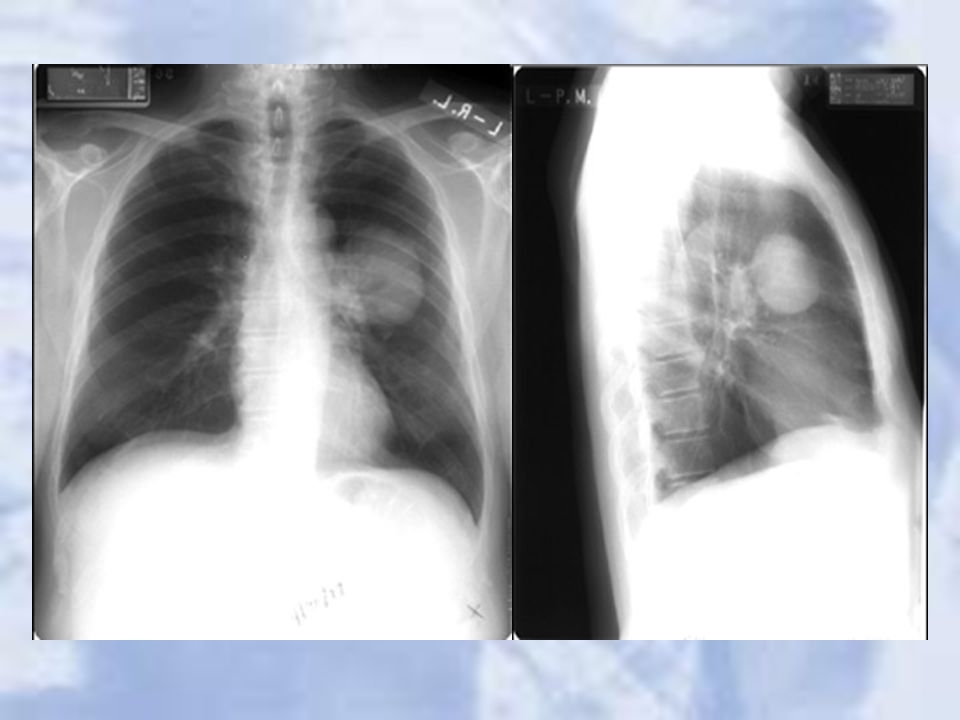
40
Case 2

42
LUL Atelectasis: Loss of heart borders/silhouetting
LUL Atelectasis: Loss of heart borders/silhouetting. Notice over inflation on unaffected lung

43
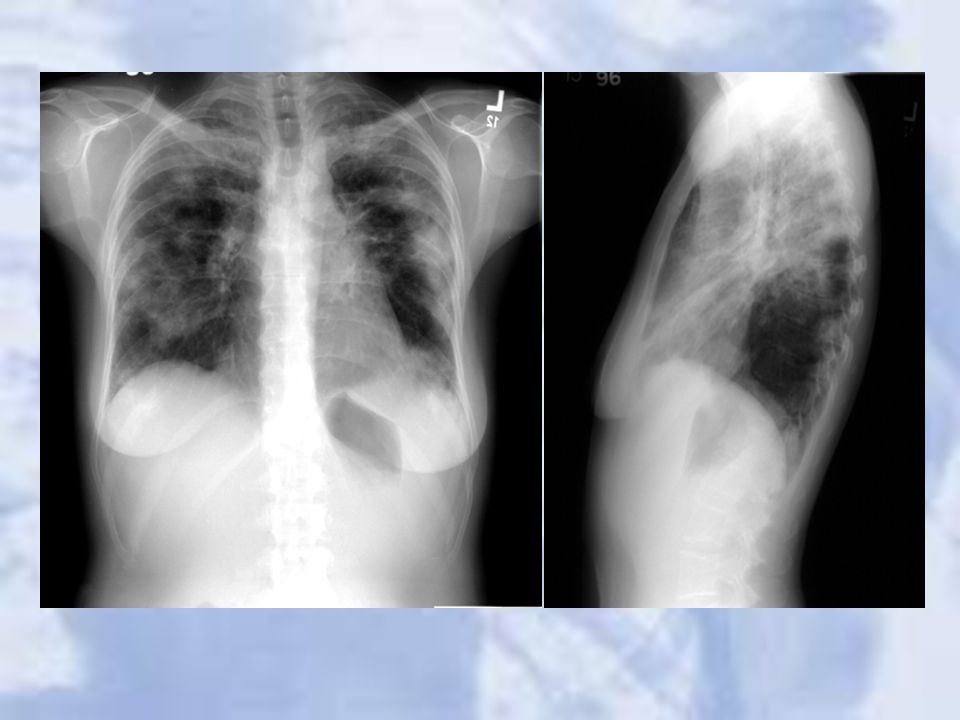
Case 3

45
Right Middle and Left Upper Lobe Pneumonia

46
Case 4

48
Cavitation:cystic changes in the area of consolidation due to the bacterial destruction of lung tissue. Notice air fluid level.

49
Cavitation

50
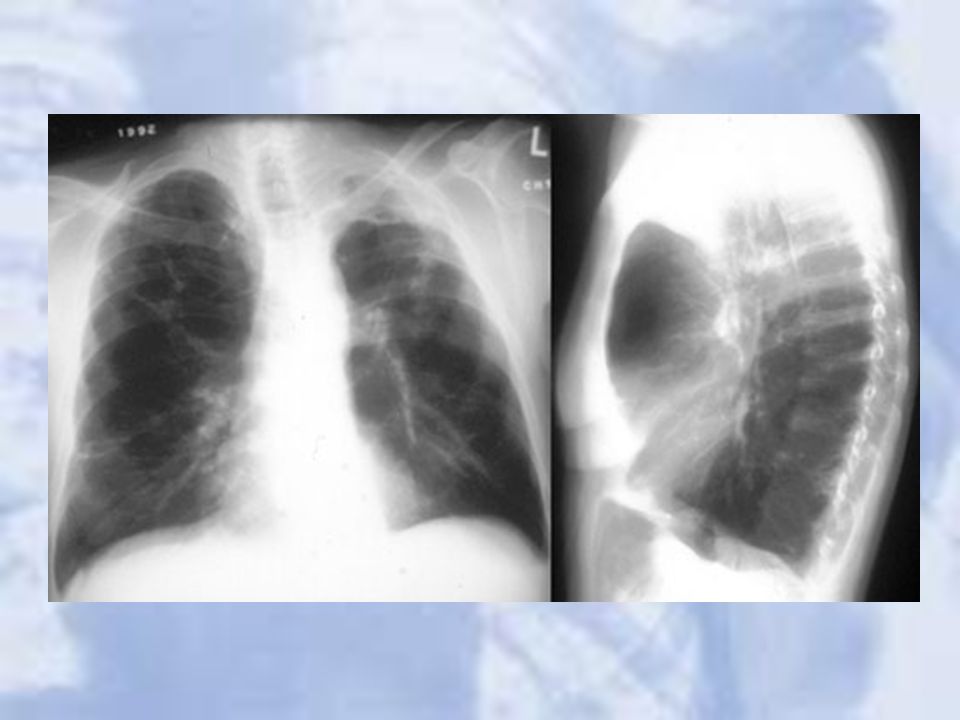
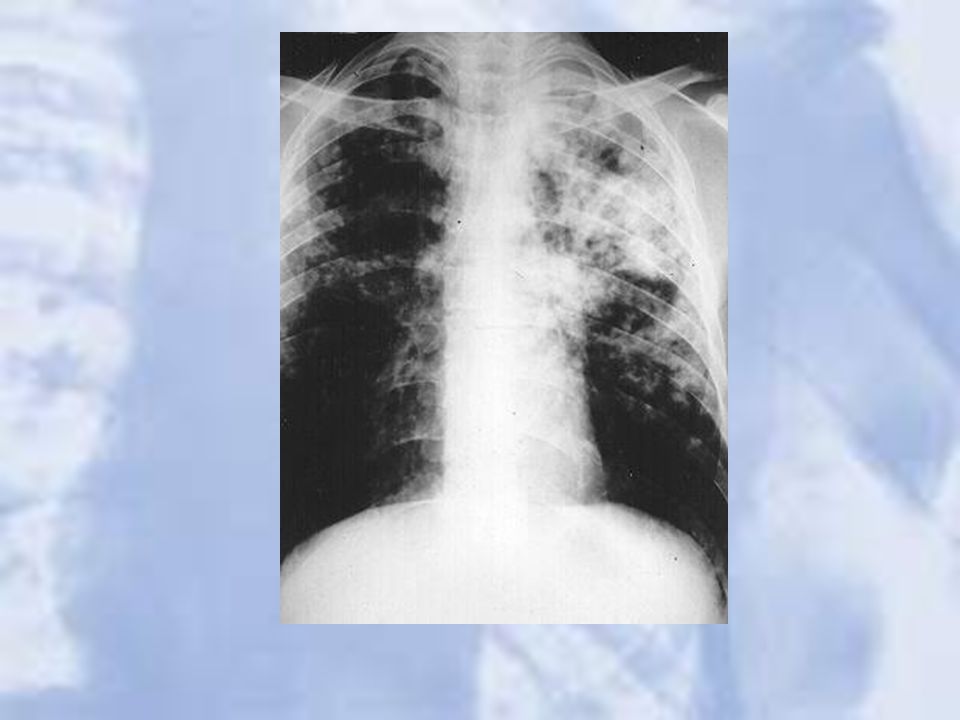
Case 5

52
Tuberculosis

53
Case 6

55
COPD: increase in heart diameter, flattening of the diaphragm, and increase in the size of the retrosternal air space. In addition the upper lobes will become hyperlucent due to destruction of the lung tissue.

56
Chronic emphysema effect on the lungs

57
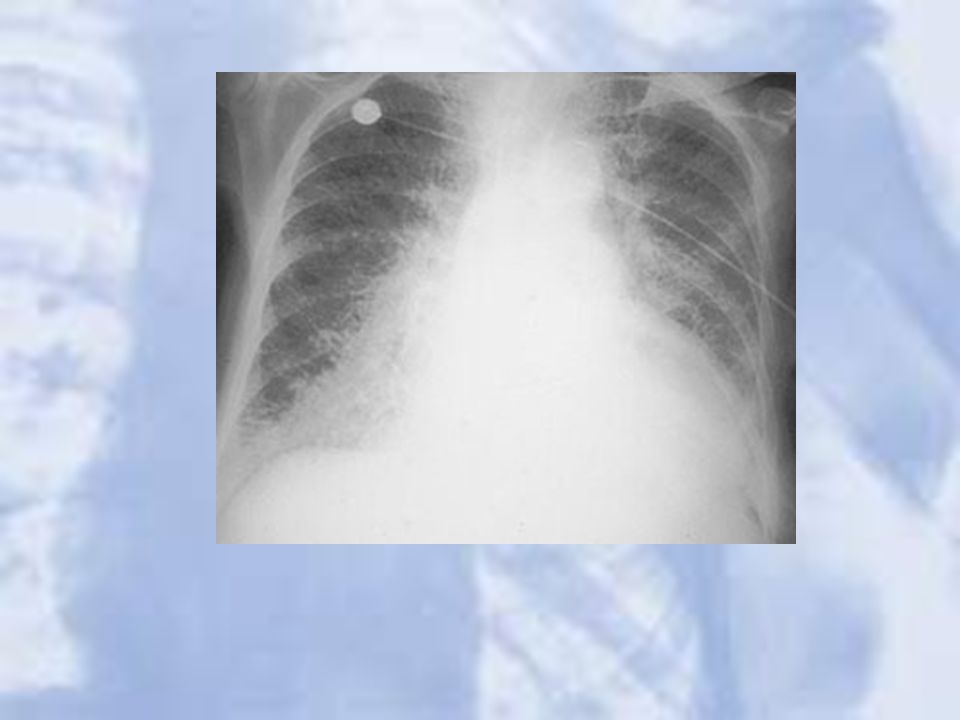
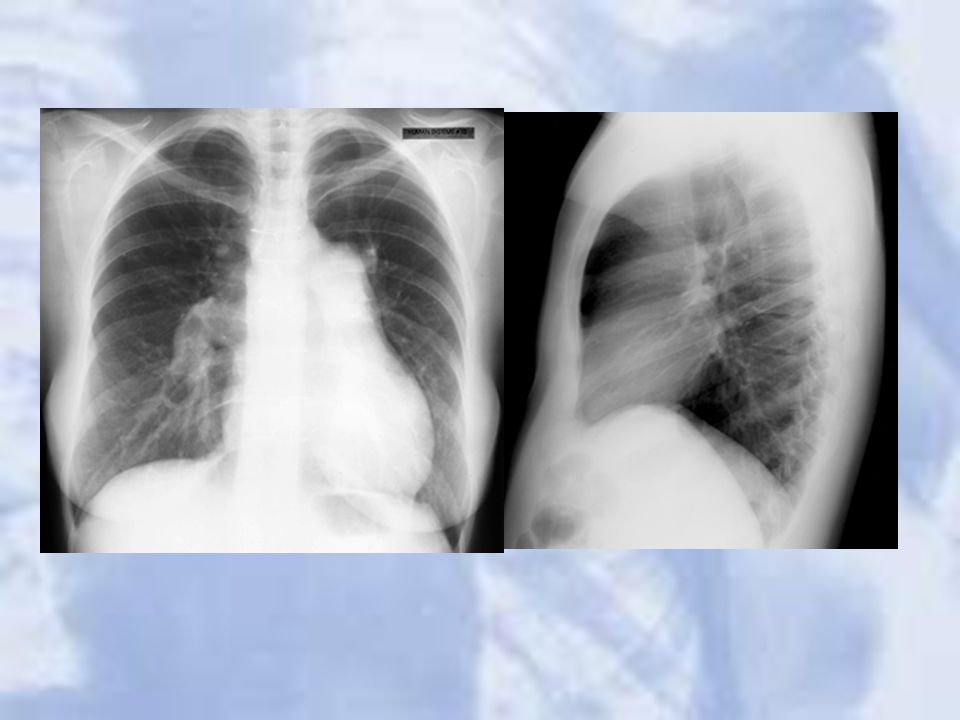
Case 7

59
Pseudotumor: fluid has filled the minor fissure creating a density that resembles a tumor (arrow). Recall that fluid and soft tissue are indistinguishable on plain film. Further analysis, however, reveals a classic pleural effusion in the right pleura. Note the right lateral gutter is blunted and the right diaphram is obscurred.

60
Case 8

62
Pneumonia:a large pneumonia consolidation in the right lower lobe
Pneumonia:a large pneumonia consolidation in the right lower lobe. Knowledge of lobar and segmental anatomy is important in identifying the location of the infection

63
Case 9

65
CHF:a great deal of accentuated interstitial markings, Curly lines, and an enlarged heart. Normally indistinct upper lobe vessels are prominent but are also masked by interstitial edema.

66
24 hours after diuretic therapy

67
Case 10

69
Chest wall lesion: arising off the chest wall and not the lung

70
Case 11

72
Pleural effusion: Note loss of left hemidiaphragm
Pleural effusion: Note loss of left hemidiaphragm. Fluid drained via thoracentesis

73
Case 12

75
Lung Mass

76
Case 13

78
Small Pneumothorax: LUL

79
Case 15

81
Right Middle Lobe Pneumothorax: complete lobar collapse

82
Post chest tube insertion and re-expansion

83
Case 16

85
Metastatic Lung Cancer: multiple nodules seen

86
Case 17

88
Right upper lower lobe pulmonary nodule

89
Case 18

91
Tuberculosis

92
Case 19

94
Perihilar mass: Hodgkin’s disease

95
Case 20

97
Widened Mediastinum: Aortic Dissection

98
Case 21

100
Pulmonary artery stenosis with cardiomegally likely secondary to stenosis.

101
Questions?

Similar presentations


 –Partial.>")


>")


