Download presentation
Presentation is loading. Please wait.

1
WHAT YOU NEED TO KNOW ABOUT WORKING IN A LAB- GENERAL LAB ORGANIZATION
Dr. Fern Tsien Department of Genetics LSUHSC

2
What type of laboratory do you work in?
In general, labs can be described as: Basic Science – the researchers do science for the sake of knowledge. For example, how does a specific transcription protein work ? Clinical research – human patients or their samples are used to investigate a disease or syndrome.

3
Where is your lab located?
Each lab is part of a Department or Center. Large pieces of equipment are often shared by the department members and are housed in a separate lab or possibly your lab. These can include ultra-cenrifuges, liquid nitrogen tank, autoclaves, dark rooms, etc. Also the department may have a conference room and a kitchen. Make sure you check if you can use these facilities before going ahead.

4
KNOW YOUR LAB COWORKERS

5
Principal Investigator (PI)
People often ask: Who is your PI? This is the head of the lab, the boss, your advisor. Most probably your mentor. This person often spends time in their office writing grants or research reports and may spend less time in the lab. If they are clinicians, they may also see patients in addition to report writing. However, this person is the intellectual guide behind most of the projects in the lab PIs are responsible for funding the lab research.

6
•I I

7
Post docs Lab Post-doctoral fellow
This person has recently received their doctorate (usually PhD) and is doing a training period before becoming a PI They usually work on their own project, but will collaborate with other lab members on various parts of the project.
 and is doing a training period before becoming a PI. They usually work on their own project, but will collaborate with other lab members on various parts of the project.")
8
Technician or research assistant
Can be a college student who wants to gain more experience in a lab before entering medical or graduate school Can be a professional with a masters degree and appropriate pay and title, based on years of experience They do a variety of tasks including: ordering lab supplies, preparing media, caring for the lab’s cell lines, assisting the lab with experiments, and they can carry their own experiments.

9
Lab supervisor The day-to-day operation of the lab is
sometimes overseen by a lab supervisor. This person usually has a masters degree and extensive lab experience.

10
their Masters degree or PhD.
Graduate students They are doing lab work to get their Masters degree or PhD. They usually work long hours and spend a lot of time invested in their specific project. They become increasingly independent during their 4-5 years in the lab.

11
Residents and fellows They have an MD and are spending some time (weeks, months, sometimes years) training in an area of his/her field before they become independent
 training in an area of his/her field before they become independent.")
12
Working hours Because experiments do not fit into a slot of 9-5, lab workers have unpredictable and sometimes eccentric hours. This does not apply to you! Clinical research also depends on the clinic schedule. Check with your mentor what working hours are expected of you and try to conform to this. Please communicate with your mentor and lab personnel what your vacation plans are. If you are sick, please let them know. Even though you do not get paid by the hour, you need to let them know out of courtesy.

13
Lab meetings Large labs usually have meetings to discuss the research of each member of the team. In these meetings, sometimes only one or two people are assigned to talk each week, or all members are expected to speak briefly. Some meetings are casual, and some are formal with a slide projector. You may be asked to participate. Ask your mentor ahead of time if he/she expects you to participate so you can prepare a few statements or questions you may have. Check out the atmosphere and ask questions during appropriate times. DO : take notes and look up terms you may not understand DO NOT: fall asleep, text message during the meeting

14
The first week By now you should have been assigned a desk
or lab bench. Your mentor should have discussed your project with you. If another lab member offers to teach you, go ahead and learn from them. You may get a lab key. Be careful with it! Your research may be slow right now while you wait for reagents to be ordered, cells to grow, etc.

15
What to do on the first few weeks
Set up and organize your lab bench or desk Introduce yourself to everyone in the lab if the mentor has not done so. TAKE NOTES ON EVERYTHING!You do not want your instructors to keep repeating themselves or they will get annoyed. Familiarize yourself with where things are kept. ASK. Of course, you do not want to bother anyone unnecessarily, but it is much better to ask about a procedure, a reagent, equipment, etc. than to wasted time and money. If you make a mistake, it’s OK. Just make sure you learn and ask coworkers for help. Ask your mentor for relevant literature about the project. This will impress them!

16
What NOT to do on your first few weeks
Don’t say “we did not do it this way in my previous job”. Each lab does experiments their own way (example: cell culture) Do not prop up your feet and read, play computer games, take a nap, or look at videos onYoutube. It is true that at the beginning, there will be some dead (non-experiment) time until the experiment takes off. However, playing while others are working hard will not make a good impression. Instead try to read about your research topic. Do not ask and/or complain to other students or co-workers about money or salaries. It can irritate mentors and other co-workers. Don’t say you are working in a lab for any other reason than for interest in the field. If you say you are working there just for the money, you will not be taken seriously and it can cost you your job.
 Do not prop up your feet and read, play computer games, take a nap, or look at videos onYoutube. It is true that at the beginning, there will be some dead (non-experiment) time until the experiment takes off. However, playing while others are working hard will not make a good impression. Instead try to read about your research topic. Do not ask and/or complain to other students or co-workers about money. or salaries. It can irritate mentors and other co-workers. Don’t say you are working in a lab for any other reason than for interest in the field. If you say you are working there just for the money, you will not be taken seriously and it can cost you your job.")
17
Basic survival rules: Attitude
Ask, do not command. Others are taking the trouble to help you and do not HAVE to do it. Be courteous to everyone, not just your mentor. Do not assume that someone is going to drop what they are doing to help you. Be patient. Write down everything when someone is giving you instructions. You are not expected to remember everything, and that person is not expected to repeat everything over and over again. Make appointments with busy people. Some mentors are also directors of a department or center, and are hard to know when they are available for them to focus on what you have to say.

18
Basic survival rules: Courtesy at the lab bench
Science Friction the lab bench Do not use reagents in someone else’s lab bench without asking. If everyone shares a reagent and you finish it, let someone know. Do not place the empty bottle back on the shelf. If something breaks, tell someone immediately.You will not get in trouble unless you try to hide it. If you do something wrong, confess. Everyone makes mistakes, but sneaking to cover a mistake is unacceptable. Clean up after the experiment. Do not leave it for the technician or graduate student to do it.

19
Check your lab’s own Safety rules
No eating, drinking, or smoking in the lab unless approved by your mentor. Do not wear open toed shoes in the lab. Your feet will be vulnerable if a chemical spills on you. No shorts or bare midriffs are allowed for safety reasons. Do not mouth pipet, even water. Ask what to do in case of emergency-where the first aid kit is kept, how to call for emergency

21
If you have any questions or problems, please make sure to let
us know early on in the internship. Dr. Paula Gregory Dr. Fern Tsien

22
TODAY’S EXPERIMENT

23
What are HeLa Cells? HeLa cells are cervical cancer cells that were
obtained form a woman named Henrietta Lacks. These cells were obtained from a biopsy of the cervix by her doctor without her knowledge/consent. The cells were immortalized. Henrietta Lacks

24
Immortalized cells and HeLa
HeLa cells obtained from the biopsy are still alive and have been useful in the understanding of cancer and disease, as well as discovery of treatments and therapy. HeLa was the first cell line immortalized Was used in the development of polio vaccine, and to find link between human papilloma virus (HPV) and cervical cancer
 and cervical cancer.")
25
The Immortal Life of Henrietta Lacks
by Rebecca Skloot Little was know about Henrietta Lacks until recently. Recently, R Skloot wrote the biography of Ms. Lacks: Poor African American woman from Baltimore Had 5 children Had cervical cancer Had little understanding of her diagnosis of cervical cancer, and no knowledge of what the doctor at Johns Hopkins was planning to do with her biopsy. Died of cancer in 1951 less than a year after diagnosis

26
Ethical implications Most widely used and propagated cell type used for research. Billions of dollars in treatment and therapy discoveries by researchers and pharmaceutical companies Last year, the National Institutes of Health (NIH) made an agreement with the Lacks family The Lacks family agreed to allow researchers to have limited access to her DNA sequence Lacks family has control over her information
 made an agreement with the Lacks family. The Lacks family agreed to allow researchers to have limited access to her DNA sequence. Lacks family has control over her information.")
27
New regulations Currently, there are specific regulations for ensuring patient confidentiality and to allow patients to give consent to use their cells for research. Cells are not allowed to be used for research without the patient consent.

28
and Access”; Statement released by the NIH
HeLa in the news “The HeLa Genome: An Agreement on Privacy and Access”; Statement released by the NIH HBO to film movie by Oprah Winfrey

29
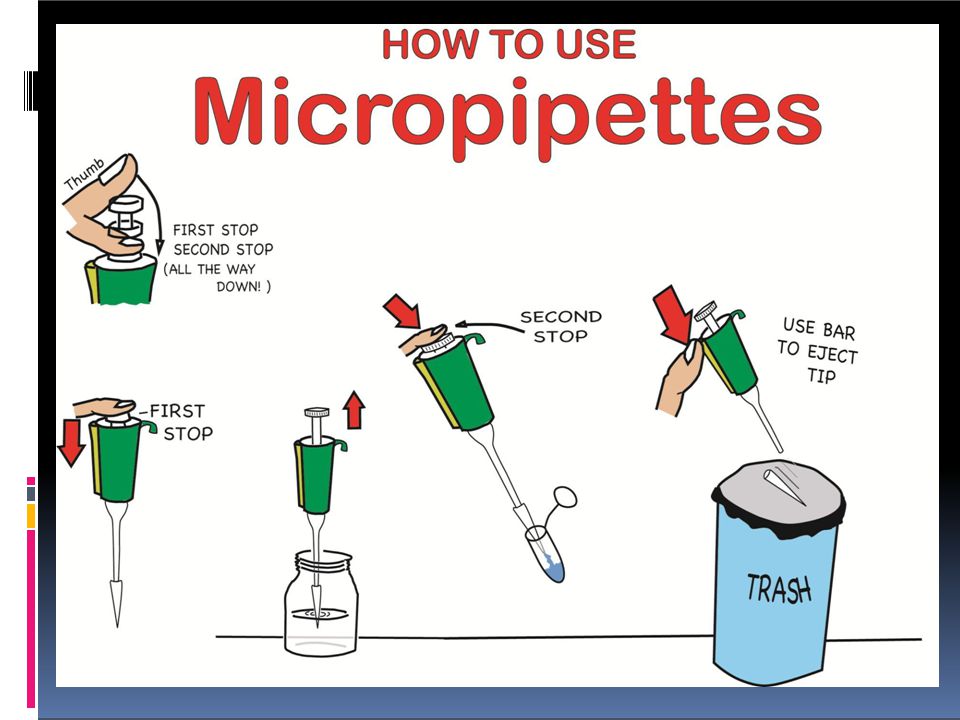
Today’s experiments: Learn how to micropipette HeLa and normal DNA
PCR analysis for the detection of human papilloma virus (HPV) Gel electrophoresis
 Gel electrophoresis.")
30
What is PCR? The polymerase chain reaction (PCR) is a fast technique used in many labs to "amplify“ or copy small segments of DNA. It is one of the most important scientific advances in molecular biology. Its creator, Kary B. Mullis, was awarded the Nobel Prize for Chemistry in 1993.

31
What is PCR used for? Once amplified, the DNA produced by PCR (PCR product) can be used in many different laboratory procedures. DNA fingerprinting in forensics and paternity testing Detection of bacteria or viruses (HIV/ AIDS) Diagnosis of genetic disorders Many types of research!
 Diagnosis of genetic disorders. Many types of research!")
32
PCR: Polymerase Chain Reaction
Used to make millions of exact copies of DNA from a biological sample Allows very small samples to be analyzed, such as a sample of a few skin cells Must be very careful about contamination in this process

33
Inside the PCR reaction tube:
DNA that you want to analyze Primers (little pieces of DNA that define the area that you want to analyze) Nucleotides (A, T, C, G) Taq polymerase (drives this entire reaction) Magnesium, salts, etc. (for solution stability) Sterile distilled water
 Nucleotides (A, T, C, G) Taq polymerase (drives this. entire reaction) Magnesium, salts, etc. (for solution stability) Sterile distilled water.")
34
The DNA is amplified millions of times in a PCR machine Millions of
DNA copies 95°C 45°C 72°C The PCR machine heats and cools the DNA, primers, and other reagents in the tube and allows the amplification to take place. This results in millions of copies.

35
EB DNA fragments move toward
1. Restrjction enzymes cleave DNA into smaJmer segments of various sizes. 2. DNA segments are loaded into wells in a porous gel. The gelfloats in a buffer solution within a chamber between two electrodes_ 3. wnen an electric current is passed through the chamber. EB DNA fragments move toward tile posilively--cilarged calhode. 111 I II I II 4 . SmallIer DNIA segments move faster and fa.riheir than larger DNA segments_

36
Variations of PCR and gel electrophoresis
RT-PCR Q-PCR Western blots Northern blots Etc….

37
THE MICROPIPETTE

39
warnings about gel electrophoresis:
THE POWER SUPPLY GENERATES AN ELECTRIC CURRENT. DO NOT IMMERSE YOUR HAND IN THE BUFFER OF THE GEL APPARATUS WHILE THE POWER SUPPLY IS CONNECTED AND TURNED ON. UV LIGHT DAMAGES EYES. MAKE SURE TO KEEP THE UV TRANSILLUMINATOR LID DOWN TO LOOK AT GEL. MAKE SURE NOT TO OPEN THE LID WHILE THE UV LIGHT IS TURNED ON.

40
Gel electrophoresis Remove the gel combs and dams.
Arrange gel on its gel tray into the gel electrophoresis apparatus, making sure that the negative side (black) is on the side with the wells. Add enough electrophoresis buffer to submerge the gel.
 is on the side with the wells. Add enough electrophoresis buffer to submerge the gel.")
41
Gel electrophoresis Retrieve the PCR reaction tubes from the PCR machine and microcentrifuge 5 seconds To each tube add 5 µl of loading dye to each sample. Mix by pipetting up and down. Load gel by pipetting 10 ul of the solution into each of the wells. Write down the order in which you loaded the samples.

42
Gel electrophoresis Attach the cover to the electrophoresis apparatus matching the color coded cables and electrodes (e.g., red to red and black to black). Connect the color coded cables to the power supply. Turn the power supply “ON” and set the voltage to “100V.” Press “RUN.” Look for bubbles to make sure it is working properly. Let samples until the loading dye has moved about ¾ of the way down the gel (about half an hour). Dr. Gregory’s presentation
. Connect the color coded cables to the power supply. Turn the power supply ON and set the voltage to 100V. Press RUN. Look for bubbles to make sure it is working. properly. Let samples until the loading dye has moved about ¾ of the way down the gel (about half an hour). Dr. Gregory’s presentation.")
43
Gel electrophoresis Turn off the power supply and remove cover of
electrophoresis apparatus. Wearing gloves, pick up the gel and tray and drain the liquid into the electrophoresis apparatus. Carefully transfer the gel on its tray to the UV transilluminator. Turn off the room lights. MAKE SURE THE LID TO THE TRANSILLUMINATOR IS CLOSED and then turn on the UV transilluminator. View the gel and photograph using a cell phone camera. Turn off the UV transilluminator, discard the gel in a waste bag provided by your teacher and wipe the transilluminator with paper towels.

44
Typical PCR Results 300 bp 200 bp

46
Housekeeping EATING and DRINKING are not permitted in labs that contain biological, chemical or radiological materials Dispose of trash in the appropriate container when it is generated to prevent accumulation Do not place empty bottles or other hazards in walkways Keep chemicals and glassware away from the edges of countertops Immediately clean up any spills Good Housekeeping Poor Housekeeping

47
Fire Safety Know the location of the nearest fire extinguisher and emergency exits During a fire, use stairs, not elevators Flame cabinet is required for storage of 10 Gal. or more of any flammable substance Compressed gas cylinders must be secured Electrical cords should be free of breaks or fraying In the event of an alarm: Secure any material that left unattended would pose a hazard Exit properly Acceptable Unacceptable Acceptable Unacceptable

48
Eyewash and Showers Know where the nearest eye wash and emergency shower stations are If you aren’t sure or don’t know how to use them, ask your supervisor

49
Hazard Information Be aware of hazard labels on entry doors and on the doors of refrigerators, freezers, microwaves and dewars You should be wearing the correct Personal Protective Equipment (PPE) before opening any door with a hazard label on it MSDS – Material Safety Data Sheets Include chemical and physical properties Toxicity and health effects Compatibility, safe handling and storage Spill and fire response
 before opening any door with a hazard label on it. MSDS – Material Safety Data Sheets. Include chemical and physical properties. Toxicity and health effects. Compatibility, safe handling and storage. Spill and fire response.")
50
An agent of biological origin that has the capacity to produce deleterious effects in humans, such as microorganisms, toxins and allergens derived from those microorganisms, and allergens and toxins derived from higher plants and animals. Examples Bacteria Fungi Parasites Prions Rickettsials Toxins Viruses

51
A/BSL-1 A/BSL-2 A/BSL-3 A/BSL-4 Examples
Low individual risk (non-infectious to healthy adults) Moderate individual risk (Not generally severe, High individual risk (Treatment may or Severe individual risk (Treatment often not available) treatment usually available) may not be available) Low risk to community Low risk to community Low risk to community High risk to community Examples E. Coli lab strains (e.g., DH5α, K12) Mice Rats Rabbits Human cells, fluids, tissues NHP cells, fluids, tissues Lentiviral vectors Rhesus Macaques Animals infected with some BSL2 agents M. tuberculosis West Nile virus Francisella tularensis Yellow fever virus Monkeypox virus Animals infected with BSL3 agents Ebola virus Lassa virus Marburg virus Animals infected with BSL4 agents
 Moderate individual risk. (Not generally severe, High individual risk. (Treatment may or. Severe individual risk. (Treatment often not available) treatment usually available) may not be available) Low risk to community. Low risk to community Low risk to community High risk to community. Examples. E. Coli lab strains. (e.g., DH5α, K12) Mice Rats Rabbits. Human cells, fluids, tissues. NHP cells, fluids, tissues Lentiviral vectors Rhesus Macaques Animals infected with some BSL2 agents. M. tuberculosis West Nile virus Francisella tularensis Yellow fever virus Monkeypox virus. Animals infected with BSL3 agents. Ebola virus Lassa virus Marburg virus. Animals infected with BSL4 agents.")
52
A/BSL-1 A/BSL-2 A/BSL-3 A/BSL-4 Lab coats, gowns, etc. Eye protection
Latex or nitrile gloves Lab coats, gowns, etc. Eye protection Latex or nitrile gloves Change when contaminated Double glove when necessary Remove gloves and wash hands after working Do not re-use gloves All manipulations performed inside a BSC Full protective clothing that must not leave the lab Eye protection Latex or nitrile gloves •BSL-3 work practices Appropriate respiratory protection All PPE indicated up to and including BSL-3 Positive-pressure suit Special facility engineering features

53
Laboratory has doors to limit traffic
Hand washing sink is available Work surfaces are easy to disinfect

54
Limit access when working
No eating, drinking, applying cosmetics or handling contact lenses No mouth pipetting Gloves must be worn and lab coats and protective eyewear are recommended Minimize splashes and creation of aerosols Disinfect waste and work surfaces Biological waste should be placed in a biohazard disposal box, labeled, and placed outside for pickup when ¾ full

55
All BSL-1 requirements, plus:
Autoclave is available Eyewash is present Signage is posted Biological waste stream is separate

56
All BSL-1 practices, plus:
A supervisor must limit access to those who are trained and approved Policy for handling sharps must be implemented Laboratory equipment must be routinely decontaminated Protective lab coats or disposable gowns must be worn Laboratory-specific Biosafety manual must be available in the lab

57
Hand Washing All laboratories are required to have a sink available for hand washing Wash hands for 15 seconds using warm water and mild – preferably liquid – soap Rinse with warm running water Dry with disposable paper towel

58
Hand Washing Alcohol-based hand sanitizers are an alternative to hand washing Sanitizers are effective against common clinical microbes, but have not been tested against laboratory pathogens Hand washing is preferred

59
outside of the work area
PPE Gloves Latex or nitrile gloves should be used for all handling of biological materials Double gloves may be needed in some circumstances in order to avoid exposure or contamination They type of gloves necessary and the frequency of changing is specific to your work and should be indicated in lab-specific training Gloves must never be worn outside of the work area

60
Eye and Face Protection
PPE Eye and Face Protection Wear protective eyewear when conducting procedures that have the potential to create splashes of microorganisms or other hazardous materials People who wear contact lenses should also wear eye protection At BSL2 and above, eye and face protection must be used for anticipated splashes and sprays of infectious materials when the microorganism is handled outside of a biosafety cabinet or other containment device

61
Sharps precautions Sharps are any instrument that can puncture, cut or scrape Use EXTREME caution when working with sharps Whenever possible, alternatives to sharps – such as plasticware – should be used When sharps are necessary, safety sharps should be selected whenever they are available

62
Work Practices Examples of Safety Sharps

63
Sharps precautions Sharps Disposal
Broken glassware must never be picked up by hand Pick up broken glass mechanically, using forceps, a brush and dustpan, tongs, etc Sharps Disposal Used disposable needles must not be bent, altered, broken, recapped, removed from disposable syringes, or otherwise modified Always dispose of contaminated sharps in an approved, puncture-resistant sharps container Dispose of container when it is ¾ full by sealing the container and placing in a biological waste box

64
Sharps Disposal Uncontaminated or decontaminated glass may be disposed of in a designated, labeled cardboard box Box should be sturdy and in good condition Take care not to overload the box – it should be kept to a reasonable weight, approximately 25 lbs.

65
Biological Waste Disposal
To be used for all items contaminated with human or animal blood, fluid or tissue Also stocks, cultures or waste from infectious materials or microorganisms All materials that may be contaminated with recombinant molecules Do not place sharps in the biological waste box. Sealed sharps containers only may be placed in the biological waste box When box is ¾ full or reaches 25 lbs. close and tie liner, securely close lid, label with PI name and room number and place in hallway for pickup

66
Disinfection and Decontamination
Disinfection is the process of reducing a contaminant load Can be accomplished in the laboratory using a 70% solution of ethanol (EtOH) or a 10% solution of bleach (sodium hypochlorite) All works surfaces and materials should be disinfected before and after use SOPs for routine decontamination are available at the Biological Safety page of the EH&S website
 or a 10% solution of bleach (sodium hypochlorite) All works surfaces and materials should be disinfected before and after use. SOPs for routine decontamination are available at the Biological Safety page of the EH&S website.")
67
Disinfection and Decontamination
Decontamination is the process of removing biohazardous agents Can be accomplished by physical or chemical means Is typically done using an autoclave, utilizing high temperature and pressure Aqueous solutions such as blood, urine, or microbial cultures must be autoclaved prior to disposal Place items in a secondary container made of stainless steel or autoclaveable plastic Larger loads require more time and should be arranged in a way that allows for steam penetration (i.e. not too densely packed) Do not cap vessels or add excessive liquid to the load
 Do not cap vessels or add excessive liquid to the load.")
68
Biological Safety Cabinets (BSCs)
Uses High Efficiency Particulate Air (HEPA) filters Does not protect against vapor or fumes, which may damage HEPA filters Class I: Inward airflow protects personnel Exhausts to outside Class II: Four different types Protects personnel, materials and environment with directional airflow and multiple HEPA filters, as pictured Class III: Both inlet and exhaust air are HEPA filtered (pictured)
 filters. Does not protect against vapor or fumes, which may damage HEPA filters. Class I: Inward airflow protects personnel. Exhausts to outside Class II: Four different types. Protects personnel, materials and environment with. directional airflow and multiple HEPA filters, as pictured. Class III: Both inlet and exhaust air are HEPA filtered (pictured)")
69
Laminar Flow Hood Is not a BSC and does not provide personnel protection Typically used for nucleic acid manipulation or other procedures that are very sensitive to contamination, but that do not pose a risk to personnel Air flows out toward the user Not to be used for work with infectious or potentially infectious materials

70
Chemical Fume Hood Is not a BSC but does provide personnel protection from chemical fumes by external ventilation Is not HEPA filtered Not to be used for work with infectious or potentially infectious materials Exhaust containing infectious materials creates an exposure risk for the immediate environment

71
Safe Operation of BSCs Disinfect cabinets before and after each use with 70% ethanol or 10% bleach solution After disinfecting the cabinet, load supplies and allow the cabinet to run for minutes before beginning work Supplies should include a small autoclave bag, sharps container and beaker with disinfectant for liquid waste Your BSC should have a current certification label

72
Safe Operation of Centrifuges
Check tubes for cracks, leaks or chips Use matching sets of tubes and buckets to ensure that the centrifuge is properly balanced Check that tubes and cups are sealed and that the rotor is locked and buckets are properly seated Close lid firmly When the cycle is finished, allow the rotor to come to a complete stop before opening lid

73
(LN2) is extremely cold, -320Fº
Displaces oxygen Expands rapidly Protect eyes and skin with goggles, gloves and shoes Do not allow LIN to touch bare skin; it will burn Do not seal containers Take care when transferring liquid or transporting containers

74
Bloodborne Pathogens Bloodborne Pathogens
pathogenic microorganisms present in human blood and other body fluids that can cause disease in humans, including hepatitis B virus (HBV), hepatitis C virus (HCV), and human immunodeficiency virus (HIV). Other Potentially Infectious Material (OPIM) materials other than human blood that can contain bloodborne pathogens and may potentially be infectious includes HIV-containing cell or tissue cultures or organ cultures and HIV- or HBV-containing culture medium or other solutions Universal Precautions blood and certain body fluids of all patients are treated as potentially infectious All research involving the use of human blood, body fluids, and OPIM is carried out using BSL2 practices and procedures, because it is unknown if these materials contain bloodborne pathogens
, hepatitis C virus (HCV), and human immunodeficiency virus (HIV). Other Potentially Infectious Material (OPIM) materials other than human blood that can contain bloodborne. pathogens and may potentially be infectious. includes HIV-containing cell or tissue cultures or organ cultures and HIV- or HBV-containing culture medium or other solutions. Universal Precautions. blood and certain body fluids of all patients are treated as potentially infectious. All research involving the use of human blood, body fluids, and OPIM is carried out using BSL2 practices and procedures, because it is unknown if these materials contain bloodborne pathogens.")
75
An exposure is contact with blood or other infectious or potentially infectious materials
For example, needlesticks or scrapes and cuts with contaminated sharps If you’re not sure if you’ve had an exposure, check for punctures in your glove. If the glove is broken, assume an exposure has occurred Contact with broken skin through cuts or rashes Splashes to the eyes, nose or mouth

76
If you have an exposure:
Stop what you are doing Thoroughly wash the affected area with soap and warm water for 15 minutes using a massaging motion For eye splashes, go to the nearest eyewash station and rinse with plain water for 15 minutes If you need medical attention: Call 911and tell the operator your location, name, nature of the injury Then call the University Police at After receiving the needed medical attention: Notify your supervisor Contact the Department of Human Resource Management at

77
Biological Spill Response
Alert others in the area, including your supervisor Put on appropriate PPE, then Cover the spill with paper towel(s) Disinfect by pouring a disinfectant around the perimeter of the spill and allowing to stand for 20 minutes Clean by wiping up with paper towel(s) Disinfect by spraying and wiping down with disinfectant and paper towel If you are unsure of what to do or uncomfortable performing the clean-up, or if the spill is larger that you can respond to, call the University Police at
 Disinfect by pouring a disinfectant around the perimeter of the spill and allowing to stand for 20 minutes. Clean by wiping up with paper towel(s) Disinfect by spraying and wiping down with disinfectant and paper towel. If you are unsure of what to do or uncomfortable performing the clean-up, or if the spill is larger that you can respond to, call the University Police at")
78
If you have any questions or concerns, please contact Department of Environmental Health & Safety
LSUHSC: Phone: (504) Emergency:
 Emergency:")
79
RECORD KEEPING AND HIPAA
HOW TO MAINTAIN A LAB NOTEBOOK- RECORD KEEPING AND HIPAA Fern Tsien, PhD Department of Genetics LSUHSC

80
Type and Format Check with your mentor if he/she requires a specific format depending on the type of research you are doing Bound book Loose leaf sheets and folders Computer/spread sheet Keep a separate file for printouts, photographs, X-rays, and anything that cannot be taped on to the notebook.

81
Content Every page should include:
Date of the start of the experiment on every page (including year) Brief title of experiment or type of clinic Statement of purpose: extension of the title with some basic background information
 Brief title of experiment or type of clinic. Statement of purpose: extension of the title with some basic background information.")
82
Content, continued Every page should also include:
Description of experiment (protocol) List of patients seen (if there is private information such as names, etc. keep this notebook locked- more on this later) At the end of the entire day, a summary of what you accomplished. Did the experiment work? How can you correct it? Is there any information that you need to look up?
 List of patients seen (if there is private information such as names, etc. keep this notebook locked- more on this later) At the end of the entire day, a summary of what you accomplished. Did the experiment work How can you correct it Is there any information that you need to look up")
83
Try to record everything-you will not be able to remember
Where things are kept Serum lot number Antibody titer Centrifuge speed, model, temperature Incubation times and temperatures Number of cells Agarose or acylamide percentage of a gel Cell culture conditions Calculations Buffer pH Who is in charge of each large equipment (autoclave, etc.)
")
84
Maintenance Record everything as soon as you can. Do not wait
until the end of the week to record data. Attach all data, printouts, and X-rays to the appropriate experiments. If they don’t fit, put away everything in a file, properly labeled. Make tables and graphs. This will help you and your mentor analyze the data. It can also be used for lab meetings and your final presentation. Make a plan for the following week. Think about what the data means and what you need to do next. Ask for help to interpret the data before continuing with the experiment.

85
Notebook Ethics The lab notebook belongs to the lab. This means that your mentor will read it, so do not put anything too personal or embarrassing. Do not “peek” at another lab member’s notebook without asking first. Only you and your mentor should have access to it. Do not be offended if the mentor looks at your notebook. He/she needs to look at it sometimes to help troubleshoot an experiment.

86
Notebook Ethics, cont. Do not dispose of old notebooks you find in the lab, data found in a drawer or on the computer. If you made a mistake or if you get negative results, record this. Do not be embarrassed and omit recording the data. Your data is your responsibility. Record it accurately and responsibly.

87
HIPAA Health Insurance Portability and Accountability Act
Federal law passed by Congress in to ensure patient confidentiality Regulations enforced by the US Dept of Health and Human Services Guidelines implemented in April, 2003 What part do students play in implementing HIPAA? How does this law affect your role as a student?

88
HIPAA regulations were designed to:
protect individuals’ rights to privacy and confidentiality and assure the security of electronic transfer of personal information

89
Working with patient data
Only the people in your lab or clinical group can discuss the patients or their data. Take all reasonable steps to make sure that individuals without the ‘need to know’ do not overhear conversations. DO NOT conduct discussions with patient names in elevators or cafeterias. Do not let others see your computer screen while you are working on patient data. Be sure to log out when done with any computer file.

90
HIPAA applies to us all--in all settings
That means do not discuss patient names at school, at home, on the shuttle buses, as well as the hospitals and clinics. If you recognize someone in the clinic ( even if it is your best friend), or see a name you recognize in the research or clinical database, keep it to yourself!!!
, or see a name you recognize in the research or clinical database, keep it to yourself!!!")
91
Why HIPAA? Genetic advancements - as more is known about our genetic predisposition to diseases, HIPAA will ensure that, for example, an individual is not denied insurance because the company knows that she may eventually develop cancer. Marketing - as information is more easily captured concerning, for example, the prescriptions we purchase, HIPAA is designed to prevent marketing of unsolicited products or services based on harvested marketing data. Technology - as information is quickly and sometimes loosely moved around networks, HIPAA standards will hold violators accountable for accidental or intentional ‘interception’ of protected health information (PHI).
.")
92
Why HIPAA? The late tennis star Arthur Ashe’s positive HIV status was disclosed by a healthcare worker and published by a newspaper without his permission.

93
HIPAA Regulations Give patients more control over their health information. Set boundaries on the use and disclosure of health records. Establish appropriate safeguards for all people who participate in or are associated with the provision of healthcare to ensure that they honor patients’ rights to privacy. Hold violators accountable through civil and criminal penalties. Strike a balance when public responsibility requires disclosure of some forms of data--for example, to protect public health.

94
Conclusions Write down everything! Maintain good notes!
Protect patient data!

Similar presentations


>")


: To review and summarize laboratory safety concepts and laboratory practices.>")


