Download presentation
Presentation is loading. Please wait.

1
NIMAC 2.0 Basics for AUs: Searching, Downloading, and Assigning Files 1www.nimac.us

2
In this PowerPoint: We will cover how to use the Search interface in the NIMAC Authorized User portal to: – Search for files in the NIMAC – Download files – Assign files to registered Accessible Media Producers 2www.nimac.us

3
NIMAC Login Screen: https://secure3.overdrive.com/NIMAC/NIMAC_Login.aspx

7
Search Page Display Clicking the Search tab brings up a display of: – All Certified files in the NIMAC – A Quick Search box – And button to go to the Advanced Search

9
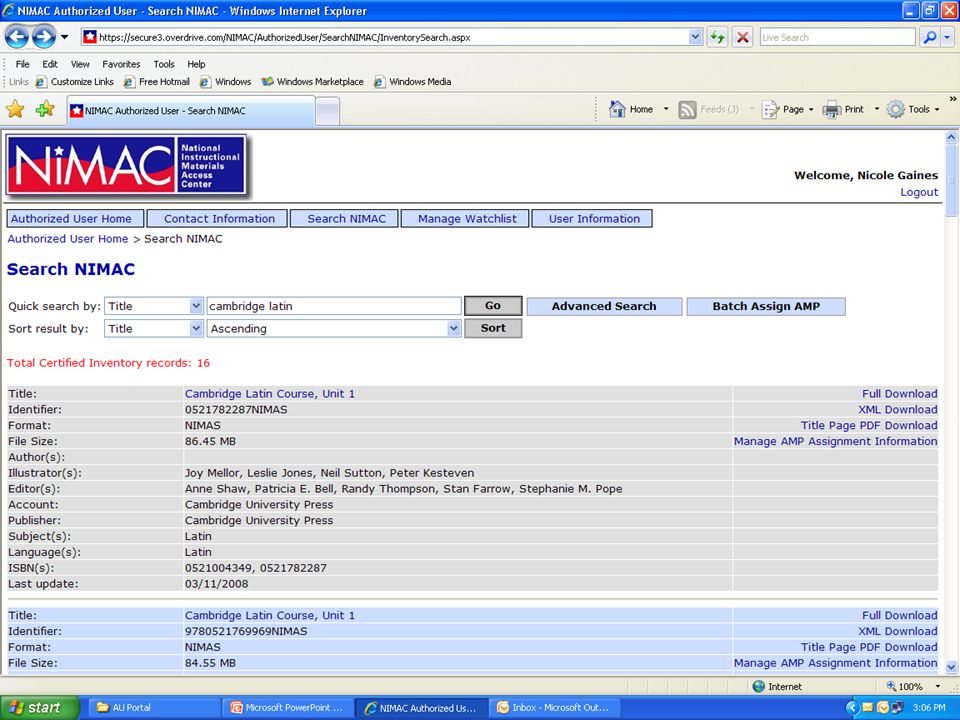
NIMAC Search Screen From the main screen, the user can page through the inventory, perform a Quick Search, or go to the Advanced Search screen. Your best search is a Quick Search by the ISBN of the student edition. We strongly recommend this as the most reliable search for finding the exact book you need.

12
Quick Search Options The default Quick Search is by ISBN. Other Quick Search options include: Title, Publisher, and Identifier.

14
Advanced Search The Advanced Search button is located to the right of the Quick Search. Clicking the button will take you to a detailed search page. A wide range of searchable fields are available.

18
Advanced Search Tips Remember: Less is better! The more search terms you use, the narrower the search results will be. We always recommend searching by student edition ISBN if possible. If you do not have the ISBN, search by a key word or phrase from the title. Add additional search terms only if you need to further limit your search results.

19
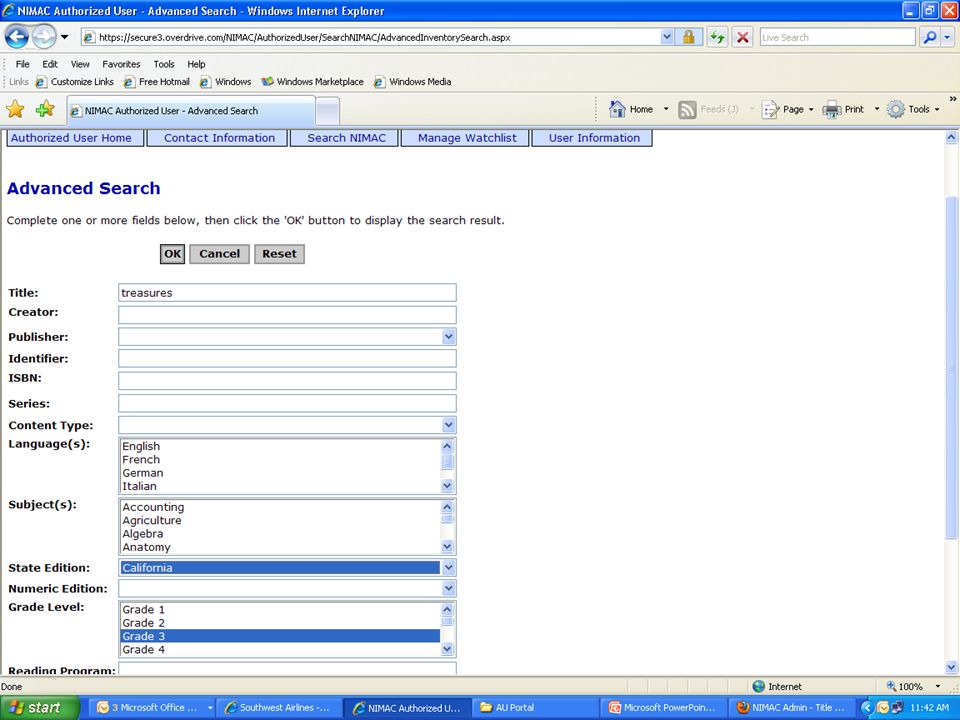
Advanced Search Example Lets say the user is looking for the California edition of the Treasures Practice Book for a third grade student. We will show an Advanced Search for: – Treasures in Title – California in State Edition – Grade 3 in Grade Level

23
What if you dont find the file you need? Feel free to contact the NIMAC for assistance. We are happy to follow up with publishers to try to expedite files that publishers have in conversion. You can also add the ISBN to your Watchlist to receive notification when the file is available. For more information, download the Watchlist presentation from the Support tab or our web site (www.nimac.us).www.nimac.us

24
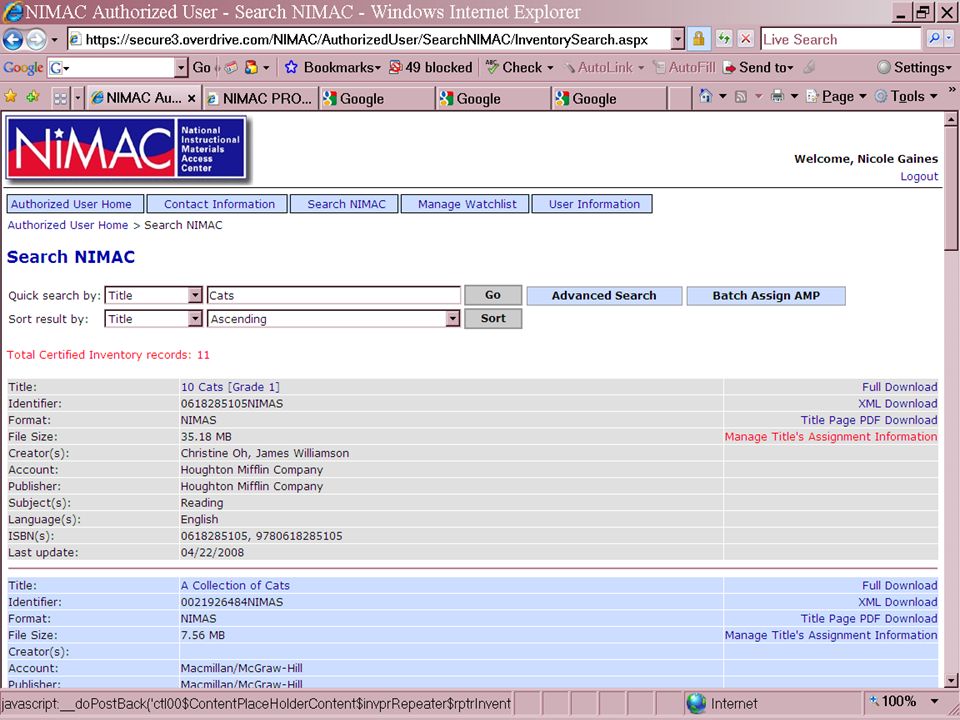
Download Option Links After performing either an Advanced or Quick Search, you will see the brief search results. To the right of the brief results, you will see the download options for the file set.

26
Downloading There are two file set download options: – XML download (which does not include images) – Full Download (which does contain images) The XML download is much smaller and will download faster. If you dont need the images for your conversion, choose this option. If you do need the images, choose the Full Download option.

27
Title page PDF download You can also choose to download and view just the title/copyright page PDF if you want to ensure you have located the correct book before downloading the file set. Note: The title/copyright page PDF is provided for file verification purposes only. The NIMAC does not receive or distribute any books in PDF format.

30
Downloading the NIMAS File Set Just choose the download option you want. The system will take you to a click-through Limitation of Use Agreement. Scroll down and click the I agree link at the bottom of the page.

34
The Download Process The file will then be fingerprinted and watermarked. After that has completed, you will be prompted to choose where you want to save the file on your computer. You can also rename the file at that time if you would like a file name other than the NIMAS Identifier.

39
Full Record Display In addition to the brief display of search results, the user also has the option to view a more complete bibliographic record for a file. Clicking on a title in the search results will take you to the full record display. Additional information includes such information as state edition, series, subjects, and source book pagination, if available.

43
Assigning Files to an Accessible Media Producer In addition to directly downloading files, Authorized Users can also assign files to be downloaded by Accessible Media Producers (AMPs) registered with the NIMAC. This option is provided for your convenience so that you do not have to download and ship the files to your AMP.

44
AMP Registration with NIMAC Registering with the NIMAC as an AMP is free and voluntary. Registration is not an endorsement by the NIMAC, and AUs should make any necessary business arrangements with the chosen AMP before assigning files to them.

45
What if the AMP I want to use isnt registered with the NIMAC? In this case, you have two options: – You can download the file and ship the file to the AMP. – Or, you can encourage the AMP to go online and register an account with us. – Just call or send us an email and we will send the registration link.

46
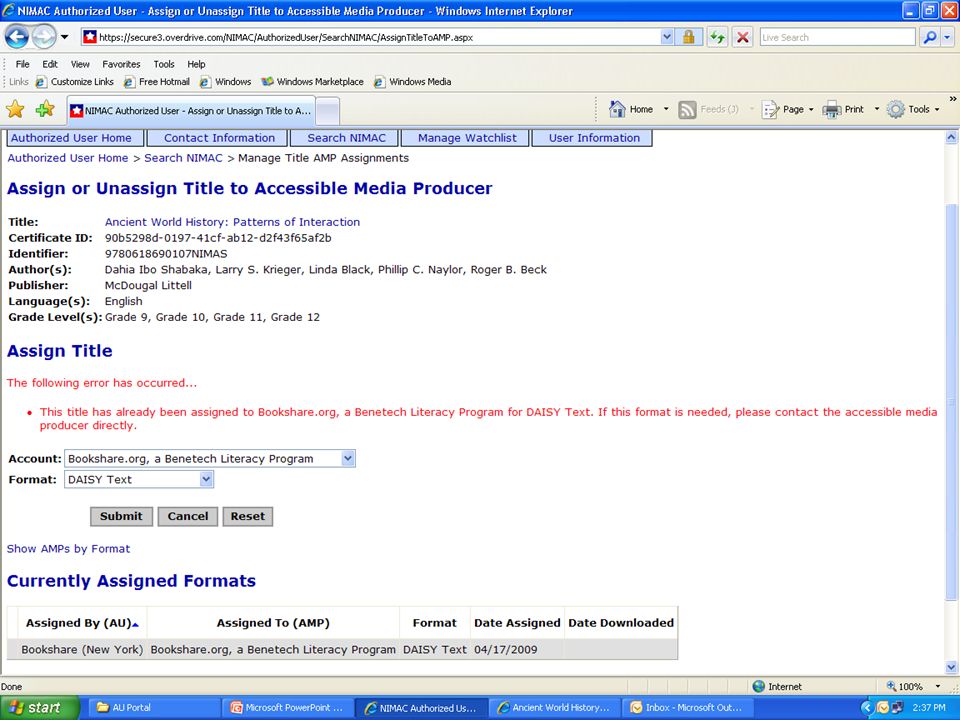
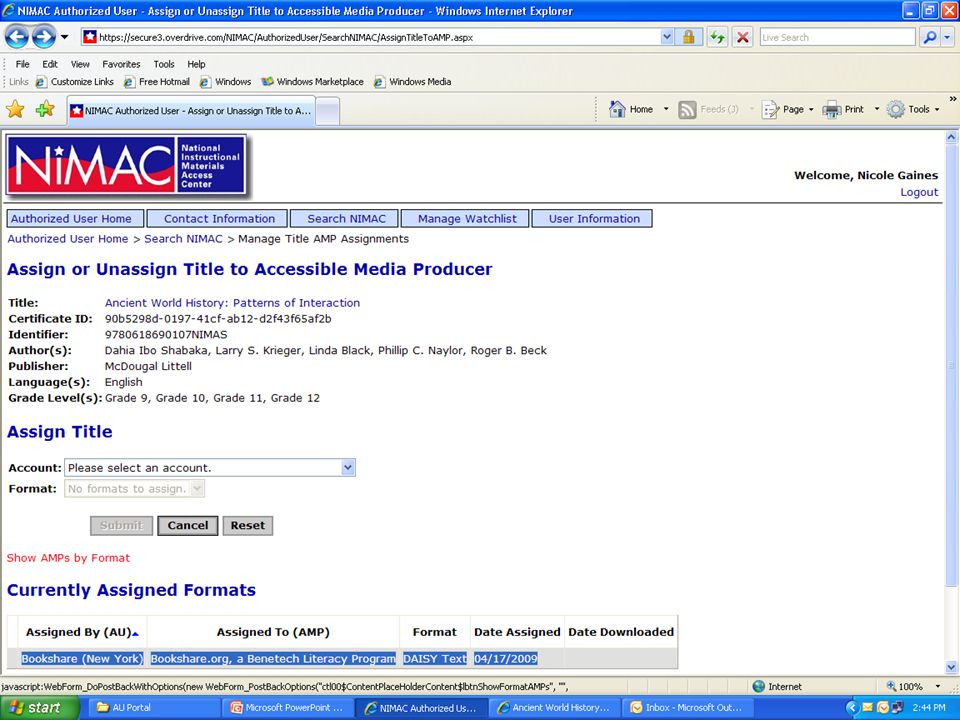
Assign File to AMP To assign a file, just click the link to the right of the brief display. The system will bring up a page asking you to choose the AMP account and format you want. Just select your options from the pick lists provided and submit the assignment.

51
Currently Assigned Formats After clicking the Submit button, you will get a confirmation message in red that the assignment was successful. You will also then see the new assignment under Currently Assigned Formats. Note: If another NIMAC user has assigned this same file to an AMP, that information will also display in that area.

53
Unassigning a File If you have assigned a file in error, either by choosing the wrong AMP or wrong format, you can undo the assignment. The link to Unassign the file is found the left under Currently Assigned Formats. Just click the link; the system will ask you to confirm the deletion of the assignment.

57
Using the Unassign Option Please note that unassign should only be used if you have made a mistake and the AMP is not going to be producing the format for you. Do not use it to remove assignments after the format has been produced by the AMP. Removing a valid assignment will prevent other users from seeing that the format has already been assigned to the AMP.

58
Automatic Emails to AMPs When you assign a file, the AMP receives an automated email from the system letting them know that the file is ready for download in their AMP account. The email tells them which file has been assigned, who assigned it, and the requested format. If you unassign a file, they likewise will receive an email alerting them that the file has been removed from their Download Queue.

60
File Assignments by other AUs If the file has already been assigned to an AMP by another AU, this information will also display under Currently Assigned Formats. The system will prevent you from entering a duplicate assignment. You will get a message from the system if you attempt to assign a file for a format already requested to the same AMP by another user.

63
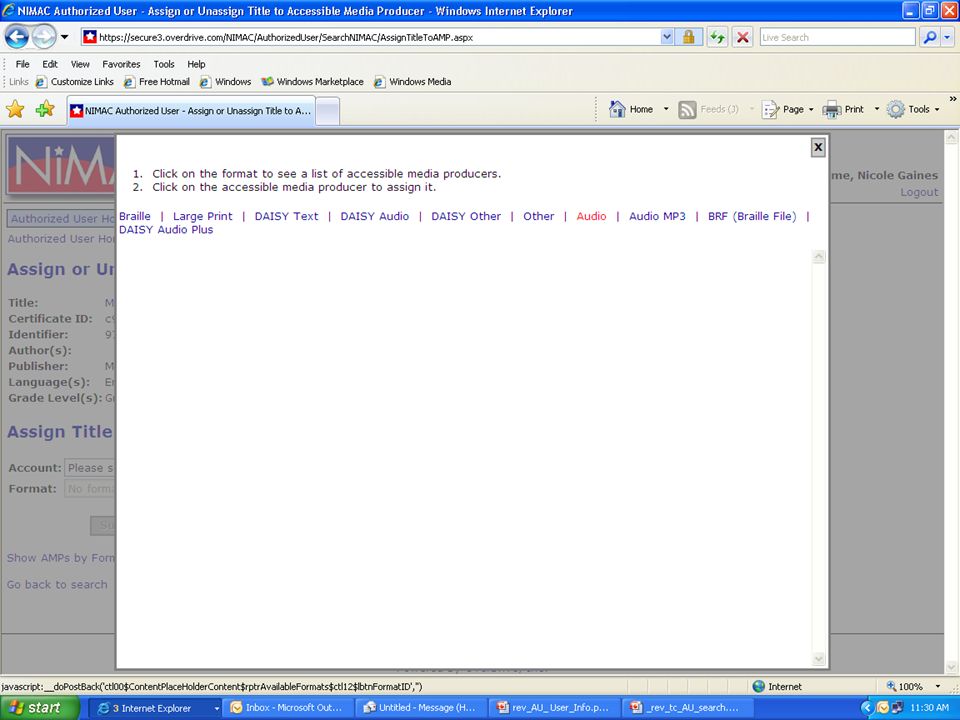
Show AMPs by Format If you would like to select from a list of all AMPs who are able to produce a specific format, just click Show AMPs by Format. This will bring up a list of formats included in the database. Click the format you want. Then click on any AMP in the list to select.

71
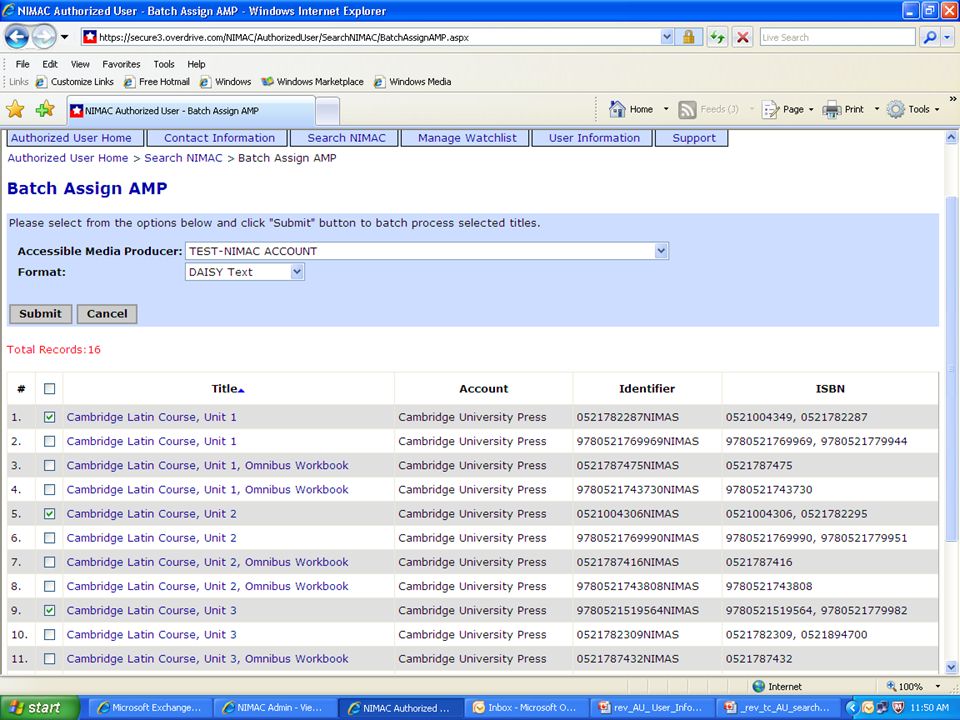
What is Batch Assignment? In addition to assigning files one by one, the system also allows you to assign multiple files at one time. Batch assigning can only be performed after a search is done. For obvious reasons, please be extremely careful with this option.

72
Batch Assignment The Batch Assign AMP button is located to the right of the Advanced Search button. This button remains grayed out until you perform a search.

75
Batch Assign AMP Clicking the button after a search will bring up a list of ALL files in the search results. Be sure to scroll down to view them all! Use the pick lists to choose your AMP and requested format. Then use the boxes to the left of each title to select the files to assign.

81
Last Step: Verify Your ISBNs! Different editions often have identical titles! Before submitting the batch assignment, verify your ISBN information against the ISBNs in the last column of the display. Once you have verified the ISBNs, just click Submit. The system will ask you to confirm the assignment.

85
Email notification As with individual AMP assignment, the AMP will receive an email for each title assigned. Remember: There is no option to batch unassign files. If you make an error in the batch assignment, you will have to unassign each file individually. Be careful to verify the ISBNs to ensure that you only assign the right files to your AMP.

86
Congratulations! You have completed this PowerPoint. You have learned how to utilize the Search tab in the NIMAC system to: – Locate files in the NIMAC – Download files to your computer – Assign files to an Accessible Media Producer 86www.nimac.us

87
For more help… Should you ever encounter a technical problem or error while working in the system, please direct those support requests to OverDrive: nimacsupport@privatereserve.com All other questions can be directed to NIMAC: nimac@aph.org 877-526-4622

Similar presentations


>")
>")


