Download presentation
Presentation is loading. Please wait.

1
IMAP for Dummies

2
HYPERLINKS Insert item into PBUSE for ordering
Order items in Operational Load Send order from PBUSE to IMAP Import request into IMAP from PBUSE Fund requests in IMAP Export statuses from IMAP (cleans up CRL/BOV reports) Clean up requisitions from PBUSE Receive supplies into PBUSE **In order to use the hyperlinks right click and select open hyperlink.**
 Clean up requisitions from PBUSE. Receive supplies into PBUSE. **In order to use the hyperlinks right click and select open hyperlink.**")
3
Click on Operational / Basic Load from the Hand Receipt selection

4
1 2 Find DODAAC Select “Operational” form the drop down. Basic is used for Class 7 PB items and the Operational is used for your Class 2 items.

5
“Search” for the item you want by NSN or Nomenclature.

7
If you conduct the search correctly it should single out your item that you want to place an order for. Don’t forget you should be in OPERATIONAL LOAD not BASIC. This however was loaded in Basic.

8
This is for those that need to input a new item.
2 3 Type the NSN of the item you want to insert into the Load list if the one you searched for is not already in the load list then click View. 1

9
Once you click view the Catalog will load the information and then you click apply to add it to your load list. Once loaded you will have to go back and search by NSN.

10
When you locate it the item you want to order click on “AUTH QTY” to order.

11
Enter your desired QTY

14
Select your fund code. If you do not know what this code is then you need to call the person who manages the checkbook and find out.

15
This document has been processed for ordering
This document has been processed for ordering. You can keep this DOC# for your records or get it on a print out through PBUSE in the Asset Vis under the Active Document Register. You will need this for your Red Binder.

16
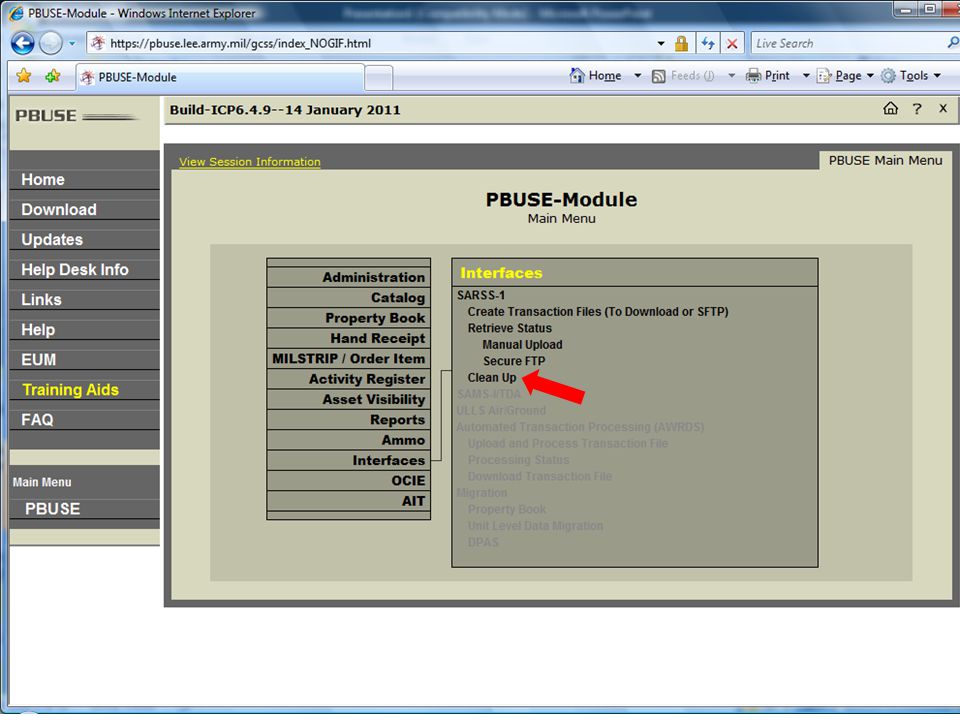
Once you have created orders for items you need to go back to the main screen and go under interfaces and click on “Create Transaction Files”

17
Click on “Find RIC” and select the RIC code you are going to use
Click on “Find RIC” and select the RIC code you are going to use. Generally there will only be one to select. If there are multiple contact someone higher in your chain for direction.

18
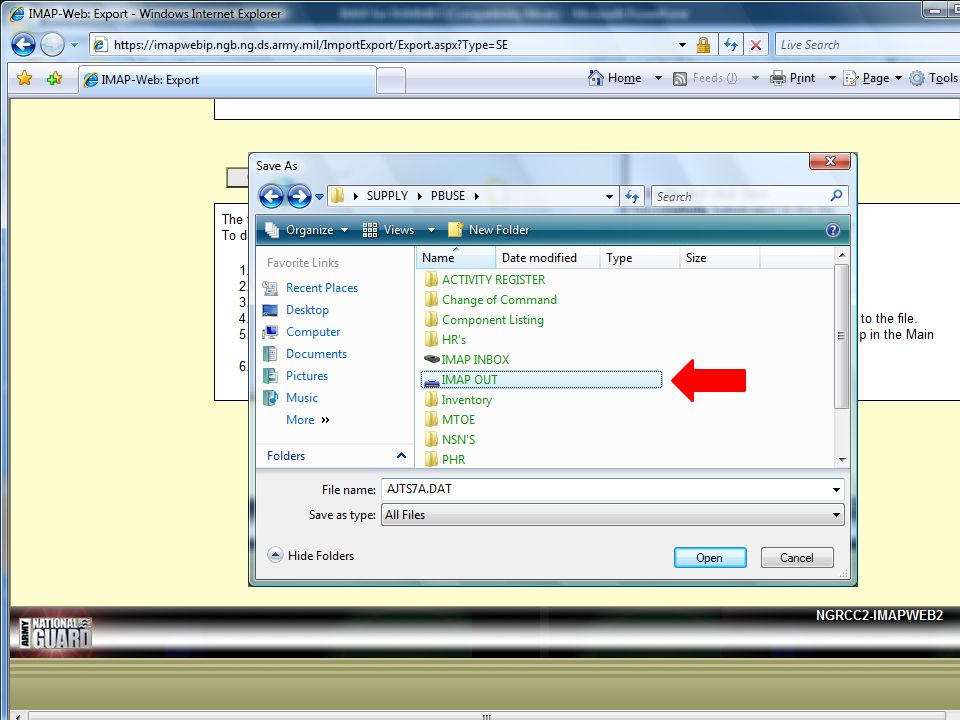
RIGHT click on the. DAT file and select the save as option
RIGHT click on the .DAT file and select the save as option. Before you do this you should create 2 folders on your desktop titled IMAP IN & IMAP OUT.

19
Select your desktop on the left side of the box
Select your desktop on the left side of the box. Then select your IMAP IN folder. You will save the AWACE225.DAT file in here. If you have an EXISTING file you can overwrite that file

21
You are now finished with the PBUSE portion of IMAP
You must now log on to IMAP Please right click and select open link on the link below to proceed and open a window to IMAP

22
Enter your AKO Username and Password.

24
Click on Import and select “Supply Request”

25
Click on Browse and it should bring up the IMAP IN file that you just saved. Select this file and hit OK.

26
The file is now inputted in the “File to import” box
The file is now inputted in the “File to import” box. Then click the “IMPORT” button.

28
Click on the home button.
**If you get a page that talks about validating requests check all the boxes and validate. DO NOT bypass this screen. Once validated click on the Home button**

29
Click on the checkbook that you want to fund. If your Balance reads $0
Click on the checkbook that you want to fund. If your Balance reads $0.00 then you need money in your checkbook in order to process your order.

30
Select the checkbox of what you wish to fund or cancel
Select the checkbox of what you wish to fund or cancel. If you want to fund all or cancel all then simply check the box located in the Gray/Taupe box.

31
Click the F for Fund and the page will update the white U to a green F
Click the F for Fund and the page will update the white U to a green F. Once the page updates click on the GREEN SUBMIT button.

32
This is located on the main page
This is located on the main page. In order to make your BOV/CRL close out you need to make sure you export your statuses. You need to check on this at least bi-weekly. This step sends information back to PBUSEwith statuses.

33
This page will automatically generate itself
This page will automatically generate itself. The only thing you have to do is click on the EXPORT button.

34
RIGHT click on the. DAT file and Save Target As
RIGHT click on the .DAT file and Save Target As. DO NOT click on the save successfully

38
Now you need to go back into PBUSE
Now you need to go back into PBUSE. You will learn how to receive in what you funded and how to clean up your requisitions in PBUSE.

40
Click on the Browse button and import your IMAP OUT status.

41
Click on Input and Process Transaction

42
When the scrolling bar starts its uploading and then the process is complete.

44
You need to clean up your requisitions otherwise they will continue to import and those files will back up in PBUSE.

45
GREAT JOB!

46
Now that your stuff has been ordered and come in, you need to receive the items in through pbuse.

47
Once your items start coming in take the or shipment document and locate your document #. Go into MILSTRIP and click on Receipt.

48
1 2 3 Insert your document number (1) in the box and then click on Continue / Refresh (2). This will input your order in the rest of the fields. Then click on the Yes – Delivered/Received from UPS (3)…. And then click apply (4). This will process your order in PBUSE. 4
 in the box and then click on Continue / Refresh (2). This will input your order in the rest of the fields. Then click on the Yes – Delivered/Received from UPS (3)…. And then click apply (4). This will process your order in PBUSE. 4.")
49
DON’T FORGET TO DO YOUR CRL’S due every quarter!!
You have now completed Importing and Exporting requests & statuses in and out of IMAP. DON’T FORGET TO DO YOUR CRL’S due every quarter!!

Similar presentations