Download presentation
Presentation is loading. Please wait.

1
Digital Art and Creativity www.blender.org

2
3D Image and Animation Software Used to make Movies Pixar Dreamworks Large and Complicated Program Won’t learn a lot of it today – just a Start

3
2D Images – PICTURES Learn how to make changes to our image

4
What does 3D Mean 3 Dimensions 3D Coordinate System to know where an object is in Space Height Width Depth

5
Moving Pictures 3D Coordinates 3D Manipulation My Little Pony

6
Open “Files” Folder on the Desktop Double-Click “Combined2-5.blend”

7
Node Editor - Dots Computer Programs use Inputs Changers Outputs

8
Scroll to Left to See your INPUTS Hold the Left Mouse Button Down Scroll to Left

9
Rabbit Ship Lego Storm Troopers Inputs

10
Rabbit input is already connected to “Start Here” box Connect “Start Here” with next Yellow Dot to the Right Hold the Left Mouse Button Down and Drag from Dot to Dot 1) Rabbit input 2) Connect Next Dots
 Rabbit input 2) Connect Next Dots")
11
Connect Remaining Yellow Dots LEFT TO RIGHT May have to scroll back to the Right 1) Connect 2) Connect 3) Connect Scroll
 Connect 2) Connect 3) Connect Scroll")
12
When you connect to the Blue Outputs Box “Plug In Here” you will see the Bunny Also Connect “Plug in Here” to the “Viewer” button above Will see bunny along the bottom 2) TO Here 1) Connect FROM here
 TO Here 1) Connect FROM here")
13
Viewer

14
See What Happens if you change the Input Connect “SHIP” to “Start Here” instead of Rabbit Just Redraw line Watch your Output

15
Now Connect “Lego Storm Troopers” to “Start Here” Change back to “Rabbit”

16
What is a Variable: Something that can change Uses a Name as a placeholder for the Value Used in Math, Science, and Computing

17
Variables Name Value Maximum Minimum Multiplier 1 st Variable - HUE Color Value – 0.536 Hue Variable

18
Change Hue Click with Mouse inside the “Hue” box Type in a Different Value Must be a decimal Between 0-1 Example – 0.835 Watch Output

19
Change Hue Use Mouse to Drag gray bar within the box Drag all the way to the left (0.0) Minimum Value Watch Output Drag Bar Drag to LEFT
 Minimum Value Watch Output Drag Bar Drag to LEFT")
20
Change Hue Use Mouse to Drag gray bar within the box Drag all the way to the Right (1.0) Minimum Value Watch Output Looks the Same On a Specturm Drag Bar Drag to RIGHT
 Minimum Value Watch Output Looks the Same On a Specturm Drag Bar Drag to RIGHT")
21
Adjust the Value for HUE to whatever color you want for your Rabbit

22
Saturation Intensity of the Color Minimum Value – 0.0 Maximum Value – 2.0 Change Saturation to the Minimum Drag to LEFT Click and type 0.0 Watch Output Saturation

23
Change Saturation to the Minimum Drag to Right Click and type 2.0 Watch Output Saturation

24
Adjust the Value for SATURATION to whatever you want for your Rabbit

25
Value Amount of Light Maximum Value – 0.0 Minimum Value – 2.0 Change Value to the Minimum Drag to the LEFT Click and type 0.0 Watch Output What Happened Value

26
Change Value to the Maximum Drag to the Right Click and type 2.0 Watch Output Value

27
Adjust the Value for VALUE to whatever you want for your Rabbit

28
Color Wheel also includes variables Move the dot in the color wheels Move Dots

29
2 Additional Variables Distort Dispersion Change Distort What Happens Change Dispersion What Happens

30
Create your 2D Picture Render Menu Render Image Or F12 Render Render Image

31
Save your Rabbit Image F3

32
Name the File – Bunny1 Click “Save As Image” Button 1) File Name – Bunny1 2) SAVE AS IMAGE
 File Name – Bunny1 2) SAVE AS IMAGE")
33
Once Saved– Return to Previous Screen Return to Previous

34
Click on the Red X in top Right Hand Corner Close

35
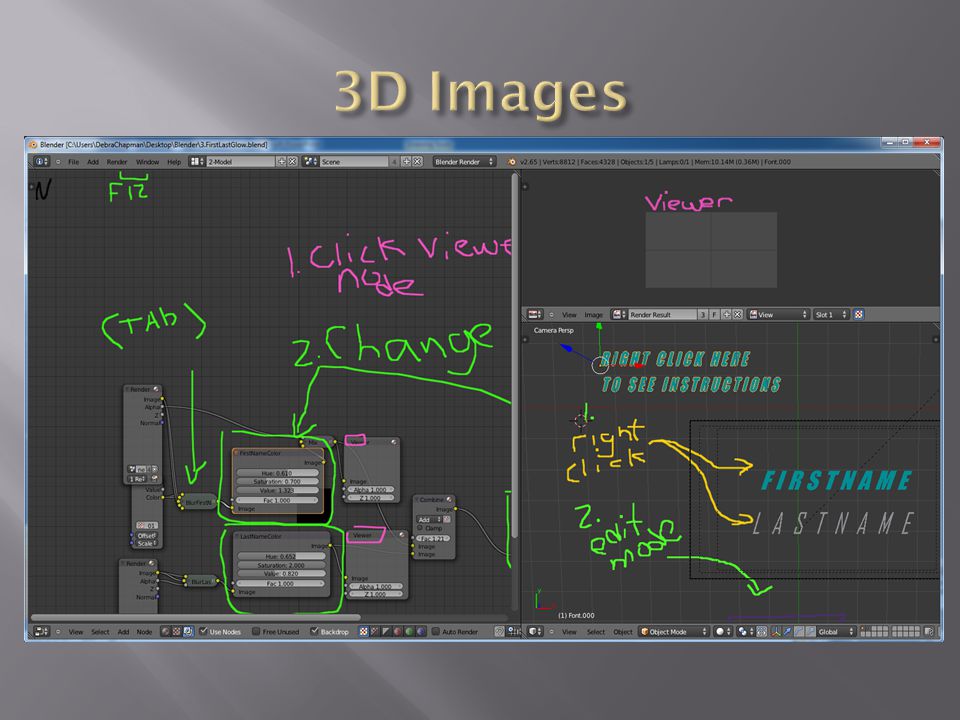
Open the “FirstLastGlow.blend” file FirstLastGlow

37
Right Click on “FirstName” Click from Object Mode to Edit Mode (or Tab Key) 1) Right Click 2) Change to Edit Mode
 1) Right Click 2) Change to Edit Mode")
38
Backspace over “FirstName” Type in Your First Name Backspace over FirstName Type in Your First Name

39
Return to Object Mode (can also use Tab Key) Right Click on Last Name Change Object Mode back to Edit Mode Switch between Object & Edit Mode Right Click on Last Name
 Right Click on Last Name Change Object Mode back to Edit Mode Switch between Object & Edit Mode Right Click on Last Name")
40
Backspace over “LastName” Type in Your Last Name Return to Object Mode Backspace over LastName Type in Your Last Name Switch between Object & Edit Mode

41
Grab / Move Right Click on First Name Hold down “G” key (Grab) Move First Name Right Click on First Name Use “G” Key to Move
 Move First Name Right Click on First Name Use G Key to Move")
42
Grab / Move Right Click on Last Name Hold down “G” key (Grab) Move Last Name Right Click on Last Name Use “G” Key to Move
 Move Last Name Right Click on Last Name Use G Key to Move")
43
Rotate Right Click on First Name Hold down “R” key (Rotate) Rotate First Name Right Click on First Name Use “R” Key to Rotate
 Rotate First Name Right Click on First Name Use R Key to Rotate")
44
Rotate Right Click on Last Name Hold down “R” key (Rotate) Rotate Last Name Right Click on Last Name Use “R” Key to Rotate
 Rotate Last Name Right Click on Last Name Use R Key to Rotate")
45
Scale Right Click on First Name Hold down “S” key (Scale) Resize First Name (only what is in box will show) Right Click on First Name Use “S” key to Rotate
 Resize First Name (only what is in box will show) Right Click on First Name Use S key to Rotate")
46
Scale Right Click on Last Name Hold down “S” key (Scale) Resize Last Name (only what is in box will show) Right Click on Last Name Use “S” key to Rotate
 Resize Last Name (only what is in box will show) Right Click on Last Name Use S key to Rotate")
47
Create your 3D Image Render Menu Render Image Or F12 Render Render Image

49
Save your Name 3D Image F3

50
Name the File – YourName Click “Save As Image” Button 1) File Name – Your Name 2) SAVE AS IMAGE
 File Name – Your Name 2) SAVE AS IMAGE")
51
Once Saved– Return to Previous Screen Return to Previous

52
Click on the Red X in top Right Hand Corner Close

53
Open “Twilight Sparkle Rig.Blend”

55
Animation work by putting many different pictures together Each picture is slightly changed from the previous picture to demonstrate movement / animation Movies can use millions of different pictures

56
Scroll over to the “Play” Button Hover over the Tool Bar Middle Wheel on Mouse to Move Scroll over to “Play”

57
Play the Animation Watch the Pony Scroll over to “Play”

58
Watch the Timeline Green Slider show Current Frame See the Different Frames Click on a Frame Timeline & Frame

59
Stop the Animation Play buttons became a Stop/Pause Button Click Frames to See Different Pictures 1) Stop Button 2) Click on a Frame
 Stop Button 2) Click on a Frame")
60
Bones – The animated image is made up of “bones” which allows for movement of parts of the picture Bones

61
Make Changes to the Pony Select a “Bone” – Right Click Right Click on A Bone

62
Use the Tools we learned Before G – Grab R – Rotate S - Scale Move Bone

63
Click on the Next Frame Move Bone Again Animation G – Grab R – Rotate S - Scale Repeat on Multiple Frames Click on Next Frame Move Again for Animation

64
Play the Animation Watch Your Updated Animation Scroll over to “Play”

65
Create your 3D Animation Image Render Menu Render Image Or F12 Render Render Image

67
Save your Animated Image F3

68
Name the File – Pony1 Click “Save As Image” Button 1) File Name – Pony1 2) SAVE AS IMAGE
 File Name – Pony1 2) SAVE AS IMAGE")
69
Once Saved– Return to Previous Screen Return to Previous

70
Control Key & F12 Watch the Animations

71
Return to the Previous Screen Return to Previous

72
Click on the Red X in top Right Hand Corner Close

73
Any Questions www.blender.org to Download www.blender.org Download Tab

Similar presentations


 structures in painting.>")


 & Robyn Jung.>")


