Download presentation
Presentation is loading. Please wait.

1
Intro to Visual Arts – JFK Memorial High School
One Point Perspective Intro to Visual Arts – JFK Memorial High School

2
What are we learning? A brief history of one point perspective
Vocabulary: Horizon line Vanishing point Vertical, horizontal, and orthogonal lines Linear perspective How to start creating a drawing with one point perspective Final project – Landscape Street View What are we learning?

3
During the Renaissance artists became interested in making two-dimensional artwork look three-dimensional. Renaissance ( ): The Renaissance began in Italy and spread through Northern Europe. Art, Science, and Literature grew during this time. a little history…
: The Renaissance began in Italy and spread through Northern Europe. Art, Science, and Literature grew during this time. a little history…")
4
Florentine sculptor and architect, Fillipo Brunelleschi, was the first architect to use mathematical perspective in creating designs for buildings during the early Renaissance. Before one point perspective, artists had to guess where the lines of buildings would go in their drawings. These drawings tended to look skewed and awkward. Brunelleschi

5
Before one point perspective, this image of Saint Florus on the left shows the figures in an awkward pose. It’s almost as if they are about to fall out of their seats. The image on the right, created by the artist Pieter de Hooch is very grounded. It looks like you can walk right through the door. Before After

6
Rediscovery of Linear Perspective by Brunelleschi
Around 1420, Brunelleschi rediscovered linear perspective Rediscovered, because the ancient Greeks and Romans may have understood linear perspective too, but if so, knowledge of it was lost during the Middle Ages Linear perspective is a way of creating a convincing, perfect illusion of space on a flat or two-dimensional surface. Rediscovery of Linear Perspective by Brunelleschi

7
Rediscovery of Linear Perspective by Brunelleschi
When Brunelleschi (re)discovered linear perspective, Florentine painters and sculptors became obsessed with it, especially after detailed instructions were published in a painting manual written by a fellow Florentine, Leon Battista Alberti, in 1435. Linear perspective eliminates the multiple viewpoints that we see in medieval art, and creates an illusion of space from a single, fixed viewpoint. This suggests a renewed focus on the individual viewer, and we know that individualism is an important part of the Humanism of the Renaissance. Rediscovery of Linear Perspective by Brunelleschi
discovered linear perspective, Florentine painters and sculptors became obsessed with it, especially after detailed instructions were published in a painting manual written by a fellow Florentine, Leon Battista Alberti, in Linear perspective eliminates the multiple viewpoints that we see in medieval art, and creates an illusion of space from a single, fixed viewpoint. This suggests a renewed focus on the individual viewer, and we know that individualism is an important part of the Humanism of the Renaissance. Rediscovery of Linear Perspective by Brunelleschi.")
8
Many of the earlier works artists created showed little depth.
Does this picture reflect depth? Why or why not? How could this picture be changed to increase its’ depth? earlier paintings Rylands Haggadah ,Catalonia, Spain, 14th century

9
Artists used mathematics and close observation to invent linear perspective. Linear perspective allows artists to trick the eye into seeing depth on a flat surface. The Music Lesson, c. 1662–65; Vermeer

10
Influential People during the Renaissance
Art: Michelangelo Leonardo da Vinci Raphael Science Galileo Literature Shakespeare Influential People during the Renaissance Raphael, School of Athens, One-point linear perspective

11
Many artists have used a variety of different techniques to show depth
Many artists have used a variety of different techniques to show depth. However it was not until the Renaissance that artists developed a system to show depth logically and consistently. Linear perspective

12
Linear perspective Based on the way the human eye sees the world.
Objects that are closer appear larger, more distant objects appear smaller. To create the illusion of space the artists creates a vanishing point on the horizon line. VANISHING POINT: The single point on the horizon where all the lines on the ground level seem to come together. It is where all things appear to disappear. It represents an infinite distance away. HORIZON LINE: The place where the land and the sky meet and is the viewer’s eye level in the picture Objects are drawn using orthogonal lines, which lead to the vanishing points. ORTHOGONAL LINES: diagonal lines to the vanishing point Linear perspective

13
One-Point Perspective
Artists use one-point perspective to show objects face-on. Most lines are vertical, horizontal, or orthogonal drawn to a single vanishing point.

14
Perspective Represents the viewer’s eye level.
The Horizon Line is horizontal, it goes from left to right and is parallel to the bottom edge of the picture. Represents the viewer’s eye level. It is the place where the ground and the sky seem to meet You can see the top of an object if it is below eye level, below the Horizon Line. If an object is above eye level, above the Horizon Line, you can not see it’s top.

15
Draw the horizon line with a ruler near the middle of your paper.

16
Put the vanishing point (a small dot) on the horizon line.
This is your vanishing point. In one-point perspective the Vanishing Point, represented is always on the Horizon Line. As things get closer to the Vanishing Point they get smaller and smaller until they appear to vanish. Put the vanishing point (a small dot) on the horizon line.
 on the horizon line.")
17
Draw a box below the horizon line using your ruler.

18
Using your ruler, draw lines connecting the corners of the box to the vanishing point.

19
Using your ruler, draw a line between the orthogonal lines that is parallel to the front of the box.

20
Erase the orthogonal lines that are between the back of the box and the vanishing point.

21
This is a box sitting on the ground in front of you
This is a box sitting on the ground in front of you. You can see over the top of it.

22
Draw another box that is taller and crosses the horizon line.

23
Using your ruler, draw lines connecting the corners of the box to the vanishing point.

24
Using your ruler, draw a line between the orthogonal lines that is parallel to the side of the box.

25
Erase the orthogonal lines that are between the back of the box and the vanishing point.

26
This box is sitting on the ground but you cannot see the top of it.

27
Draw a box above the horizon line in the right corner of your paper.

28
Using your ruler, draw lines connecting the corners of the box to the vanishing point.

29
Using your ruler, draw a line between the orthogonal lines that are parallel to the side and front of the box.

30
Erase the orthogonal lines that are between the back of the box and the vanishing point.

31
This box is floating in the sky. If you like, add legs to hold it up.

32
NOW YOU TRY! Draw your initials in 6 inch block style letters and then use the steps to turn them into a 1 point perspective drawing.

33
Other Perspective Terms
Bird’s Eye View: the area above the horizon line. It is looking down on the ground. Other Perspective Terms

34
Other Perspective Terms
Worm’s Eye View: the area below the horizon line. It is looking up at ground level. Other Perspective Terms

35
Assignment #1 You will create a 1 point perspective drawing that will include the following: A home with windows and a door trees a road anything else creative you want The drawing should fully shaded showing a range of values. Don’t forget to use a ruler!

36
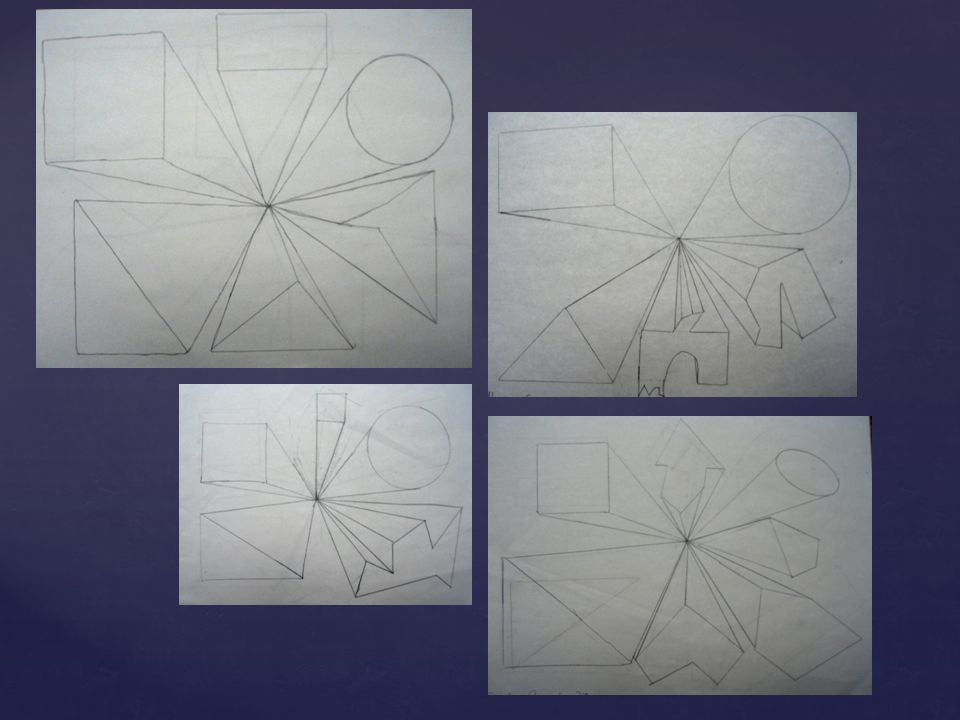
Assignment #2 1-point perspective project, we are going to draw some geometric shapes and project them into space to make them look 3-D.

37
Then you will add the vanishing point and converging lines.

38
Then we will ad more shapes and make them look 3-D. Be careful
Then we will ad more shapes and make them look 3-D. Be careful! Don’t draw lines across the front of shapes!

39
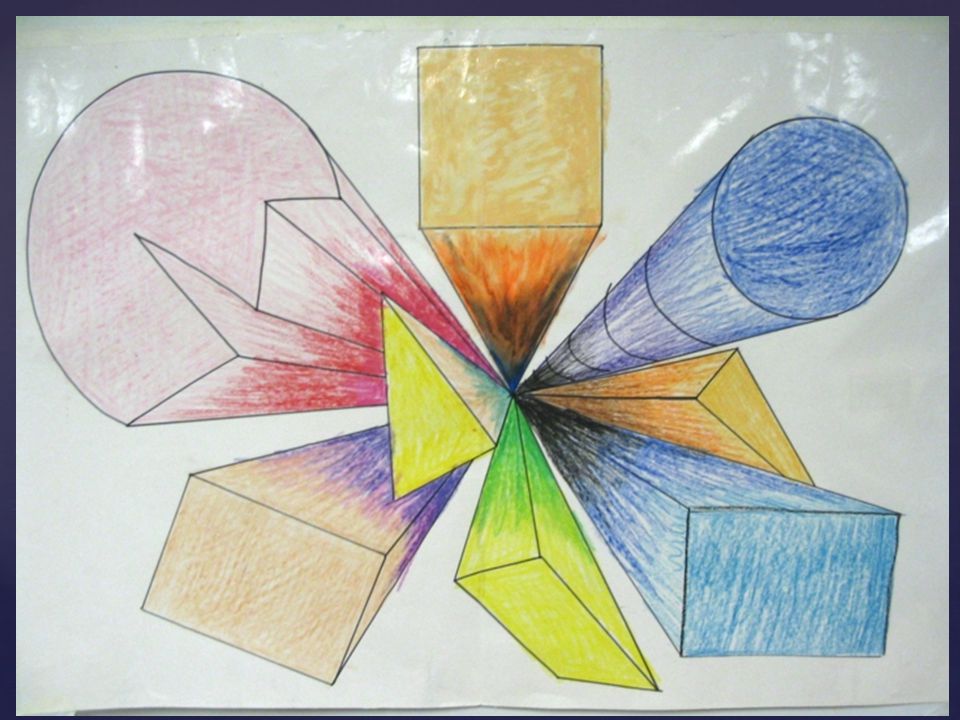
Last, we will color the front of each shape and slanted sides to increase the sense of depth and space. Keep the front sides bright and make the colors get darker as they go back toward the vanishing point. Here the spaces between the converging lines have been filled with gradients of gray.

41
The student who drew this project used darker color values to show the sides of the objects going back into space.

43
Be careful! Use gently blending between color values, not sudden changes in light and dark.

44
Neatness is important!

45
Look how the inside shapes of the numbers also get darker as they go back in space.

46
On this example, patterns and designs play an important role decorating the front of each shape.

48
Assignment #3 Draw a 1 point perspective room.

49
The blue box is the back wall
The blue box is the back wall. The green lines create the other walls, floor and ceiling.

50
Everything on the walls, floor and ceiling will have lines to the vanishing point.

51
This is the beginning of a great room! Add details and furniture!

Similar presentations


 artwork look three- dimensional.>")


