Download presentation
Presentation is loading. Please wait.

1
Windows 7 INSERT BOOK COVER
This presentation introduces you to the Windows 7 operating system. Understanding your operating system streamlines your workload and saves you time.

2
Windows 7 Desktop Operating system Desktop Taskbar Window Icon Desktop
Icons Let’s begin our study of Windows 7 with some definitions. These definitions apply to all computer systems ,so they are worthwhile to understand. The operating system is a software application that controls the activities of the computer. Behind the scenes ,it accepts input from devices, such as the keyboard and mouse, and directs output to the monitor and speakers. It keeps track of your files and folders on storage devices, such as disk drives and flash drives. It provides security for your computer system. It communicates with the other software applications you have on your computer and enables them to work together. The desktop is the screen that displays once you have turned on the computer and responded to prompts for your user name and password. This is your workspace. It is where you manage tasks on the computer. Your software opens on the desktop. You manipulate your files and folders on the desktop. The taskbar provides you with access to the software applications, enables you to move between the applications, and gives you access to system resources. It is a horizontal bar that appears at the bottom of the screen. A window is a space on the desktop representing a program, system resource, or data. Multiple windows can be open at one time, working independently as well as together. For instance, if you write a report on the latest sales for your company, you will open a spreadsheet and copy the net profit directly from the spreadsheet into the report document. Windows can be moved around the desktop, minimized to take up less space, and maximized to fill the desktop. Icons are small pictures that represent programs, files, folders, or other things on the desktop. Objects with the same characteristics, like file folders, have the same icon. Software icons are unique so that you can quickly find the software application. Don’t worry if the desktop you see in your office or at school is different than the one you have at home. Computers have unique configurations of installed programs and files. Windows 7 enables you to create a desktop environment with which you are comfortable by adding or removing icons that fit your needs. Start button Taskbar

3
The Taskbar Word Excel Program icons
The taskbar enables you to move between open windows and provides access to the resources of your computer. Just as you can have many files and papers covering your desk, in Windows 7, you can have many applications open on your computer desktop. Using the taskbar, you activate a window that is covered by other windows by clicking the program icon. If you have used Windows in the past, it is important to note that, by default, only one program icon appears for each application that is running, not an icon for each window. For instance, if you open a cover letter and a résumé on the desktop, only one program icon─for Microsoft Word─will appear on the taskbar. If you wish to change this so that there is an application icon for each open window, right-click an open area of the taskbar, select Properties, click Never Combine on the Taskbar buttons list box, and then click OK. You may also select to combine the application icons when the taskbar is full. The windows shown here are for Microsoft Excel and Microsoft Word. On the taskbar, the program icons are different. To bring the Word document to the front, simply click the Word program icon. Program icons

4
Aero Peek Preview Program icon with three Word documents shown
Aero Peek provides a preview of the window when you place your mouse pointer over the program icon. This tells you at a glance whether the item on the taskbar is the one you wish to view. When you have multiple items open in the same software, such as the résumé and cover letter, both items will be shown in the Aero Peek preview. The program icon is slightly different when multiple items of the same type are open. Program icon with three Word documents shown

5
The Start Menu System folders Programs Control Panel Help and Support
The Start menu, accessed with a click on the Start button, lists the programs, folders and utility applications that are available on your computer. The Start menu is divided into panes, with similar items grouped on a pane. The left pane displays a list of programs that you commonly access on the computer. This gets you going quickly if you need one of these applications. If you use Microsoft Word consistently, it will appear on this list. Programs that you don’t use as frequently are accessed when you point to All Programs on the left pane. The right pane accesses your system folders, such as Documents, Pictures and Music. You open and adjust your system settings from this pane, using the Control Panel. You also log off, shut down, and get help using the right pane of the Start menu. Below the left pane, the Search box enables you to type keywords to complete searches for files or folders on your computer. Searching will be covered in a later slide in this presentation. Help and Support All Programs Shut down Search box Start button

6
The Toolbar Right-click on taskbar to see the toolbars Address toolbar
In addition to the features Windows 7 automatically includes on the taskbar, you can add toolbars to increase your productivity. The Address toolbar appears on the taskbar in this example. To add toolbars to the taskbar, right-click on an open area of the taskbar, and point to Toolbars. Select the toolbar you wish to use. A checkmark appears next to toolbars that are already active on the taskbar. The Address toolbar is useful in accessing Internet Web pages quickly by typing the URL or Web address into the toolbar. The Links toolbar is a way to navigate to locations that you have set on your browser as favorites. Right-click on taskbar to see the toolbars Address toolbar

7
Pinning an Application
Jump List (iTunes) Software applications are pinned to the taskbar to make them accessible with a single click, even when they are not currently running. This saves you time since you will not have to click the Start button, open the All Programs menu, and then select the application. When applications are open on the desktop, right-click the program icon on the taskbar to open the Jump List. The Jump List contains common actions or resources for the application. Click Pin this program to taskbar. If the application is not running, right-click the program name on the Start menu, and click Pin to Taskbar. Pinned applications are removed from the taskbar by right-clicking the icon and selecting Unpin this program from the taskbar. A related concept is pinning items to the Start menu. Items you select to pin appear at the top of the left pane of the Start menu. If you want quick access to Microsoft Word, pin it to the Start menu and save yourself from having to locate it by clicking All Programs, scrolling to the Microsoft Office folder, and then looking for Word. Pinning items to your taskbar or Start menu really makes the Windows 7 interface your own. It increases your productivity by creating an environment in which you quickly find applications. Pinned programs Currently open program (iTunes)
 Software applications are pinned to the taskbar to make them accessible with a single click, even when they are not currently running. This saves you time since you will not have to click the Start button, open the All Programs menu, and then select the application. When applications are open on the desktop, right-click the program icon on the taskbar to open the Jump List. The Jump List contains common actions or resources for the application. Click Pin this program to taskbar. If the application is not running, right-click the program name on the Start menu, and click Pin to Taskbar. Pinned applications are removed from the taskbar by right-clicking the icon and selecting Unpin this program from the taskbar. A related concept is pinning items to the Start menu. Items you select to pin appear at the top of the left pane of the Start menu. If you want quick access to Microsoft Word, pin it to the Start menu and save yourself from having to locate it by clicking All Programs, scrolling to the Microsoft Office folder, and then looking for Word. Pinning items to your taskbar or Start menu really makes the Windows 7 interface your own. It increases your productivity by creating an environment in which you quickly find applications. Pinned programs. Currently open program (iTunes)")
8
The Notification Area Pop-up window Open Action Center link
The Notification area alerts you to important information about activities going on behind the scenes in your computer. A red circle with an X on the notification icon indicates that a message is available. Click the notification icon and a pop-up window displays the information. The notification area provides information on the detection of new devices on your computer, the availability of software updates, or recommended maintenance and security tasks. The notification can be opened for more information by clicking on the Open Action Center link. The pop-up window, shown here, is a result of clicking the Action Center icon on the taskbar. The Action Center is discussed in a later slide of this presentation. Action Center icon Notification area

9
Customize the Desktop Themes Desktop Background Window Color
Just as you can rearrange the items on your desk, you can customize your desktop to make it uniquely suited to your tastes. The screen saver, a series of moving pictures that appears when your computer has been idle for a period of time, along with background and window color, are selected from the Personalization window. Right-click on an empty portion of the desktop and select Personalize to open this window. The Desktop Backgrounds include built-in categories or you may select a personal picture from a folder on your computer. Many people enjoy placing family photos or pet photos on the background of their desktop. Likewise the screen saver, which provides privacy for your open files on the computer when you are away from your desk, is changed with built-in screen savers. The color of the borders of your windows is another change that you can make to your desktop. You can mix your own colors and change the intensity of the colors as desired. Different themes are built-in, downloaded from online theme libraries, or created by you. These change the desktop background, window color, sounds and screen saver all at one time. Desktop Background Window Color Screen Saver

10
Window Components Title bar Minimize window Maximize window
Close window All windows share common components. These components make it easier for you use the applications. The title bar, at the top of every open window provides the name of the file or folder, as well as the application name. Located on the right side of the title bar, the control buttons enable you to minimize the window to the taskbar so you don’t see it, maximize it to fill the screen, or close the window. When you have a window maximized, the middle control button becomes a restore button which returns the window to a smaller size. Windows may also be resized by pointing to the border with the mouse and dragging the double-headed arrow out or in as needed. Or, you may resize the window by pointing and dragging the double-headed arrow at the corner of the window. Sometimes, you need to view two windows at the same time and resizing helps you achieve this result. In some cases, your document may exceed the size of your open window. When this happens, scroll bars appear on the right side of the window or along the bottom. Click the arrows to move up or down the document, or to the sides. You can also drag the rectangle on the scroll bars to quickly move around the page. The discussion on window components continues on the next slide. Scroll bar

11
Window Components (continued)
Aero Flip 3D You may also move windows. Point to an open area on the title bar of the window and drag it to a new location, as needed. You may wish to cycle through all open windows, one at time. Use the keyboard with the keystrokes of Alt and Tab to move from window to window. Release the Alt key when you are viewing the window you want to display. Aero Flip 3D, shown here, displays the windows in a rotating 3D stack. Hold the Windows logo key and press Tab to cycle through the open windows. Release the Windows logo key when you arrive at the one you wish to view and it will appear on top. You may also click on any open window in the stack to display it. The discussion of using window components continues on the next slide.

12
Window Components (continued)
Cascade windows Windows 7 can arrange windows for you in three different configurations. Windows can be displayed in a cascading fashion, vertically stacked, or side by side. To set this up, right-click on an empty portion of the taskbar and click the configuration you want to use. Shown here is the cascading display of three open windows. Note that you can see each title bar. Another handy Windows 7 tool is Snap. This feature automatically places a window on the side of the desktop. Click and drag the title bar of a window to the left or right side of the desktop until an outline of a window appears. Release the mouse button and the window will snap into place.

13
Showing the Desktop Three documents (transparent) in Aero Peek
Show desktop button Sometimes you want to quickly minimize all of your open windows and see the desktop. No matter how many open windows you have, click the Show desktop button in the lower right corner of the desktop. Your programs and windows will still be available, but you will have a clean desktop. This feature can ensure privacy because you can quickly return to the desktop view before you step away from your desk or if someone comes into your office. If you want to see something on your desktop, such as a gadget clock or calendar, but not minimize the open windows, just point to the Show desktop button. Your desktop will be displayed until you move the mouse pointer away from the button. This slide shows three Word documents that are transparent while the mouse pointer is over the Show desktop button. This is an additional Aero Peek feature.

14
Dialog Boxes Check box Option button Spin arrow Text box List box
Standard windows include file, folder and program windows. A special type of window is a dialog box, which displays when an operation requires confirmation or additional information. It is important to read the information in the box and not just click the Close button or OK. Using a dialog box, you indicate how you want an operation to be completed. The Print dialog box shown here is very typical and contains a number of selections. Option buttons enable you to make a single choice from a group of options. You may only select one option button in a group. If you change your mind and prefer a different option, merely click another option. A text box enables you to enter specific information. In the dialog box shown here, you can respond to the Pages request by typing the page numbers to print. A spin arrow provides a fast method for increasing or deceasing a setting. Click the up arrow to increase the setting and the down arrow to reduce it. Check boxes are displayed when you can apply more than one option at the same time. You may check all of the boxes, a few, or none at all, as your needs require. A list box displays some of the available choices which can be selected. Click the arrow on the right side of the list box to display the additional choices. Command buttons enable you to accept or cancel the selections. The OK button initiates the choices you have made in the dialog box, while the Cancel or Close button ignores the options and closes the dialog box. List box Command button

15
Windows Accessories Notepad WordPad
Windows 7 contains accessory application software that enables you to accomplish a few basic tasks. The programs include Notepad, WordPad, Paint, Snipping Tool, and Calculator. We will discuss each in the next few slides. Notepad is a text editing application. It focuses mainly on capturing text. Computer programmers and Web designers often use it to write programs. Document formatting is not a feature of Notepad. You can see that the window is very plain. WordPad, in contrast, is more like a word processing program. It includes a more robust interface, enabling you to format text and insert graphics. It is a handy application if you do not have access to Microsoft Word. WordPad saves the documents in Microsoft Word format so that they can open in Word. Granted, it does not contain all of the functions of Microsoft Word, but it does have the basic tools. Access Notepad or WordPad from the Start button. Point to All Programs and click Accessories. Select either Notepad or WordPad to launch the software. WordPad

16
Windows Accessories (continued)
Click here to open a picture Ribbon A graphics accessory, Paint, enables you to create drawings and to open digital photographs or graphics. Click the Start button, All Programs, Accessories, and Paint to open the application. The Ribbon at the top of the window contains many options. Available tools include the Pencil tool, Brushes, Colors, and Shapes. The document area in the center of the window acts as an easel on which you can draw. Be sure to save your works of art! Click the Save button at the top of the window to save the painting. With Paint, you can open a photograph and make notations on top of it, perhaps circling an important portion of the picture, drawing an arrow to focus attention, or adding a caption. Click the button in the upper left corner of the Paint window to open a digital photograph. Browse to the location of the picture, and double-click the picture to open it. Use Paint to make the modifications and save it when done.

17
Windows Accessories (continued)
Scientific view Statistics view Standard view On your desk, or in a close-by drawer, you probably have a calculator. The Windows 7 desktop has the same feature. The Calculator accessory is a handy tool for doing many kinds of functions─from simple calculations to advanced scientific, programming and statistical functions. In fact, you don’t just have one calculator, but a variety from which to select the type best for the job. Open the basic calculator from the Start button. Click All Programs, Accessories, and Calculator. With a calculator open, click the View button to change the view. All four views are shown on this slide. The calculator is easy to use. Press the numbers or operators, such as the plus sign, on your keyboard or click the buttons of the calculator using the mouse pointer. If you use the keyboard, you can use the numeric keypad or the number keys across the top of the keyboard. Usually laptops do not have numeric keypads, but with a function key you can use alternative keys as a numeric keypad. Programmer view

18
Windows Accessories (continued)
Sticky notes Do you have sticky notes reminding you of important dates, places, and so on, all over your desk? Some people even line the edges of their computer monitor with these reminders. With Windows 7, the sticky notes are available to place right on your desktop! Open Sticky Notes by clicking the Start button, All Programs, Accessories, and Sticky Notes. Record your to-do list, phone numbers, and meeting reminders by typing on the note. Notice that the font even looks like handwriting. Click the plus sign in the upper left corner of the Sticky Note to open a new note. To change the color of a note, right click on the body of the note and select a different color. To delete a note, click the Delete Note button in the upper right corner of the note. You might like to place your Sticky Note pad on your desktop by pinning the Sticky Notes to your taskbar as discussed in a previous slide.

19
Security Settings and Software
Action Center Windows Defender User Account Control Windows Update Windows Firewall Parental Controls Protecting your computer from security threats, such as viruses, spyware, and hacking is very important. Windows 7 assists you by monitoring the security status, providing recommendations, and offering software updates as needed. Although there are some powerful tools included with Windows 7, you should make sure your computer is protected with antivirus software, purchased from a third-party vendor. Windows 7 provides a firewall and antispyware software. The Action Center monitors your system for maintenance and security settings, offering recommendations when necessary. Windows Defender identifies and removes spyware. User Account Control requests your permission before any changes are made to your computer settings. Windows Update provides you with Windows 7 software updates as they are released by Microsoft. The Windows Firewall protects you against unauthorized access, known as hacking. Parental Controls limit the number of hours, the types of games, and the programs that can be run by different user accounts. Each of these features will be discussed in the following slides.

20
Action Center Buttons Important alert Suggested tasks
While you are using your computer, Windows 7 is constantly monitoring your system for various maintenance and security situations. The Action Center recommends actions when necessary. You can open the Action Center from the Start menu, Control Panel, System and Security, and then Action Center, or you can click the Action Center icon on the taskbar. If the Action Center icon contains an X in a red circle, action is being recommended. If there is no red circle, there are no actions suggested. Click the Open Action Center link to open the Action Center window. When actions are recommended, they are listed in the order of severity. Red flags are serious and should be addressed. Scheduled updates of Windows 7 are an example of red flag actions. Yellow flags are suggestions and reminders. Maintenance suggestions, such as creating a backup, are usually presented as yellow flags. Buttons next to the recommendations direct you to the places to complete the procedures or to learn more about the issue.

21
Windows Defender Spyware is software, often downloaded while connected to the Internet, that collects information from your computer and transmits it to another computer. It is an uneasy feeling to think that someone is tracking your keystrokes, keeping track of Web sites you visit, or changing your computer settings without your knowledge. Windows Defender is the antispyware application included with Windows 7 to protect you from spyware. Open Windows Defender by clicking the Start button. Type Windows Defender in the Search box, and press Enter. Windows Defender can be set to run in real time, always on guard against spyware, or on a routine schedule for scanning. If you run Windows Defender in real time, you receive notifications whenever spyware attempts are made. Routinely scheduled scans report the spyware attempts as each scan completes.

22
User Account Control Click and drag this tab to adjust UAC level
Once you have established your computer system and applied the operating system settings you find useful, you will want to protect your computer against changes to the system. The User Account Control feature of Windows 7 notifies you prior to making changes to your system settings. The administrator of the system is the only person who can respond to User Account Control messages. There are different levels of notification that you can select from the Action Center. Open the User Account Control Settings dialog box by clicking the Start button, Control Panel, System and Security, and then Action Center. Click Change User Account Control Settings to use the dialog box shown here. The levels of notification range from a high level of security to completely disabling notifications. The default setting notifies you if programs are making changes to your computer, but not if you are making changes to Windows settings. This is a recommended setting for most computer users.

23
Windows Update Select level of update
Most software undergoes change. Updates are made to improve functioning and provide security against new threats. Modifications to the Windows 7 operating system are made through Windows Update. Microsoft strongly recommends that you set up your operating system to automatically download and install any updates. On the Windows Update window, accessed by clicking the Start button, All Programs, Windows Update, and then Change Settings, you select the method for downloading and installing the updates along with scheduling a time for the updates to occur. If you wish to check for updates independently of the scheduled download, click the Start button, All Programs, Windows Update and then Check for Updates in the left pane.

24
Windows Firewall Click here to turn firewall off or on
Firewall software prevents your computer from self-replicating a virus or becoming disabled by another user. The firewall software of Windows 7 is installed when the operating system is installed. The firewall controls the flow of incoming and outgoing traffic and requests permission from you when people, computers, or programs that are not allowed to communicate with your computer, come calling. Think of the firewall as the doorman to your computer. Access the settings of the firewall though the System and Security portion of the Control Panel. Remember, turning off the firewall is not a recommended action and leaves you vulnerable.

25
Parental Controls User accounts within your computer can be set with limits. Using Parental Controls, you limit the hours and types of games or programs that the account can run. The settings can apply to any standard account in the system, but not an administrator account. The settings do not apply to guest accounts, so it is a good idea to disable the guest accounts if you wish to effectively use the Parental Controls. Click Set up parental controls for any on the Control Panel to set up your desired controls. Select the standard account and respond to the options in the User Controls window.

26
Windows Search Search box in the window Search bar on Start menu
It seems as if every computer user sooner or later misplaces a file or folder. Windows 7 enables you to search your computer system if you know a part of the file name, the file type, or even some of the contents of the file. Windows 7 offers several ways to search. The Search box on the Start menu is very useful for finding files, folders, programs, and . In addition, some windows have a Search box in the upper right corner for quick searches. To begin a search, type keywords in the Search box on the Start menu. As you begin to type the keywords, items that match your search appear in the list above the Search box. Click the item to open the related application and view the file. Searches are conducted based on the text in the file, text in the file name, tags, and other file properties. You may be surprised to know that even messages are scanned in a search for the keywords. Windows 7 completes searches quickly through the use of indexed locations. All folders in Libraries are automatically included in the index. If you search in locations that are not in the index, the time required for the search increases. If necessary, you can add locations to the indexes. Searches conducted through the Search box in an open window only show results from the contents of the current folder. For instance, if you open the Documents folder from the Start menu, and type keywords into the Search Documents box, only items in your Documents library will be shown. Your or other locations in your computer would not be evaluated. You can expand or narrow your searches as described on the next slide.

27
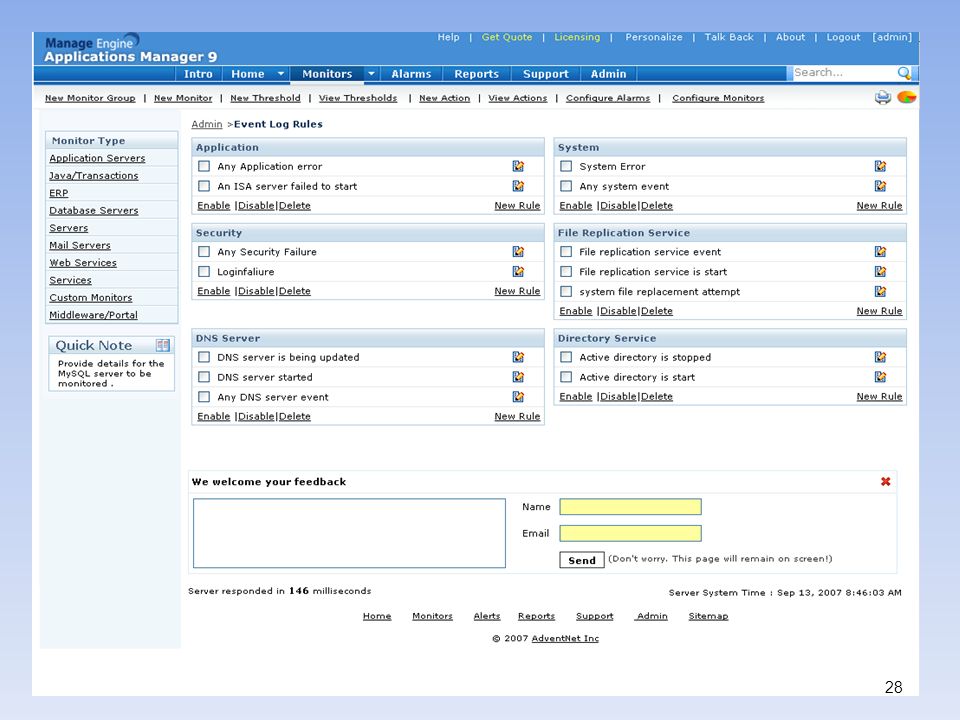
Application Manager Applications Manager can be used to monitor the various windows events. Event Log rules can be configured for generating alarms. (You Can Download ) When an event of type Error occurs in System Log, you can generate a critical alarm which inturn will affect the Health of the Windows Monitor.
 When an event of type Error occurs in System Log, you can generate a critical alarm which inturn will affect the Health of the Windows Monitor.")
29
File Manager

30
Memory How is memory measured? Megabyte MB 1 million bytes
By number of bytes available for storage Term Abbreviation Approximate Size Kilobyte KB or K 1 thousand bytes Megabyte MB 1 million bytes Gigabyte GB 1 billion bytes Terabyte TB 1 trillion bytes

31
Memory Management Press ctrl alt delete Click on Task Manager

32
Task Manager Working Set Display

33
Task Manager

34
Different between Shut Down, Hibernate, Standby, Log off Feature
Switch User: Switches to another user account on the computer without closing your open programs and Windows processes. Log Off: Switches to another user account on the computer after closing all of your open programs and Windows processes. Lock: Locks up the computer while you're away from it (same as clicking the Lock button). Restart: Reboots the computer. (This option is often required as part of installing new software programs or Windows updates.) Sleep: Puts the computer into a low-power mode that retains all running programs and open windows in computer memory for a super-quick restart. Hibernate (found only on laptop computers): Puts the computer into a low-power mode after saving all running programs and open windows on the machine's hard drive for a quick restart.
. Restart: Reboots the computer. (This option is often required as part of installing new software programs or Windows updates.) Sleep: Puts the computer into a low-power mode that retains all running programs and open windows in computer memory for a super-quick restart. Hibernate (found only on laptop computers): Puts the computer into a low-power mode after saving all running programs and open windows on the machine s hard drive for a quick restart.")
35
Top Ten: Windows 7 Magic Search Commands
Ise Displayswitch Snipping Action Network Remote Uninstall word, excel, outlook, powerpoint, onenote Msconfig resmon

36
Thank You

Similar presentations


 Lecture 04 Sajid Riaz.>")


