Download presentation
Presentation is loading. Please wait.

1
Elastic Launch Glider- B 2015-16
CeAnn Chalker

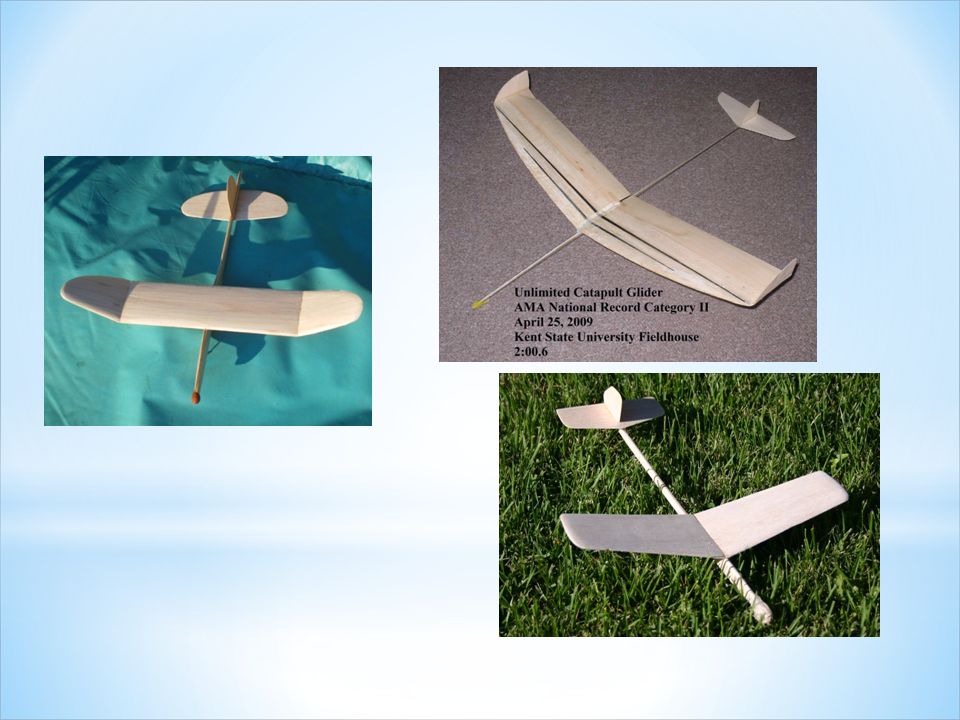
2
Parts of a Glider Wing Horizontal Stabilizer/Stab Fuselage Ballast
Vertical Stabilizer Fin Rudder Launch Hook Parts of a Glider

3
Span Parts of a Glider Chord

4
Two Overall Components of Event
Glider(s) up to 2 at Competition Flight Log Very similar to AMA event “Standard Catapult Launch Glider”
 up to 2 at Competition. Flight Log. Very similar to AMA event Standard Catapult Launch Glider")
5
Construction Parameters Dimensions
Maximum Wingspan – 30.0 cm Minimum Glider length – 32.0 cm Minimum of 3.5 grams Maximum of 10.0 grams Nose must be blunt When inserted into a lip balm cap does not touch the inside end of the cap depth~15.7 mm diameter~13.7 mm

6
Construction Parameters
Constructed of only wood, foam, paper, plastic film, carbon fiber, tape, thread, and glue Ballast may be any malleable, non-metallic substance May be constructed from: Published Plans Student Designs Commercial Kits Kits MUST not contain any pre-glued joints or pre- covered surfaces Gliders must be labeled

7
Construction Parameters Launching Parts
Launch Apparatus (excluding elastic) MUST be used MUST be less than 1 meter long in any orientation at launch MUST be a safe configuration MUST be operated by a Single Competitor May be constructed by the competitors or acquired completely assembled Elastic MUST be non-metallic MUST be In contact with the glider throughout launch
 MUST be used. MUST be less than 1 meter long in any orientation at launch. MUST be a safe configuration. MUST be operated by a Single Competitor. May be constructed by the competitors or acquired completely assembled. Elastic. MUST be non-metallic. MUST be In contact with the glider throughout launch.")
8
Launch Handles

9
Flight Log Minimum of 10 entries Minimum of 4 data points
Estimated Peak height Length of Elastic (relaxed) Flight Time Any one other (more are fine) 10% deduction for incomplete Flight Log 30% for no Flight Log Most important part of practice and competition!
 Flight Time. Any one other (more are fine) 10% deduction for incomplete Flight Log. 30% for no Flight Log. Most important part of practice and competition!")
10
Competition Competitors MUST wear eye protection at all time when in the Competition Area Launch MUST be aimed only towards the ceiling Flight Period for Official Flights – 5 minutes Starts with 1st Official Flight Official Flights – up to 5 using 1 or 2 Gliders All flights within a Team’s Flight Period are official unless declared a trim flight prior to launch. Steering is not allowed

11
Competition (Inspection)
Official Inspection – Immediately prior to 5 official flights teams must present - Glider(s) Launch Apparatus(s) Flight Log Construction violations for Gliders and/or Launch Apparatus will cause the team to be ranked behind all other teams Event Supervisors may request a re-inspection
 Launch Apparatus(s) Flight Log. Construction violations for Gliders and/or Launch Apparatus will cause the team to be ranked behind all other teams. Event Supervisors may request a re-inspection.")
12
Timing Start – when Glider leaves the Launch Apparatus Stops -
Any part of the Glider touches the floor (including pieces that break off) When Glider stops moving due to an obstruction
 When Glider stops moving due to an obstruction.")
13
Scoring Winner – Ties - Penalties –
Highest sum of the team’s 3 longest official flight times aloft (minus Penalties) Ties - broken by longest non-scored official flight Penalties – 10% flight time deduction for incomplete log 30% deduction for none (off of each flight) Construction & Competition violations for a Glider are ranked below all other teams
 Ties - broken by longest non-scored official flight. Penalties – 10% flight time deduction for incomplete log. 30% deduction for none (off of each flight) Construction & Competition violations for a Glider are ranked below all other teams.")
14
Construction - General
Anticipate building many gliders throughout the year

15
What is Elastic Launched Gliders About?
It’s not about designing a glider It’s actually about collecting data and evaluating it to optimize a complex system Unless you can build a glider that flies, you can’t start data collection so it is obviously required Gliders is one of the 3 flying events in rotation for this purpose

16
Glider “Secrets” All about Sink Rate Seconds/Feet of descent
~1 sec/foot is good Combination of weight and lift Weight – Wood Selection, Build Quality Lift – Trim, Build Quality, Design Height achieved critical Transition to Glide is important Design will change based on ceiling height

17
Construction - General
Priorities 1 - Build quality/trueness/straightness 2 - Strength 3 - Weight (as close to 3.5 grams as possible) 4 -(and a distant number 4!!!) Design
 4 -(and a distant number 4!!!) Design.")
18
Where Do We Start? Choose a design –
(you have to start somewhere) Gather and prepare materials Construct the Glider Make wing, sand carefully to shape Make stabilizers Make fuselage Assemble Trim for Performance and Repeatability
 Gather and prepare materials. Construct the Glider. Make wing, sand carefully to shape. Make stabilizers. Make fuselage. Assemble. Trim for Performance and Repeatability.")
19
Tools and Supplies Building Tools, must have Building Tools, Helpful
A flat cutting surface (Use old plywood) Razor knife ($2 Hobby Lobby) A metal edge rule/straight edge ($2) A scale accurate to 0.1 gm cheap mini pocket electronic ones available on the net (less than $15 from Amazon or Old Will Knott) Building Tools, Helpful Balsa Stripper (Master Airscrew Balsa Stripper or Windsor Balsa Stripper less than $10)
 Razor knife ($2 Hobby Lobby) A metal edge rule/straight edge ($2) A scale accurate to 0.1 gm cheap mini pocket electronic ones available on the net (less than $15 from Amazon or Old Will Knott) Building Tools, Helpful. Balsa Stripper (Master Airscrew Balsa Stripper or Windsor Balsa Stripper less than $10)")
20
Building Materials (minimum)
A complete kit, easy way to get everything to build 1 or 2 gliders – COSTLY OR Balsa, 1/32 and 1/16 sheets Glue, Superglue (also called: cyanoacrylate or CA) or balsa cement If using CA, instant setter (accelerator)
 or balsa cement. If using CA, instant setter (accelerator)")
21
Flying Materials Necessary- Helpful - Catapult apparatus Rubber
Stop watch, NOT your cell phone, you’ll get DQ’d Your flight LOG and a pen/pencil! A good carrying/storage box Helpful - Glider Stand – Something to hold the glider, remember, they break, often when they fall off a table Repair Kit CA, setter, knife, spare covering, spare balsa

22
Design – Select a Plan Plans - Two key elements -
Available on the internet Come with kits Two key elements - Drawing with dimensions and all parts A bill of materials often missing, you probably will have to make it yourself Wherever you get your plans - Make sure they comply with the Current SO rules or adjust accordingly!!!

23
All Plans are not to SO Specs!
If you find designs online most will be AMA designs. There are a lot of ‘GOOD’ designs to AMA rules. BUT, AMA rules AREN’T SO rules. We don’t know that AMA designs won’t turn out best, but… Remember, the purpose is to test, collect data and adjust!!

24
Select Plans – The Drawing

25
Material Selection Balsa Selection:
Wood selection is CRITICAL, straight, correct weight, stiff, etc. If possible visit the hobby shop and WEIGH EACH SHEET !!! Specialty wood is not required with the 3.5 g minimum. Select straight sheets for your components to match plan. Have glue, pins, scrap blocks on hand

26
Construction - Details
Use Carbon Fiber for reinforcement Strong in Tension Only! Fuselage Ideal Spot Foam Meat Trays Light Wings Center of Gravity Critical

27
Trimming for Performance & Repeatability
Plan LOTS of Practice Time – I can show you how to build a Glider, but without practice and data collection you won’t be able to fly it! Data Collection – This event is PRIMARILY about data collection and evaluation. Minimal flight logs pass the requirement, but miss the point. Teams with logs do better.

28
Trimming – Step #1 Do several hand glides
It should glide in the correct direction without diving or stalling. Make a couple of level 25% power catapult launches to determine the glider direction and make sure the model doesn’t want to nose dive or go into a loop. These must be corrected to a level flight first Record data

29
Trimming – Step #2 Use Launch Apparatus and add some Elevation
Use 25% Power Do NOT aim straight up like you are shooting an arrow at the moon. This model needs to glide, and to do that it needs to transition from fast catapult to slow glide Getting the transition to work correctly is the hard part Record Data

30
Trimming – Step #3 Launch at Half Power
Start with about 45º bank and 30º elevation The model should arc up and then go into the correct glide The elevator is your most powerful control and then rudder Record Data

31
Trimming – Step #4 Increase Launch Power to 80%, if OK then 100%
You may need to adjust the launch angle. As you approach maximum warp speed things happen much faster a trim that works at 50% power may not cope with higher speeds the trim becomes more critical and needs to be refined in smaller steps If it is now too loopy you will need down elevator, perhaps a touch of rudder Be accurate and consistent on the launch angle Record DATA!!!

32
Flying - Basics Attach one end of elastic to Launch Apparatus and to Glider Pull back the Glider to extend the elastic Check the ceiling Make sure you launch aiming at any point on the ceiling Let Go of Glider! Record Data! Be prepared for repairs Avoid grabbing a flying Glider from the air

33
Flying – Adjusting Basics
Trim for lowest sink rate Stall – Too much lift Wave pattern on descent Dive – Too little lift Goes down to fast Adjust Center of Gravity (CG) with Ballast Adjust Incidence by bending wood Increased Wing Incidence increases lift (leading edge of wing higher than trailing edge) Decreased Stab Incidence increases wing incidence
 with Ballast. Adjust Incidence by bending wood. Increased Wing Incidence increases lift (leading edge of wing higher than trailing edge) Decreased Stab Incidence increases wing incidence.")
34
Required Flight Log Sample

36
Resources Where to find help?
Everything I cover here and more is on the internet somewhere, the National SO page is a good starting point Start here first. written by one of the best practioners of gliders, study, read and understand this site. Check you local AMA clubs, especially those focusing on free flight

37
Links LOTS of information: Forums: www.scioly.org
Good Starting point: LOTS of information: legacy.amaglider.com Forums: Supplies - Rubber: (buy 3/32” stock unless you have a rubber stripper) Various tools: Bulk Balsa:
 Various tools: Bulk Balsa:")
Similar presentations


 Often oval, can be round or.>")


