Download presentation
Presentation is loading. Please wait.

1
OFF110-Microsoft Word for Advocates (2003) March 18, 2009
 March 18, 2009")
2
Presenters Rachel R. Medina LSNTAP

3
Objectives for Today Understand the Tool of Your Trade Explore Using New Functions & Use Old Functions in New Ways Ultimate Goal is to Help You Be Competitive and Efficient Advocates

4
Todays Topics Section 1: Manage Your Word Environment Work Menu Toolbars Section 2: Formatting Tips: Paste Special, Format Painter AutoCorrect, AutoText, AutoFormat Find and Replace Keyboard Short-cuts Section 3: Breaks and Pagination Headers & Footers Section & Page Breaks Section 4: Reference Table of Contents & Styles Table of Authorities Section 5: Protecting Your Document Word Redaction Remove Personal Information & Password Protection

5
Work Menu Tool Bar Section 1: Managing Your Word Environment

6
Keep Project or Current Case Documents at Your Mousetips Why Use the Work Menu? Have you ever gone to your list of recently used files (under your File menu) to look for a document, only to realize it has recently dropped off the list? Do you wish you could keep certain documents at your fingertips?
 to look for a document, only to realize it has recently dropped off the list. Do you wish you could keep certain documents at your fingertips .")
7
Keep Project or Current Case Documents at Your Mousetips ADD WORK to your Menu Bar Select Tools>Customize >Commands tab From Categories Select Built-in Menus From Command Select & Drag Work to Menu Bar Close the Custom Dialog Box ADD option to delete files from Work Menu Select Tools>Customize>Commands Tab From Categories Select All Commands From Commands Select & Drag ToolsCustomize RemoveMenuShortcut to Work Menu (wait for menu to drop down, then release your mouse)
")
9
You can add the Work menu in more than one location. You may find it convenient to add it just bellow your List of Recently Used Files under the File menu.

10
Add the Remove Menu ShortCut You must add the Remove Menu ShortCut if you want to be able to remove a file from the Work menu. The Remove Menu Shortcut switches your cursor to a minus sign - Warning: While in RemoveMenu mode you can delete any menu item – so be very cautious and only place the cursor over the document name you want removed from the Work menu. -

12
To add: Select Add to Work Menu to add the active document to the list. To remove: Select Remove Menu Shortcut, then select the file name in the Work Menu list that you want removed. Add or Remove Files to Work Menu -

13
Work Menu Tool Bar Section 1: Managing Your Word Environment

14
Edit Your Tools Right click anywhere on your tool bar & Select Customize. Or, Select View>Toolbars>Customize....then… To Create a New Custom Toolbar: Select New from Toolbars Name your toolbar, then drag & drop commands from the Command menu to the new toolbar Or, To Modify an Existing Toolbar: Drag & drop commands from the Command menu to an existing toolbar

15
Paste Special Format Painter AutoCorrect & AutoText Find & Replace Keyboard Short-cuts Section 2: Formatting

16
Paste Special: Why is it Important? Paste Special allows you to copy-and- paste information without transferring unwanted formatting code.

17
Examples in Use Cut-and-Paste from Email into Document Cut-and-Paste from Website into Document Cut-and-Paste between Documents

18
How to Paste Special? From the Menu Bar: Edit > Paste Special Choose Unformatted text Click OK Note for Word 2002 and 2003 Users: In Word 2002 and 2003, you get yet another option. In Tools > Options > Edit you can tick Show Paste Options buttons to give you even more control. If you click that option, when you paste (using ctrl-v or Edit > Paste), you see a little clipboard thingy, which contains a drop down menu.
, you see a little clipboard thingy, which contains a drop down menu..")
20
Paste Special – Dialog Box

21
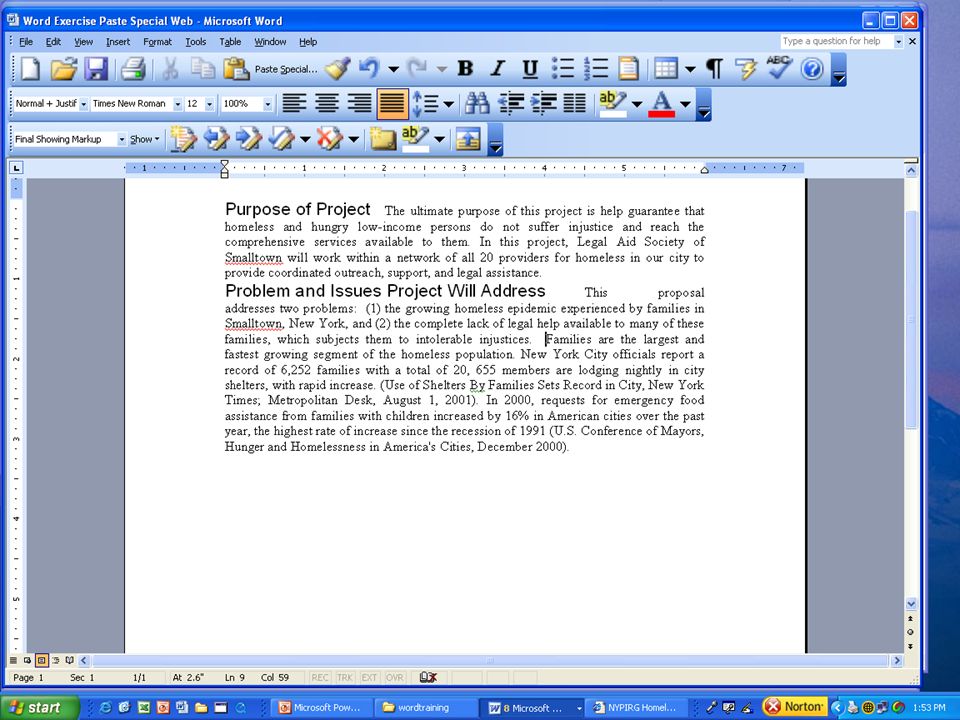
Applications of Paste Special: Web Text Website text comes in all colors, fonts and sizes, even white text on a dark background. If you copy white text and paste it into Word, it is invisible. Use Paste Special: Default option is HTML – thatll create invisible text, so try unformatted text.

26
Advanced Paste Special To copy a picture from a web page, another document, or to/from an e-mail or convert picture to smaller size: (use.gif or.jpeg)
")
27
Paste Special Format Painter AutoCorrect & AutoText Find & Replace Keyboard Short-cuts Section 2: Formatting

28
Format Painter What? Looks like a paintbrush in Toolbar. Why? Can apply formatting you have in one part of a document to any other part of the document with one click.

29
Format Painter - Application Character Attributes: copy font style, font size, bold, italics etc. Paragraph Attributes: copy alignment, indentation, bullets etc. Copy Attributes to … A Single Location Or Multiple Locations Note on Formatting Text in Multiple Locations: You can also use a feature called Styles to apply formatting to multiple locations in a file. The advantage of this is that you can select all instances of that formatting and change all of them at once if you want. Format->Styles and Formatting.

30
How to Use Format Painter Select the text with the formatting you want applied elsewhere in the document. Single Location: On the Standard toolbar, click Format Painter icon Select the text you want painted with the new format. The text takes on the new formatting. Multiple Locations: On the Standard toolbar double-click the Format Painter icon Select multiple words, phrases, or paragraphs to apply the formatting. Press ESC when done!

31
Format Painter – Example Add text from an email to your pleading. Formatting is messed up. Correct with Format Painter. Say you've written a quarterly report for one of your funders, in Word. You like the look, especially your headings, which are 14 pt. Bookman Old Style, centered, green, and bold, with a nice subtle shadow. Thirty minutes before you're supposed to present the report, you need to add four new sections to the report. You spend twenty minutes adding the information and manually reformatting all of the text to match the existing headers. You spend the next two wishing that you hadn't chosen such complicated formatting for your headings.

35
Paste Special Format Painter AutoCorrect & AutoText Find & Replace Keyboard Short-cuts Section 2: Formatting

36
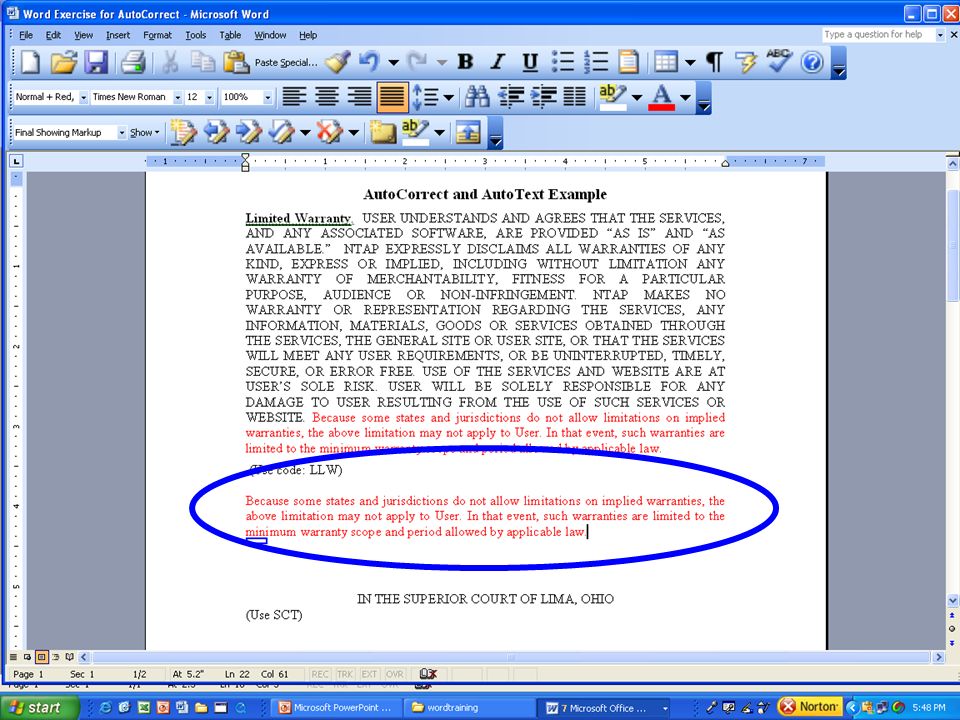
AutoCorrect What? Corrects typos as they occur. It does this by replacing text you type with something else. Why? You need to know how to turn it off. You can use it to apply replace characters with special symbols you commonly use (such as the § symbol). Very Important: You can use it like a mini-macro. You can save A LOT of time if you use it to replace text you type as a shortcut, with longer, standardized text that you tire of retyping again and again. You can assign abbreviations to frequently used names, phrases, and terminology.
. Very Important: You can use it like a mini-macro. You can save A LOT of time if you use it to replace text you type as a shortcut, with longer, standardized text that you tire of retyping again and again. You can assign abbreviations to frequently used names, phrases, and terminology..")
37
AutoCorrect: How? From the Tools menu, select AutoCorrect Options…to: Change Rules: (i.e., correct two CAPITAL letters together.) Change Formatting: You will see a grid that shows character(s) and the symbol Word will convert it to. If you are done with the © symbol transformation, simply highlight it and Delete or modify. Scroll through to see what else Microsoft wants to correct for you.
 Change Formatting: You will see a grid that shows character(s) and the symbol Word will convert it to. If you are done with the © symbol transformation, simply highlight it and Delete or modify. Scroll through to see what else Microsoft wants to correct for you..")
38
AutoCorrect for MiniMacros Type in the desired text–e.g., your contact information; or, a standardized clause for agreements or pleadings Tools > AutoCorrect Options …In the With field, paste your text …In the Replace field, type the code you want to use to have Word automatically generate that text. Notice you can select Plain Text or Formatted Text. This will simply allow you to carry over specific formatting, if desired.

39
AutoCorrect for Mini-Macros Note: if you use a commonly used word, like address, then every time you type the word address, your programs name and contact will show up. So, choose a logical, but unique code. Suggestion: Use a naming convention to name your autocorrect macros and create a cheat-sheet for reference. Example: For standard clauses, name them in this fashion: CLAUSE-MED for a mediation clause, CLAUSE-INDEM for an indemnity clause, CLAUSE-WAIV for a waiver clause, CLAUSE-SEV for a severability clause, etc.

40
Applications for AutoText & AutoCorrect Commonly used words: Your programs name The name of courts you file in Your signature Small sentences you type often (confidentiality clauses, closings, etc.) Opposing Counsel names
 Opposing Counsel names")
45
AutoText What? AutoText finishes words you are typing. You can use AutoText for words you will still type out (versus use a code as in AutoCorrect), but you want Word to finish your typing for you to save time. Any text entered as AutoText will be utilized for word prediction. Examples: Name of your program Your name Your courts name Opposing parties (common) Some sentences or phrases
, but you want Word to finish your typing for you to save time. Any text entered as AutoText will be utilized for word prediction. Examples: Name of your program Your name Your courts name Opposing parties (common) Some sentences or phrases.")
46
AutoText How? 2 Ways: Tools>AutoCorrect Options… Select AutoText Insert>AutoText Example: Legal Services National Technology Assistance Project

47
Find and Replace What? Change a certain word or phrase that is repeated throughout the document. Save time by typing a code that will be replaced later. How? Edit > Find Note: Word also lets you conduct expanded searches for such things as matching case, whole words, wildcards, sounds like, all word forms, character formats, and special punctuation. To access these features, click the More button in the Find and Replace window.

48
Find & Replace Test 1 Youve cut and paste a section of your colleagues document into your own. Their section has two returns in between each sentence. Your task: Find and Replace the ¶ ¶ in your section and replace with one.

49
Find & Replace Test 2 You have finished a management agreement of 70 pages. You need to go through it and make sure a trademark symbol is next to their name consistently throughout the document. How could you use Find and Replace to do this?

50
Paste Special Format Painter AutoCorrect & AutoText Find & Replace Keyboard Short-cuts Section 2: Formatting

51
Keyboard Short-cuts: The Standard Short-cuts You should know by now TaskShort-cuts Open a new word doc; Open a previously saved docCtrl+N; Ctrl+O Closes the active window, but does not Exit WordCtrl+W Closes Microsoft Word (or other open program)Alt+F4 Searches for specified text in the active documentCtrl+F Selects all text and graphics in the active windowCtrl+A Remove selection from active document (place on clipboard)Ctrl+X Copies the selection to the clipboardCtrl+C Inserts the contents of the clipboard at the insertion point (cursor) or whatever is selected Ctrl+V Saves active document with its current file name, location and format Ctrl+S Prints the active fileCtrl+P Undo the last action. Reinstate the last action.Ctrl+Z; Ctrl+Y Format / Unformat text (Bold, Italic, Underline)Ctrl+B, Ctrl+I, Ctrl+U
Ctrl+B, Ctrl+I, Ctrl+U.")
52
Keyboard Short-cuts: Diacritic Marks Diacritic MarkKeyboard Short-cut The acute accent – (café or fiancé) Ctrl+ ' (quote) before typing the vowel. The grave accent - (là or où)Use Ctrl+ ` (tick) before typing the vowel. The circumflex accent – (côte, fête) Use Ctrl+Shift+ ^ before typing the vowel The tilde - (piñata, jalapeño)Use Ctrl+Shift+ ~ before typing the letter. The umlaut- (Chloë, naïve)Use Ctrl+Shift+ : (colon) before the vowel The cedilla – (façade, soupçon)Use Ctrl+, (comma) before the letter The ring – (the Angstorm symbol - Å) Use Ctrl+Shift+@ before the letter The compound AE - (hæmoglobin) Use Ctrl+ & before a The German S - (straße)Use Ctrl + & + s
Use Ctrl+ ` (tick) before typing the vowel. The circumflex accent – (côte, fête) Use Ctrl+Shift+ ^ before typing the vowel The tilde - (piñata, jalapeño)Use Ctrl+Shift+ ~ before typing the letter. The umlaut- (Chloë, naïve)Use Ctrl+Shift+ : (colon) before the vowel The cedilla – (façade, soupçon)Use Ctrl+, (comma) before the letter The ring – (the Angstorm symbol - Å) Use before the letter The compound AE - (hæmoglobin) Use Ctrl+ & before a The German S - (straße)Use Ctrl + & + s.")
53
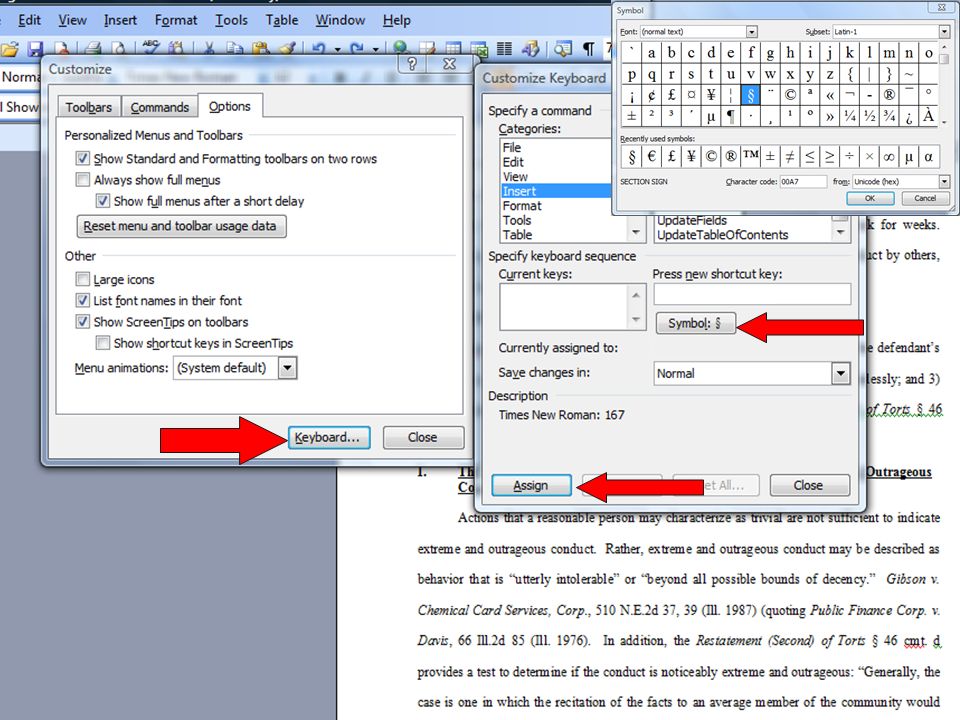
Assigning Keyboard Short-cuts for Commands & Symbols For commands: Tools>Customize>Keyboard Select Category and Command Enter new short-cut key (e.g., alt+letter, ctrl+shift+letter) to determine if short-cut is already in use (pick another short-cut if necessary) Select Assign For symbols: Insert>Symbol>Shortcut Key Enter new short-cut key (see above) Select Assign
 to determine if short-cut is already in use (pick another short-cut if necessary) Select Assign For symbols: Insert>Symbol>Shortcut Key Enter new short-cut key (see above) Select Assign")
56
Headers & Footers Page & Section Breaks Section 3: Headers & Footers

57
Navigating Headers and Footers Go to the View menu, and choose Header and Footer from the list. You will be placed in the header area first and provided with a floating toolbar. To move to the footer area, click the Switch Between Header and Footer button on the Header and Footer Toolbar.

58
Multiple Headers/Footers What if you want different footers or headers on pages in your document? Word will only break the connection of headers and footers by sections that is sections, not pages. If your document isn't already sectioned then you'll need to create section breaks at any point where the header or footer will be different from the previous pages. Once the section breaks are in then you're ready to begin.

59
Paragraph/Page and Section Breaks Word has two main features for controlling pagination: Paragraph style pagination options: Format>Paragraph Manual page and Section breaks: Insert>Break…

60
Use Show/Hide to show where section breaks occur

61
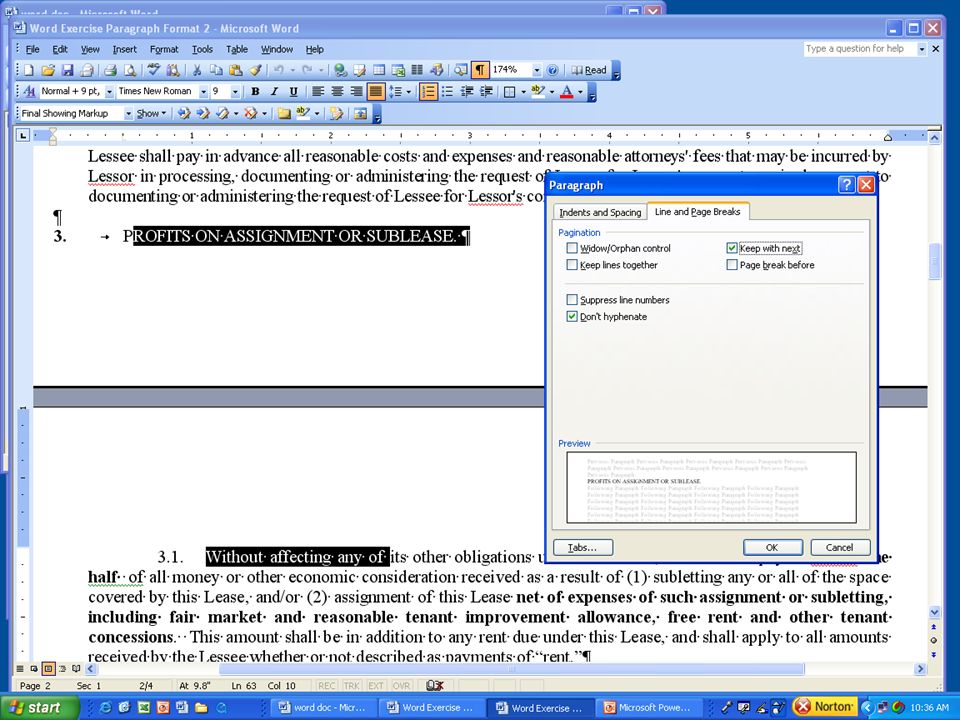
Paragraph Style Breaks Format>Paragraph… Keep with next - keeps a paragraph with the paragraph following it Example: You have a pleading with a heading at the bottom of a page and the text on the next page. This can keep it together.

63
Section Breaks Sectioning your document allows you to apply different attributes -- Header, Footer, Columns, or Page Numbers -- within the same document. Example: You have a grant or a pleading with Exhibits. You want the main document to be paginated 1 – 10. You want the Exhibits to be paginated Exhibit A – C. You can change this in the footer if you create sections first.

64
Section Breaks Example 2: You have a document that has two columns but then has one column thereafter on the same page. Create a section to change these attributes.

66
Headers and Footers Revisited Once you have your section breaks, go back in and fix the Headers and Footers for each Section. In order to keep a Header and Footer in one Section distinct from the next, you turn off Same as Previous by selecting the Link Previous button.

67
Headers and Footers Revisited EXAMPLE: Footer-Section 2- is for the Table of Contents. Roman numeral numbering is needed.

68
Headers and Footers Revisited Footer-Section 3 – is for the body of the document. Same as Previous must be removed FIRST, because Arabic page numbering is needed in this section. Same As Previous Removed by Selecting Link Previous Button Here Page Numbering Style Changed Here

69
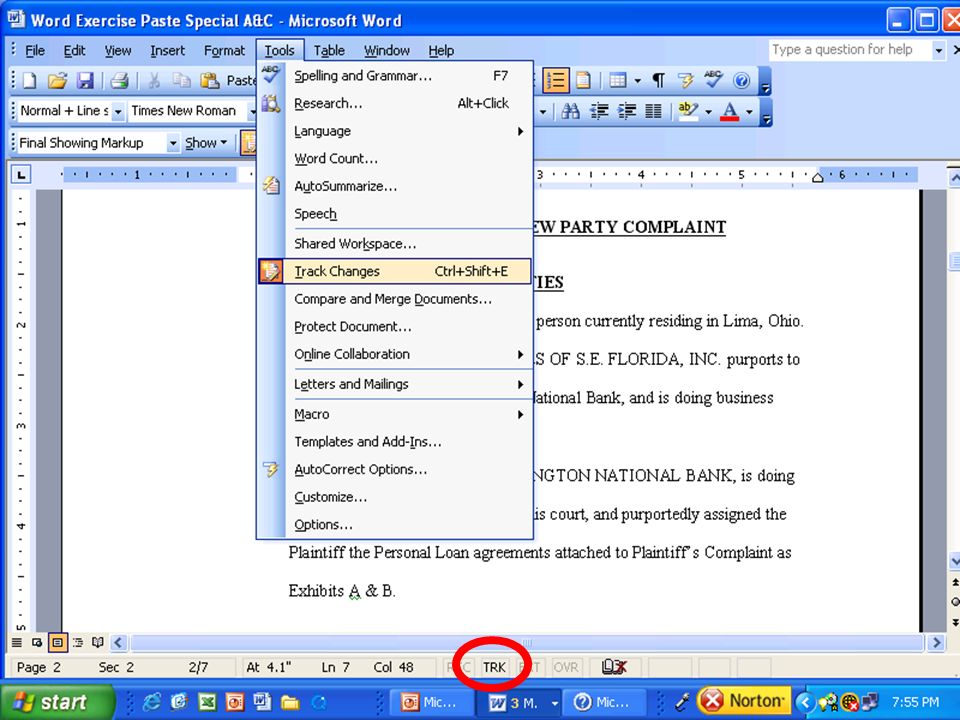
Collaborative Editing Section 4: Track Changes

70
Track Changes You can access this several ways on Word: Tools>Track Changes View>Toolbars>Reviewing TRK (Located bottom of your screen next to OVR and REC. Click on it to activate)
.")
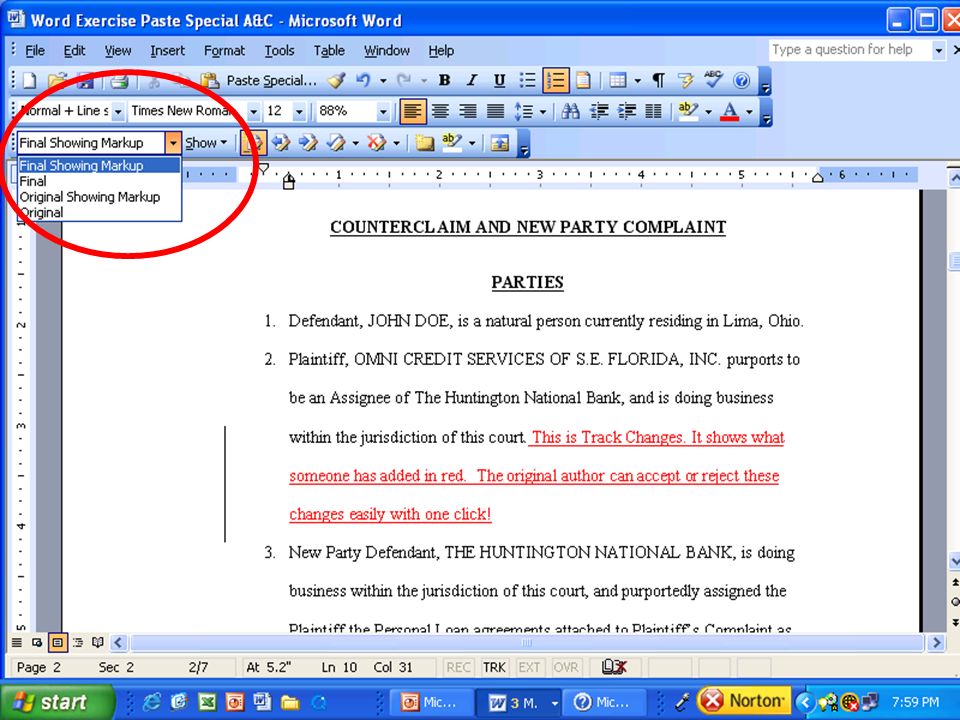
74
Remember! Make sure when you are sending the final: Select Show Final Showing Markup to make sure all changes have been accepted or rejected. Otherwise, your recipient will see all the edits and iterations.

75
Table of Contents Table of Authorities Section 5: Reference

76
Preface to TOC & TOA Do yourself a favor and get rid of automatic numbering, bullets, etc… Tools>AutoCorrect Options>

77
Table of Contents The act of inserting a TOC is easy if… youve properly formatted your document. How? Insert > Reference > Index and Tables When you want to update, Right Click and Update

78
Insert | Reference | Index & Tables

79
Prepping for TOC Three Options: Styles Outlining Format Manual Entry of Fields

80
Styles Specially crafted packages of formatting that apply many attributes at once. Instead of applying each thing individually, you apply the style once and you're done. A precursor to Table of Contents

81
Styles How To Format>Styles & Formatting OR On your Formatting Toolbar (usually displayed)
")
83
Styles…

84
Styles in Action You can assign a style for Headings and Subheadings (useful for brochures or reports) For you: TOC – A Table of Contents is created by automatically taking everything named as Heading 1, 2, and 3 and putting it in order.
 For you: TOC – A Table of Contents is created by automatically taking everything named as Heading 1, 2, and 3 and putting it in order.")
85
Styles: What You Need to Know They exist If you take the time to create them, you can easily assign headers and complex formatting to your document with one click You can check existing documents to see what Styles you are importing Clear Formatting to start over

86
Outlining Level Start every document with Outline Level to easily organize your thoughts and layout. View > Toolbars > Outlining Automatically allows you to assign Levels of text…relates each Level to a Style… You can make a TOC with Outlining

87
Manual Field Assignment ALT SHIFT O on highlighted text allows you to see a dialogue box to attribute a TOC field (Level corresponds to outlining view)
")
88
A Strong Document.. Appropriate use of Styles Appropriate use of numbering Consistent headings and fonts Pagination relevant to each section No hanging headers at bottom of pages

89
Table of Contents Table of Authorities Section 5: Reference

90
Table of Authorities The act of inserting a TOA is easy if… youve properly categorized and marked your citations throughout your pleading. How? Insert > Reference > Index and Tables When you want to update, Right Click and Update

91
Insert | Reference | Index & Tables

92
Table of Authorities HOW? A TOA draws from all of the marked citations in a document. A marked citation will be tagged with special information (which can be modified). A tag for a citation may look something like this: U.S. v. DiPrima, 472 F.2d 550, 551 (1st Cir. 1973) { TA \l U.S. v. DiPrima, 472 F.2d 550 \s 472 F2d. at \c9 } The full or long citation follows the code \l Purpose: Identifies how the citation should look in the TOA The short citation follows the code \s Purpose: Helps Word Mark All remaining citations for the case. The last code – \c is the category number. Purpose: Organizes your Table of Authorities into Categories.
. A tag for a citation may look something like this: U.S. v. DiPrima, 472 F.2d 550, 551 (1st Cir. 1973) { TA \l U.S. v. DiPrima, 472 F.2d 550 \s 472 F2d. at \c9 } The full or long citation follows the code \l Purpose: Identifies how the citation should look in the TOA The short citation follows the code \s Purpose: Helps Word Mark All remaining citations for the case. The last code – \c is the category number. Purpose: Organizes your Table of Authorities into Categories..")
93
Setting Up Categories Most trial and appellate briefs are likely to have at least two different categories of authorities Here are some sample categories you could set up before you begin to mark your citations: Supreme Court of the United States Other Federal Authority State Court Decisions Statutory Provisions United States Constitution

94
Setting Up Categories Insert>Reference> Index and Tables> Mark Citation> Category, OR Alt+Shift+I>Category The first seven categories are pre-defined. Scroll down until you find an unused option (8, 9, 10, etc.) Replace the # with your own custom category.
 Replace the # with your own custom category..")
95
Marking Citations For Most Citations Highlight the first citation Insert>Reference>In dex and Tables>Mark Citation OR Alt+Shift+I Correct your long cite to remove pinpoint cite Correct short citations, so that you can "mark all – e.g., 994 F.2d at Select Mark All

96
Finding the Next Citation Select Next Citation and Repeat the Process: Select Next Citation Highlight the entry Alt+Shift+I Correct your long cite to remove pinpoint cite Correct short citations, so that you can "mark all – e.g., 994 F.2d at Select Mark All

97
Marking Citations Second Occurrence of same long citation: Best practice for briefs is to repeat a long citation if a short citation would be confusing to the reader – e.g., new page, new subheading, etc. Treat as a new citation (with a couple twists) Select Next Citation Highlight the entry Alt+Shift+I BUT – instead of correcting the long and short citation, simply pick the case from the Short Citation List. AND – Select Mark (NOT Mark All)
 Select Next Citation Highlight the entry Alt+Shift+I BUT – instead of correcting the long and short citation, simply pick the case from the Short Citation List. AND – Select Mark (NOT Mark All).")
98
Marking Citations Second Occurrence of same long citation example

99
Marking Citations Deadling with "Id.___ Obviously Id. can refer to any case AND you won't find it using "next citation" Select Edit> Find OR Ctrl-F to search for cases of "Id." Simply select from the short citation drop down box to find the related case. Select Mark

100
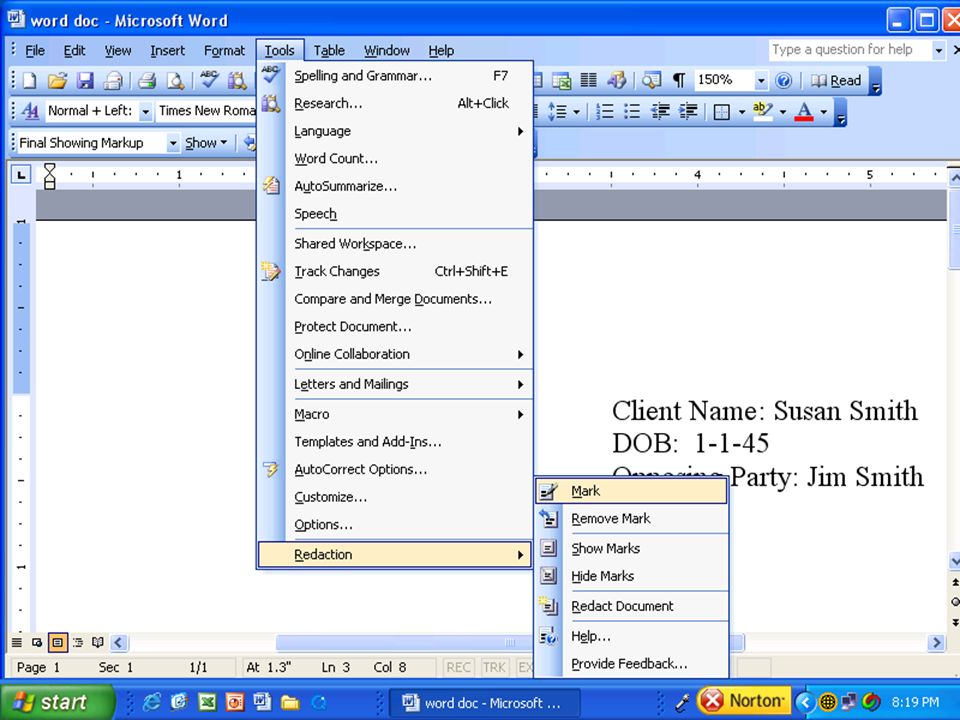
Word Redaction Remove Personal Information Section 6: Protecting Your Documentation

101
Word Redaction Why? Helps you black out words easily from your document, but still have them edit-able by the recipient. You can protect confidential information. How? Download: www.microsoft.com/downloads (Search Word Redaction. Free.) www.microsoft.com/downloads
")
104
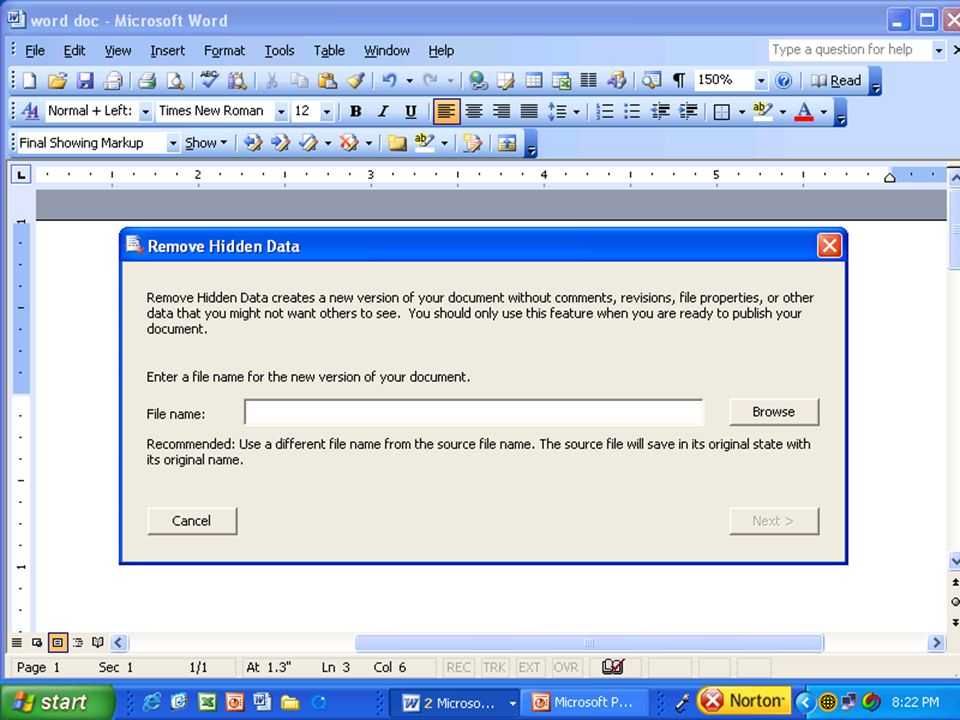
Remove Hidden Text www.microsoft.com/download Why? There is information associated with each document that lists authors who contributed, dates edited, and potentially other information registered to the computer user. When you are ready for your final version, remove hidden data.

106
Password Protect Your Doc Requires a password to open and/or read only. Tools>Options>Security

108
THANK YOU Dont forget to complete our survey Rachel R. Medina rachel@lsntap.org Training Coordinator LSNTAP rachel@lsntap.org

Similar presentations


 March 7, 2008>")


 July 15, 2009.>")


