Download presentation
Presentation is loading. Please wait.

1
Updating Your Class and Event Calendar

2
The “CW” – Compelling Why For marketing purposes, we can actively promote your classes via email, etc. by sending our customers to vikingsewinggallery.com. This will eliminate you having to send out multiple mass emails to your customers and thus save you time. By having the calendar always available on vikingsewinggallery.com, your customers can check out your events any time of day or night without having to search through your emails. This will make it much easier for your customers to find classes and get more information.

3
This will create a unified brand image for Viking Sewing Gallery stores. This is an ongoing goal to have all of our marketing materials branded cohesively. You will not need to create your calendars in multiple places or in a variety of programs. You can update all class information on vsg.com and both you and your customers can print a calendar for reference. This will eliminate having to print as many calendars in your store since a customer can simply view your calendar online. The “CW” – Compelling Why

4
Now Let’s Add a Class!

5
First, you will need to login

6
Enter your Username and Password. Your Username is your email address and the password is the same as your store email. If you have forgotten your password, email or call Kelly, Kristin, or Jenny for assistance.

7
This is what your Dashboard will look like. Here you can manage class information, images, and location information.

8
To edit or add a new class, click “Classes”.

9
This is where you will find a list all of your uploaded classes. Here you can edit current classes and add new to your calendar. Click “Add New” to add a class to your calendar

10
Now you can add your class information. Note: After the class is “published” you will be able to add Date and Time information about the class. (we will get to this shortly) Notice a URL will be created for the class
 Notice a URL will be created for the class.")
11
If you wish to add text from a Word Document or other source, click the button shown below (looks like a clipboard with a “W”) to copy and paste your text.
 to copy and paste your text.")
12
Want to add a picture to your class description? Click “Add Media” to upload or choose your photo.

13
A window will pop-up to upload an image. You can drag and drop the image into the window or Select the File from your computer. When you select your file, you will be taken to the Media Library.

14
The Media Library is the place that will house all uploaded images and documents for use on the WordPress website. Any image you upload will be located in your Media Library. The image you uploaded will be selected to insert into the post. Notice the Attachment Details on the right. Here you can add a title and description for your image. You can also change the size that the image will be within the post. Once completed, click “Insert into Post”.

15
Now your image is embedded in the class description. If you wish to upload another photo, click “Add Media” and select another image. However, try not to go too heavy with images. Up to three images is fine. If you feel good about the class title and description, click “Publish” to add Date/Time. Please insert the image at the END of the class description.

16
Now you can add the Date and Time of the class. Once completed, click “Update” to update the post with the date/time information. Don’t worry about filling out the “Locations”. With or without this information, your classes will still show up on your page.

17
The message at the top will confirm that the post has been updated. This means that your post is complete and available to view on the website! Note: If you click “View Post” from here, the post that displays will not look correct. Don’t fret! Just look it up on the site or follow the URL that was created for the class.

18
When a customer reaches your store page, this is what they will see. Here they can see the details of the upcoming class, they can sign up for the class, and view the full list of classes available. Note: There is a number that will come up next to the class title, but ignore that. It will be resolved soon.

19
This is how the customer will reserve a spot for the class. Once they send this form, the information will be sent to your store’s email address. It is up to YOU to follow through with that customer to get them officially booked and set-up for the class.

20
Do you have a class that is offered many different times throughout the month? Now you can “clone” this class to change the date and any extra information necessary. To do this, simply hover over the class you wish to copy and click “clone”.

21
The “cloned” class will then show up as a DRAFT on your class list. Simply open the class, edit what is needed, and click the blue “publish” button to add the class to the site.

22
Things to Keep in Mind… Posts should be descriptive and fun! When you write a post, write it as if it were meant for someone who has never heard of VSG. That way both new and old customers will all be on the same page! Make sure to include ALL info about class – Cost of class – Date/Time of class – Topics and techniques covered in class – Items needed for the class – Number allowed in class. Ex: “Space is limited, reserve your spot today!”

23
A customer does not understand what “Owner’s Class 1” means. Instead, try “Machine Introduction” or “Machine Basics”. – See “website_class_examples” (attached to this slide) for suggested copy If a class is sold out, edit the title to be “SOLD OUT – Machine Introduction” Keep times consistent. Ex: Use “10:00am – 12:00pm” instead of “10am-noon”. Things to Keep in Mind…
 for suggested copy If a class is sold out, edit the title to be SOLD OUT – Machine Introduction Keep times consistent. Ex: Use 10:00am – 12:00pm instead of 10am-noon . Things to Keep in Mind….")
24
Please DO NOT link to any outside websites All text formatting has been locked to ensure consistent branding throughout the entire site. You can call out text by bolding or underlining. The “published date” is NOT the date/time of the class. It is the date when the class was posted to the site. Try not to change this date but be sure it is a date in the past. Things to Keep in Mind…

25
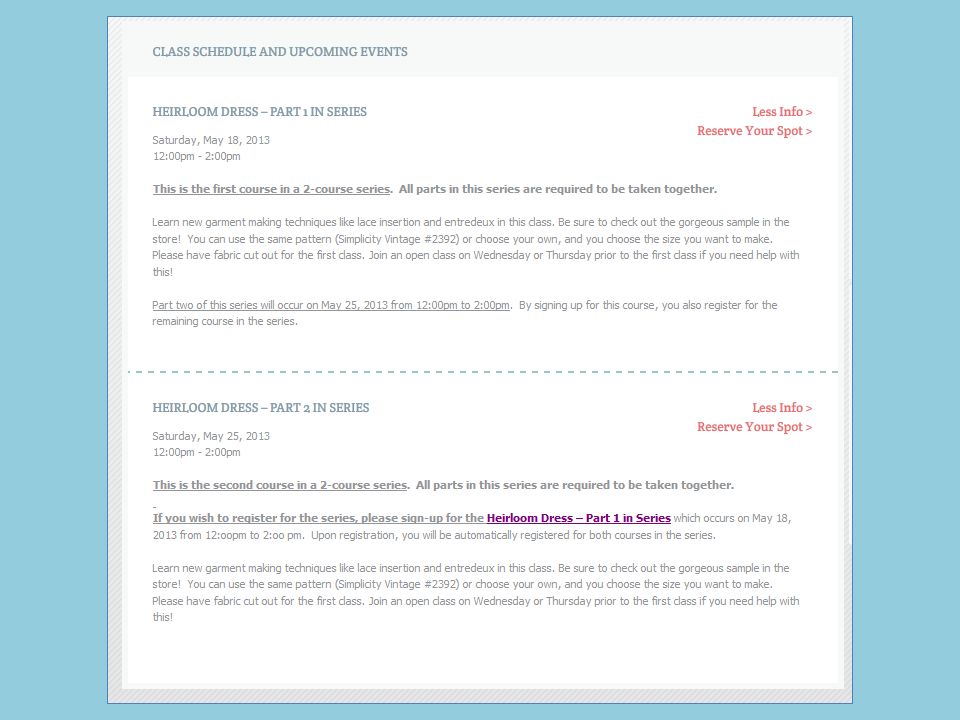
Course Series Some courses are required to be taken in a series. 1. Some series are required to be taken together 2. Some have a prerequisite to the course 3. Some have previous courses that are helpful but not necessary. The description is where you explain the series requirements to the customer. Each course will need to have it’s own post (so it will populate in the calendar), and each post will have to clearly explain which courses are necessary to take in the series.
, and each post will have to clearly explain which courses are necessary to take in the series..")
26
1. If all classes in series are required, then… In the first course description: “This is the first course in a 2-course series. All parts in this series are required to be taken together.” Include the full course description “Part 2 (or 3, 4, etc.) in this series will occur on (course date/time).” “By signing up for this course, you also register for the remaining courses in the series.” In the second (and third, etc.) course description: “This is part 2 of 2 in a series. All parts in this series are required.” “To sign up for this series, please register for the first course in the series, (course title/date). Upon registration for the first course, you will automatically be registered for all parts of this series” Include the full course description
 in this series will occur on (course date/time). By signing up for this course, you also register for the remaining courses in the series. In the second (and third, etc.) course description: This is part 2 of 2 in a series. All parts in this series are required. To sign up for this series, please register for the first course in the series, (course title/date). Upon registration for the first course, you will automatically be registered for all parts of this series Include the full course description.")
28
Links to Series It is extremely helpful to include links to the series in the courses. (especially when the customer must sign up for the first course in the series). That way, they can simply click the link to the class and can register for all courses in the series. Highlight the text you wish to hyperlink, and click the Hyperlink button (looks like an infinity symbol) Note: Please do not put links to any sites outside of VSG.com
. That way, they can simply click the link to the class and can register for all courses in the series. Highlight the text you wish to hyperlink, and click the Hyperlink button (looks like an infinity symbol) Note: Please do not put links to any sites outside of VSG.com.")
29
Links to Series This box will pop up. Simply copy and paste the URL to the course in the URL box and click “Add Link”. Your text will now be hyperlinked to that page! Remember, the URL to the course will be right under the course title.

30
2. If all classes in series are not required to be taken in conjunction, but a prerequisite class (or classes) is required, then… Add a note (or list) in the post description that includes the Prerequisite class(es) necessary.
 is required, then… Add a note (or list) in the post description that includes the Prerequisite class(es) necessary..")
31
3. If there not a prerequisite required but a previous class is beneficial to have taken first, then… Add a note in the class description like, “Having attended Machine Introduction is helpful, but not necessary.”

32
Editing Store Information Click “locations”, and you can edit store hours and store description

33
Here you can add your store hours and a description of who you are! Ex: “We are located in the shopping mall inside Joann’s Fabric Store.” Note: There is longitude and latitude information here. This is for the map function on your store page. Please do not alter these numbers.

34
Questions?? Don’t be afraid to ask! Email Kelly or Kristin anytime for assistance!

Similar presentations