Download presentation
Presentation is loading. Please wait.

1
101 P C O L S Recommended Role: New and Existing Resource Managers How to Redeem a Resource Manager Token in AIM I N T E R A C T I V E T U T O R I A L

2
TUTORIAL ICON LEGEND: HOME/BACK: This icon will take you back to the List of Actions or back one action NEXT: This icon will allow you to continue to the next action REPLAY: This icon will allow you to replay the action EMAIL: This icon will take you to the email message INFO: This icon will take you to additional information SCROLL: This icon will allow you to scroll down

3
The button will appear on many screens throughout this tutorial. Click on this button to view additional information. Click the button to return to the previous screen. Clicking on an area highlighted by a red box will advance the tutorial to the next step.

4
Scenario: The A/OPC has initiated the creation of a new Managing Account in AIM and has nominated you as a Resource Manager. The following interactive tutorial shows you how to redeem your token and accept the nomination. Click the Information icon to see FAQs about redeeming tokens

5
My work address and my work phone number are missing or incorrect, how do I change them? On the “Role Acceptance” page, you will see a link to “Update User Information.” Clicking this link will open a separate window where you can log into DEERS and update your contact information. After your work address and work phone number changes have been saved, log out of DEERS and close this separate window in order to return to the Role Acceptance screen. IMPORTANT: Do not close the Role Acceptance window if your work address and work phone number have not been immediately updated. It may take up to 24 hours before your changes will be displayed in PCOLS. You should proceed with accepting your Resource Manager nomination as outlined in the tutorial. My work email address is missing or incorrect, how do I change it? On the “Role Acceptance” page, you will see a link to “Update Email Address.” Clicking this link will open a separate window where you can log into DEERS and update this information. After your work email address has been saved, log out of DEERS and close this separate window in order to return to the Role Acceptance screen. IMPORTANT: Do not close the Role Acceptance window if your work email address has not been immediately updated. It may take up to 24 hours before your changes will be displayed in PCOLS. You should proceed with accepting your Resource Manager nomination as outlined in the tutorial. What is a token? A token is an electronic code composed of letters and numbers that uniquely identifies your nomination as a Resource Manager. It will be included in the task email that you receive from PCOLS. The token can only be used or redeemed once to accept your role. It will expire immediately after the Role Acceptance window has been successfully opened. Do not close the Role Acceptance window without clicking the Accept button at the bottom of the screen. If you do, the token will already be expired. I tried to redeem my token and I received an expired token error, what do I do? You will need to contact your A/OPC and ask him or her to send you a new token email. Why do I need to redeem a token in PCOLS if I’m already a Resource Manager? Redeeming your token allows PCOLS to associate your Managing Account with the information stored on your CAC. If you do not complete this process, your A/OPC will not be able to successfully submit the request for your Managing Account to the bank. You will also not receive email notifications whenever the A/OPC makes changes to your account through PCOLS. Finally, redeeming your token electronically records your acceptance of the Resource Manager role and the responsibilities associated with it. FAQs for New and Existing Resource Managers

6
RM Action 1 AIM: Accept Nomination as RM on Managing Account RM Action 1 AIM: Accept Nomination as RM on MA

7
You have received a new PCOLS Task email. This task email contains a token code nominating you as RM. Click one of the links to complete the task.

8
Click the “OK” button. RM Action 1 AIM: Accept Nomination as RM on MA

9
The token number has been entered. Click the “Redeem Token” button. RM Action 1 AIM: Accept Nomination as RM on MA

10
You have entered your PIN. Click the “OK” button. Note: Before entering the CAC PIN, you may be prompted to select a certificate. You will need to choose the non-email certificate to proceed.

11
RM Action 1 AIM: Accept Nomination as RM on MA You have been redirected to accept your role. Click the down arrow to simulate scrolling to the next section of the form.

12
If the Organization listed is not the correct organization, you can select the drop down list in order to pick the correct one. If your work address and phone number listed are not correct, you will need to click “update user information” to direct you to milConnect for corrections. To correct your email address, you will need to click “update email address” to direct you to Rapids Self Service for corrections.

13
RM Action 1 AIM: Accept Nomination as RM on MA Click the “Accept” button to be assigned to this Managing Account as the RM.

14
Resource Manager and Resource Manager Pool Within the Managing Account process, the Resource Manager (RM) is responsible for entering all financial information and approving the Managing Account. The RM has the authority to approve or reject the Managing Account request. In addition to the RM’s involvement in Managing Account creation, an RM or a member of the RM Pool can also view, update, or reject a Managing Account. Refer to Sections 7.0 and 8.0 in the AIM Application User Manual for further details: https://acc.dau.mil/CommunityBrowser.aspx?id=394485&lang=en-US https://acc.dau.mil/CommunityBrowser.aspx?id=394485&lang=en-US

15
RM Action 1 AIM: Accept Nomination as RM on MA The action was successful. Click the arrow to continue with this tutorial.

16
RM Action 1 Complete RM Action 1 AIM: Accept Nomination as RM on MA

17
RM Action 2 AIM: Approve the Financial Resources of the Following Managing Account RM Action 2 AIM: Approve the Financial Resources of the Following MA NOTE: For accounts established through US Bank, new Lines of Accounting (LOAs), Accounting Validation Controls (AVCs) and / or Alternate Accounting Codes (AACs) must be properly set up in Access Online prior to using them in AIM. Any questions or issues related to LOAs, AVCs and AACs should be referred to Access Online Support for further assistance.

18
RM Action 2 AIM: Approve the Financial Resources of the Following MA While still in AIM, you have received a new PCOLS Task email. Click on the email icon to view the message.

19
You have received a new PCOLS Task email to “approve, modify, or reject the following Managing Account.” Click the “X” button to return to the tutorial.

20
RM Action 2 AIM: Approve the Financial Resources of the Following MA The new task can be found in the Task Inbox. You can also scroll down on the current screen to designate the Managing Account financial information.

21
RM Action 2 AIM: Approve the Financial Resources of the Following MA Click on the “Select” button to view the new task.

22
The Managing Account Information and POCs are listed. Click the down arrow to simulate scrolling to the next section of the form.

23
RM Action 2 AIM: Approve the Financial Resources of the Following MA In the EDI Payment Routing Information box, you will need to select the appropriate option for the new Managing Account. Click the Non-EDI payment radio button to continue with the tutorial.

24
RM Action 2 AIM: Approve the Financial Resources of the Following MA In the Reallocation Method box, you will need to select the appropriate option for the new Managing Account. Click the down arrow to simulate scrolling to the next section of the form.

25
You have selected the EDI Payment Routing Information and the Reallocation Method. Click on the arrow to scroll down.

26
Note on EDI: Army, Air Force, and Defense Agency users, if you select EDI payment, you are also required to enter the following information: i.Invoice ii.Obligation The Cost Transfer field is optional Note on Reallocation Method: If you choose By Alternate Accounting Code (AAC), an Alternate Accounting Codes box will display below the Default Accounting Codes. You are required to enter an AAC Code and click Add. The AAC Code is displayed in the Final List of AAC Codes. If you need to remove an AAC Code, click the name of the Code that you want to remove, and click Remove.

27
You will need to enter the Accounting Validation Code. Click on the Enter AVC field.

28
You have entered the Accounting Validation Code. Check the box to store this AVC for future use. RM Action 2 AIM: Approve the Financial Resources of the Following MA

29
Note: If the RM selects the box to have the AVC or DAC stored for future use, the information will be added to the list of Stored AVCs or Stored DACs under the Profile tab once the RM approves the account. For any subsequent new Managing Account requests, any Stored AVCs will be available for selection under the AVC code name drop down list and that any saved DACs will be available for selection under the Stored DACs drop down list.

30
RM Action 2 AIM: Approve the Financial Resources of the Following MA You will need to enter the Default Accounting Code. Click on a DAC segment.

31
You have entered the Default Accounting Code. Check the box to store this DAC for future use.

32
The Profile tab in AIM also provides you with the ability to store certain financial information for use during Managing and Cardholder Account issuance and maintenance. 1.To store an Accounting Validation Code (AVC), in the “Accounting Validation Code” section: a.Enter the appropriate AVC. b.Click Add. The AVC will be displayed in the “Stored AVC” box below. 2.To store a Default Accounting Code (DAC), in the “Default Accounting Code” section: a.Enter the appropriate DAC. b.Click Add. The DAC will be displayed in the “Stored DAC” box below. Note: The Stored AVCs and DACs can be removed by selecting them and then clicking Delete.
, in the Accounting Validation Code section: a.Enter the appropriate AVC. b.Click Add. The AVC will be displayed in the Stored AVC box below. 2.To store a Default Accounting Code (DAC), in the Default Accounting Code section: a.Enter the appropriate DAC. b.Click Add. The DAC will be displayed in the Stored DAC box below. Note: The Stored AVCs and DACs can be removed by selecting them and then clicking Delete..")
33
RM Action 2 AIM: Approve the Financial Resources of the Following MA In the Purchase Limits box, Credit Limit and Cycle Purchase Limit are the required fields. You have the option to lower any of the existing Purchase Limits that have been entered by the A/OPC. If any of the Purchase Limits need to be increased, the Managing Account request must be rejected and it will be sent back to the A/OPC for revision. For the purposes of this tutorial, no changes will be made. Click the down arrow to simulate scrolling to the next section of the form.

34
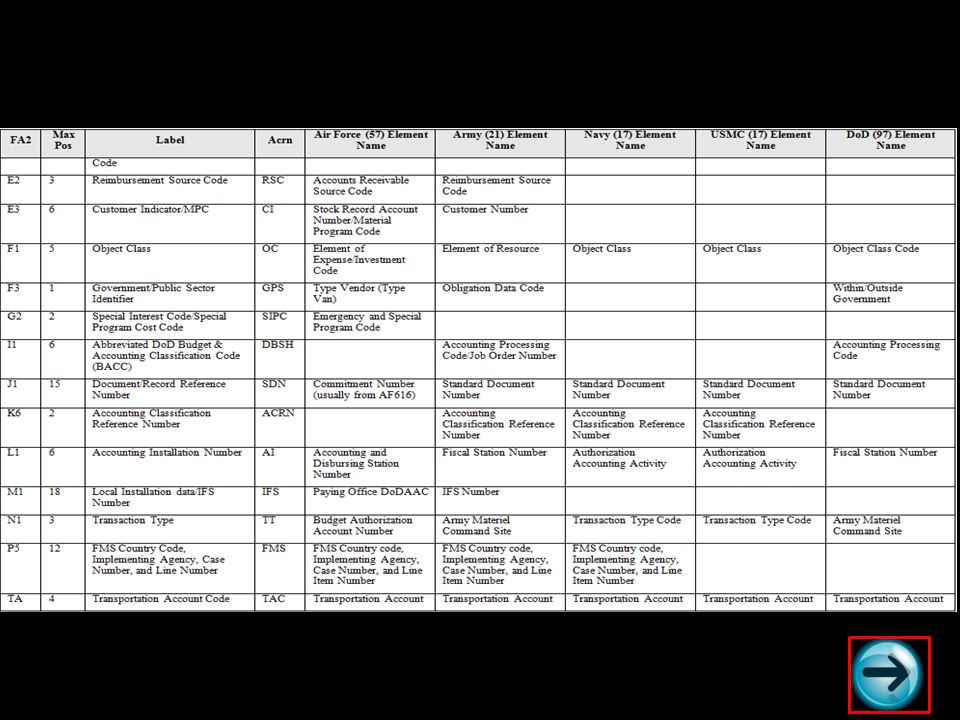
Lines of Accounting Field Definitions The following table defines the accounting data title, the acronym used in AIM, and the corresponding acronyms used within the Services and Defense Agencies. In addition, the second column lists the number of characters required for each field.

36
Note: Lines of Accounting Field Definitions can also be located in Appendix E of the AIM User Manual. Refer to the AIM Application User Manual for further details: https://acc.dau.mil/CommunityBrowser.aspx?id=394485&lang=en-US https://acc.dau.mil/CommunityBrowser.aspx?id=394485&lang=en-US

37
RM Action 2 AIM: Approve the Financial Resources of the Following MA You have confirmed that all financial information is correct. Click the “Approve” button.

38
Note: If you choose to reject the Managing Account, you must choose a Reason Code from the drop-down box. If you have any additional comments, you can enter them in the text box. Click Reject. You have the option to Save as Draft and return to finish entering information. You also have the option to Assign to Pool, if you would like other members of the RM Pool to have access to this Managing Account. Assigning the account to the RM Pool will allow other members of the pool to act, not only on the Managing Account, but all Cardholder Accounts created beneath it. Tip: To check the status of an account request, click the Accounts in Progress tab.

39
Your action was successful. Click the "Logoff” link. RM Action 2 AIM: Approve the Financial Resources of the Following MA

40
RM Action 2 Complete

41
101 This concludes the PCOLS 101 Interactive Tutorial: How Redeem a Resource Manager Token in AIM To learn how a new Managing Account is created in AIM, view the PCOLS 101 Interactive Tutorial: How to Create a Managing Account in AIM To exit tutorial press ESC on your keyboard P C O L S I N T E R A C T I V E T U T O R I A L

Similar presentations


 Community Based Abstinence Education September, 2009.>")
.>")


 RM Maintenance in AIM I N T E R A C T I V E T U T O R I A L.>")

