Download presentation
Presentation is loading. Please wait.

1
Access Online (AXOL)
")
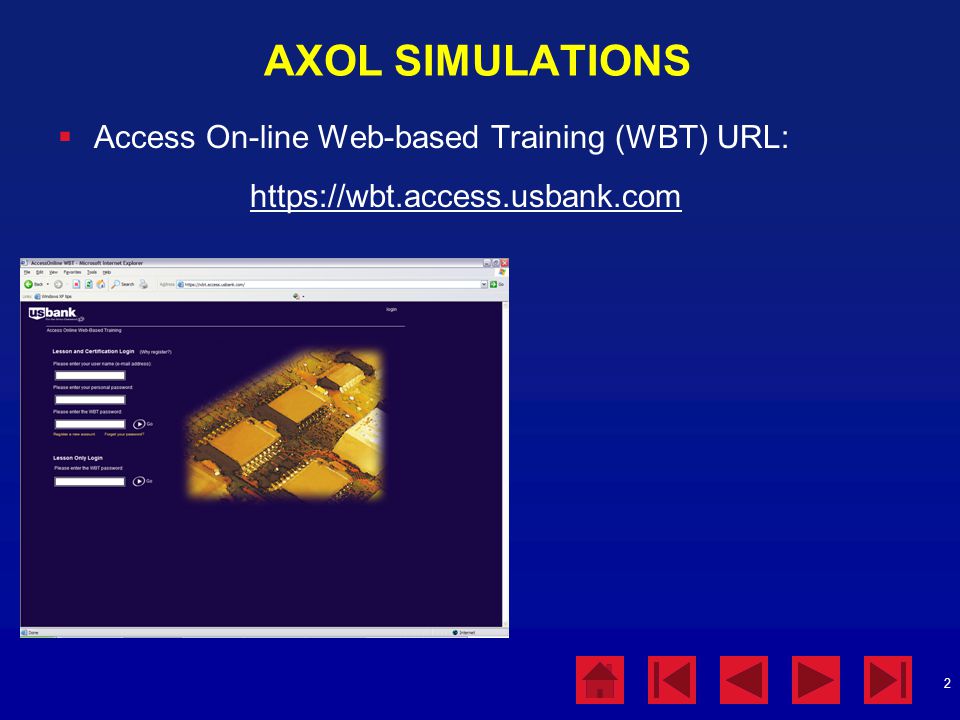
2
AXOL SIMULATIONS Access On-line Web-based Training (WBT) URL:
3
Introducing Access® Online
Cardholder and Billing Official Training Introducing Access® Online: Cardholder, Billing Official and Approving Official Training Access Online is a web-enabled purchase card program tool that gives you the ability to view cardholder statements, transaction information, and account profile information. You can easily change your password, authentication question and address. One of the more impressive features is the cardholder statement notification. Once your statement is available in Access Online, you can receive an notification of the statement’s availability. Billing Officials can also receive notification of managing account statement availability. You can also use Access Online to create manual orders, match orders and transactions, and reallocate transactions. 1-7

4
Presentation Navigation Buttons
Access Online Lessons Online Registration - Pages 6-9 Forgot Your Password - Pages 10-13 Logging In - Page 14 Navigation Basics - Pages 15-16 My Personal Information - Pages 17-23 Password Demo - Pages 24-35 Contact Info Demo - Pages 36-43 Account Profile - Pages 44-58 Account Profile Demo - Pages 59-83 Viewing Statements - Pages 84-85 Order Management - Pages 86-91 Order Creation Demo - Pages Match in Order Management - Pages Match Multiple Demo – Pages Transaction Management - Pages Disputes Demo - Pages Transaction Final Approval – Pages Statement Approval – Pages Managing Account Certification – Page 168 Web-Based Training - Pages Access Online Lessons Click the lesson title to jump to that lesson. Use the navigation buttons on the lower right to navigate the presentation in Slide Show mode. Go back to the Access Online Lessons list Go to the first slide in the presentation Go back one slide Go forward one slide Go to the last slide in the presentation Note the text in the lower left corner. This text displays the URL for the web site or the high-level task that corresponds to the task on the slide. Presentation Navigation Buttons URL or Left Navigation Bar Link 1-7

5
New Access Online Concepts
Change your password every 60 days View statements online Receive notification of statement availability Have transactions final-approved by a billing official Combine reallocation and order and transaction matching New Access Online Concepts In Access Online, you need to change your password every 60 days for security reasons. You can view your statement online. You can also receive an to let you know your statement is available in Access Online. Your transactions need to be final-approval by a billing official. You can reallocate a transaction and match an order to the transaction using the same transaction management function. 1-7

6
Online Registration https://access.usbank.com
Online Registration for New Cardholders Not every cardholder will need to register online. The C.A.R.E. to Access Online conversion process will include registering cardholders. The online registration process will apply to new cardholders in the future. These new cardholders will need to register online before they can use Access Online, including viewing account information, statements, and transactions. To register online, you need your organization short name, account number, account expiration date, and account ZIP code. Instructions: Navigate to Click the Register Online link. Register Online 1-7

7
Online Registration Online Registration army Online Registration
Instructions: Fill in each field with your account information. Click the Register This Account button if you are registering one account. Click the Additional Account button if you are registering more than one cardholder account. Complete that information, then click Register This Account. The Licensing Agreement screen displays. Tip! You must complete each field with a red asterisk. Online Registration 1-7

8
Online Registration Online Registration Online Registration
Instructions: Review the agreement, and then click the I Accept button to proceed with the online registration process. The Online Registration: Password and Contact Information screen displays. Tip! If you click the I Decline button, the system stops the online registration process. Click the “I Accept” button Online Registration 1-7

9
Online Registration Online Registration Instructions:
Complete all required fields (with a red asterisk). The Army has made the Address a required field. Click the Continue button. You are now logged in to Access Online and the Home page displays. Address is a required field: 1-7
. The Army has made the Address a required field. Click the Continue button. You are now logged in to Access Online and the Home page displays. Address is a required field: 1-7.")
10
Forgot Your Password https://access.usbank.com Forgot your password?
Click link and answer authentication question to reset your password. After 3rd failed login attempt, the system locks you out. You must contact the support desk to reset your password. See “Contact Us” in Left-Column Navigation Bar for the telephone number. Forgot Your Password If you have forgotten your password, you can reset your password via the Forgot your password? link to answer your authentication question and reset your password. Instructions: Click the Forgot your password? link. The Login: Forgot Password screen displays. Tip! After your third failed login attempt, the system locks you out. So, after your second failed login attempt, remember to use the Forgot your password? link to reset your password. Otherwise, you must contact the support desk to reset your password for you. You can find these numbers on the Contact Us screen. 1-7

11
Forgot Your Password Forgot your Password Forgot Your Password
Instructions: Type your answer to your authentication question. Click the Continue button. The Login: New Password screen displays. Forgot your Password 1-7

12
Forgot Your Password Forgot your Password
Must be 8-20 characters in length with at least one alpha and one numeric character. Passwords are not case sensitive. Cannot reuse password for 12 months. Forgot Your Password Instructions: Type your new password in each field. Your password must be 8-20 characters in length, with at least one alpha character and one numeric character. Passwords are not case sensitive. You cannot reuse a password for 12 months. Click the Save button. Forgot your Password 1-7

13
Forgot Your Password Message from U.S. Bank and DoD
Welcome to Access Online! Forgot Your Password The Client Home page displays. You are now in Access Online and your password is reset. Home 1-7

14
Logging In https://access.usbank.com Organization Short Name - army
User ID – CH sends to A/OPC Password Logging In The first time you log in to Access Online, and every 60 days after that, you must change your password. The first time you log in, you must also view and respond to the licensing agreement. Simply click the I Agree button to continue. (The license agreement is not shown in this section.) Instructions: Type your organization short name (army), your user ID, and your password in the corresponding fields. The fields are not case sensitive. Click the Login button. Tip! Remember to use the Forgot your password? link to reset your password after your second failed login attempt to avoid being locked out. 1-7
 Instructions: Type your organization short name (army), your user ID, and your password in the corresponding fields. The fields are not case sensitive. Click the Login button. Tip! Remember to use the Forgot your password link to reset your password after your second failed login attempt to avoid being locked out")
15
Navigation Basics Message from U.S. Bank and DoD
Welcome to Access Online! Left-Column Navigation Bar Account Number link to Transaction List Home and Contact Us Navigation Basics The following screen elements are important navigational features in Access Online. Disabled browser Back button—The browser Back button is disabled for security reasons. If you use the Back button, the browser stores the web pages in a temporary internet folder on your hard drive. To protect your information, you do not want pages stored in this folder. Message area—The Home page displays bulletin-board-type messages customized to each client, such as new functions available. Logout link—You can log out from any screen by using the Log Out link in upper right-hand side. Account number link—You may be set up to click an account number link in an Account Activity box to view transactions. Left-Column Navigation Bar—This main menu bar contains links to all functions and tasks available. Below the high-level tasks are the Home page link (available from any screen to return to the screen displayed on this slide) and the Contact Us link. (See the next slide.) Tip! For security reasons, if you are not active in Access Online for 15 minutes, the system displays a dialog box that lets you know your session is about to expire. If you do not respond, the system logs you out of your session automatically. Home 1-7
 and the Contact Us link. (See the next slide.) Tip! For security reasons, if you are not active in Access Online for 15 minutes, the system displays a dialog box that lets you know your session is about to expire. If you do not respond, the system logs you out of your session automatically. Home")
16
Government Support Desk Telephone Number
Support Desk Numbers Government Support Desk Telephone Number Support Desk Numbers The Contact Us screen displays telephone numbers for the support desk for different users and issues. This phone number is also on back of the GPC. Tip! Print out or write down the numbers in case you cannot access the Contact Us screen. Contact Us 1-7

17
My Personal Information
Change your Password My Personal Information Managing your personal information in Access Online is quick and easy. Keep in mind that you need to change your password every 60 days. Instructions: Click the My Personal Information link in the Left-Column Navigation Bar. To change any of your personal information, click the appropriate link. For example, to change your password, click the Password link. My Personal Information 1-7

18
My Personal Information
Contact Information My Personal Information The contact information you provide is for U.S. Bank to updates regarding Access Online. Because your organization relies on this information, you should keep the information current. This contact information is different from the billing information U.S. Bank assigned to your account. Instructions: Click the Contact Information link. A screen displays that lets you update your contact information. My Personal Information 1-7

19
Contact Information My Personal Information: Change Your Contact Information Fields with a red asterisk are required by Access Online. Instructions: Review and update any fields that are not correct. If you make a mistake while making your changes, you can click the Reset button to set the fields back to the values that displayed when you first accessed the screen. (You will lose all your changes.) Click the Save button to save your changes. Address is a required field: My Personal Information 1-7
 Click the Save button to save your changes. Address is a required field: My Personal Information")
20
Email Notification My Personal Information Email Notification
The notification function sends you an when your statement is available in Access Online. The notification is NOT automatically enabled for you. If you want to be notified, you must enable the function in Access Online. If you use the Data Exchange function, you may also receive notification via Data Exchange. (Note: this is for A/OPCs & RMs.) Instructions: Click the Notification link. The My Personal Information: Notification screen displays. My Personal Information 1-7
 Instructions: Click the Notification link. The My Personal Information: Notification screen displays. My Personal Information")
21
Email Notification My Personal Information
My Personal Information: Notification Instructions: Verify or type your address. Select Enable or Disable from the Status drop-down list. If you have access to other accounts and you want to set notification for those accounts, click the Add Cardholder Accounts link. (This presentation does not cover the procedure for adding an account.) Click the Save button. Tip! You can only enable notification for accounts you are entitled to access. My Personal Information 1-7
 Click the Save button. Tip! You can only enable notification for accounts you are entitled to access. My Personal Information")
22
Account Access My Personal Information Account Access
The account access function lets you know which accounts you currently have access to in Access Online. Instructions: Click the Account Access link. The Account Access screen displays. My Personal Information 1-7

23
Account Access My Personal Information Account Access
Account access information includes: Organization Short Name—Identifies your organization in Access Online using a unique code. Functional Entitlement Group—Determines the Access Online functions that your organization has assigned to your user ID. Accounts—Lists the accounts assigned to you. Depending on your program setup and access rights within the system, you can add accounts you are entitled to access. You can also add an account from this screen by clicking the Add Accounts link, completing the Account Number, Expiration Date, and Zip Code fields, and then clicking the Add Account button. (This presentation does not cover the screens for adding an account.) Tip! This information is view-only. To change this information, you must contact your A/OPC. My Personal Information 1-7
 Tip! This information is view-only. To change this information, you must contact your A/OPC. My Personal Information")
24
Click Here to Run the Password Demo
Click Here to Skip the Password Demo Password Demo Trainer: Click the upper Click Here to Run the Password Demo box to run the demo. Or, click the lower box to skip the demo and go to the next lesson in the presentation. To make sure the cursor is visible during the demo, right-click and select the Pointer Options>Arrow option. 1-7

25
Password Demo Click “My Personal Information” link. Password Demo
Trainer: Click the My Personal Information high-level task. 1-7

26
Password Demo Click the “Password” link. Password Demo
Trainer: Click the Password link. 1-7

27
Password Demo Click in the “Current Password” field. Password Demo
Trainer: Click in the Current Password field. 1-7

28
Password Demo Click in the “Enter New Password” field. Password Demo
Trainer: Click in the Enter New Password field. 1-7

29
Password Demo Password Demo
Trainer: Click in the Re-enter New Password field. Click in the “Re-enter New Password” field. 1-7

30
Password Demo Password Demo
Trainer: Click anywhere on the screen to advance. Tip! You can also press the <Space Bar> on you keyboard to advance in the presentation. Click anywhere on the screen to go to the next slide. 1-7

31
Password Demo Click on the “Authentication Question” field.
Trainer: Click in the Authentication Question field. 1-7

32
Password Demo Password Demo Trainer: Click the Birth Place option.
1-7

33
Password Demo Password Demo
Trainer: Click in the Authentication Response field. Click in the “Authentication Response” field. 1-7

34
Password Demo Password Demo Trainer: Click the Save button.
1-7

35
Password Demo Message text at top of the screen shows successful action. Password Demo Trainer: Click anywhere on the screen to go to the next lesson. Click anywhere on the screen to go to the next slide. 1-7

36
Click Here to Run the Contact Info Demo -Or- Click Here to Skip the Contact Info Demo Password Demo Trainer: Click the upper box to run the Contact Info demo. Click the lower box and skip the demo and go to the next lesson in the presentation. To make sure the cursor is visible during the demo, right-click and select the Pointer Options>Arrow option. 1-7

37
Contact Info Demo Click the “My Personal Information” high-level task. Contact Info Demo Trainer: Click the My Personal Information high-level task. 1-7

38
Contact Info Demo Click the “Contact Information” link. Contact Info Demo Trainer: Click the Contact Information link. 1-7

39
Contact Info Demo Click in the “Last Name” field. Contact Info Demo Trainer: Click in the Last Name field. 1-7

40
Contact Info Demo Click in the “Address 2” field. Contact Info Demo Trainer: Click in the Address 2 field. 1-7

41
Contact Info Demo Contact Info Demo Trainer: Click anywhere on the screen to advance. Click anywhere on the screen to go to the next slide. 1-7

42
Contact Info Demo Contact Info Demo Trainer: Click the Save button. Click the “Save” button. 1-7

43
Contact Info Demo Message text at top of the screen shows successful action. Contact Info Demo Trainer: Click anywhere on the screen to go to the next lesson in the presentation. Click anywhere on the screen to go to the next slide. 1-7

44
Account Profile Account Information Account Information
Demographic Information Cardholder Account Profile: Account Summary The cardholder account profile gives you access to information about your account. All account profile information is view-only. Instructions: Click the Account Information link in the Left-Column Navigation Bar. Click the Account Profile link to display the Account Summary screen and the five profile links. The account profile links include: Demographic Information—Cardholder name, address and contact information Authorizations Limits—Account status and authorization limit information (e.g. credit limit, single purchase limit, available credit) Account Information—Additional information about the account (e.g. cycle day, open date, and hierarchy information) Account Authorizations—Summary and detail information about transaction authorizations (e.g., approved, referred, declined transactions) (may not be visible to cardholders). Default Accounting Code—Default accounting code assigned to the account Financial History—Detailed history on the account’s financial events (e.g., number of payments, times past due). Click the Demographic Information link. Account Information 1-7
 Account Information—Additional information about the account (e.g. cycle day, open date, and hierarchy information) Account Authorizations—Summary and detail information about transaction authorizations (e.g., approved, referred, declined transactions) (may not be visible to cardholders). Default Accounting Code—Default accounting code assigned to the account. Financial History—Detailed history on the account’s financial events (e.g., number of payments, times past due). Click the Demographic Information link. Account Information")
45
Demographic Information
Cardholder Account Profile: Demographic Information The Demographic Information screen lists: Cardholder name NOTE: SSN is NOT used! Date of birth – not used! Address Contact information, including phone, fax and address The demographic information, like all account profile information, is view-only. Contact the A/OPC to make changes. Account Information 1-7

46
Authorization Limits Account Information Authorization Limits
Cardholder Account Profile: Authorization Limits Authorization limits are also referred to as velocity limits. Instructions: Click the Authorization Limits link. Account Information 1-7

47
Authorization Limits Account Information
Cardholder Account Profile: Authorization Limits Your authorization limits are set up by the A/OPC based on input from the billing official. These limits are based on historical usage. Typically, authorization limit information includes: Account status (e.g., open, closed) Limits (e.g., credit limit, cycle limit, single purchase limit) Any assigned merchant authorization controls (e.g., office supplies are enabled for purchases) The authorization limits information, like all account profile information, is view-only. Account Information 1-7
 Limits (e.g., credit limit, cycle limit, single purchase limit) Any assigned merchant authorization controls (e.g., office supplies are enabled for purchases) The authorization limits information, like all account profile information, is view-only. Account Information")
48
Account Information Account Information Account Information
Cardholder Account Profile: Account Information Instructions: Click the Account Information link. Account Information 1-7

49
Account Information Account Information
Cardholder Account Profile: Account Information The account information screen displays general account information, such as cycle day and open date. The screen also displays the processing hierarchy position for the account. The account information data, like all account profile information, is view-only. Account Information 1-7

50
Account Authorizations
Cardholder Account Profile: Account Authorizations If you have the entitlement, you can view account authorizations. Instructions: Click the Account Authorizations link to access summary and detail information about transaction authorization requests on the account. The screen displays a list of transactions designated with an Approved, Referred or Declined status. The account authorizations data, like all account profile information, is view-only. Account Information 1-7

51
Account Authorizations
Cardholder Account Profile: Account Authorizations Summary If you have the entitlement, you can view transaction authorization information such as the authorization date and time, response, authorization number, request type, transaction amount, MCC, and MCC description. Instructions: To view detail information about a specific transaction, click the transaction’s time link in the Auth Time column. A screen displays a series of six tabs that provide details about the authorization. Account Information 1-7

52
Account Authorizations
Cardholder Account Profile: Account Authorizations Detail If the merchant approved the transaction, the Decline tab states that the transaction was not declined. If the merchant declined the transaction, then the Decline tab states the reason. The additional tabs, Account, Merchant, Parent, Diversion, and Process, display additional detail about the authorization. Keep in mind these tabs only display if you have the entitlement to view account authorizations. Note that this transaction was not declined. Account Information 1-7

53
Default Accounting Code
Cardholder Account Profile: Default Accounting Code Instructions: Click the Default Accounting Code link. Default Accounting Code Account Information 1-7

54
Default Accounting Code
Cardholder Account Profile: Default Accounting Code Your default accounting code is the accounting code that your transactions will be assigned when the transactions enter Access Online. If a default accounting code does not display, then you do not have an assigned default accounting code. The default accounting code information, like all account profile information, is view-only. Account Information 1-7

55
Financial History Account Information Financial History
Cardholder Account Profile: Financial History Instructions: Click the Financial History link. Account Information 1-7

56
Financial History Account Information
Cardholder Account Profile: Financial History The Financial History tabs provide information about the history of the account, including 12-month history, seven-year historical analysis, and seven-year history. Account Information 1-7

57
Financial History Account Information
Cardholder Account Profile: Financial History The 7 Year History Analysis tab lists the number of times listed events occurred during each year (grouped by billing cycle). Account Information 1-7
. Account Information")
58
Financial History Account Information
Cardholder Account Profile: Financial History The 7 Year History tab provides a yes/no indication of the listed events by month/year. Account Information 1-7

59
Click Here to Run the Account Profile Demo
Click Here to Skip the Account Profile Demo Account Profile Demo Trainer: Click the upper box to run the Account Profile demo. Click the lower box to skip the demo and go to the next presentation lesson. To make sure the cursor is visible during the demo, right-click and select the Pointer Options>Arrow option. 1-7

60
Account Profile Demo Click the “Account Information” high-level task.
Trainer: Click the Account Information high-level task. 1-7

61
Account Profile Demo Click the “Cardholder Account Profile” link.
Trainer: Click the Cardholder Account Profile link. 1-7

62
Account Profile Demo Click the “Demographic Information” link.
Trainer: Click the Demographic Information link. 1-7

63
Account Profile Demo Account Profile Demo
Trainer: Click the Back to Cardholder Account Summary link. Click the “Back to Cardholder Account Summary” link. 1-7

64
Account Profile Demo Click the “Authorization Limits” link.
Trainer: Click the Authorization Limits link. 1-7

65
Account Profile Demo Account Profile Demo
Trainer: Click anywhere on the screen to advance. Click anywhere on the screen to go to the next slide. 1-7

66
Account Profile Demo Account Profile Demo
Trainer: Click the View Details link. Click the “View Details” link. 1-7

67
Account Profile Demo Account Profile Demo
Trainer: Click anywhere on the screen to advance. Click anywhere on the screen to go to the next slide. 1-7

68
Account Profile Demo Account Profile Demo
Trainer: Click the Back to Authorization Limits link. Click the “Back to Authorization Limits” link. 1-7

69
Account Profile Demo Account Profile Demo
Trainer: Click anywhere on the screen to advance. Click anywhere on the screen to go to the next slide. 1-7

70
Account Profile Demo Account Profile Demo
Trainer: Click the Back to Cardholder Account Summary link. Click the “Back to Cardholder Account Summary” link. 1-7

71
Account Profile Demo Click on the “Account Information” link.
Trainer: Click the Account Information link. 1-7

72
Account Profile Demo Account Profile Demo
Trainer: Click anywhere on the screen to advance. Click anywhere on the screen to go to the next slide. 1-7

73
Account Profile Demo Account Profile Demo
Trainer: Click the Back to Cardholder Account Summary link. Click the “Back to Cardholder Account Summary” link. 1-7

74
Account Profile Demo Click the “Account Authorizations” link.
Trainer: Click the Account Authorizations link. Tip! Keep in mind that not all organizations enable all users to view account authorizations. 1-7

75
Account Profile Demo Click the “10:18 PM ET” link.
Trainer: Click the top-most 10:18 PM ET link. 1-7

76
Account Profile Demo Click the “Back to Account Authorizations List” link. Account Profile Demo Trainer: Click the Back to Account Authorizations List link. 1-7

77
Account Profile Demo Account Profile Demo
Trainer: Click the Back to Cardholder Account Summary link. Click the “Back to Cardholder Account Summary” link. 1-7

78
Account Profile Demo Click the “Default Accounting Code” link.
Trainer: Click the Default Accounting Code link. 1-7

79
Account Profile Demo Click the “Back to Cardholder Account Summary” link. Account Profile Demo Trainer: Click the Back to Cardholder Account Summary link. 1-7

80
Account Profile Demo Click the “Financial History” link.
Trainer: Click the Financial History link. 1-7

81
Account Profile Demo Account Profile Demo
Trainer: Click anywhere on the screen to advance. Click anywhere on the screen to go to the next slide. 1-7

82
Account Profile Demo Account Profile Demo
Trainer: Click anywhere on the screen to advance. Click anywhere on the screen to go to the next slide. 1-7

83
Account Profile Demo Account Profile Demo
Trainer: Click anywhere to go to the next presentation lesson. Click anywhere on the screen to go to the next slide. 1-7

84
Viewing Statements Account Information Cardholder Statements
Statements for the past three cycles are available. Your statement is available the day after the cycle end day (e.g., available on the 20th as the cycle end day is the 19th of every month). Instructions: Click the Account Information link on the Left-Column Navigation Bar. Click the Statement link. Select the cycle date from the drop-down list. Click the View Statement button. The statement displays in a new browser window as a portable document format (PDF) file. Account Information 1-7
. Instructions: Click the Account Information link on the Left-Column Navigation Bar. Click the Statement link. Select the cycle date from the drop-down list. Click the View Statement button. The statement displays in a new browser window as a portable document format (PDF) file. Account Information")
85
Viewing Statements Account Information Viewing Statements
You can save, print, and a PDF file. Print or save the statement by clicking on the Print or Save button in the Adobe® Acrobat Reader tool bar. Account Information 1-7

86
Order Management (CARE Transaction Log)
Creating a manual order Matching transactions to orders in order management Matching multiple transactions and orders at the same time Order Management In order management, your most common tasks will include: Creating a manual order, using a form that has been customized for your organization. Matching transactions to orders. You can match orders and transactions using the order management function, using the transaction management function, or the multiple order and transaction matching function. In this lesson, you will learn how to perform this task using the order management function. Tip! For information on matching orders to a transaction, refer to the Transaction Management lesson. Order Management 1-7

87
Create a Manual Order Order Management
Select the “Order Management” high-level task. Create a Manual Order The order form you use is custom for your organization. Instructions: Select the Order Management high-level task. Select the Create New Order Record link. Your organization’s default, custom order form displays. The next three screens show the major sections in the manual order form. Order Management 1-7

88
Create a Manual Order (Order Information)
Required fields have a red asterisk. Create a Manual Order The first section is Order Information. Instructions: Specify all the information for required fields (marked with a red asterisk). Specify any additional information you have available. Tip! Depending on your organization’s program setup, you may use a system-generated order number or you may be able to type your own; e.g. document #. Order Management 1-7
. Specify any additional information you have available. Tip! Depending on your organization’s program setup, you may use a system-generated order number or you may be able to type your own; e.g. document #. Order Management")
89
Create a Manual Order (Line Items Section)
The second section is the Line Items section. Instructions: Specify line item information for the order by typing the number of line items, clicking the Add button, and then providing details on the line items in your order. Order Management 1-7

90
Create a Manual Order (Allocations Section)
The third section is the Allocations section. Instructions: Specify allocation information for your order, if needed, by typing the number of allocations to add, clicking the Add button, and then specifying allocation information for your order. You can allocate by percentage or by line item. Order Management 1-7

91
Create a Manual Order Order Management Order Management
The last two sections are Comments and Match Tolerance. Instructions: Most organizations reserve one or more Comments fields for your program management office. You may, however, be able to add comments to your order. Your organization customized your Comments fields during program setup. When you are done, click the Save and Create Order button. Tip! Once you create an order, you can select to copy the order to create a new one. The new order form populates with the same information for the original order. You can then edit the information to create and save a new order. Click the “Save and Create Order” button. Order Management 1-7

92
Click Here to Run the Order Creation Demo
Click Here to Skip the Order Creation Demo Order Creation Demo Trainer: Click the upper box to run the order creation demo or the lower box to skip the demo and go to the next presentation lesson. To add your own demo slides, insert a new slide and apply the demo screen slide master. Insert and crop a screen capture. Next, use the rectangle drawing tool to draw a clear rectangle (no fill, no line). Next, select the rectangle and add a hyperlink to the rectangle to the next slide (Insert>Hyperlink). Use a new screen capture for each step you want to illustrate. To make sure the cursor is visible during the demo, right-click and select the Pointer Options>Arrow option. 1-7
. Next, select the rectangle and add a hyperlink to the rectangle to the next slide (Insert>Hyperlink). Use a new screen capture for each step you want to illustrate. To make sure the cursor is visible during the demo, right-click and select the Pointer Options>Arrow option")
93
Order Creation Demo Select the “Order Management” high-level task.
Trainer: Click the Order Management high-level task. 1-7

94
Order Creation Demo Click the “Create New Order Record” link.
Trainer: Click the Create New Order Record link. 1-7

95
Order Creation Demo Order Creation Demo
Trainer: Click in the Requestor Name field. Click in the “Requestor Name” field. 1-7

96
Order Creation Demo Order Creation Demo
Trainer: Click anywhere on the screen to advance. Click anywhere on the screen to go to the next slide. 1-7

97
Order Creation Demo Order Creation Demo
Trainer: Click in the Order Amount field. Click in the “Order Amount” field. 1-7

98
Order Creation Demo Order Creation Demo
Trainer: Click anywhere on the screen to advance. Click anywhere on the screen to go to the next slide. 1-7

99
Order Creation Demo Order Creation Demo
Trainer: Click anywhere on the screen to advance. Click anywhere on the screen to go to the next slide. 1-7

100
Order Creation Demo Click in the “Name” field in the Merchant section.
Trainer: Click in the Name field in the Merchant section. 1-7

101
Order Creation Demo Click anywhere on the screen to go to the next slide. Order Creation Demo Trainer: Click anywhere on the screen to advance. 1-7

102
Order Creation Demo Click anywhere on the screen to go to the next slide. Order Creation Demo Trainer: Click anywhere on the screen to advance. 1-7

103
Order Creation Demo Click the “Line Items” field. Order Creation Demo
Trainer: Click in the Line Items field. 1-7

104
Order Creation Demo Click the “Add” button. Order Creation Demo
Trainer: Click the Add button. 1-7

105
Order Creation Demo Click the top-most “Product Code” field.
Trainer: Click in the top-most Product Code field. 1-7

106
Order Creation Demo Click in the top-most “Item Description” field.
Trainer: Click in the top-most Item Description field. 1-7

107
Order Creation Demo Click in the top-most “Qty” field.
Trainer: Click in the top-most Qty field 1-7

108
Order Creation Demo Click in the top-most “Unit of Measure” field.
Trainer: Click in the top-most Unit of Measure field 1-7

109
Order Creation Demo Click in the top-most “Unit Cost” field.
Trainer: Click in the top-most Unit Cost field 1-7

110
Order Creation Demo Order Creation Demo
Trainer: Click anywhere on the screen to advance. Click anywhere on the screen to go to the next slide. 1-7

111
Order Creation Demo Order Creation Demo
Trainer: Click the Add button in the Allocations section. Click the “Add” button in the Allocations section. 1-7

112
Order Creation Demo Click in the “Change to” field.
Trainer: Click in the Change to field. 1-7

113
Order Creation Demo Order Creation Demo
Trainer: Click anywhere on the screen to advance. Click anywhere on the screen to go to the next slide. 1-7

114
Order Creation Demo Order Creation Demo
Trainer: Click the Save and Create Order button. Click the “Save and Create Order” button. 1-7

115
Order Creation Demo Review error message text at top of the screen.
Trainer: Review the error message text at the top of the screen. Click anywhere on the screen to advance. Click anywhere on the screen to go to the next slide. 1-7

116
Order Creation Demo Click in the upper “% of Order Amount” field.
Trainer: Click in the upper % of Order Amount field (e.g., 0.00). 1-7
")
117
Order Creation Demo Order Creation Demo
Trainer: Click anywhere on the screen to advance. Click anywhere on the screen to go to the next slide. 1-7

118
Order Creation Demo Order Creation Demo
Trainer: Click the Save and Create Order button. Click the “Save and Create Order” button. 1-7

119
Order Creation Demo Message text at top of the screen shows successful action. Order Creation Demo Trainer: Click anywhere on the screen to go to the next presentation lesson. Click anywhere on the screen to go to the next slide. 1-7

120
Matching Multiple Orders and Transactions
Select the “Order Management” high-level task. Click the “Match Multiple Orders to Transactions” link. Matching Multiple Orders and Transactions You can match orders and transaction in transaction management, in order management, or by using the matching multiple orders and transactions function. In this lesson, you will learn how to use the match multiple orders and transactions function. Instructions: Select the Order Management high-level task. Click the Match Multiple Orders to Transactions link. Order Management 1-7

121
Matching Multiple Orders and Transactions
Select a “Date Range” for the Orders List. Click “Search”. Select a “Date Range” for the Transactions List. Click “Search”. Matching Multiple Orders and Transactions Instructions: Select a date range for the order list and click the Search button. Select a date range for the transaction list and click Search. On the order list, select the order to match transactions to. On the transaction list, select each transaction to match to your selected order. Click the Match to Order button. Depending on how your program is set up, the transaction assumes the allocation of the order and is automatically approved. Once an order is fulfilled, then the order no longer displays on the order list. Once you match a transaction, then the transaction no longer displays on the transaction list. Select the order to match transactions to. Click the “Match to Order” button. Select the transaction to match to the selected order. Order Management 1-7

122
Click Here to Run the Match Multiple Demo
Click Here to Skip the Match Multiple Demo Match Multiple Demo Trainer: Click the upper box to run the match multiple demo or the lower box to skip the demo and go to the next presentation lesson. To add your own demo slides, insert a new slide and apply the demo screen slide master. Insert and crop a screen capture. Next, use the rectangle drawing tool to draw a clear rectangle (no fill, no line). Next, select the rectangle and add a hyperlink to the rectangle to the next slide (Insert>Hyperlink). Use a new screen capture for each step you want to illustrate. To make sure the cursor is visible during the demo, right-click and select the Pointer Options>Arrow option. 1-7
. Next, select the rectangle and add a hyperlink to the rectangle to the next slide (Insert>Hyperlink). Use a new screen capture for each step you want to illustrate. To make sure the cursor is visible during the demo, right-click and select the Pointer Options>Arrow option")
123
Match Multiple Demo Select the “Order Management” high-level task.
Trainer: Click the Order Management high-level task. 1-7

124
Match Multiple Demo Click the “Match Multiple Orders to Transactions” link. Match Multiple Demo Trainer: Click the Match Multiple Orders to Transactions link. 1-7

125
Match Multiple Demo Click the left-hand “Date Range-Unfulfilled Orders to Match” fields. Match Multiple Demo Trainer: Click the left-hand Date Range-Unfulfilled Orders to Match fields. 1-7

126
Match Multiple Demo Click the right-hand “Date Range-Unfulfilled Orders to Match” fields. Match Multiple Demo Trainer: Click the right-hand Date Range-Unfulfilled Orders to Match fields. 1-7

127
Match Multiple Demo Click the “Search” button. Match Multiple Demo
Trainer: Click the Search button. 1-7

128
Match Multiple Demo Click the left-hand “Date Range-Unmatched Transactions” fields. Match Multiple Demo Trainer: Click the left-hand Date Range-Unmatched Transactions fields. 1-7

129
Match Multiple Demo Click the right-hand “Date Range-Unmatched Transactions” fields. Match Multiple Demo Trainer: Click the right-hand Date Range-Unmatched Transactions fields. 1-7

130
Match Multiple Demo Click the “Search” button. Match Multiple Demo
Trainer: Click the Search button. 1-7

131
Match Multiple Demo Match Multiple Demo
Trainer: Click the bottom order’s radio button (i.e., 03/07/2007 for McMaster Carr). Click the bottom order radio button “03/07/2007”. 1-7
. Click the bottom order radio button 03/07/")
132
Match Multiple Demo Match Multiple Demo
Trainer: Click the check box for the 03/11 $85.99 McMaster Carr transaction. Check the “Select” box for the 03/11 $85.99 McMaster Carr transaction. 1-7

133
Match Multiple Demo Match Multiple Demo
Trainer: Click the Match to Order button. Click the “Match to Order” button. 1-7

134
Match Multiple Demo Click the “Yes, Match” button. Match Multiple Demo
Trainer: Click the Yes, Match button. 1-7

135
Match Multiple Demo Message text at top of the screen shows successful action. Match Multiple Demo Trainer: Click anywhere on the screen to go to the next presentation lesson. Click anywhere on the screen to go to the next slide. 1-7

136
Transaction Management
Transaction list Disputes Transaction approval process Transaction Management Key tasks in transaction management include: Viewing the list of transactions Disputing a transaction Matching a transaction to an order Transaction approval process: transaction approval, statement approval, final approval, managing account certification Reallocating a transaction Tip! Your organization may perform transaction approval tasks in a different order. The process is customizable and flexible. 1-7

137
Viewing Transaction List
Account Link to List of Transactions Viewing Transactions You can access a list of transactions in two ways: Using the account number link in the Account Activity box (as referred to in the Navigation Basics section). Using the Transaction Management high-level task. Instructions: Select the Transaction Management high-level task on the Left-Column Navigation Bar. Click the Transaction List link on the screen that displays. You can view a list of your transactions for the current (open) cycle and the past six closed cycles, as well as available details for each transaction. (The amount of detail information depends on the level of information the merchant passes with the transaction.) Link to Transaction List Transaction Management 1-7
. Using the Transaction Management high-level task. Instructions: Select the Transaction Management high-level task on the Left-Column Navigation Bar. Click the Transaction List link on the screen that displays. You can view a list of your transactions for the current (open) cycle and the past six closed cycles, as well as available details for each transaction. (The amount of detail information depends on the level of information the merchant passes with the transaction.) Link to Transaction List. Transaction Management")
138
Transaction List Transaction Management Card Account Summary
Search Criteria Transaction List The transaction list has three sections that you can navigate using the + icon (to open a section) and the – icon (to close a section). This feature lets you view only the section you want to. The three sections are: Card Account Summary—Includes account number, account name, billing cycle selection and account status. You can select a specific cycle or all cycles. Search Criteria—Includes search fields that you can use to filter and view-only the transactions you want to see (e.g., only transactions over $1,000). Transaction List—Includes a list of transactions that meet the cycle selection and search criteria. The next slide shows your transaction list. Transaction List Transaction Management 1-7
 and the – icon (to close a section). This feature lets you view only the section you want to. The three sections are: Card Account Summary—Includes account number, account name, billing cycle selection and account status. You can select a specific cycle or all cycles. Search Criteria—Includes search fields that you can use to filter and view-only the transactions you want to see (e.g., only transactions over $1,000). Transaction List—Includes a list of transactions that meet the cycle selection and search criteria. The next slide shows your transaction list. Transaction List. Transaction Management")
139
Transaction List Transaction Management Transaction List
Links to Transaction Detail Transaction List The transaction list displays a list of transactions, including approval status, transaction date, posting date, merchant name, transaction amount, and accounting code. You can click the date link (in the Trans Date column) to access additional detail. Instructions: Click the date link (e.g., 05/20) in the Trans Date column. A series of tabs displays additional detail. (See next slide.) Transaction Management 1-7
 to access additional detail. Instructions: Click the date link (e.g., 05/20) in the Trans Date column. A series of tabs displays additional detail. (See next slide.) Transaction Management")
140
Transaction Detail Summary Tab
The elements of the detail screen include: The account number and cardholder name. Transaction summary information for the selected transaction. Additional detail on each tab, including the Summary tab. The Summary tab includes additional transaction detail, merchant information, reference information, extract details, and currency information. Instructions: Click the Back to Transaction List link to return to the transaction list. To dispute the transaction, click the Dispute Transaction link. A list of dispute reasons and instructions displays. Dispute Information Dispute Transaction link Transaction Management 1-7

141
Dispute a Transaction Transaction Management Dispute a Transaction
Instructions: Select the dispute reason radio button. Review the additional instructions (e.g., Print, Signature) Click the Select button. Follow the on-screen instructions for adding comments, signing and forwarding the dispute form to U.S. Bank. Tip! The more detailed your comments, the better your chances of resolving the dispute quickly. Transaction Management 1-7
 Click the Select button. Follow the on-screen instructions for adding comments, signing and forwarding the dispute form to U.S. Bank. Tip! The more detailed your comments, the better your chances of resolving the dispute quickly. Transaction Management")
142
Click Here to Run the Disputes Demo
Click Here to Skip the Disputes Demo Disputes Demo Trainer: Click the upper box to run the disputes demo or click the lower box to go to the next presentation lesson. To make sure the cursor is visible during the demo, right-click and select the Pointer Options>Arrow option. 1-7

143
Disputes Demo Click the “Transaction Management” high-level task.
Trainer: Click the Transaction Management high-level task. 1-7

144
Disputes Demo Click the “Transaction” link. Disputes Demo
Trainer: Click the Transaction List link. 1-7

145
Disputes Demo Disputes Demo
Trainer: Click the top-most transaction’s date link (i.e., 04/18 for Poland Spring Water). Click the “04/18” date link for Poland Spring Water. 1-7
. Click the 04/18 date link for Poland Spring Water")
146
Disputes Demo Disputes Demo
Trainer: Click anywhere on the screen to advance. Click anywhere on the screen to go to the next slide. 1-7

147
Disputes Demo Disputes Demo Trainer: Click the Dispute button.
Tip! Not all organizations enable the review function, so the Mark as Reviewed button may not display. Click the “Dispute” button. 1-7

148
Disputes Demo Click the radio button “Unauthorized”. Disputes Demo
Trainer: Click the radio button for Unauthorized. 1-7

149
Disputes Demo Disputes Demo
Trainer: Click anywhere on the screen to advance. Click anywhere on the screen to go to the next slide. 1-7

150
Disputes Demo Disputes Demo Trainer: Click the Select button.
1-7

151
Disputes Demo Click the “Requestor Phone Number” field. Disputes Demo
Trainer: Click in the Requester Phone Number field. 1-7

152
Disputes Demo Click the “Comments” field. Disputes Demo
Trainer: Click in the Comments field. 1-7

153
Disputes Demo Disputes Demo Trainer: Click the Continue button.
1-7

154
Disputes Demo Message text at top of the screen shows successful action. Click the “transaction detail” link. Disputes Demo Trainer: Click the transaction detail link. 1-7

155
Disputes Demo Disputes Demo
Trainer: Click anywhere on the screen to advance. Click anywhere on the screen to go to the next slide. 1-7

156
Disputes Demo Disputes Demo Trainer: Click the Cancel Dispute button.
1-7

157
Disputes Demo Click the “Cancellation Comments” field. Disputes Demo
Trainer: Click in the Cancellation Comments field. Tip! The Cancellation Comments field lets the user add comments about why the user is cancelling the dispute. 1-7

158
Disputes Demo Disputes Demo
Trainer: Click the Yes, Cancel Dispute button. Click the “Yes, Cancel Dispute” button. 1-7

159
Disputes Demo Message text at top of the screen shows successful action. Disputes Demo Trainer: Click anywhere on the screen to advance. Click anywhere on the screen to go to the next slide. 1-7

160
Disputes Demo Disputes Demo
Trainer: Click the Plus Sign icon for Dispute History. Click the “Plus Sign” icon. 1-7

161
Disputes Demo Disputes Demo
Trainer: Click the Back to Transaction List link. Click the “Back to Transaction List” link. 1-7

162
Disputes Demo Disputes Demo
Trainer: Click anywhere on the screen to go to the next presentation lesson. Click anywhere on the screen to go to the next slide. 1-7

163
Transaction Final-Approval
Check the “Select” box. Transaction Final-Approval Cardholders must approve transactions by matching them to manual orders. Billing officials can then final-approve transactions. Some organizations require that the final-approver review any related information (e.g., the matched order) before final-approving a transaction. Instructions: On the transaction list, select the check box in the Select column for each transaction to approve. Click the Approve button. The Approval Status changes from Pending to Approved. Tip! Your organization may let users approve a group of transactions. Click the “Approve” button. Transaction Management 1-7
 before final-approving a transaction. Instructions: On the transaction list, select the check box in the Select column for each transaction to approve. Click the Approve button. The Approval Status changes from Pending to Approved. Tip! Your organization may let users approve a group of transactions. Click the Approve button. Transaction Management")
164
Transaction Final-Approval
You can also approve a transaction from the transaction detail Summary tab. Instructions: On the transaction list, click the transaction’s date link. Review the detail on any of the tabs. On the Summary tab, click the Approve button. On the transaction list, the Approval Status changes from Pending to Approved. Tip! Keep in mind that you organization may require you to review related information (e.g., the matched order) before final-approving a transaction. For example, you can simply select the Matched Order tab to review the order data. Click the “Approve” button. Transaction Management 1-7
 before final-approving a transaction. For example, you can simply select the Matched Order tab to review the order data. Click the Approve button. Transaction Management")
165
Transaction Final-Approval
Click the “Approval History” tab. Transaction Final-Approval You can easily select the Approval History tab to view the approval history of a transaction. Transaction Management 1-7

166
Statement Approval Transaction Management
Select correct cycle from drop-down Click “Search” button. NOTE: Totals are for the account, not the selected cycle. Statement Approval You can easily approve your statement. All your transactions must be approved before you can approve your statement. Keep in mind that the totals listed are for the account, not the selected cycle. Instructions: Select the correct cycle from the Billing Cycle Close Date drop-down list. Click the Search button. Make sure you have the correct cycle. Click the Approve Statement button. A confirmation screen with the approval text unique to your organization displays on which you finalize your approval. Click the “Approve Statement” button. Transaction Management 1-7

167
Statement Approval Transaction Management Statement Approval
The text that displays is unique to your organization. Instructions: Review the text. Click the Agree button. Click the “Agree” button. Transaction Management 1-7

168
Managing Account Certification
Check the “Select” box of the account you want to certify. Managing Account Certification You must final-approve all transactions before you can certify a managing account. Instructions: Select Managing Account List sub-task in the Transaction Management function. Search and select the managing account and cycle you want to certify. Select the account’s check box in the Select column. Click the Certify button. A confirmation message with text unique to your organization displays that lets you finalize your certification. Click the “Certify” button. Transaction Management 1-7

169
Web-Based Training https://wbt.access.usbank.com
Go to accessible site for users with visual or mobility impairments. Click “Register a new account” link. The Access Online Web-Based Training The web-based training (WBT) is a detailed training resource on Access Online functions. The WBT includes: Interactive lessons Final exam and certification Hands-on simulations Additional reference materials, including a glossary Use the WBT to train yourself on the system. You can also bookmark the WBT to access when you need help. Passwords change every two months. Instructions: New users need to register in order to participate in the certification process. To register, click the Register a new account link. (See the next slide.) Registered users log in by typing their address, personal password and current WBT password and clicking Go. Registered users can click the Forgot your password? link to use the WBT authentication to reset their personal WBT passwords. You can use the Lesson Only Logon field to access the lesson content only. Tip! Cardholders can practice registration by using the WBT Login and Registration simulation available on the training and communication web site. 1-7
 is a detailed training resource on Access Online functions. The WBT includes: Interactive lessons. Final exam and certification. Hands-on simulations. Additional reference materials, including a glossary. Use the WBT to train yourself on the system. You can also bookmark the WBT to access when you need help. Passwords change every two months. Instructions: New users need to register in order to participate in the certification process. To register, click the Register a new account link. (See the next slide.) Registered users log in by typing their address, personal password and current WBT password and clicking Go. Registered users can click the Forgot your password link to use the WBT authentication to reset their personal WBT passwords. You can use the Lesson Only Logon field to access the lesson content only. Tip! Cardholders can practice registration by using the WBT Login and Registration simulation available on the training and communication web site")
170
Web-Based Training https://wbt.access.usbank.com
Enter requested information. Address is: Password is 8-20 characters. Organization Short Name is “army”. The Access Online Web-Based Training You only need to register once and then you can log in as a registered user. As a registered user, you can review lesson content, access user guides and other documentation, practice hands-on simulations, take the final certification exam, and print a completion certificate. Instructions: To register, specify information in every field. Select the user type carefully, since user type controls which lessons you have access to. Also specify the correct organization short name. Click Register when you are done. Next time, log in as a registered user. Click on the drop down and choose one of the following: “Government Cardholder” “Government AO/BO” for all billing officials “Government Financial Managers” for all Resource Managers & Resource Advisors. (Note: Advisors are view-only and cannot change limits or EDI-enable.) 1-7
")
171
Web-Based Training https://wbt.access.usbank.com
Click this link to access lesson content, including procedures, self-evaluation questions, user guides, quick references, and simulations. Click this link to access the final certification exam (not the same as the lesson self-evaluation questions). The Access Online Web-Based Training On the main menu, you can roll your mouse over the menu item to access information about the option. On this screen, you can see that the user has moused over the Go to the certification exam option. The Print certificate option only displays after you pass at least one topic’s certification exam questions. Keep in mind that the WBT contains both self-evaluation questions at the end of each lesson, and, for registered users, a separate final certification exam. Registered users can take the final exam certification exam questions for one or more lessons at a time. The system keeps track of which topics the registered user has passed in the final certification exam. Instructions: Mouse over a main menu option to find out more information. Click an option to proceed. Mouse over an option for more information. 1-7
. The Access Online Web-Based Training. On the main menu, you can roll your mouse over the menu item to access information about the option. On this screen, you can see that the user has moused over the Go to the certification exam option. The Print certificate option only displays after you pass at least one topic’s certification exam questions. Keep in mind that the WBT contains both self-evaluation questions at the end of each lesson, and, for registered users, a separate final certification exam. Registered users can take the final exam certification exam questions for one or more lessons at a time. The system keeps track of which topics the registered user has passed in the final certification exam. Instructions: Mouse over a main menu option to find out more information. Click an option to proceed. Mouse over an option for more information")
172
Web-Based Training https://wbt.access.usbank.com
Watch the Announcements section for update information and links to updated content. Select a lesson checkbox to review that lesson and access the related user guide. The Access Online Web-Based Training Instructions: Select a lesson check box to take that lesson and access the related user guide. Click the Go to lessons link. Review the Announcements section for information in content updates. Click a link to go directly to the updated content. 1-7

173
Web-Based Training https://wbt.access.usbank.com
Links to user guides, quick references, and simulations. NOTE: these are on the USMA GPC Webpage WBT navigation lets you go from one lesson to the other, go screen by screen, or skip around within a lesson. The Access Online Web-Based Training Within the lesson, you can read the procedural steps and view the corresponding sample screens and pins. You can go screen by screen, skip around within a lesson, or select another lesson. You can also access user guides, quick references, and simulations. Instructions: Use the scroll bar to read all the steps. Click an arrow to go to the next screen. Click a star to go the another section in the lesson. Click a lesson number to go to another lesson. Click the User Guides link to access user guides and quick references. Click the Simulations link to access the simulations. Procedural steps display here. Sample screens and numbered pins display here. 1-7

174
Questions (and hopefully) Answers
? Write your questions in the box below and to the AOPC

Similar presentations

. MODULE 4.5 PubMed/How to Use MY NCBI Instructions - This part of the: course is a PowerPoint demonstration intended to introduce.>")


 Search Invoice Manage.>")

>")


