Download presentation
Presentation is loading. Please wait.

1
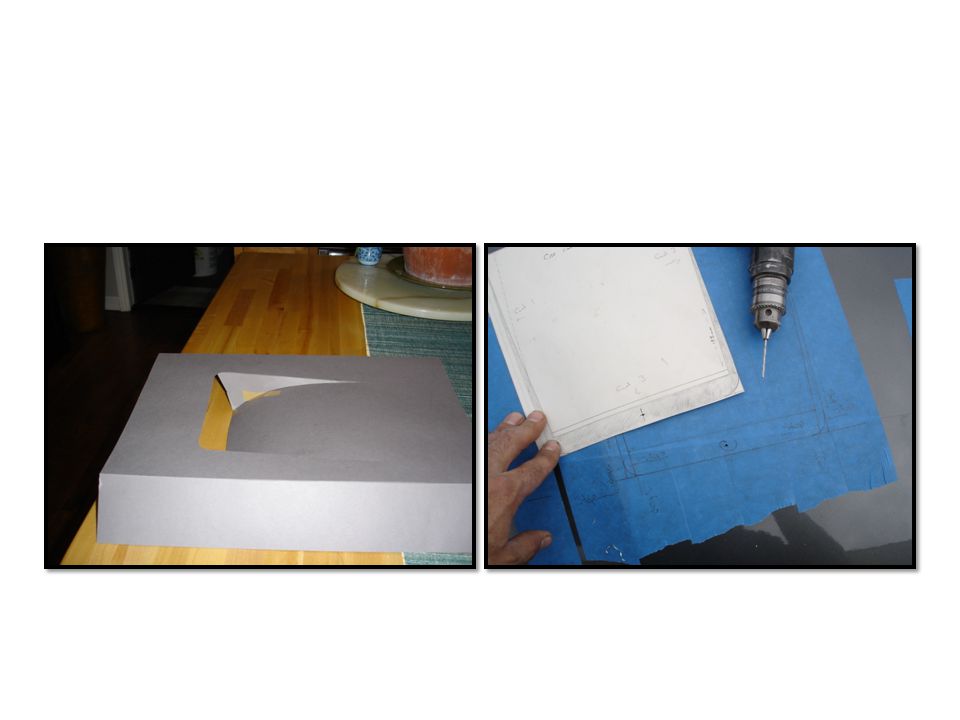
RS6 Hood Vent Templates and fab Instructions. You will need- Painters tape. 1” and 2”+ Aircraft paint stripper Tape measure mm T square Good pencil Drill with small drill bit Something to cut aluminum with a fine blade (possibly a FEIN Multimaster or Dremel with the serated wood blade ) I used the dremel and burnt out the motor Would recommend test cuts on some aluminum sheet before cutting the hood!!! Some aluminum sheet 300mm x 400mm x 1.5mm(min) should be plenty. Some files, some small curved ones and some flats Mesh – I used some from a small screen door found at hardware store
 I used the dremel and burnt out the motor Would recommend test cuts on some aluminum sheet before cutting the hood!!. Some aluminum sheet 300mm x 400mm x 1.5mm(min) should be plenty. Some files, some small curved ones and some flats Mesh – I used some from a small screen door found at hardware store.")
2
Step 1. Remove and strip the hood. - As cutting causes heat the paint will be damaged around these areas and the bond to the hood will be broken – even if you can’t see it. This will cause problems later. Also welding on the hood in later steps will total paint in a vast area. (its going to get paint anyway so just strip it. I did the top only and sanded off the underside in the areas that would be exposed to heat after they were identified. TERMS Top = back or rear Bottom = front RidgeLine – the center section of the hood is raised then bends off to the sides (ridge is the top of this first bend) and flattens out again (trough) to continue to the outside edge *NOTE - the vent template should be labeled LEFT on one side and RIGHT on the other as it must be turned over to mark the other side of the hood. CHECK the position of all marks and cuts many times before cutting anything!!
 and flattens out again (trough) to continue to the outside edge *NOTE - the vent template should be labeled LEFT on one side and RIGHT on the other as it must be turned over to mark the other side of the hood. CHECK the position of all marks and cuts many times before cutting anything!!.")
3
From the rear / TOP outside corner of the hood measure towards the BOTTOM on the same side along the ridge line 840 mm. Set the top of the templete at this point. I marked the template where the tape should end up… 10mm on the inside of the ridgeline. This will give you a rough idea of the area we will be working with. All taping will be done in this area for the front vents. Using 1” (20mm) painters tape define the ridge line. Run the tape edge along this line (the highest point of the bend) with the tape to the outside edge of the hood. (this step is key – make sure its straight and do this for both sides of the hood now – so they are at the same point ) Next use the 2” tape (50mm+) to lay up against the ridge line in strips long enough to generously cover the area that the vent will cover. Step3. Step 2. Now re-measure from the Top outside edge of the hood back down the ridgeline and set the Template in position. Make sure the correct side is facing up for the side of the hood your working on!! With the edge against your ridgeline tape run your pencil across the top of the template to give you a guide. At this point you have two reference lines (the ridge line and the top line marking the top of the template. You can either secure the template in place here and mark around it or transfer all lines onto the taped area using measurement. Up to you – I perfer transfering the information over myself.
 painters tape define the ridge line. Run the tape edge along this line (the highest point of the bend) with the tape to the outside edge of the hood. (this step is key – make sure its straight and do this for both sides of the hood now – so they are at the same point ) Next use the 2 tape (50mm+) to lay up against the ridge line in strips long enough to generously cover the area that the vent will cover. Step3. Step 2. Now re-measure from the Top outside edge of the hood back down the ridgeline and set the Template in position. Make sure the correct side is facing up for the side of the hood your working on!. With the edge against your ridgeline tape run your pencil across the top of the template to give you a guide. At this point you have two reference lines (the ridge line and the top line marking the top of the template. You can either secure the template in place here and mark around it or transfer all lines onto the taped area using measurement. Up to you – I perfer transfering the information over myself..")
4
Step 4. So now you should have both sides marked up – check against the template and make sure they are mirror images of each other (opposites) Set the template on top of your marks and secure with alittle tape. Now using the drill and a very small bit drill through the template and hood where marked. If you are off alittle this will give you alittle room to adjust before the cutting – just make sure both sides end up the same. no turning back now!!! Remove the template, note where there is a gap from the ridgeline edge to the actual cut line (10mm)- fold alone this line and place on the underside of the hood matching up the hole you just drilled to the template – keep in position with the drill bit if that helps. IMPORTANT – make sure if you are working on the left side that the template is still facing the right way – on the underside of the hood the LEFT should be against the hood. Reversed on the other side. Now just mark around the template with a marker giving about 10mm extra all the way around. This will give you room to work – weld Repeat on the right side
 Set the template on top of your marks and secure with alittle tape. Now using the drill and a very small bit drill through the template and hood where marked. If you are off alittle this will give you alittle room to adjust before the cutting – just make sure both sides end up the same. no turning back now!!. Remove the template, note where there is a gap from the ridgeline edge to the actual cut line (10mm)- fold alone this line and place on the underside of the hood matching up the hole you just drilled to the template – keep in position with the drill bit if that helps. IMPORTANT – make sure if you are working on the left side that the template is still facing the right way – on the underside of the hood the LEFT should be against the hood. Reversed on the other side. Now just mark around the template with a marker giving about 10mm extra all the way around. This will give you room to work – weld Repeat on the right side.")
5
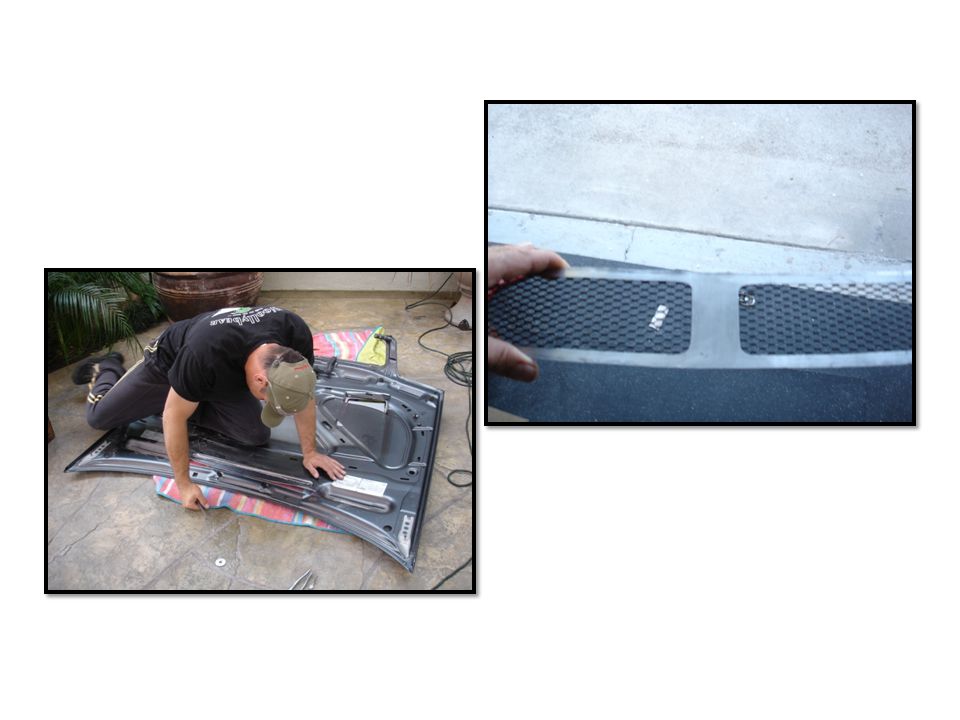
Step 5. On the underside of the hood cut out the subframe where marked being very careful not to go into the hood. TAKE YOUR TIME. When you get to the front section only slice the sides of the sub frame then bend it back down against the hood at about 90’ (you will probably have to cut some off the front so it fits when folded down.. I think it was just alittle long. When this is all cleaned up and your happy with it turn the hood over.. Time for the top. Tape extra protection all around the outside of the marked cut area – lots of it. During cutting your blade can hook up and takeoff across the hood (I have done it) Make all cuts on the waste side of the line leaving maybe 1mm where possible.. After cutting clean up cut to line with a file. NEVER cut or file past the line!! DON’T CUT THE TOP OF THE FLAP OFF. It must stay attached to the hood here. Start on the two inside vertical cuts (bottom to top) then the inside horizontal Then the outside verts then horizontal Use the dead space (where the guide hole you drilled is) to work at the corners linking the verts to the horizontal cut. The rounded corners will need to be shapped with a file.
 Make all cuts on the waste side of the line leaving maybe 1mm where possible.. After cutting clean up cut to line with a file. NEVER cut or file past the line!. DON’T CUT THE TOP OF THE FLAP OFF. It must stay attached to the hood here. Start on the two inside vertical cuts (bottom to top) then the inside horizontal Then the outside verts then horizontal Use the dead space (where the guide hole you drilled is) to work at the corners linking the verts to the horizontal cut. The rounded corners will need to be shapped with a file..")
6
Step 6. At this point you should have the vent cleaned up – filed to the line and looking good. On the underside make sure you have sanded back any paint that is now visible after removing the extra 10mm of material from the subframe around the vent area. Use the side templates to mark out on the aluminum sheet these pieces. Tape the sheet then mark on that. Cut out and shape up with a file. Hold those pieces up to the underside of the vent area and see how much rock you need to put in the flap. This is the hardest part – I had a piece of pipe (4” or 100mm +) I cut to the width of the flap then sliced in half and spread that piece even wider using some heat from a cutting torch. This is the piece that you use to add rock to the flap. Very carefully place this piece under the flap and work a curve into the hood flap from the tip of the flap back. I clamped the tip of the flap to the pipe and then rocked it – NOT TO MUCH but way more on the end tapering off towards the middle. Do not bend past about ½ way up the flap.. Maybe 2/3 up. Your trying not to crease the flap – it will crease but the less the better for the body work later. You just want it to get a close curve to the side sections before they are welded in
 I cut to the width of the flap then sliced in half and spread that piece even wider using some heat from a cutting torch. This is the piece that you use to add rock to the flap. Very carefully place this piece under the flap and work a curve into the hood flap from the tip of the flap back. I clamped the tip of the flap to the pipe and then rocked it – NOT TO MUCH but way more on the end tapering off towards the middle. Do not bend past about ½ way up the flap.. Maybe 2/3 up. Your trying not to crease the flap – it will crease but the less the better for the body work later. You just want it to get a close curve to the side sections before they are welded in.")
7
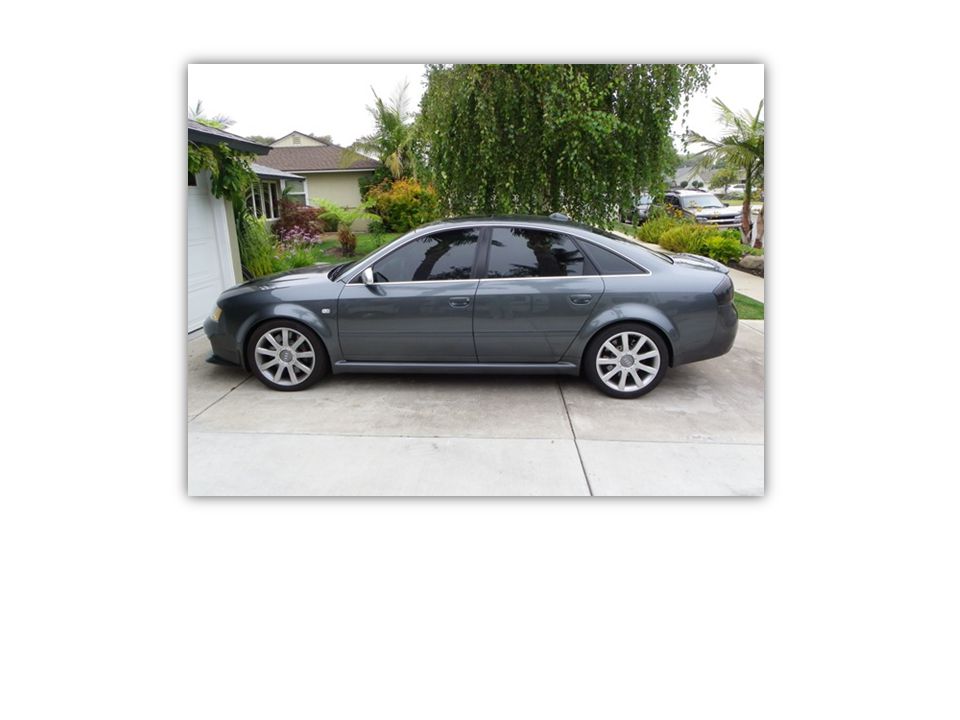
Step 7. When that’s all done the welding can start. Make sure that all pieces and the hood area to be welded are cleaned with a special solvant to remove oxide before welding!! The welding should be done by someone who works with aluminum A LOT!! Should be tacked - don’t work any one area only as it will warp the hood and that shaped will be fixed into the hood by the weld. Just tack it so it is solid – don’t try and seal it completely – that’s what the body shop will take care of. So then the welds are cleaned up – light file. I put the drain pipe in at this point along the bottom of the flap. Its optional Ask your body shop – maybe they perfer to shape out the vents before the mesh goes in as it would be much easier for them. Then mesh it and they can finish and paint. If you put this in – put the mesh in first then the drain over that. I used an epoxy to secure the drain in place and the mesh. That’s the fronts done – my drain has plastic 90’ at the low side, then on the car I have pvc hose ends to heat proof hose that leads out the wheel well vents so water can get out there.

8
The Back vent You must find the center point of the hood in the back 300mm or so. Tape the back section roughly where the vent will go. Measure from the back corners down the edge say 200mm – mark it. And 300mm from the corner and mark it. Do this on both sides then get a long straight edge, what ever works as long as its straight and link your marks. Roughly through the vert center line mark a horizontal line across both marks. Now just measure the width of the hood at both marks, ½ that and measure in to the center and mark on that line you drew. Do this from both sides to confirm your math!!! Link the two points up with a vert line and you now have your center line. Lay the template back on this point matching up the center line – hey presto. As far as the underneath venting channels ref. the pics I posted on the RS6 site. Ask me if you need more. Use common sense and remember keeping rain out of the engine compartment is the goal / while venting the engine bay. Yes you should put the soft heat shield back in when your done. I also put some self adheivese heat shield on the underside of the vent flaps. Helps a lot! Fit the soft heat shield – mark with a highlighter then remove / cut and stitch up the edges.

Similar presentations


 Installation principles 1. Cabinets need to be installed straight, plumb, and level. 2. The area you are working in is rarely straight, plumb,>")


 Paper version This guide is intended to be.>")
 and slow velocity to reduce.>")

