Download presentation
Presentation is loading. Please wait.

1
Introduction to Video Communications The Production Process TGJ2O – Grade 10 Comm-Tech Bluevale Technology

2
Intro to Video Communications During the next few weeks, you will experience a variety of lessons and activities to help you better understand the process involved in producing high-quality video projects. During this unit, you will develop a strong understanding of: Parts of a video camera and how to handle video equipment Shot types and shot composition The video production process Digital video production & editing

3
The Production Process The production process is a term that describes the different steps involved in producing a final video or multimedia project. There are 3 major steps in the production process: 1. Pre-Production 2. Production 3. Post-Production Each step is crucial to the step it precedes. If any step is done poorly, the overall project will suffer, so address each stage with care.

4
Pre-Production This is the planning and development stage of video production. The first step is generating an idea for the project. The idea should be effective enough for you to want to move ahead to the next steps – developing a budget, script and storyboard. Your budget will depend on the nature of the final product, so plan carefully.

5
Pre-Production (contd.) After budget approval, your idea needs to be translated into a detailed script and storyboard. A script provides dialogue, scene descriptions, etc. for the project. A storyboard is a carefully drawn visual representation of production. It represents the various camera shots to be used in the project. Storyboards provide important information about shot composition, camera/talent movement, audio, setting, etc.

6
Pre-Production - Storyboards

8
Pre-Production - Screenplay

9
Pre-Production – Scouting Locations All locations to be used during the production stage of the project need to be scouted before actual filming can begin. Locations are very important to the overall feel of the production, so great care should be taken to select appropriate filming sites.

10
Production The second stage of the process is Production. This stage involves the actual filming or collecting of raw footage for the project. This step usually involves many more people than other stages (on-screen talent, crew, etc.). There are a few important hints you should try to follow during production to make your job a bit easier…
. There are a few important hints you should try to follow during production to make your job a bit easier….")
11
Production - Hints Rehearse Before you shoot any footage, have talent run through the scene a few times. This saves on wasted tape and gives camera people time to set up. Set Up Your Shots Be careful to pay attention to environment when filming. Watch for distracting backgrounds, etc. Make sure camera is properly set for lighting conditions. Film extra shots of scene details for editing (including cutaways) and reshoot from different angles.
 and reshoot from different angles..")
12
Production – Hints (contd) Take Extra of Everything Take time to pack everything with you that you might need during filming so you don’t get stuck without required equipment, props, etc. Schedule, Schedule, Schedule A well-planned production always has a well-planned schedule. Make sure everyone involved knows what is being done each day so people come to class prepared for work. Leave plenty of time for post-production as this often takes the longest

13
Post-Production This is the final stage of the process and is usually the longest step. There are three main aspects to this step: 1. Video & Audio Editing 2. Soundtrack Composition (sound effects & music) 3. Marketing & Advertising (for commercial productions)
 3. Marketing & Advertising (for commercial productions).")
14
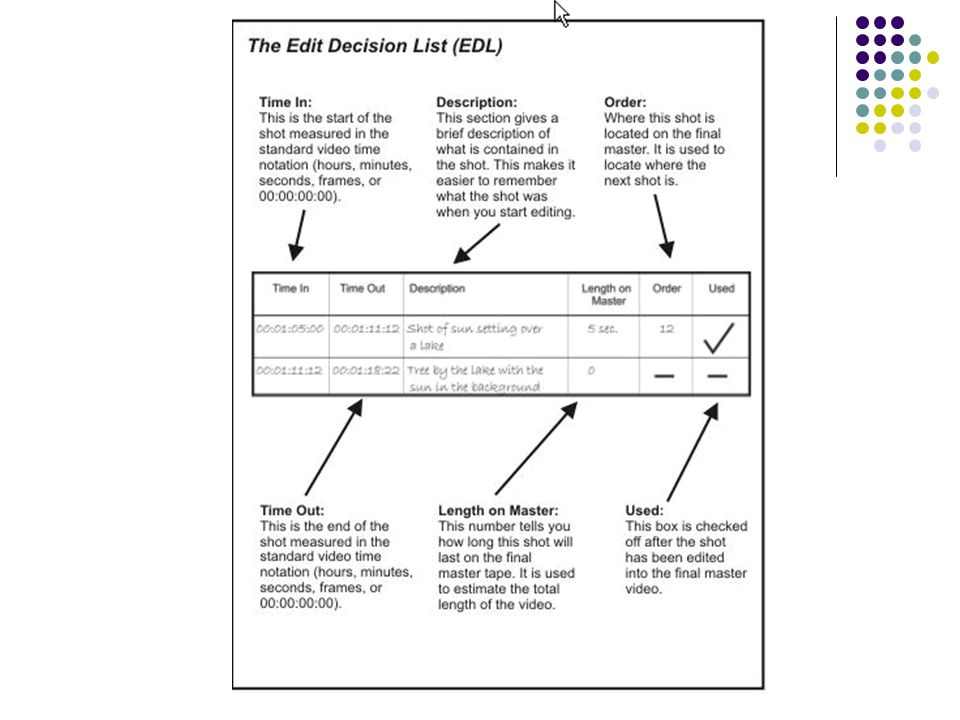
Video & Audio Editing Editing can be a tedious and drawn-out process if not carefully planned out. You should use an Edit Decision List to help with the process of selecting and organizing shots filmed during Production.

16
Video Editing Video editing can be just as creative a step as filming. There are many styles of editing that can be employed to make a video more interesting. It is up to you and your group to decide which style works best based on the mood of the project and the intended audience. Are cuts going to be fast-paced to give the video action, or slow-paced to give a tranquil, relaxed feeling? We’ll cover Editing Style in more depth during a later class!

17
Video Editing Methods Two methods currently available… Linear Editing Older format involving editing from one tape to another by sequencing shots one after the other. Non-Linear Editing Editing in a random fashion – not in a line Computer-based editing Clips can be easily moved, trimmed and rearranged using editing software Much quicker and less expensive than linear editing

18
Audio Editing This is just as important as video editing. Appropriate audio needs to be heard at appropriate levels during the project. Most dominant audio is usually the talent speaking. Music and sound effects should not interfere with dialogue. When using a computer to edit, there are many audio tracks available for mixing and editing (up to 99 in Adobe Premiere).
..")
19
Audio Editing (contd) Key Points to Remember… Do not cut off dialogue in mid-word. Do not cut music off. Use fades in and out as needed when adding music. Sudden audio cuts sound very unprofessional and can ruin even the best footage. Always maintain good, consistent audio levels and clean sound throughout the project.

20
Soundtrack Composition The soundtrack of a video is just as important as the visuals. A good soundtrack has many different parts to it, including music and sound effects. Music and sound effects are added AFTER the video footage has been edited together. Choose music/soundtrack very carefully as this can dramatically alter the mood of your final production.

21
Final Thoughts Once you’ve completed the entire production process, you should have a final product that you’re proud to share. In some cases, you may need to go back and reshoot or re-edit portions of your project if things didn’t turn out quite as planned. Always consider showing your project to others to get useful feedback during production.

Similar presentations