Download presentation
Presentation is loading. Please wait.

1
Using Microsoft Office Word Assignment Layout

2
Target Create a Cover Page (Front Page) Create a Table of Contents Page Create a Table of Figures Page Create Footnotes Create the Header and Footer on each page Create the Bibliography Page
 Create a Table of Contents Page Create a Table of Figures Page Create Footnotes Create the Header and Footer on each page Create the Bibliography Page")
3
Cover Page Press the INSERT tab at the top of your Word program. Hence Press the COVER PAGE tab and choose from one of the various cover pages offered in the drop down menu. The MOTION style cover page is the most ideal for such assignments.

5
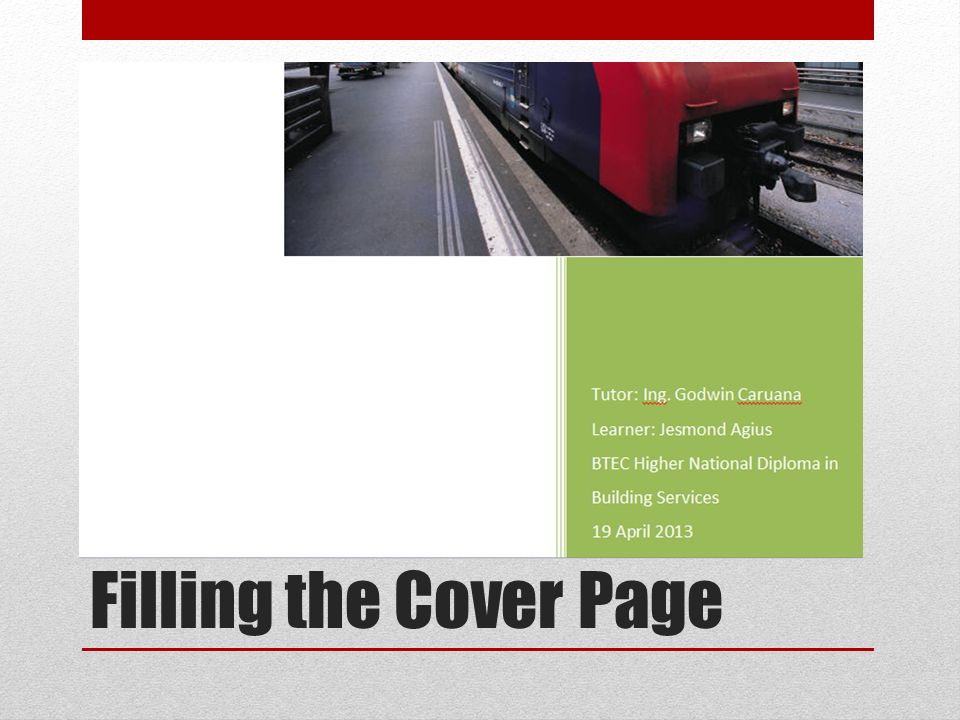
Filling the Cover Page In this Cover Page we need to input the following things. The Unit Name and Number (ex: Unit 58: Application of Scientific Principles to Building Services Engineering) in the TITLE box The Assignment Number and Name. (ex: Assignment 1: Heat Transfer) This can be put exactly underneath the title box with different font and size. The Date of the Deadline. (ex: 19/04/2013) The Tutors Name (ex: Ing. Godwin Caruana) The Learners Name (ex: Jesmond Agius) The Course (ex: BTEC Higher National Diploma in Building Services)
 in the TITLE box The Assignment Number and Name. (ex: Assignment 1: Heat Transfer) This can be put exactly underneath the title box with different font and size. The Date of the Deadline. (ex: 19/04/2013) The Tutors Name (ex: Ing. Godwin Caruana) The Learners Name (ex: Jesmond Agius) The Course (ex: BTEC Higher National Diploma in Building Services).")
6
Filling the Cover Page

8
Changing the Cover Page Picture You can also change the cover page picture instead of the one given in the template. Right click on the picture given and press Change Picture. Select a picture from your picture folders and press ok.

9
The Finished Cover Page

10
Table of Contents In order to do the table of contents, first finish all the assignment and make sure that each task starts on a new page and each section is already numerated as shown below.

11
Table of Contents First we need to arrange the fonts of all titles, subtitles and subtitles. This will be done by pressing the HOME tab and go onto the STYLES section.

12
Table of Contents Here as you can see there are already two buttons called Title and Subtitle. Note that the Sub Subtitle button is missing but we can use the Subtitle button if we want to leave the same format. Otherwise we could create such style. Note that the format of the title and subtitle style might not be the format you desire in your document. So this has to be modified also.

13
Modifying the Styles Right click on the title style and press modify.

14
Modifying the Styles A new window appears. In this window, you can arrange the appearance of your title and even choose whether to apply this setting to new documents.

15
Create a new Style In order to create a new style press the button where the arrow is pointing in the picture and the Styles window will appear. To create a new style press this button.

16
Table of Contents Once all the styles are arranged according to your preference, start highlighting all your titles, subtitles and sub subtitles and press the appropriate style that was arranged for them. The picture below shows an example of such arrangement. Before After

17
Table of Contents Next thing to do is to assign the appropriate level to each title, subtitle and sub subtitle. Press the REFERENCES tab and hence go to the Table of Contents section. Aim for the add text button.

18
Table of Contents Here the add text button shows you four different functions as you can see. The Levels indicate the difference between Titles, Subtitles and Sub Subtitles.

19
Procedure Highlight all the titles in your document and press the Level 1 Button. Highlight all the subtitles in your document and press the Level 2 Button. Do the same thing for the sub subtitles but press the Level 3 Button.

20
Table of Contents Once you have finished assigning all the levels for your titles the only thing remaining is to do the table of contents. Go where you are going to insert the table of contents page. Press again the REFERENCES tab and this time press the TABLE OF CONTENTS button. Choose from one of the options the software has shown you.

21
Table of Contents Your final product should be something like this.

22
Table of Contents In case, you have already finished the table of contents but you have inserted additional data or the pages of your document have change and hence you need to modify them, don’t panic. There is an easy solution. Press on your contents. The underneath window will appear. Press on the update table, and choose whether you want to update the entire table or only the page numbers.

23
Table of Figures In order to prepare a Table of Figures, one first need to numerate each figure and store them in the word software. First click on the picture you are about to numerate and store. Go to the REFERENCE tab again and press the button INSERT CAPTION.

24
Table of Figures In this new window, one could write what the picture consists of (ex: Metal Lattice) in the Caption toolbox near Figure 1. Note that each time you insert a new figure in this way, the figure number will update automatically and in order as well.

25
Table of Figures From the label toolbox, one could also choose if you are inserting a figure, a table or an equation. This function is very useful for higher students and those who are doing a dissertation.

26
Table of Figures Once all the figures are numerated in this way shown above, go on the page where you are going to put the table of figures page and press the button INSERT TABLE OF FIGURES found in the REFERENCE tab and just press OK on the new window opened.

27
Table of Figures The final product should look similar to this. Again, if you need to insert another figure and hence update the table of figures, do as we did earlier to update the table of contents.

28
Footnotes Footnote is defined as a note placed at the bottom of a page of a book or manuscript that comments on or cites a reference for a designated part of the text. In order to create one, put the pointer at the end of the text where you need to insert an extra comment as a footnote. Go to the REFERENCE tab and press the button INSERT FOOTNOTE. A number will appear near the pointer and the same number will appear at the end of the same page. Here the font will be different from the normal font text you were using before. Note that the numbers of the footnotes will update automatically and in order.

29
Footnotes This picture shows you how a footnote will look like compared with the rest of the text.

30
Header and Footer In order to create a Header and a Footer, go to the INSERT tab and press on the Header or Footer button. A drop down menu will appear. This will show you various styles from where to choose.

31
Header and Footer Headers should include the unit number and name and the course one is following.

32
Header and Footer Footers should include the students’ name and I.D number and the page number.

33
Bibliography Citations are a fundamental key in an assignment. They will guide the reader from where such information was taken. Thus it is very important that such information is written properly with the appropriate tools. Microsoft Office Word has the potential to do so in a very easy way.

34
Bibliography Lets just say that you want to add the proper citation after this quote that was taken from the book “Environmental Science in Building Fifth Edition” by “Randall Mcmullan”. Such book was written in 2002 in New York and was published by Palgrave Macmillan). The following paragraph was found in page 22. “Conduction is the transfer of heat energy through a material without the molecules of the material changing their basic position.” (REFERENCE)
. The following paragraph was found in page 22. Conduction is the transfer of heat energy through a material without the molecules of the material changing their basic position. (REFERENCE).")
35
Bibliography Put the pointer after the final word. Go to the REFERENCE tab and press INSERT CITATION and hence press ADD NEW SOURCE.

36
Bibliography The following window should appear.

37
Bibliography Note that here you have to select from where the source came, such from the internet or from a book. In the previous example the source was a book. Hence select the book source. Fill in the table and just press ok.

38
Bibliography The table after filled should look like this.

39
Bibliography After pressing the OK button, near the text you will see written, the surname of the author and the year. Here you can also introduce the page of the book from where this citation was taken. Just click on the year so that the citation change colour. Press on the down arrow and choose EDIT CITATION.

40
Bibliography If you notice that you have done an error while inputting the data in the citation box, you can fix it from here by pressing EDIT SOURCE to re-open the original citation window.

41
Bibliography Note that each time you fill up a citation, you can reuse it again in this document and even in other documents. In this document, it will appear again when you press the insert citation button in the reference tab. In this case you can reuse it again whenever you use the same source just by pressing on it, if you know that nothing has changed.

42
Bibliography If you started a new document and you need to reuse some of the previous citations, then you have to manage such sources. Go to the REFERENCE tab and this type press the MANAGE SOURCES button.

43
Bibliography Here you can find all the citations used in all your documents. Just by clicking on one of them, various information will be displayed at the bottom of the window. Here you can decide if you want to copy it in the present document.

44
Bibliography After finishing doing all the citations in the document, the only thing left to do, is to do the bibliography page. Go at the end of your document and press the cursor on a new page. Go to the REFERENCE tab and press the BIBLIOGRAPHY button Choose the style you want from the drop down list.

45
Bibliography Your final page should look similar to this.

46
Bibliography Again, if you have already done the bibliography and suddenly you decided to add another citation, you can update the bibliography as you did before in the table of contents section and the table of figures section.

47
THE END???????? Waaaaaaiiiiiiiiiiiiiiiiiiiiiiiiiitttttttttttttttttttttttttttttttttttttttt?

48
Recheck things Check that the style of the Table of Figures and the Bibliography are TITLE style. Check also that they appear in the TABLE OF CONTENTS page. Update the Table of Contents page and the Table of Figures page, because the following pages might have shifted. There are other useful things, but you will learn these while you are practicing on this exercise.

49
THE END………….. See you for another lecture next year!!!!!!!!!!!!!

Similar presentations


 Outline: Open MS Word Select Insert Tab Select Header Tool Customize Header as Needed (Title, Page Number, Etc.) MLA Style Formatting.>")


