Download presentation
Presentation is loading. Please wait.

1
Shooting, Exposure, Metering, Bracketing, Compression, etc

3
Left hand supports the camera and right hand holds it Elbows close to the body Left forearm should be straight up and down in line with the camera with left hand cradling the lens. Use this hand to focus. Lean slightly forward with a steady stance and release shutter between breaths. Right hand is free to press the shutter and change the aperture and shutter

4
Meter the object/ scene to get the right exopsoure Depress shutter halfway to autofocus or manual focus the lens on the subject. Compose the shot Depress shutter release button to take the shot!

5
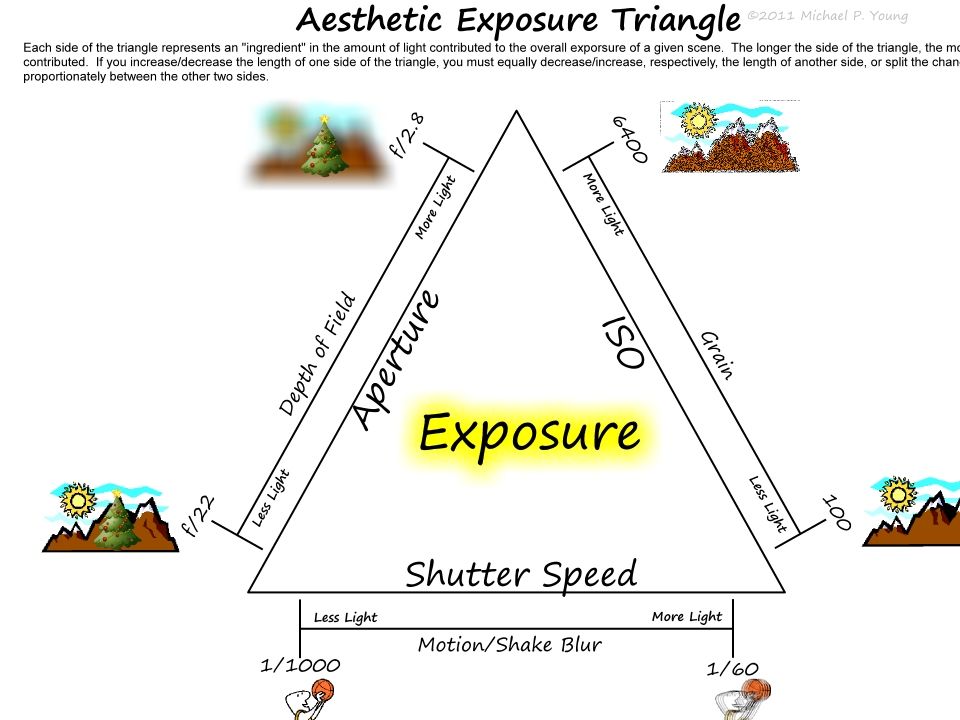
How much light is allowed to hit the film or the imaging chip in a digital camera when you take a photo or open the shutter Three things control the exposure: Aperture: amount of light the camera allows in (f-stop) Shutter speed: The length of time the light is allowed in Film Speed: The films sensitivity to light (ISO
 Shutter speed: The length of time the light is allowed in Film Speed: The films sensitivity to light (ISO")
6
You can increase and decrease each of these to achieve different effects in your photo but you have to compensate by changing the others. The idea is to maintain a total amount of exposure or light Exposure is measured in stops. Each of the three are measured in stops. Each stop doubles or halves the amount of light allowed in.

8
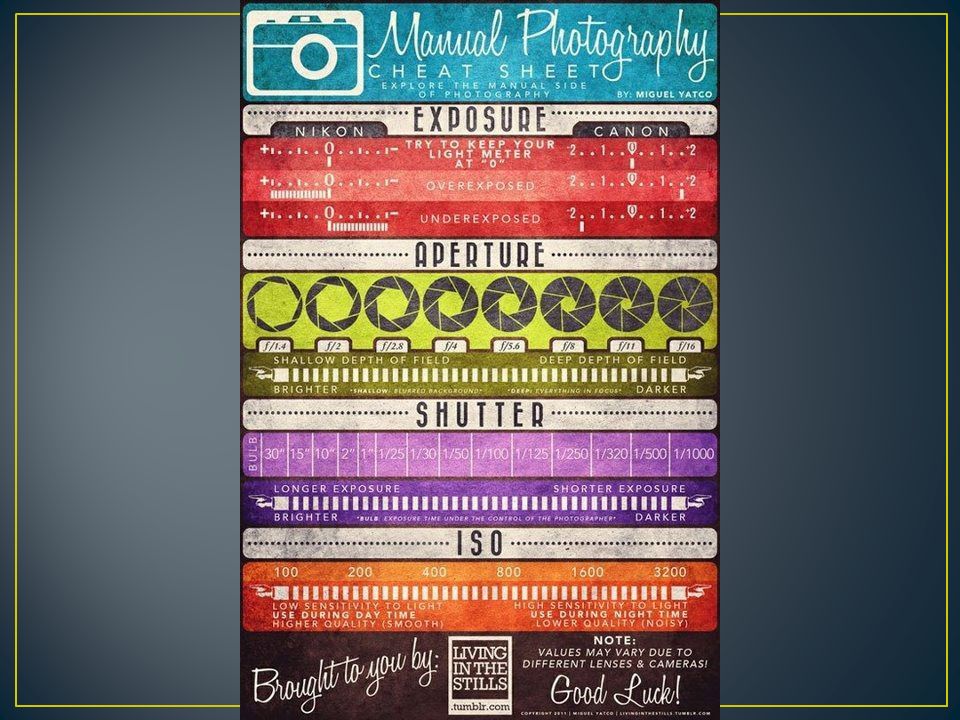
Controls the amount of light that passes through the lens Changes the diameter of the lens aperture or circular window. Each f-stop is the same amount of light no matter the lens size or length. Smaller numbers let in more light, bigger numbers let in less light

9
Depth of field: how much of the scene is in focus around the subject or whatever is in focus. changes with f-stop changes. Smaller the opening (the larger the number) the greater the depth of field. Larger the opening (the smaller the number) the lesser the depth of field. Learning how to use this will take your photography to a new level
 the greater the depth of field. Larger the opening (the smaller the number) the lesser the depth of field. Learning how to use this will take your photography to a new level.")
10
Controls the amount of time light is allowed to hit film or imaging chip Ranges from 1/8,000 of a second to many hours depending on the camera, lighting conditions, film speed and f-stop used B or Bulb setting will allow you to manually open and close the shutter yourself.

11
Shutter speed control the perception of motion The faster the shutter speed the more frozen or static the subject The slower the shutter speed the more the movement will show up in the exposure resulting in blurring and streaking

12
When you use shutter speeds lower than 1/60 of a second and hand hold the camera there is a chance tat the camera will move during exposure Its impossible for you to hold absolutely still and it doesn’t take much movement to get blur. Look for small highlights that look slightly blurred then camera moved Use a tripod or set camera on ground, bench, rail etc.

13
Films sensitivity to light Every film has an ISO number (International standards organization) that indicates its sensitivity to light. The lower the number the less sensitive it is and the more light it needs to make an exposure The courser silver grains of a fast film or higher film speed produce grainier images with less fine detail The smaller silver grains of a slow film capture higher resolution and finer details. No Noise! Noise!

14
International Standards Organization Speed: term used in traditional photography to indicate light sensitivity of film materials. Ex: ISO 50, 100, 200, 400. As the values doubles the sensitive material needs only half the amount of light to create the exposure. The best quality images are produced using the lower ISO settings! Basic digital cameras are designed with just one ISO speed setting, usually ISO 200. Better digital cameras allow a range of settings that can be set to match a range of different conditions.

15
Noise is inextricably linked to ISO When high ISOs are selected and images are shot under low lighting conditions, insufficient light causes the creation of error pixels, called noise (Bright red and green dots to fill in missing data) Creates a loss in image sharpness Effects can be minimized through image software like Photoshop, but not completely removed
 Creates a loss in image sharpness Effects can be minimized through image software like Photoshop, but not completely removed")
16
Move your subject out of the shadows Use a flash Reduce your ISO settings (that will force your camera to slow down its shutter speed or increase its aperture) Open up your aperture (if your ISO is set to auto then that can lower the ISO setting). Slow down your shutter speed (this too, will reduce your ISO settings if your ISO is set to auto, although it’s not much good if your subject is moving quickly because then a slow shutter speed will result in motion blur.) Try locking the ISO at a safe level — one which you know your camera can handle without producing too much noise. Use a tripod, to allow for a much longer exposure. However, now that I mention long exposures, you might also want to know that really long exposures, like ones lasting minutes, can increase the amount of noise!
 Try locking the ISO at a safe level — one which you know your camera can handle without producing too much noise. Use a tripod, to allow for a much longer exposure. However, now that I mention long exposures, you might also want to know that really long exposures, like ones lasting minutes, can increase the amount of noise!.")
17
Traditional film is manufactured to work within certain natural daylight. Digital camera have a white balance function for this. Which provides invisible color correction to daylight, florescent and tungsten light.

18
Auto White Balance (AWB): By default, DSLRs and point-and-shoots alike are set to this setting. Based on the surroundings, natural light, aperture settings, etc., the camera calculates and sets the white balance based on all the contributing focus spots combined automatically. Pretty straight forward. Daylight: If it's especially bright out and you'd like to add some warmth to your photo, Daylight adds touches of warm tones (usually in a more bluish nature) to your frame. Cloudy: Like Daylight, cloudy settings tend to be plain and whitewashed under AWB. Using this function you can add some additional warmth (usually a more golden touch) and depth to your photo. Cloudy also works well for indoor photos that are lackluster and need a bit of a natural boost. Shade: This also adds warm, yellow tones to a photo, but its to combat the natural blue tones often found in the shade. Tungsten: If there is too much warmth (and perhaps a lot of yellow tones when shooting indoors), you can reduce this with Tungsten, which adds cooler tones, enhances white shades and generally makes photos a whole lot brighter. Fluorescent: Fluorescent adds warm tones as well, but there usually a bit more red or purple. It could be fun to use for parties, or if there happens to be a lot of red tones in your setting but your camera isn't capturing them very well. Flash: A camera's built-in flash tends to produce a lot of cool tones on its own, so to combat it, partner your flash with the flash white balance setting to bring in some warm hues and produce a more balanced photo. Custom: This one might take awhile to be able to master, but basically you point the camera at your target option, and that becomes the neutral object of the frame, with all of the tones based on this single object. It's quite like Auto (and Auto might turn out to be better). But according to Ken Rockwell, you might be able to trick your camera into displaying opposite colors by pointing it at a colored piece of paper or filter (i.e.) blue). Then with the camera set to that photo, press the shutter pointed on your real subject, and the tones should be the opposite (i.e. yellow).Ken Rockwell
 to your frame. Cloudy: Like Daylight, cloudy settings tend to be plain and whitewashed under AWB. Using this function you can add some additional warmth (usually a more golden touch) and depth to your photo. Cloudy also works well for indoor photos that are lackluster and need a bit of a natural boost. Shade: This also adds warm, yellow tones to a photo, but its to combat the natural blue tones often found in the shade. Tungsten: If there is too much warmth (and perhaps a lot of yellow tones when shooting indoors), you can reduce this with Tungsten, which adds cooler tones, enhances white shades and generally makes photos a whole lot brighter. Fluorescent: Fluorescent adds warm tones as well, but there usually a bit more red or purple. It could be fun to use for parties, or if there happens to be a lot of red tones in your setting but your camera isn t capturing them very well. Flash: A camera s built-in flash tends to produce a lot of cool tones on its own, so to combat it, partner your flash with the flash white balance setting to bring in some warm hues and produce a more balanced photo. Custom: This one might take awhile to be able to master, but basically you point the camera at your target option, and that becomes the neutral object of the frame, with all of the tones based on this single object. It s quite like Auto (and Auto might turn out to be better). But according to Ken Rockwell, you might be able to trick your camera into displaying opposite colors by pointing it at a colored piece of paper or filter (i.e.) blue). Then with the camera set to that photo, press the shutter pointed on your real subject, and the tones should be the opposite (i.e. yellow).Ken Rockwell.")
19
Changing one will force you to change at least one other http://www.cooldailyinfographics.com/post/digital- photography-exposure-guide

22
http://www.nphotomag.com/2 012/06/04/nikon-vs-canon- shooting-modes-compared/

23
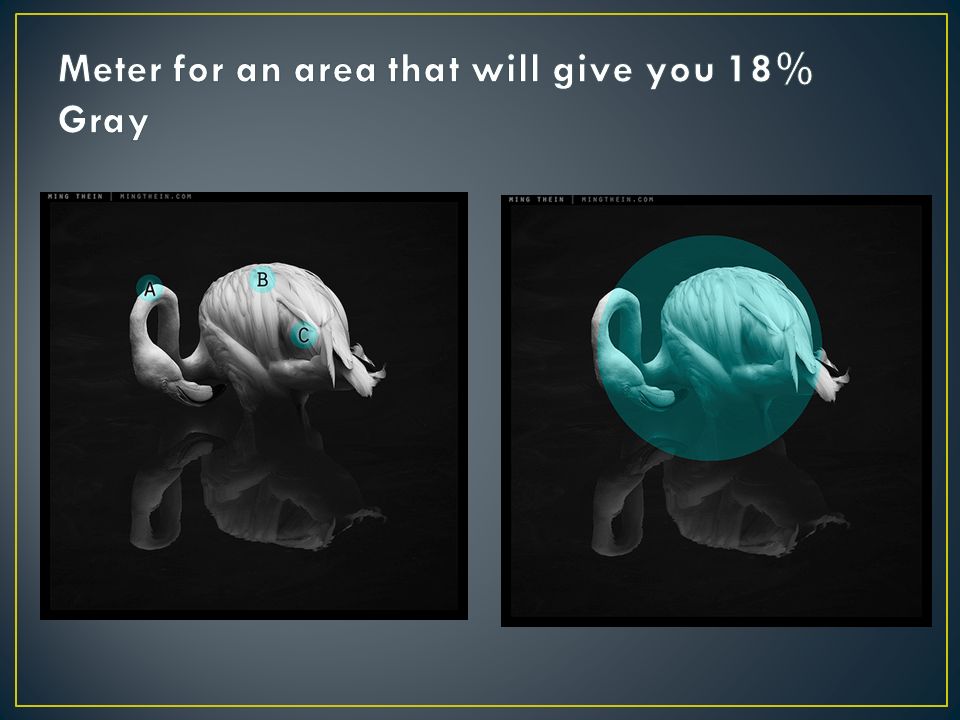
Used to determine combination of shutter speeds and f-stops These are built in or separate from camera You can either make all settings yourself or you can choose everything yourself Reflected metering: measures the amount of light reflected from the scene. Most built in light meters work this way. It is best to take a light reading from something that will print middle gray or use a gray card when measuring exposure. Incident metering: measures the light that hits the scene

24
Spot Meter for 18% gray area The meter attempt to make everything gray Different metering modes to select certain areas in the viewfinder You can also walk up to your subject and meter on something specific

26
High key or white scenes: they measure the light and try to make it gray, usually adjust by two stops to keep it white Low key or dark scenes: subtract the exposure by two stops to keep your dark areas High Contrast or sunny days Low light

28
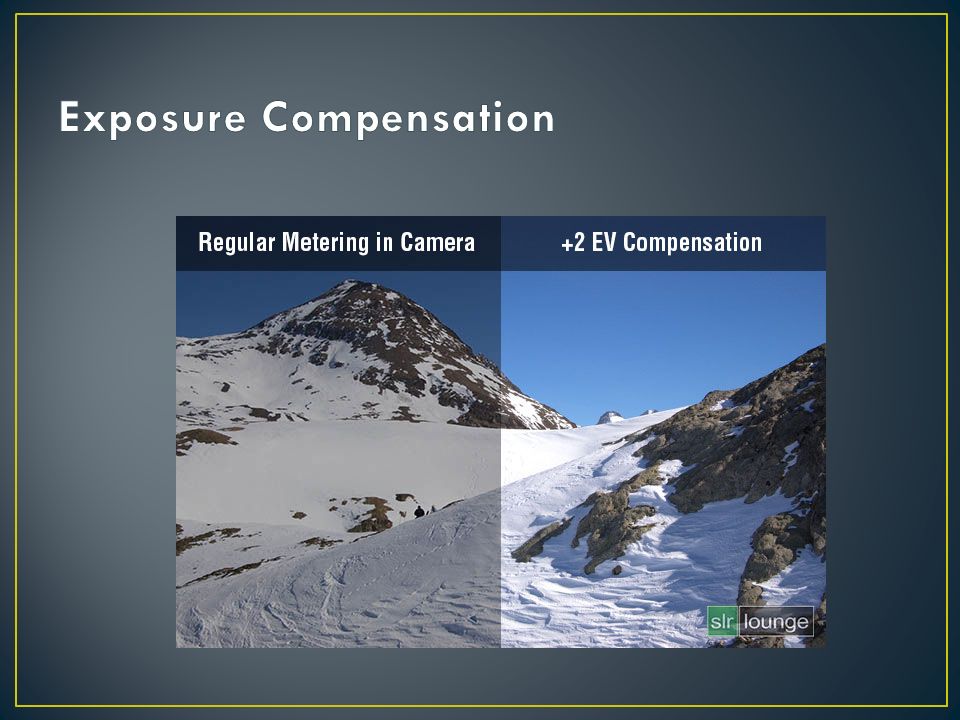
Use Exposure compensation In a number of situations, you will need exposure compensation to get the right exposure, irrespective of the metering mode you select. Scenes with a lot of snow cover will be under exposed and will require an increment of +1 or more stops of exposure to make the snow look white. Conversely, a black furry bear or a person wearing very dark clothing will be overexposed and will require negative exposure compensation of -1 or more stops.

29
Provide indirect lighting with no deep shadows and bright highlights Lighting is even and flat Contrast is low Great for photographing and then adjusting in the editing process

30
Shooting a series of shots of the same scene at different levels of exposure, from light to dark.

31
You’ve taken your pictures, now where do they actually go? The images reside on the memory card in you camera, but the more important question is “How many photos can I store on the card or on my computer’s hard drive?” The answer to that comes down to one basic thing – image quality. The various image file formats that are available to you differ in how much actual photographic information (this includes metadata) you wish to “store” within in each image file, and how much is thrown away. That’s the basic nature of compression – the elimination of potentially extraneous information, and the three main image file formats are JPEG, TIFF, and RAW.
 you wish to store within in each image file, and how much is thrown away. That’s the basic nature of compression – the elimination of potentially extraneous information, and the three main image file formats are JPEG, TIFF, and RAW..")
32
Main file formats you will see: JPEG TIFF RAW PSD RAW: Many cameras allow you to shoot in RAW which collects all data from the image. Highest quality image and the best for editing, but will not fill up your memory card much faster JPEG: Compressed image. Your camera has a variety of sizes for JPG files. You should shoot in the largest size possible on your camera when shooting for class. (Go into your menu and set your JPEG setting to largest now!) TIFF: Many digital cameras can package digital image data directly using the universal Tagged Image File Format (TIFF). Used in print and publishing world and can be read by most image applications. Large: Take up lots of storage space.
 TIFF: Many digital cameras can package digital image data directly using the universal Tagged Image File Format (TIFF). Used in print and publishing world and can be read by most image applications. Large: Take up lots of storage space..")
33
JPEG: Smallest file RAW: all data, largest file TIFF: Good for printing from preserves image quality Photoshop file: if you wish to continue working in Photoshop

34
Large data files that are created by digital images can be reduced in size using a compression routine such as JPEG. Compressed images take up less space on a memory card but you trade quality of image and loss of image detail for storage space. You can take High quality, Normal, Poorest quality. High quality JPEG and TIFF has become the standard file format for good quality printouts!

35
Better to shoot larger image quality if your intention is for a high quality print out. Better to shoot lower quality if your intention is to publish to the internet. Subjects to be shot for both Internet and print should be shot on the largest image size possible, then resized in photoshop or another imaging application. http://www.exposureguide.com/image-file-formats.htmhttp://www.exposureguide.com/image-file-formats.htm Great website on exposure and about file formats and resolution

36
Resolution can be identified by the measurement of pixels in dimensions of height and width. For example, a camera manufacturer can describe the resolution of the camera as 3904x2598 (W x H) pixels, which again can be termed as 3904x2598=10,142,592 pixels. If this number is divided by 1 million, the figure thus attained will come out to be 10.1 megapixels (one megapixel is equivalent to one million pixels). Hence, the resolution of the image can also be described as 10.1 megapixels, or 10.1 MP. The Rule of Thumb here is - the greater the number of pixels in an image, the denser the picture information and therefore the higher the resolution. Higher resolution provides more detail within your image and allows for larger printouts with smooth, continuous tone and color accuracy.
 pixels, which again can be termed as 3904x2598=10,142,592 pixels. If this number is divided by 1 million, the figure thus attained will come out to be 10.1 megapixels (one megapixel is equivalent to one million pixels). Hence, the resolution of the image can also be described as 10.1 megapixels, or 10.1 MP. The Rule of Thumb here is - the greater the number of pixels in an image, the denser the picture information and therefore the higher the resolution. Higher resolution provides more detail within your image and allows for larger printouts with smooth, continuous tone and color accuracy..")
37
Leave sharpening features off! They can be applied in photo shop. But if you go to edit an image that was taken with the sharpening tool on you will get error pixels.

Similar presentations


>")


.>")


. Before we get started… - These are only very simple explanations - I could be wrong! - Mainly aimed at digital users.>")


 Meter (measures light in a scene and calculates proper exposure) Aperture ( controls the.>")
 of the opening of a lens diaphragm inside a photographic lens regulates the amount.>")
