Download presentation
Presentation is loading. Please wait.

1
© Tracey Garvey Photography www.tgarveyphotography.com

2
A lens function that brings an image into sharpness Manual Focus – The photographer must manually turn the focusing ring on the lens until the image appears sharp in the viewfinder Auto Focus – Focusing is set by the camera, typically autofocus is set by lightly pressing the shutter button before taking the photo Fixed Focus – The focus is permanently set by the camera manufacturer no focus adjustments are available

3
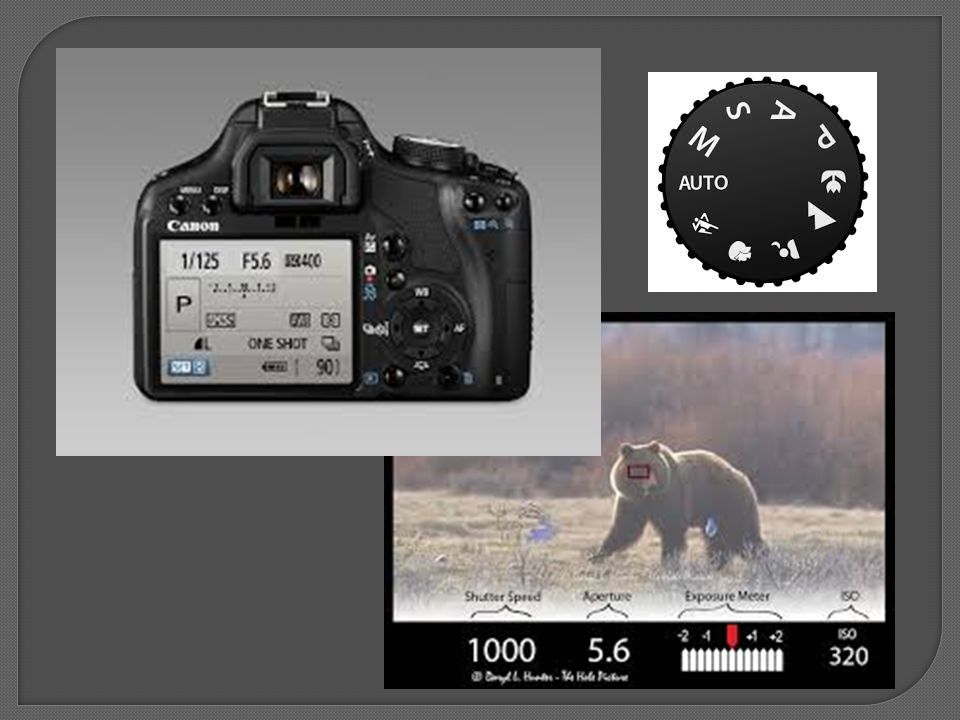
The total amount of light allowed through the lens and onto the camera’s sensor. The aperture controls the amount of light, and the shutter controls the time that the light is allowed to pass through. The aperture and shutter work together to control exposure.

4
Overexposure – When too much light reaches the camera sensor, creating an image to appear washed out or too light Underexposure – When to little light reaches the camera sensor, creating a dark looking photo Normal Exposure – The proper shutter speed and aperture combination measured by your camera’s light meter Exposure Meter can be read in the viewfinder or the back of the display screen of your camera, it measures the light for exposure

6
Shutter Speed - is how long your camera’s shutter stay’s open Shutter speed can be read on the back of your display screen or in the viewfinder The longer the shutter is open the more motion is shown e.g. 1/15 The faster the shutter speed the less motion that is captured e.g. 1/200 On your camera you can use “S” mode for shutter priority which means you choice the shutter speed and the camera automatically sets the other settings for you.

7
Aperture – also know as “F Stops” it controls how much of your image is in focus, also controls how much light comes into the lens The lower the F Stop e.g. F3.5 not much is in focus only the subject The higher the F Stop e.g. F22 everything in lens should be in focus On your camera you can use “A” or “AV” for aperture priority which means you choice the aperture you want to use and the camera automatically sets the other settings for you

8
Manual Mode – is the “M” mode in your camera Enables you to control the entire process of taking the photo You set the shutter speed, aperture, ISO etc.

10
The camera can only focus its lens on a single point, but there will be an area in front of and behind this focal point that appears sharp this is known as the depth of field, it is not a fixed distance and can be changed Shallow Depth of Field – only a narrow area appears sharp Deep Depth of Field – where more or most of the photo appears sharp Depth of field is controlled using your “F Stops

11
Shallow Depth of Field Deep Depth of Field

12
ISO – light sensitivity of your camera’s sensor The higher the ISO the more sensitive your camera is to light High ISO can cause grainer images The lower the ISO the less sensitive your camera is to light Higher ISO’s allow for faster shutter speeds in dark conditions ISO 200 great for daylight sunny day ISO 400 great for shade or cloudy day ISO 1600 for low light situations ISO 3000 and higher for very low light situations

13
An electronic adjustment in the camera that ensures realistic white and colour renditions in a photograph WB is based on the lighting environment WB must be changed depending on how a scene is light e.g. sunlight, tungsten lamps, florescent, flash etc.

14
Composition is the placement or arrangement of visual elements in a photograph A good composition is one that has just enough detail, too few details may make the photo hard to interpret, to many details can be distracting Guiding the viewers eye through the photo Composing an image that is visually pleasing

15
Photographing a moving subject, the panning technique is allows you to keep the subject in the same position of the frame for the duration of the exposure By moving the camera with the moving subject, the subject remains in focus and the background becomes blurred

Similar presentations


 1.What is it? 2.Where is it? 3.What does it do? 4.When do you use it? 5.Why would you use F/2.8? 6.Why.>")


