Download presentation
Presentation is loading. Please wait.

2
START

3
Electronic Field Book Goal

4
Installing Field Book Program on the PDA

5
http://www.udot.utah.gov/index.php?m=c&tid=448

7
Establish a VPN connection. jsweeten

8
ASSIGN USER PROJECTS

10
Displays only Projects assigned to the Resident Engineer or Consultant. Resident Engineer or Consultant can assign projects to Inspectors. (Tap) to close the window
 to close the window.")
11
“Synchronize” to update the project information.

12
SELECT PROJECT

13
To select the project you want to work on, (Tap) “Menu” and (Tap) “Select Project”.
 Menu and (Tap) Select Project .")
14
SELECT PROJECT (Tap) the “Project Number” you want to work on and (Tap) “OK”.
 the Project Number you want to work on and (Tap) OK .")
15
After you select a project, you can (Tap) on any of these “Menu” option for the task you want to document.
 on any of these Menu option for the task you want to document.")
16
ENTERING DATA

17
John Njord, UDOT Executive Director Tom Hart, Surety2000 Insurance Al Smith, Contractor Safety Super. Robert Jones, Provo City Engineer

18
FB HELP

19
(Tap) the button on any window. “FB-Help” window opens with information about the selected window.
 the button on any window. FB-Help window opens with information about the selected window.")
20
DAILY VISITORS

21
(Tap) “Daily Visitors” Documents visitors that are not normally part of the everyday construction activities, (ie, Insurance Representatives, UDOT Senior Leaders, Contractor Senior Representatives, FHWA, etc. Important Information for Claims

23
DIARY COMMENTS

24
(Tap) “Diary Comments” Dairy Comments are used to record general project comments on a daily basis. Multiple comments may be added for each date. Important information for Claims.

25
(Tap) “Comment Date” to see all diary comments. Maximum comment is 250 characters. “Add” additional comments for the same date. “Delete” a comment. “Prev” and “Next” to scroll through the diary comments for the selected date.

26
EQUIPMENT USED

27
(Tap) “Equipment Used” Documents all the equipment used on the project by the Prime Contractor and Subcontractors Important Information for Claims
 Equipment Used Documents all the equipment used on the project by the Prime Contractor and Subcontractors Important Information for Claims")
28
(Tap) “Date” dropdown to view every day equipment was documented (Tap) “Contr/Sub” to select the Prime Contractor or an approved Subcontractor for the project. (Tap) “Prev” or “Next” to rotate through equipment windows for the same date.
 Prev or Next to rotate through equipment windows for the same date..")
29
When the equipment window opens, the previous entered contractor/subcontractor equipment is copied forward. “O” = Operating “S” = Standby

30
LABOR

31
(Tap) “Labor”
 Labor")
32
(Tap) “Date” dropdown to view every day labor was documented for the project. (Tap) “Contr/Sub” to select the Prime Contractor or an approved Subcontractor for the project. Enter the number of workers for each applicable “Work Type”.
 Contr/Sub to select the Prime Contractor or an approved Subcontractor for the project. Enter the number of workers for each applicable Work Type ..")
33
(Tap) “Save” to save the record before leaving window. (Tap) “Delete” to the record for the date and selected Contractor or Subcontractor (Tap) “Cancel” to return to the main menu.
 Delete to the record for the date and selected Contractor or Subcontractor (Tap) Cancel to return to the main menu..")
34
DETAILS

35
(Tap) “Detail” to display all the project details, (i.e. Roadway, Structures, Landscaping, etc.). (Tap) “Prev” or “Next” to rotate through the details.
. (Tap) Prev or Next to rotate through the details..")
38
ITEM

39
(Tap) “Item” to display all the items for the selected project. (Tap) the item and then (Tap) “Display Item”
 the item and then (Tap) Display Item .")
40
Item Summary “Item Summary” window opens for the select item. Window displays total “Placed Qty”, “%” of item complete and “Placed Total” dollar amount. NOTE: “Stationing” and “Placement” buttons are not active for autocalc items. ( Autocalc items are items that automatically calculate the amount to be paid in accordance with the contract specifications).
..")
41
(Tap) “Comment” to record a general comment about the select item. Maximum comment length is 255 characters. (Tap) “Add” button to add additional comments for the same date. (Tap) “Delete” to delete a comment. (Tap) “Prev” and “Next” to rotate through the comments for the selected date.
 Add button to add additional comments for the same date. (Tap) Delete to delete a comment. (Tap) Prev and Next to rotate through the comments for the selected date..")
42
Quantity Placement Options: (Tap) “Stationing” or “Placement” buttons to document a placed quantity for the selected item. (Tap) “Stationing” opens the “FB Select Stationing” window. (Tap) “Placement” opens the “FB Placement” window.
 Stationing opens the FB Select Stationing window. (Tap) Placement opens the FB Placement window..")
43
Quantity Placement Options

44
OPTION 1: Quantity Placement with Stationing (Tap) “Stationing” button.
 Stationing button.")
45
“Select Stationing” window opens with a list of Original (Orig) stationing setup by the Project Designer. Select (Tap) a station or (Tap) “Add Stationing” to add a new station to this window. After selecting a station, (Tap) “Display Stationing”.
 a station or (Tap) Add Stationing to add a new station to this window. After selecting a station, (Tap) Display Stationing ..")
46
“FB-Stationing” window opens “grayed out” so you can review the stationing information. (Tap) “Yes” (Tap) “Add” button if this is the station you want to use.`
 Yes (Tap) Add button if this is the station you want to use.`.")
47
FB-Stationing window is enabled and the stationing information can be edited. Optional: (Tap) “Station Comment” button to document a unique stationing comment.
 Station Comment button to document a unique stationing comment..")
48
“FB-Stationing Comment” window opens. Enter a comment up to 255 characters. Property owner requested to be notified prior to removal of sidewalk. Needs to move vehicles before leaving for work. (Tab) when finished. (Tab) “Yes” to save comment.
 when finished. (Tab) Yes to save comment..")
49
“FB-Stationing” window opens with a by the Station Comment button indicating there is a comment. (Tap) “Placement” button to document placed quantity.
 Placement button to document placed quantity..")
50
FB-Placement window opens with the specified stationing. Enter the “Placed Qty.” (Tap) the “Placement Comment” button to document the quantity placed. 10.2
 the Placement Comment button to document the quantity placed")
51
4’ X 23’/9 = 10.2 sq. yd. Verified by: tbb Chkd. by: ks FB-Placement Comment window opens. Enter a placement comment up to 255 characters. Note: If the quantity required a calculation, “Checked By” is required. (Tap) (Tap) “Yes” to save the comment.
 (Tap) Yes to save the comment..")
52
Placement Comment box has a indicating there is a placement comment for this record.

53
(Tap) “Save” and the “Amount” is calculated (Tap) “Delete” to delete the placement record. NOTE: Placement records cannot be deleted if they have an “Estimate #” indicating the placed quantity has been paid. 2 (Tap) “Add” to add another placement record for the same date. (Tap) “Prev” and “Next” to scroll through placement records for the specified date. 3
 Add to add another placement record for the same date. (Tap) Prev and Next to scroll through placement records for the specified date. 3.")
54
(Tap) the Item and then (Tap) “Display Item”. OPTION 2: Placement without Stationing
 the Item and then (Tap) Display Item . OPTION 2: Placement without Stationing")
55
FB – Item Summary window opens for the selected item. (Tap) “Placement” button. FB–Placement List window opens listing all placements for the selected item. To view an existing placement, (Tap) the placement from list and (Tap) “Display Placement”.
 Placement button. FB–Placement List window opens listing all placements for the selected item. To view an existing placement, (Tap) the placement from list and (Tap) Display Placement ..")
56
FB – Placement window opens for the selected placement record. (Tap) to return to the FB- Placement List. (Tap) “Add Placement” to add a new placement record.
 to return to the FB- Placement List. (Tap) Add Placement to add a new placement record..")
57
FB – Placement window opens for the selected placement. Enter, “Placed Qty.” 433.33 Options for “Ticket/Desc” field: Stationing, Tickets, Invoices, etc. 127+00 – 135+25 (Tap) “Placement Comment” to enter supporting documentation for the placed quantity.
 Placement Comment to enter supporting documentation for the placed quantity..")
58
“Placement Comment” window opens. Comments can be entered up to 255 characters. 325’ X 24’ X 1.5’/27 = 433.33 cu. yd. See Dwg. File #4 Verified by: js Chkd. by: tbb (Tap) when finished. (Tap) “Yes” to save.
 when finished. (Tap) Yes to save..")
59
“FB- Placement” window opens with a by the “Placement Comment” button. (Tap) “Save” to save the record and calculate the “Amount”. (Tap) “Delete” to delete the record. NOTE: Placement records cannot be deleted if they have an “Estimate #” indicating the placed quantity has been paid. 3
 Save to save the record and calculate the Amount . (Tap) Delete to delete the record. NOTE: Placement records cannot be deleted if they have an Estimate # indicating the placed quantity has been paid. 3.")
60
(Tap) “Add” to add a new placement record for the same date. (Tap) “Prev” or “Next” to scroll through the placement records for the same date.
 Prev or Next to scroll through the placement records for the same date..")
61
TIME CHARGES

64
6

65
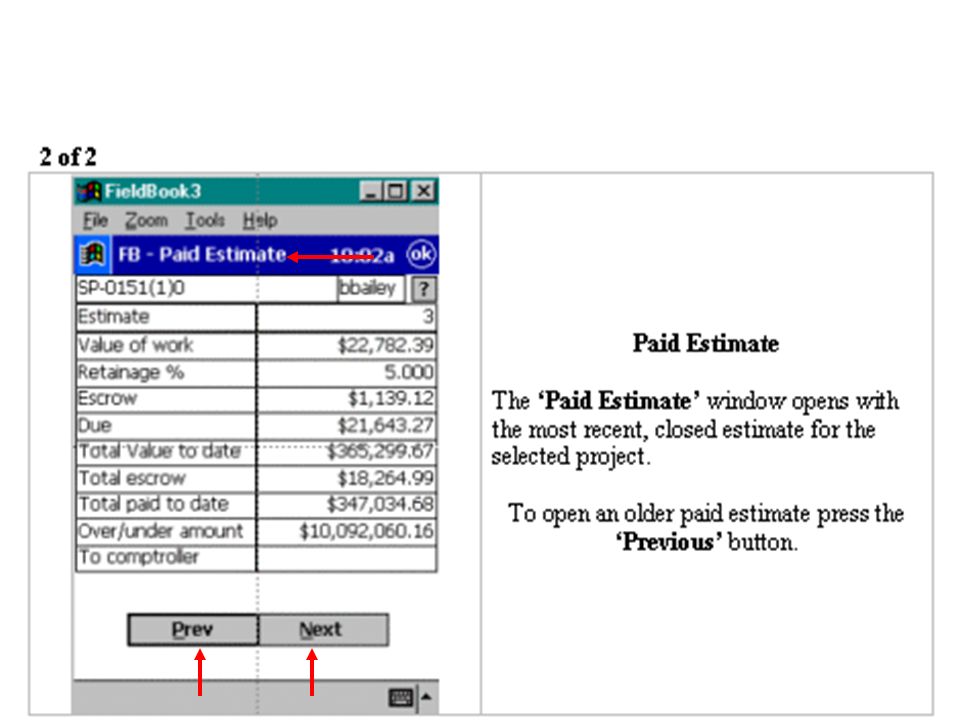
PAID ESTIMATES

66
Page 33

68
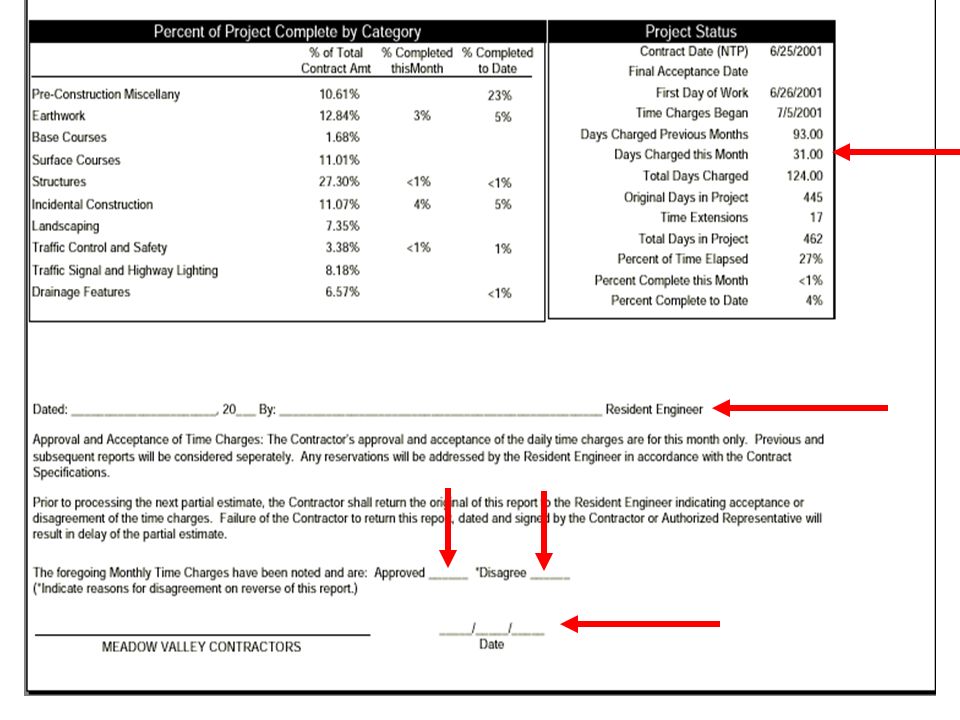
PROGRESS REPORT

71
STATUS OF WORK

74
SYNCHRONIZATION

75
Establish a VPN Connection

80
Synchronize Field Book BEFORE Closing Estimate Synchronize Field Book AFTER Closing Estimate

81
PDBS Project Accounting

82
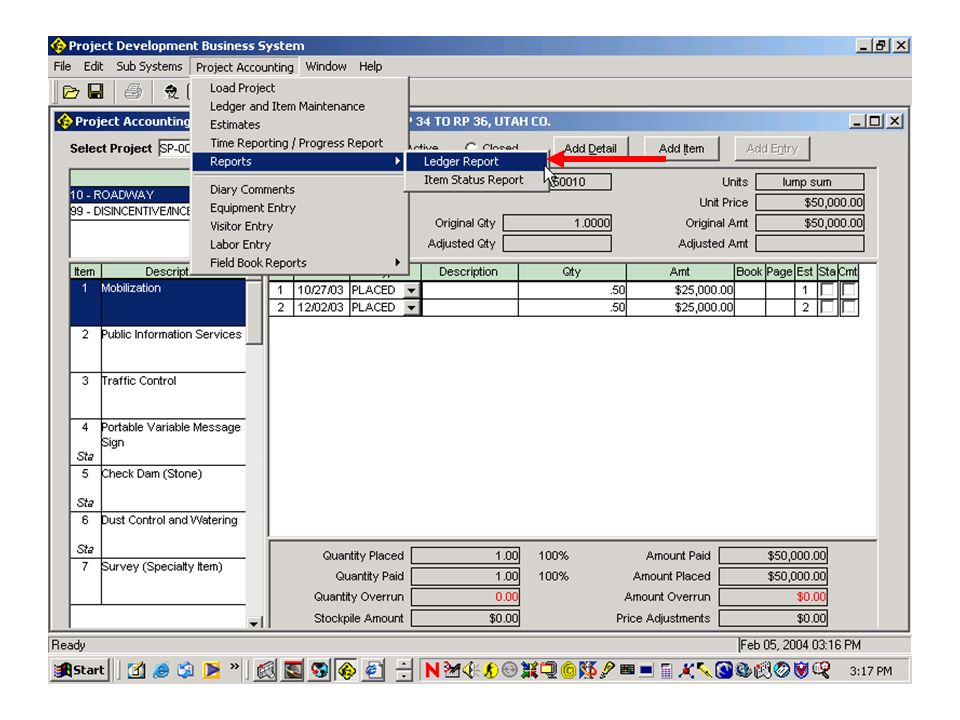
PROJECT ACCOUNTING

83
Right Mouse Click Row.

84
ENGINEERS DAILY REPORT

85
Engineer’s Daily Report

86
Page 79

89
LEDGER ITEM REPORT

91
Highlight an Item. Click “View” or “Print”.

92
The Ledger Entry Report shows every placement entry for the selected item. Includes the “Placement Comment” and “User” who document the placement.

93
PA Diary Comments

96
PA Equipment

99
PA Visitors

102
PA LABOR

105
PA TIME REPORTING

108
Locks Time Records.

112
Progress Report is locked after “Contractor Approval/Disapproval Date is entered.

113
Field Book Resources

116
DELETE DATABASE

117
(Tap) “Start”, (Tap) “UDOT Field Book”. NOTE: You must close the field book application before deleting your database. (Tap) “Menu”, (Tap) “Exit”.
 Menu , (Tap) Exit ..")
118
(Tap) “Start”, (Tap) “Programs”. (Tap) “File Explorer”.
 Start , (Tap) Programs . (Tap) File Explorer .")
119
(Tap) & (Hold) down on “UltraLiteDB”. (Tap) “Delete”. Tab & Hold
 & (Hold) down on UltraLiteDB . (Tap) Delete . Tab & Hold")
121
POWERPOINT TRAINING WEBSITE

122
“Save” the file to your computer. Click “Get PowerPoint Viewer” if you do not have PowerPoint.

123
Click on the slide where you want to start.

124
Click “Slide Show” icon to start presentation.

129
Thank you.

Similar presentations


>")


. Welcome To the ETS – Change Bid Request.>")