Download presentation
Presentation is loading. Please wait.

1
JDS5 Training Guide

2
On Start Up you will see this screen click the OK button Click OK

3
You will then see the printer setup page Click the Add button

4
Select the printer driver Select you com port Select your RS232 speed Give the Selected printer a name

5
Once done press the OK button

6
The printer driver is now loaded click exit

7
Now click file and new

8
Select the printer you have just loaded and click the OK button

9
You can now enter your label height and width Label Height and ribbon advance normally always match

10
A blank label is now ready to be edited

11
Text Barcodes Graphics Lines Frames Auto Date Auto Time What the Side Buttons do

12
New FileOpen FileSave File Rotate labelDelete labelPrint LabelUndoRedo Cut CopyPast Rotate field by 90 Delete FieldZoom Out Zoom InHelp What the Top Buttons do

13
Fixed text Click the T button and select fixed text

14
Fixed text We can now enter one line Of fixed text

15
Fixed text To change text height And type click this tab

16
Resident fonts 1= News Gothic Bold 2= Swiss Bold 3= Swiss Roman 4= Special (Arial, High speed) True type fonts Can be downloaded to The printer covered later Fixed text Character height Character Map Rotation Negative Image Is the text printed Increase or decrease the Width of text Once you have made the required changes press the OK button
 True type fonts Can be downloaded to The printer covered later Fixed text Character height Character Map Rotation Negative Image Is the text printed Increase or decrease the Width of text Once you have made the required changes press the OK button")
17
A + Place maker is top left of the text Crosshairs for placement on scale Fixed text X Y position

18
You can edit the attributes by double Clicking the text To reposition left click and hold on the text to move Fixed text

19
Now click the T and Variable Field Variable Field

20
Is the text inputted from the PC or Keyboard *Note The Normal option is shown The Field number MUST be changed if You have more than 1 Variable text field Is the title printed For example Title Variable input BN: 123456 Is the Inputted information Numeric or Alphanumeric You can limit The amount of numeric information

21
Once you have made the required changes click the OK button Variable Field

22
Position the Variable text in the Required Position on the label

23
Variable Text Click the T and Select the Variable text option

24
Variable field option is used to set up information from a database We will not be covering this advanced option in this guide. Variable Text

25
Click the T and select Multiple Fields Multiple Field

26
Here you can select the Multiple field number. Multiple field are set up under a different Menu they are used when you need to link fields for use in Barcodes ect. For this example we will use field number 1 click ok Multiple Field

27
For this example please set up another variable field as shown Remember to change the field number to 2

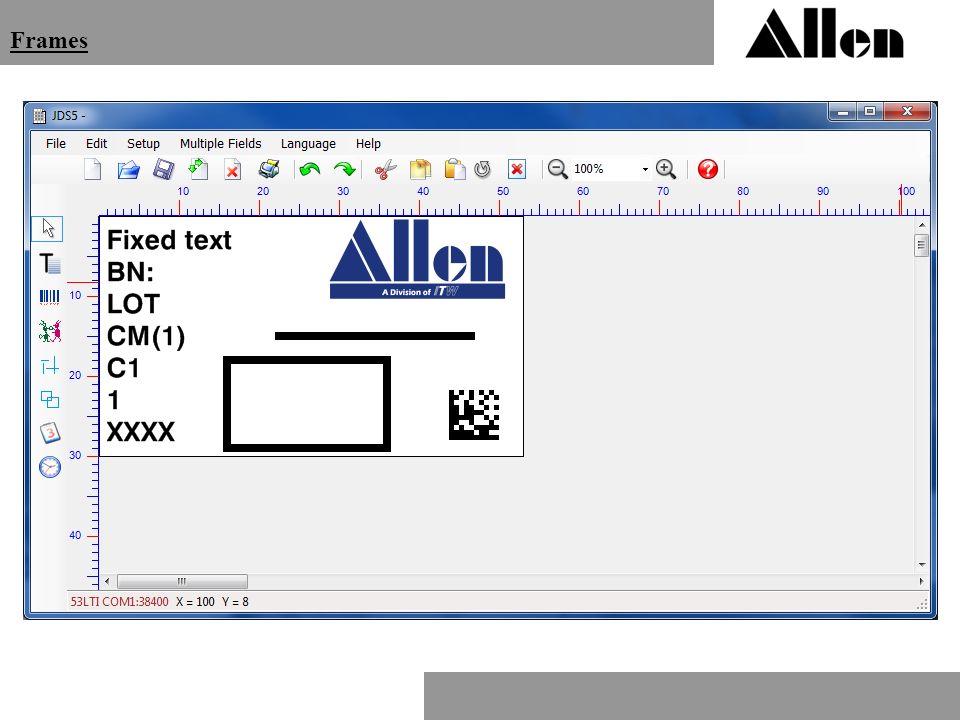
28
Multiple Field The Multiple field will be printed in this position To set the Multiple field click here

29
This is the Multiple Field number we Have chosen These are the Types of fields we can link For this example we will add the two variable fields we have created Multiple Field

30
We have now created the Multiple field, this can now be linked to a barcode Or a printed human readable. We will come back to Multiple Fields when we Look at Barcodes. Numbers of the fields 1= BN 2= LOT

31
Click T and select RS field RS Field

32
RS field allows us to receive information from an RS242 source. This is an advanced option and we will not be covered it in this training.

33
Click the T button and select counter Counter

34
This the title Of you counter This will print the Title I normally have this turned off With the tick In the counter goes up and off it will count down The step of the counter 1=1,2,3,4, 5,6 2=2,4,6,8, 10 The repeat of the counter 1= 1,2,3,4,5 2= 1,1,2,2,3,3 The length of the counter up to 9 digits Same as using Variable fields If you have more than one you must Remember to number them

35
Counter Once you have set your counter up click the OK button

36
Your counter added Counter

37
The Next Option is Audit Code We will not be covering this in the training Audit Code

38
The next option is Common variable Common Variable is information Associated to a specific printer. The information is stored in the printer Rather than the image, it can be used As a line identifier. The information that is printed is set in Setup Menu to be covered later Common Variable

39
Click the T and select Shift Codes Shift Code

40
Enter the Number of required Shifts 1 st shift start Time How long the Each shift is

41
Shift Code An example of a the shift code set up press OK

42
Your Shift Code Shift Code

43
Week Shift Code Press T and click on week shift code

44
Week Shift Code Week shift code works in the same way as shift code but allows you To set a shift up for individual days

45
Your Week Shift Code Week Shift Code

46
Now click on the barcode option Barcodes

47
The supported Barcodes are listed here The types of fields that can be linked to barcodes These options control How the barcode is displayed

48
Barcodes For this example we are going to link a datamatrix to the Multiple field we Created earlier, click OK

49
The datamatrix will be populated By the Lot and BN number Barcodes

50
The Next option allows you to add graphics Click the Icon Graphics

51
Supported Types are BMP,JPG,GIF,PNG Graphics

52
Your Graphic added

53
This Option allows you to add lines Lines

54
If you double click the line you Can change its thickness Lines

55
The line thickness is in point size

56
Lines

57
The next option is frames this allows you to Put boxes in to the label Frames

58
You will need to click and drag to create the frame Frames

59
Your frame created Frames

60
You can also change the line thickness by double clicking the frame And changing the point size Frames

62
Date The Next option is automatic dates

63
Dates Date field format can be generated with the options shown You can set up exp dates with the add options

64
Dates Above is an example set to print today's date in the following Format; 25-12-12 click the OK button

65
Dates Your date shown here.

66
Time The Next Option is Time

67
Here you can set a time format in 12 or 24 hour clocks Time

68
An example of the time set up in the 24 hour format 23:00

69
Your Time example is shown here Time

70
The label is now ready to be printed Connect the PC to the printer Via A RS232 cable and click the print button Printing

71
The following screen will appear you can change and variable information In the label

72
Printing Check the printer is connected by pressing View machine status Once you are happy that the variable information is correct then press the OK button

73
Printing The printer will load and display the following message on the PR5

74
Click the Setup button Making changes to the printer setup

75
Select the printer you wish to make changes to and click the printer setup Making changes to the printer setup

76
The software will communicate with the printer and populate the setup screen Making changes to the printer setup You can change all of the printer settings from this page

77
The next option is Common Variables Making changes to the printer setup

78
Here we can tell the printer what to print when using the common variable option In the label, an example would be a line number We can also set our Seven day batch option and the time offset Making changes to the printer setup

79
The next option is download fonts This option allows you to download a True Type font to the printer so it can print as a Printer resident font Making changes to the printer setup

80
You can search through all the fonts installed on your PC Making changes to the printer setup

81
I have selected High Tower and pressed the send key. The process can take up to 5 mins Making changes to the printer setup

82
For an example we will create an Auto date and change the font Making changes to the printer setup

83
Select the TT font we have just downloaded and set the height Making changes to the printer setup

84
The time will now update with the new font Making changes to the printer setup

85
The last option to look at is the Online utilities Making changes to the printer setup

86
This screen allows to read back information when the printer is running You can also stop the printer at any point Making changes to the printer setup

87
When the printer is stopped you can load any labels that are stored in the printer Making changes to the printer setup

88
This concludes our introduction to the label design software. For good practice I would like you to open a new label file and generate the following fields Variable field called GTIN Variable field called LOT Variable Field called EXP Time Field Date field with a 10 day offset Import a graphic of your choice Once you have inputted this information we will generate a GS1 2d Datamatrix The Test………

89
Your label should look something like this, the next task is to create A multiple field linking the variable fields with identifiers

90
Your Multiple field should look like this Click Ok

91
Now set up a barcode up as shown

92
You have now set up a GS1 datamatrix

93
We can now send are label to the printer, this can be done in two ways RS232 or USB key To copy a file to the USB key follow the next few slides

94
Click file then save as

95
Save the file in a folder that is relevant to you

96
Now insert your USB key in to the computer and create a folder called IMPPRX

97
Copy your test file to the folder

98
You are now ready to transfer the file to the printer Eject the USB key

99
Connect the USB key to the PR5 PR5 Handset USB Drive

100
When connected the message below is briefly displayed

101
To access the images on the USB drive, press the down arrow until “USB pendrive” is highlighted & press the “Enter” key

102
To transfer images from the USB drive in to the printer memory the “Export” command is used. Select it using the arrow keys & press “Enter”

103
There are now three choices, to transfer a single image use the “Image” option. Press enter & the images on the USB are displayed

104
Select the image to transfer & press “Enter” The selected image will then be duplicated in the printer memory.

105
Now load the image from print on the main menu

106
Last tip: remember to change your label height and ribbon advance for smaller labels Go to file> label parameters

108
Thank you for you attention. Any Questions?

Similar presentations