Download presentation
Presentation is loading. Please wait.

1
Working with Graphics

2
Objectives Understand bitmap and vector graphics Place a graphic into a frame Work with the content indicator Transform frame contents Use the Links panel Replace a linked image and embed a file Add graphics to a library

3
Understanding Bitmap and Vector Graphics Bitmap graphic Graphic that is made up of pixels Tiny color squares arranged in a grid used to display graphics Pixels can be seen when zooming Examples: Television screens Scanned photographs Photographs taken from a digital camera Files created in an image-editing software program

4
Vector graphic Graphic that is made up of vectors Straight or curved line segments connected by anchor points (small dots) Created in drawing programs Ideal format for illustrations and logos Can be resized in page layouts without losing image quality Can be manipulated in InDesign using the Pen tool and Direct Selection tool Understanding Bitmap and Vector Graphics
 Created in drawing programs Ideal format for illustrations and logos Can be resized in page layouts without losing image quality Can be manipulated in InDesign using the Pen tool and Direct Selection tool Understanding Bitmap and Vector Graphics")
5
FIGURE D-1: Viewing pixels Understanding Bitmap and Vector Graphics

7
Resolution is the number of pixels per inch (ppi) used to display computer graphics on a monitor There should be at least 72 pixels per inch in order for a graphic to display correctly The resolution required for printed materials, also known as the number of lines per inch (lpi) or dots per inch (dpi), is much higher because pixels are converted to dots when graphics are printed Understanding Bitmap and Vector Graphics
 used to display computer graphics on a monitor There should be at least 72 pixels per inch in order for a graphic to display correctly The resolution required for printed materials, also known as the number of lines per inch (lpi) or dots per inch (dpi), is much higher because pixels are converted to dots when graphics are printed Understanding Bitmap and Vector Graphics")
8
Placing a Graphic into a Frame Graphics are placed into frames Using any of the frame tools: Rectangle, Ellipse, and Polygon tool Placed using the Place command on the File menu Upper-left corner of the graphic snaps to the upper-left corner of the frame and fills the remainder of the frame If the frame is larger than the graphic, not all of the frame will be filled If the graphic is larger than the frame, part of the graphic will not be seen

9
Placing a Graphic into a Frame

10
Figure D-6: pizza.psd graphic placed in the frame

11
Working with the Content Indicator Content indicator Donut-shaped icon Appears over a placed graphic when Selection tool is moved over the graphic Allows you to move a graphic in a frame without moving the frame Image can be dragged until it is cropped to your liking Cropping: hiding part of the image without permanently removing it

12
Working with the Content Indicator

13
The Direct Selection tool has many uses in addition to selecting a placed object separately from its frame Select the individual anchor points and line segments of vector graphics, then edit the graphic to make a subtle change or an entirely new shape

14
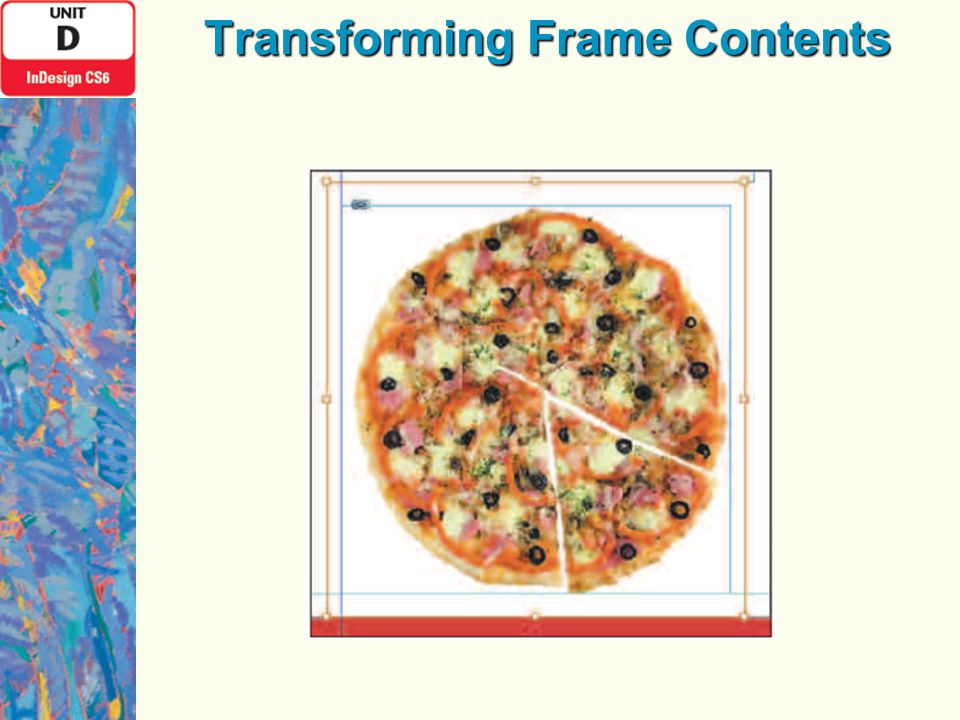
Transforming Frame Contents Control panel Displays options for transforming frame contents Examples: scale, rotate, center, or flip There are also buttons for fitting the image to match the size of the frame and vice versa

15
Transforming Frame Contents

17
Using the Links Panel When an image is placed in a frame a preview is displayed Graphical representation of the original image file and not the file itself Link is automatically established between the preview and actual image file Linking images helps to keep file size manageable Size of placed image files is not added to the InDesign file size

18
Using the Links Panel

19
Editing a link Use the Edit Original button on the Links panel or Use the Edit Original command on the Links panel menu The file opens in the software program that it was created in

20
Replacing a Linked Image and Embedding a File To replace a placed image in InDesign: Click the image on the Links panel Click the Relink button on the Links panel Choose a new file in the Relink dialog box New image replaces the original image Inherits any fitting commands and transformations that were made to it

21
Embedding a file: Makes it a permanent part of the file No longer linked Embedded files remain on the Links panel with an Embedded icon Great way to protect a file from being changed, moved, or deleted Link status Replacing a Linked Image and Embedding a File

22
Figure D-15: Relink dialog boxFigure D-16: Embedding the logo file Replacing a Linked Image and Embedding a File

23
Adding Graphics to a Library Libraries Strictly for storing often-used text, graphics, and pages for use in any InDesign document Store all formatting applied to objects and text InDesign files (with an.indl extension) that look and work like InDesign panels
 that look and work like InDesign panels")
24
Adding Graphics to a Library

25
Printing an InDesign document with linked files Original files that are linked to the document must be present on the same computer in order for the document to print correctly If you send your InDesign document to a printer or a service bureau for printing, you must send not only the InDesign document, but also all of the linked files in one folder

26
Unit Summary Understand bitmap and vector graphics Place a graphic into a frame Work with the content indicator Transform frame contents Use the Links panel Replace a linked image and embed a file Add graphics to a library

Similar presentations