Download presentation
Presentation is loading. Please wait.

1
Word Lesson 1 Understanding Word Fundamentals
Microsoft Office 2010 Fundamentals Story / Walls

2
Objectives 2 2 Open an existing Word document. Navigate a document.
Select text. Enter text. Save a document. Change document views and page formatting. Preview and print a document. Close a document. 2 2

3
Vocabulary collate document drag I-beam insertion point landscape
margins portrait select word-processing software word wrap 3 3

4
Introduction Microsoft Word 2010 is the word-processing program included in the Microsoft Office 2010 suite of software. The program lets you insert and manipulate text and graphics to create documents Examples of documents include lists, letters, reports, flyers, and brochures Word includes predefined styles, formats, and effects to help you create documents 4 4

5
Examining the Word Program Window
5 5

6
Starting Word and Opening an Existing Document
Click the Start button on the Windows taskbar; click All Programs; click the Microsoft Office folder; click Microsoft Word 2010. 6 6

7
Starting Word and Opening an Existing Document (continued)
Click the File tab on the Ribbon and then click Open to display the Open dialog box. 7 7

8
Navigating the Word Document
The insertion point is the blinking vertical bar that signals where any text you type will appear. You can move the insertion point in several ways: With the mouse With the keyboard With the GoTo command 8 8

9
Navigating the Word Document (continued)
Using the Mouse: The mouse pointer looks like an I-beam when you slide it over text. To move the insertion point in existing text, position the I-beam where you want to work and click. 9 9

10
Navigating the Word Document (continued)
Use scroll bars to move to a position not displayed in the document window. 10 10

11
Navigating the Word Document (continued)
Using the Keyboard Shortcuts: 11 11

12
Navigating the Word Document (continued)
Using the Go To Command: You can use the Go To command to jump to a specific page, section, line, comment, or other element within a document. Access the Go To command on the Find menu in the Editing group (located on the Home tab of the Ribbon). 12 12
")
13
Selecting Text Before you can format text or move or delete text or graphics, you must select, or highlight, the text or object you want to change. You can select text two ways: With the mouse With the keyboard 13 13

14
Selecting Text (continued)
Selecting with the Mouse: 14 14

15
Selecting Text (continued)
Selecting with the Keyboard: 15 15

16
Entering Text Position the insertion point where you want to insert text and then type the text. Word enters text at the insertion point. Word wrap automatically continues text to the next line within a paragraph. Press Enter to create the first line of a new paragraph. 16 16

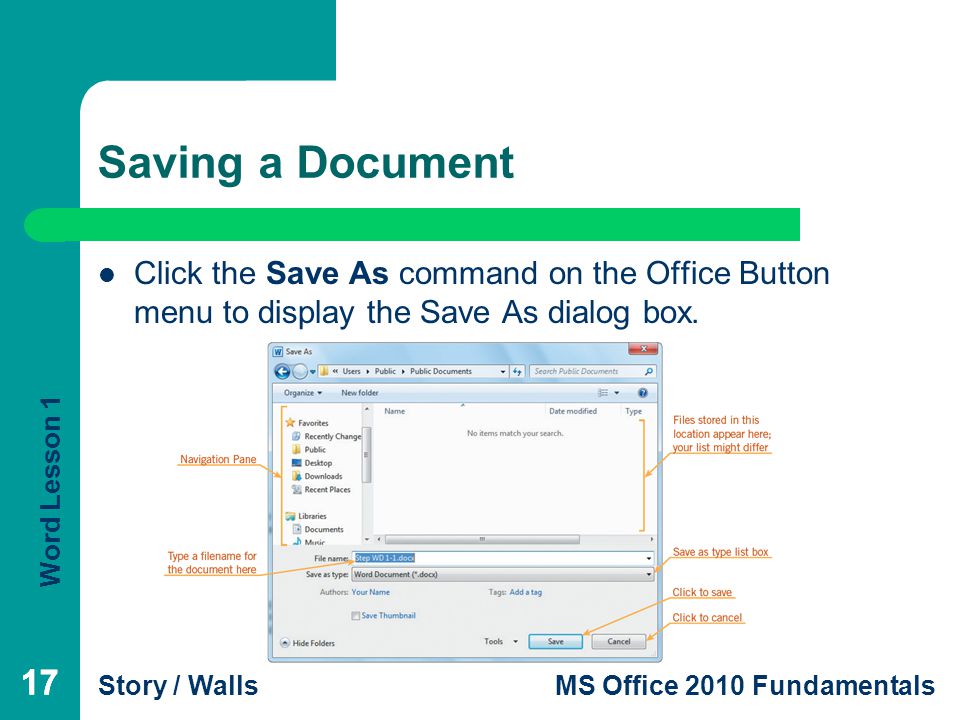
17
Saving a Document Click the Save As command on the Office Button menu to display the Save As dialog box. 17 17
18
Saving a Document (continued)
Once you have saved a file, use the Save button on the Quick Access Toolbar or the Save command on the File tab to update it. The Save & Send option on the File tab lets you save a document online to Windows Live SkyDrive or to an organization’s SharePoint site. Word’s AutoRecover feature automatically saves your document at regular intervals so you can recover at least some of your work in case of a power outage. 18 18

19
Changing Document Views
Word provides five different views using the buttons in the Document Views group on the View tab of the Ribbon. Print Layout Full Screen Reading Web Layout Outline Draft 19 19

20
Changing Page Formatting
Use the Page Setup group of commands on the Page Layout tab to set up a document’s pages. 20 20

21
Changing Page Formatting (continued)
Setting Margins: Margins are the areas of white space that border the text on the edges of a page The Margins button and menu provides commands for common margin settings 21 21

22
Changing Page Formatting (continued)
Choosing Paper Size: You can use the Size button and menu to choose from a list of common paper sizes. 22 22

23
Changing Page Formatting (continued)
Changing Orientation: Use the Orientation button in the Page Setup group to change page orientation. Portrait is a horizontal page setup. Landscape is a vertical page setup. 23 23

24
Previewing and Printing a Document
Click Print on the File tab to display Backstage view. 24 24

25
Closing a Document To close a document without closing Word, choose the Close command on the File tab. When you have only one document open, click the Close button on the title bar to close the document and exit the program at the same time. If you have more than one document open, you can close all documents and exit the program using the Exit command on the File tab. Word prompts you to save your work if you made any changes since you last saved. 25 25

26
Summary In this lesson, you learned:
To open an existing document using the Open dialog box. Ways to move the insertion point in the Word document using the mouse, keyboard shortcuts, and the Go To command. To select text using the mouse and the keyboard. 26 26

27
Summary (continued) That when you enter text, Word automatically wraps it to the next line. How to save a document using the Save As dialog box. The five different ways to view a document. Ways to change margins, paper size, and orientation. 27 27

28
Summary (continued) To preview and print a document using Backstage view on the File tab. To close a file. 28 28

Similar presentations

. Content from Microsoft.>")


