Download presentation
Presentation is loading. Please wait.

1
Diagnosis and Repair of Electronic Circuits
Chapter 11 Diagnosis and Repair of Electronic Circuits

2
Objectives (1 of 5) Explain what is meant by sequential electronic troubleshooting. Perform tests on some key electronic components including diodes and transistors. Define the acronym EST. Identify some types of EST in current use. Identify the levels of access and programming capabilities of each EST.

3
Objectives (2 of 5) Explain why electronic damage may be caused by electrostatic discharge and by using inappropriate circuit analysis tools. Describe the type of data that can be accessed by each EST. Identify what type of data may be read using the on-board flash codes.

4
Objectives (3 of 5) Perform some basic electrical circuit diagnosis using a DMM. Identify the function codes on a typical DMM. Test some common input circuit components such as thermistors and potentiometers. Test semiconductor components such as diodes and transistors. Describe the full range of uses of a ProLink 9000 reader/programmer.

5
Objectives (4 of 5) Connect a ProLink to the vehicle data bus via the SAE/ATA data connector and scroll through the display windows. Update a ProLink software cartridge by replacing the PROM chip(s) or data cards. Define the objectives of a snapshot test. Outline the procedure required to use a PC and OEM software to read, diagnose, and reprogram vehicle electronic systems.
 or data cards. Define the objectives of a snapshot test. Outline the procedure required to use a PC and OEM software to read, diagnose, and reprogram vehicle electronic systems.")
6
Objectives (5 of 5) Understand the importance of precisely completing each step when performing sequential troubleshooting testing of electronic circuits. Interpret the SAE J1587/1939 codes for MIDs, PIDs, SIDs, and FMIs using SAE interpretation charts. Repair the sealed electrical connectors used in most electronic wiring harnesses.

7
Types of EST The term electronic service tool (EST) is generally used in the trucking industry to cover a range of electronic service instruments from on-board diagnostic/malfunction lights to sophisticated computer-based communications equipment. The use of generic ESTs and procedures will be reviewed in this section. Proprietary ESTs are designed to work with an OEM’s specific electronics and will not be discussed in any great detail in this text because they are system-specific.
 is generally used in the trucking industry to cover a range of electronic service instruments from on-board diagnostic/malfunction lights to sophisticated computer-based communications equipment. The use of generic ESTs and procedures will be reviewed in this section. Proprietary ESTs are designed to work with an OEM’s specific electronics and will not be discussed in any great detail in this text because they are system-specific.")
8
ATA Connectors ESTs capable of reading ECM data are connected to the on-board electronics by means of standard connectors. An ATA connector as used in J1587/1708 system is a 6-pin Deutsch connector. The more recent J1939 connector uses a 9-pin Deutsch connector with a key in the A-pin recess.

9
Flash or Blink Codes Flash or blink codes are designed to read active system fault codes. Depending on the system, sometimes historic or inactive codes can also be read. Where multiple codes are displayed, OEM troubleshooting literature should be consulted because certain types of circuit failure can trigger codes in functional circuits and components.

10
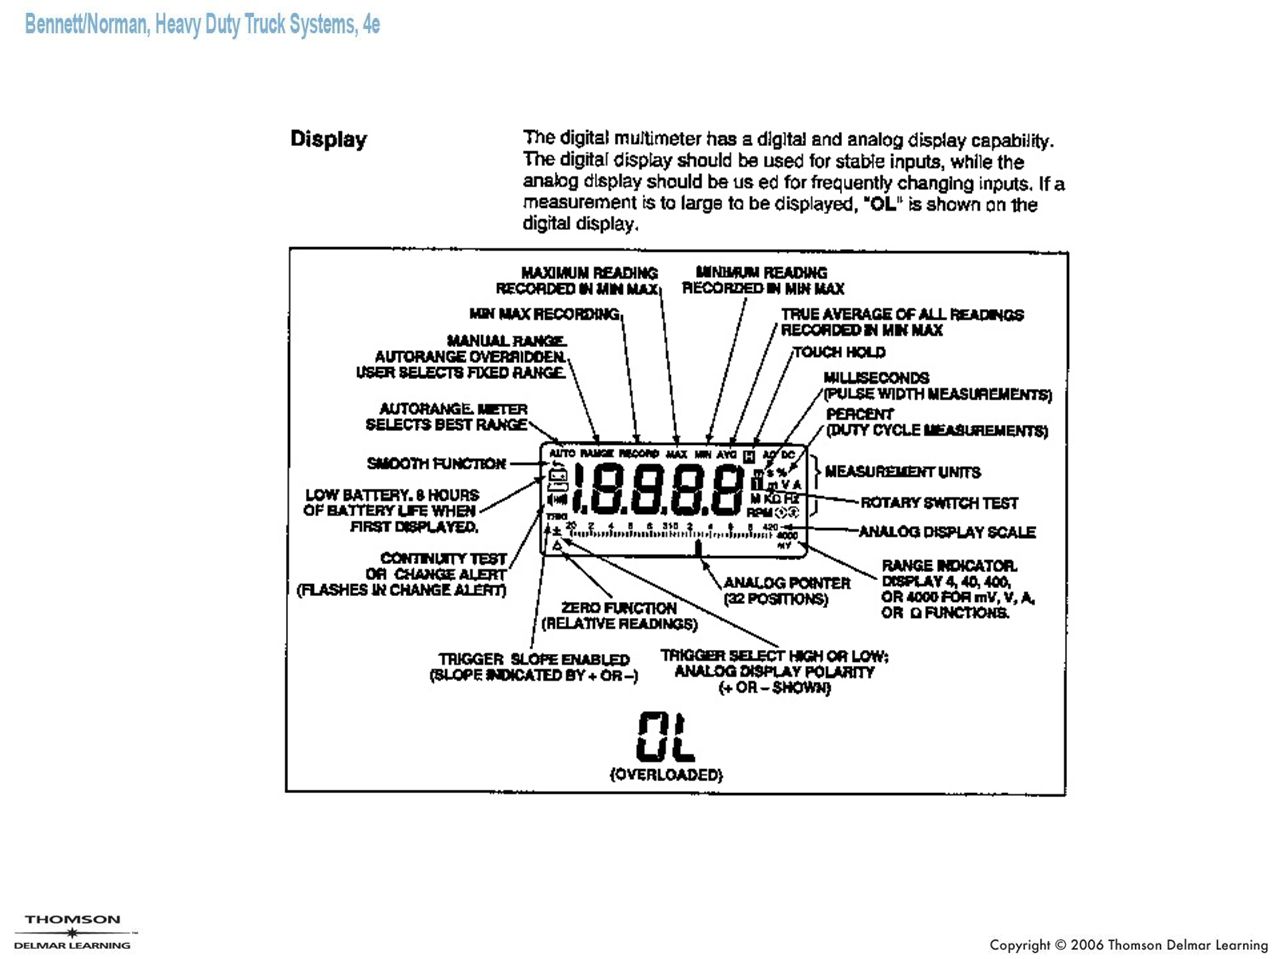
Using Digital Multimeters (1 of 2)
Most electronic circuit testing requires the use of a DMM. This instrument should displace the analog multimeter and circuit test light in the truck/bus technician’s toolbox.

11
DMM Input Terminals

12
DMM Rotary Switch

13
DMM Pushbuttons

15
Using Digital Multimeters (2 of 2)
Resolution Accuracy Caution: Whenever a truck circuit has an electronic control module, ensure that a digital multimeter (DMM) is used to make voltage measurements. Analog voltmeters can damage ECM circuits.
 is used to make voltage measurements. Analog voltmeters can damage ECM circuits.")
16
Measuring Voltage Checking circuit supply voltage is usually one of the first steps in troubleshooting. Voltage measurements determine: Source voltage Voltage drop Voltage imbalance Ripple voltage Sensor voltages

17
DMM Setup for Making Voltage Measurements

18
Measuring Resistance (1 of 2)
Most DMMs will measure resistance values as low as 0.1Ω. Some will measure high resistance values up to 300MΩ (megohms). Infinite resistance or resistance greater than the instrument can measure is indicated as OL or flashing digits on the display. For instance, an open circuit would read OL on the display. Resistance and continuity measurements should be made on open circuits only. Using the resistance or continuity settings to check a circuit or component that is energized will damage the test instrument.
. Infinite resistance or resistance greater than the instrument can measure is indicated as OL or flashing digits on the display. For instance, an open circuit would read OL on the display. Resistance and continuity measurements should be made on open circuits only. Using the resistance or continuity settings to check a circuit or component that is energized will damage the test instrument.")
19
DMM Setup for Measuring Resistance

20
Measuring Resistance (2 of 2)
Resistance measurements determine: Resistance of a load Resistance of conductors Value of a resistor Operation of variable resistors Continuity is a quick resistance check that distinguishes between an open and a closed circuit. Continuity tests determine: Fuse integrity Open or shorted conductors Switch operation

21
Diode Testing Current flows only when the anode is more positive than the cathode. Additionally, a diode will not conduct until the forward voltage pressure reaches a certain value, 0.3V in a silicon diode. Some meters have a diode test mode. When testing a diode with the DMM in this mode, 0.6V is delivered through the device to indicate continuity; reversing the test leads should indicate an open circuit in a properly functioning diode. If both readings indicate an open circuit condition, the diode is open. If both readings indicate continuity, the diode is shorted.

22
Measuring Current (1 of 3)
Current measurements are made in series, unlike voltage and resistance readings, which are made in parallel. The test leads are plugged into a separate set of input jacks, and the current to be measured flows through the meter.

24
Measuring Current (2 of 3)
Current measurements determine: Circuit overloads Circuit operating current Current in different branches of a circuit A DMM should have current input fuse protection of high enough capacity for the circuit being tested. This is mainly important when working with high pressure (220V+) circuits.
 circuits.")
25
Measuring Current (3 of 3)
Current probe accessories When making current measurements that exceed the DMM’s rated capacity, a current probe can be used. Current probes are not particularly accurate. There are two types: Current transformers A current transformer measures AC current only. The output of a current transformer is 1mA per 1A. This means that a current flow of 100A is reduced to 100mA, which can be handled by most DMMs. Hall-effect probe The output of a Hall-effect probe is 1 mV per ampere. It will measure AC or DC.

26
Breakout Boxes and Breakout “T”s
The DMM is often used in conjunction with a breakout box or breakout T. Breakout devices are designed to be T’ed into an electrical circuit to enable circuit measurements to be made on both closed (active) and de-energized circuits. A primary advantage of breakout diagnostic devices is that they permit the reading of an active electronic circuit, for instance, while an engine is running.
 and de-energized circuits. A primary advantage of breakout diagnostic devices is that they permit the reading of an active electronic circuit, for instance, while an engine is running.")
27
Caution When a troubleshooting sequence calls for the use of breakout devices, always use the recommended tool. Never puncture wiring or electrical harnesses to enable readings in active or open electronic circuits. The corrosion damage that results from damaging wiring conduit will create problems later on and the electrical damage potential can be extensive.

28
Caution The terminals in many connectors are especially vulnerable to the kind of damage that can be caused by attempting to insert DMM probes, paper clips, and other inappropriate devices. Even more important, remember that it is always possible to cause costly electrical damage by shorting and grounding circuits in a separated electrical connector.

29
Shop Talk When performing a multiple-step, electronic troubleshooting sequence on a large multi-terminal connector, photocopy the coded face of the connector(s) from the service manual and use it as a template. The alphanumeric codes used on many connectors can be difficult to read and using a template is a good method of orienting the test procedure.
 from the service manual and use it as a template. The alphanumeric codes used on many connectors can be difficult to read and using a template is a good method of orienting the test procedure.")
30
Diagnostic Connector Dummies
Diagnostic connector dummies are used to read conditions in a circuit that has been opened by separating a pair of connectors. The dummies are a means of accessing the circuitry with a DMM without damaging the connector sockets and pins.

31
Testing Semiconductors
See Figure on page 288 in textbook.

32
ProLink 9000 MPSI ProLink 9000 is a generic reader /programmer EST.
Access active and historic codes Erase historic(inactive) codes View all system identification data View data on system operation with the engine running or the truck moving Perform diagnostic tests on system subcomponents, such as solenoid testing Reprogram customer data parameters on engine and chassis systems Act as a serial link to connect the vehicle ECM via modem to a centrally located mainframe for proprietary data programming (some systems only) Snapshot system data parameters to assist intermittent fault-finding solutions
 codes. View all system identification data. View data on system operation with the engine running or the truck moving. Perform diagnostic tests on system subcomponents, such as solenoid testing. Reprogram customer data parameters on engine and chassis systems. Act as a serial link to connect the vehicle ECM via modem to a centrally located mainframe for proprietary data programming (some systems only) Snapshot system data parameters to assist intermittent fault-finding solutions.")
33
Shop Talk As truck electronic systems have become more complex, the limitations of ProLink have made it much less likely that OEMs will recommend its use. Today ProLink will read most systems when connected to the chassis data bus but may not be capable of doing much else. OEMs tend to recommend PC-based diagnostics and reprogramming and are therefore less likely to support ProLink with the software required to do anything other than read a system.

34
ProLink Data Connection Hardware

35
ProLink Head, Software Cartridge, and Cables

36
Multiprotocol Cartridge
The ProLink MPC (multiprotocol cartridge) is updated simply by replacing the MPC card. Some of the MPC cards are equipped with a general heavy-duty reader that permits ProLink to read all the SAE- coded data. Replacement of an outdated MPC card by a current version means that no cartridge disassembly is required to update software. This simplifies the upgrade procedure for ProLink data cartridges.
 is updated simply by replacing the MPC card. Some of the MPC cards are equipped with a general heavy-duty reader that permits ProLink to read all the SAE- coded data. Replacement of an outdated MPC card by a current version means that no cartridge disassembly is required to update software. This simplifies the upgrade procedure for ProLink data cartridges.")
37
Caution Exercise extreme care when altering customer data.
Significant performance problems and component damage may result from incorrectly programming data to an ECM.

38
Shop Talk Always double-check that the password has been correctly input. After a password has been input to a system, no future access can be achieved without it. Read the number back to yourself to ensure that it is correctly input.

39
SAE/ATA J1587/J1708/J1939 Protocols
SAE J1587 covers common software protocols. SAE J1708 covers common hardware protocols. SAE J1939 covers both hardware and software protocols. These data bus protocols enable the interfacing of electronic systems manufactured by different OEMs on truck and bus chassis, and provide any manufacturer’s software to be able to read other OEMs’ electronic systems.

40
Protocols Message identifier (MID) is used to describe a major vehicle electronic system, usually with independent processing capability. Parameter identifiers (PIDs) are usually primary subsystems common to all different OEM types covered by the MID. Subsystem identifiers (SIDs) describe subsystems that fall within the major system (MID) and often include systems or components used specifically by one manufacturer. Failure mode indicators (FMIs) are indicated whenever an active or historic code is read using ProLink or a PC. The code actually displayed in the electronic service tool may be the OEM’s code, but all North American truck electronics use FMIs so system failures can at least be read by their competitor’s diagnostic software.
 are usually primary subsystems common to all different OEM types covered by the MID. Subsystem identifiers (SIDs) describe subsystems that fall within the major system (MID) and often include systems or components used specifically by one manufacturer. Failure mode indicators (FMIs) are indicated whenever an active or historic code is read using ProLink or a PC. The code actually displayed in the electronic service tool may be the OEM’s code, but all North American truck electronics use FMIs so system failures can at least be read by their competitor’s diagnostic software.")
41
Common MID, SID, PID, and FMI Codes
Common MID, SID, PID, and FMI codes are used by all the OEMs manufacturing trucks in North America. Unlike OBD codes in automobiles, which cover only emissions-related components, truck data bus codes are fully comprehensive of all on-board electronic systems and allow one OEM’s diagnostic instrument to at least read their competitor’s diagnostic codes.

42
FMIs 0 = Data valid but above normal operating range
1 = Data valid but below normal operating range 2 = Data erratic, intermittent, or incorrect 3 = Voltage above normal or shorted high 4 = Voltage below normal or shorted low 5 = Current below normal or open circuit 6 = Current above normal or grounded circuit 7 = Mechanical system not responding properly 8= Abnormal frequency, pulse width, or period 9 = Abnormal update rate 10 = Abnormal rate of change 11 = Failure mode not identifiable 12 = Bad intelligent device or component 13 = Out of calibration 14 = Special instructions 15 = Reserved for future assignment

43
Electrical Wiring, Connector, and Terminal Repair
Metri-pack Connectors Installation of Metri-Pack 150 connectors Installation of Metri-Pack 280 connectors Deutsch connectors

44
Splicing Guidelines (1 of 2)
")
45
Splicing Guidelines (2 of 2)
Three-wire splice Three-way splice connectors are commercially available to accommodate three-wire splices. The technique is the same as a single butt splice connector.

46
Circuit Symbols and Diagrams
The technician should be able to easily identify most of the symbols displayed here because they are so commonly used. They do vary slightly depending on the OEM. Note the twisted pair symbol used for the vehicle data bus.

47
ISO Wiring Codes Most manufacturers are either currently using or plan to use ISO wire color codes on their chassis electrical systems. See Table 11-1 on page 316 of the textbook.

48
Shop Talk Diagnostic trees are often used by truck OEMs to troubleshoot malfunctions. The “root” of the tree is the problem. The “branches” are the various different paths that circuit testing will route the diagnostic technician. These tests are sometimes referred to as “leaves.” Never skip tests or sections within a diagnostic tree. Some diagnostic trees are driven by OEM software and may have hundreds of steps.

49
Summary (1 of 8) The ESTs used to service, diagnose, and reprogram truck engine management systems are on-board diagnostic lights, DMMs, scanners, generic reader/programmers, proprietary reader/programmers, and PCs. Flash codes are an on-board method of accessing diagnostic codes. Most systems will display active codes only. Some will display active and historic (inactive) codes.
 codes.")
50
Summary (2 of 8) ProLink 9000 with the appropriate OEM software cartridge has become the industry standard portable shop floor diagnostic and customer data programming EST. Most OEMs use the PC and proprietary software as their primary diagnostic and programming EST.

51
Summary (3 of 8) ESTs designed to connect with the vehicle ECM(s) do so via the SAE/ATA J708/1939 connector. Most electronic circuit testing requires the use of a DMM. Continuity is a quick resistance check that distinguishes between an open and a closed circuit. A dark band identifies the cathode on a diode.

52
Summary (4 of 8) Circuit resistance and voltage are measured with the test leads positioned parallel to the circuit. Direct measurement of current flow is performed with the test leads located in series with the circuit. A Hall-effect probe can be used to approximate high current flow through a DC circuit.

53
Summary (5 of 8) The ProLink 9000 EST is used to access active and historic codes, read system identification data, perform diagnostic testing of electronic subcomponents, reprogram customer data, act as a serial link for mainframe linkage, and perform snapshot data analysis. A ProLink OEM software cartridge is updated by replacing the PROM chips.

54
Summary (6 of 8) A snapshot test is performed to analyze multiple data frames before and after a trigger, usually a fault code or manually keyed. SAE J1587 and J1939 codes and protocols numerically code all on-board electronic systems, parameters, and failure modes. Most truck manufacturers have made the PC their primary reader, programming, and diagnostic EST but some sub-system manufacturers still require the use of a proprietary reader programmer.

55
Summary (7 of 8) The PC is connected to the vehicle data bus by means of a 6- or 9-pin connector known as an ATA connector. Once connected, the OEM software accesses the appropriate MID so that the system can be read and diagnosed. Technicians should remember that any system using J1587 or J1939 protocols can at least be read using simple general heavy-duty software.

56
Summary (8 of 8) System parameter (PID) failures are identified by FMIs, making circuit diagnosis easy. Sealed electronic circuit connectors must be assembled using the correct OEM tooling and components.

Similar presentations


 LECTURE # 14 BY MOEEN GHIYAS.>")
>")

>")


