Download presentation
Presentation is loading. Please wait.

1
History and Techniques

2
Leonardo daVinci’s The Last Supper

3
The rules of perspective provide a way of bringing the appearance of three dimensional to a two-dimensional drawing. A basic understanding of the key points of perspective will greatly enhance your ability to draw. You will be able to give the viewer the impression that some elements of the picture are closer while others recede into the distance, thus creating an illusion of reality.

5
Perspective goes back to the ancient Egyptians and later the ancient Greek as they attempted to convey foreshortening, by overlapping objects and suggested distance by drawing objects bigger, smaller, higher, lower or in strata. It wasn’t until the Renaissance that perspective became a common standard of drawing for classical architects and artists. Some of its pioneers were architects Brunelleschi (1377-1446), Alberti (1404-1472) and painter Paolo Uccello (1396-1475). Filippo Brunelleschi Architect Leon Battista Alberti Architect Paolo Uccello Painter
, Alberti ( ) and painter Paolo Uccello ( ). Filippo Brunelleschi Architect Leon Battista Alberti Architect Paolo Uccello Painter.")
6
Leonardo da Vinci Leonardo da Vinci saw perspective space in a formal linear framework. Note the picture at the bottom with the lines representing a one point perspective linear painting. The focal point begins at Jesus’s head.

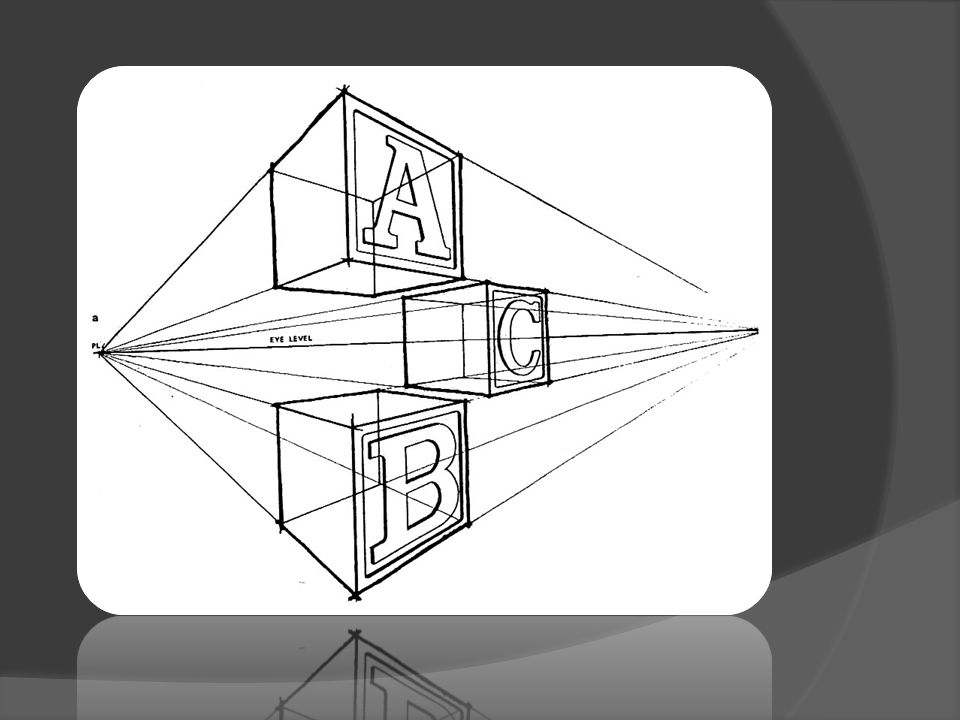
8
To draw a one point perspective shape, you will need a horizontal line, shape of your choice anywhere on a blank sheet of drawing paper, a ruler or straight edge and a pencil. To start we draw a line at the center of the page and place a dot at the center of the line. The dot is called your vanishing point and all the shapes you add to your blank paper will connect to this vanishing point. Once you have 2 or 3 shapes placed anywhere on your page, start to connect the corners of your triangle, box or edges of your circle to your vanishing point one corner at a time. As lines create a distance, you want to make sure that when extending your shape that the lines are parallel from one another. When your shape is complete, erase hidden lines and lines extending to the horizon. Add your light source and voila! You have just drawn a shape with dimension.

10
To start drawing a two point perspective drawing you will need the same essentials as mentioned above. This time your horizontal line will start at the bottom or at the top of your drawing paper. On your horizontal line add two vanishing points, one on the right of the line and another on the left of the line. Please do not go ahead and draw shapes yet. Listen for instruction. 2 point perspective can be a little tricky. Add a vertical line, about 1 inch anywhere on your paper. Connect each vanishing point to the top and bottom of that line. You should have drawn 4 lines, 2 for each vanishing point. Next choose the distance of your shape and connect with the bottom line, making sure it’s perpendicular to your vertical line. Now pay close attention to connecting your new vertical lines to the opposite vanishing point. Once you have achieved to get the first shape down the rest are easy. Just follow the same rules. When your shape is complete, erase hidden lines and lines extending to the horizon. Add your light source and voila! You have just drawn another shape with dimension.

12
YouTube video then Hands on and Rubric

Similar presentations


>")


