Download presentation
Presentation is loading. Please wait.

1
(ITI310) By Eng. BASSEM ALSAID SESSION 3: Using RAID Technology In Windows 2008 Server SAT 07-Nov-2015

2
SESSION 3: “Using RAID Technology in Windows 2008 Server” Session Abstract RAID (Redundant Array of Independent Disks) offers many advantages over the use of single hard disks. The potential for increased capacity, performance and reliability are attractive, but they come with real costs. Learning Objectives Upon completion of this part, the student will be able to: – Identify main RAID levels – Implement main RAID levels using Windows 2008 Server

3
Using RAID What RAID is? and what it does? depends on what type of applications RAID is needed, how these applications are implemented. For example, for some applications RAID 5 is better than RAID 0; for others, RAID 0 is superior to RAID 5. Generally, using RAID can offer some combination of the following: Higher Data Safety. Fault Tolerance. Improved Availability. Increased, Integrated Capacity. Improved Performance.

4
Concepts & Definitions Parity: Adding a check bit to the end of the byte. This can help detecting errors by comparing the received bit and the calculated bit: if they do not match, the retransmission should be performed. Two types: – Odd Parity: add 1 if the number of 1’s is even, and add 0 if the number of 1’s is odd. – Even Parity: add 1 if the number of 1’s is odd, and add 0 if the number of 1’s is even.

5
Concepts & Definitions Error Correcting Code (ECC): ECC is a process of generating parity values that can be used to both detect errors in data and to reconstruct the correct data. This could be performed by calculating the code bits and compare with the stored code, if they don’t match an error occurs and the error is determined and corrected by comparing. Striping: By using Stripping we can break a block of data to smaller pieces and simultaneously written to multiple locations in order to increase the R/W operations performance.

7
RAID Level 0 - Striping RAID-0 is known as data striping. The data is broken down into several smaller, equally sized pieces. This process increases I/O bandwidth by simultaneously accessing multiple disks. It does not offer any redundancy. Thus backup is required. RAID-0 is ideal for high bandwidth applications, such as video production.

9
Creating a Striped (RAID 0) Volume: A striped volume is normally created using two similarly sized disk drives connected to a Windows Server 2008 system. Select Storage Disk Management (Let us assume that we have 3 disks numbered 0, 1 and 2 respectively where disks 1 and 2 will be used to create a striped set of data disks). Right click on the unallocated space of disk 2 Select Create New Striped Volume. This will start the New Striped Volume wizard, Click Next. In order to add at least one more disk for disk stripping, you have to choose the other disk (disk 3) and to add it to the selected disks list. By clicking Next you can assign a drive letter or mount point for the volume. You can choose now Format Volume in order to fix the type of the file system.
. Right click on the unallocated space of disk 2 Select Create New Striped Volume. This will start the New Striped Volume wizard, Click Next. In order to add at least one more disk for disk stripping, you have to choose the other disk (disk 3) and to add it to the selected disks list. By clicking Next you can assign a drive letter or mount point for the volume. You can choose now Format Volume in order to fix the type of the file system..")
11
Recovering a Striped Volume: When a disk in a striped set fails or goes off-line the volume will be listed as Missing, Offline, Failed or Unreadable. If the disk is offline or missing the first thing to check is that all drives in the striped set are powered up and that the connectors are firmly in place. If a disk can be brought back on line the next step is to instruct Windows to rescan the disks so that striped volume can be brought back online. Do this by selecting Rescan disks from the Action menu. If the disk is listed as failed, unreadable or shows errors then the disk may have physical errors which suggest the disk needs to replaced and the data on the striped volume restored from the most recent back up.

12
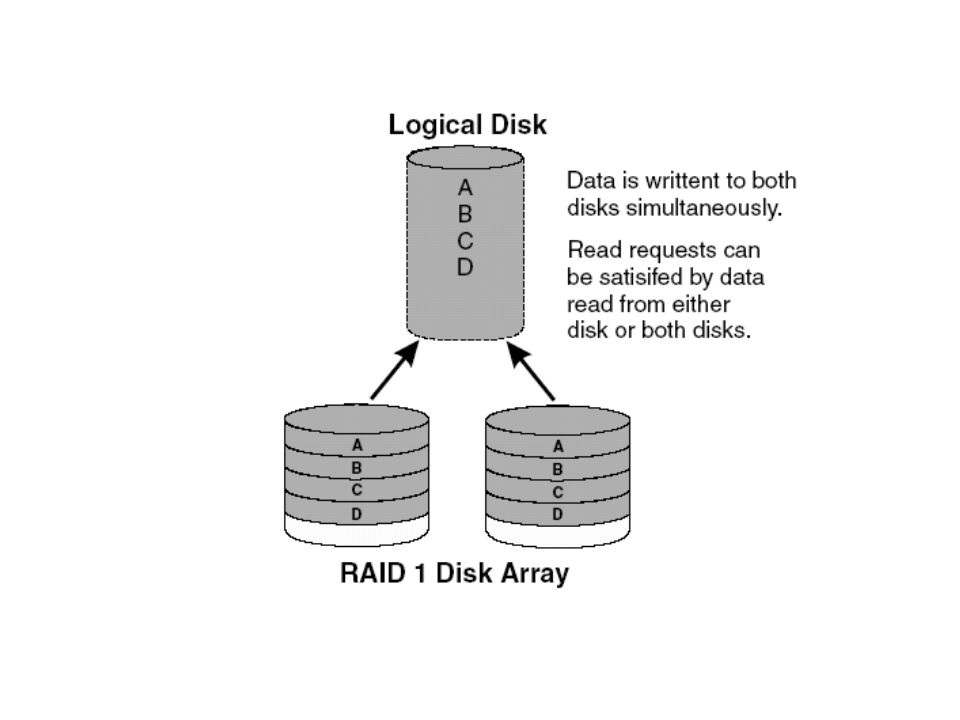
RAID Level 1 – Disk Mirroring Disk mirroring consists of creating a single logical disk drive from two physical disk drives. All data written to the logical drive is written to the two physical disk drives. Using disk mirroring allows us to create a pair of drives containing exactly the same data. (RAID 1) consists of creating a single logical disk drive from two physical disk drives. All data written to the logical drive is written twice to both physical disk drives. This allows us to create a pair of drives containing exactly the same data. (RAID 1) increases the performance of reading data. In fact, controllers could read from two disks.
 consists of creating a single logical disk drive from two physical disk drives. All data written to the logical drive is written twice to both physical disk drives. This allows us to create a pair of drives containing exactly the same data. (RAID 1) increases the performance of reading data. In fact, controllers could read from two disks..")
13
However, the performance of writing data is degraded since each writing operation should be repeated twice. (RAID 1) provide full fault tolerant for a single drive failure: No performance degradation after the failure. After the replacement of the damaged disk, the mirror set is rebuilt. (RAID 1) is a good choice when the read performance and fault tolerance are critical and when the cost is not a major concern (Generally we need 2 disks instead of one).
 provide full fault tolerant for a single drive failure: No performance degradation after the failure. After the replacement of the damaged disk, the mirror set is rebuilt. (RAID 1) is a good choice when the read performance and fault tolerance are critical and when the cost is not a major concern (Generally we need 2 disks instead of one)..")
15
Windows 2008 Server: Dynamic Disks Dynamic disks provide features that basic disks do not, such as the ability to create volumes that span multiple disks (spanned and striped volumes) and the ability to create fault-tolerant volumes (mirrored and RAID-5 volumes). Windows Server 2008 allows basic disks to be converted to dynamic disks. To create a dynamic disk: – Select Storage Disk Management. – Right click on the icon for the drive in question and select Convert to Dynamic Disk. – This will invoke the Convert to Dynamic Disk dialog.

16
Windows 2008 Server: Creating a Mirrored (RAID 1) Set Once the conversion to dynamic disks is performed for two physical disk drives, we can create the required mirroring set: Select Storage Disk Management. Within the Disk Management tool right click on the unallocated space in the graphical view of the first disk to be used in the mirror set and select New Mirrored Volume to invoke the New Mirrored Volume wizard. Click Next on the welcome screen to proceed to the disk selection screen. To add the second disk of the mirrored set, select a suitable disk click on Add to add it to the selected disks list. Click Next to assign a drive letter or mount point for the volume and to proceed to the Format Volume screen.

18
Recovering a Mirrored Set: If one of the disks in a mirrored set fails the good news is that, unlike striped volumes, all the data is still present on the remaining healthy disk. In this situation, however, it is important to replace the faulty disk and rebuild the mirror before the healthy drive also fails. To achieve this right click on the failed volume and select Remove Mirror. Next, identify a suitable alternate or newly installed drive with sufficient space to act as a mirror. Right click on the existing, healthy volume from the original mirrored set, select Add Mirror from the resulting menu, select the new disk in the Add Mirror dialog and click on Add Mirror. Windows will now rebuild the mirror using space on the new disk. As noted above, this process can take some time depending on the size of the volume in question.

19
RAID Level 5 RAID 5 is a Block-level striping (Independent access) with a distributed parity. RAID 5 needs at least 3 physical disk drives. Data is stripped across all disk drives. The parity is also striped across all disk drives. In the case of disk failure, a computation lost data stored in the failed disk is performed mathematically using the other disk data sectors and parity sectors. However, replacing the failed disk, allows us to rebuild the data previously stored on it.

21
Configuring RAID 5 Using Windows Server 2008 Disk Management RAID-5 implementation requires a minimum of 3 disk drives. We assume that our system contains 4 disk drives: disk 0 is the system disk and disks 1 through 3 are used for RAID 5 configuration. Go to Start All Programs Administration Tools Computer Management. Right click on one of the 3 disks in the Disk Management graphical view. Select the New RAID-5 Volume to invoke the New RAID-5 Volume wizard. Click on the Next button to proceed to the Disk Selection screen. Currently, only the current disk is included in the selected list. Two more disks must be added to the selected disks in order to build the RAID-5 array. Select disks from the Available list and click on the Add button. The Next button will activate the remainder of the configuration to be completed. Once these settings are configured click Next to proceed to the Format Volume screen.

23
Fixing RAID 5 Problems: If the RAID5 set displays Failed Redundancy and the volume is listed as Offline, Missing or Online (Errors) there is a problem which needs to be resolved. If the status is Offline or Missing, check that the disk is connected and powered up. If the problem is resolved select Rescan Disks from the Actions menu. Once the rescan is complete right click on the problematic drive and select Reactivate. All being well the drive status will change to Regenerating as the data is rebuilt using the parity information on the other drives in the array. Once regeneration is complete, the status does not return to Healthy, right click once again and select Regenerate Parity. If a disk in a RAID 5 configuration is listed as Failed or Online (Errors) repeat the above steps. If this fails the disk may be unrecoverable and will need to be replaced. To achieve this, right click on the volume on the failed disk and select Remove Volume from the popup menu. Once the volume has been removed, right click on a suitable block of unallocated space on another dynamic disk which is not already part of the RAID 5 array, has sufficient space and has a matching partition style and select Repair Volume. This will rebuild the RAID 5 configuration using the space on new disk drive together with the remaining healthy disks from the original RAID 5 configuration.
 repeat the above steps. If this fails the disk may be unrecoverable and will need to be replaced. To achieve this, right click on the volume on the failed disk and select Remove Volume from the popup menu. Once the volume has been removed, right click on a suitable block of unallocated space on another dynamic disk which is not already part of the RAID 5 array, has sufficient space and has a matching partition style and select Repair Volume. This will rebuild the RAID 5 configuration using the space on new disk drive together with the remaining healthy disks from the original RAID 5 configuration..")
24
Configuration may also be implemented from the command prompt using DiskPart. DiskPart may be launched either from a command prompt or a Run dialog simply by typing diskpart. Once invoked, DiskPart will display the DiskPart> “command prompt” and is ready to receive commands. 1- To identify the disks attached to the system use list disk command: DISKPART> list disk Disk ### Status Size Free Dyn Gpt ----------- ---------- -------- ------------ ------ ----- Disk 0 Online 30 GB 15 GB * Disk 1 Online 8 GB 8189 MB Disk 2 Online 8 GB 8189 MB Disk 3 Online 8 GB 8189 MB 2- Convert disks to dynamic disks: DISKPART> select disk 1 Disk 1 is now the selected disk. DISKPART> convert dynamic DiskPart successfully converted the selected disk to dynamic format.

25
3- Repeat Step 2 for disks 2 and 3. 4- Use create volume raid command to create the RAID 5: DISKPART> create volume raid disk=1,2,3 DiskPart successfully created the volume. 4- Use list volume command to check the volume status DISKPART> list volume Volume ### Ltr Label Fs Type Size Status Info ---------- --- ----------- ----- ---------- ------- --------- -------- * Volume 0 RAW RAID-5 16 GB Rebuild Volume 1 C NTFS Simple 15 GB Healthy System Volume 2 D DVD-ROM 0 B No Media 5- Format the volume using the format command as follows: DISKPART> format fs=ntfs label="RAID 5 Vol" 100 percent completed DiskPart successfully formatted the volume.

26
The following table, from a www.cerberos.com RAID whitepaper, summarizes strengths and weaknesses of all the standard RAID levels.

27
You are preparing to deploy Microsoft SQL Server on a Windows Server 2008 server. You have five disks. You want to provide protection of the operating system and the data in the event a single disk fails. You also want to optimize the performance of the disks. What should you do? A.Create a RAID-1 and a RAID-5. Place the operating system and the SQL data files on the RAID-1 and the SQL transaction log on the RAID-5. B.Create two RAID-5 volumes. Place the operating system on one RAID-5 and the SQL files on the other RAID-5. C.Create a RAID-1 and a RAID-5. Place the operating system and the SQL data files on the RAID-5 and the SQL transaction log on the RAID-1. D.Create a RAID-1 and a RAID-5. Place the operating system and the SQL transaction log on the RAID-1 and the SQL data files on the RAID-5. EXERCISE

28
NEXT SESSION Date: Saturday 14-Nov-2015 C2: 12:00 C3: 13:30 Title: “Disks, Files and Folders” THANKS

Similar presentations


 Striping of data across multiple media for expansion, performance and reliability.>")


. Disk organization technique that manages a large number of disks, providing a view of a single disk of High.>")


 Disks.>")
, also known as Redundant.>")


 –A group of hard disks is called a disk array FIGURE 14-10 Server with redundant NICs.>")