Download presentation
Presentation is loading. Please wait.

2
***Adding items to your Etudes Homepage***

3
Log into Etudes https://myetudes.org https://myetudes.org

5
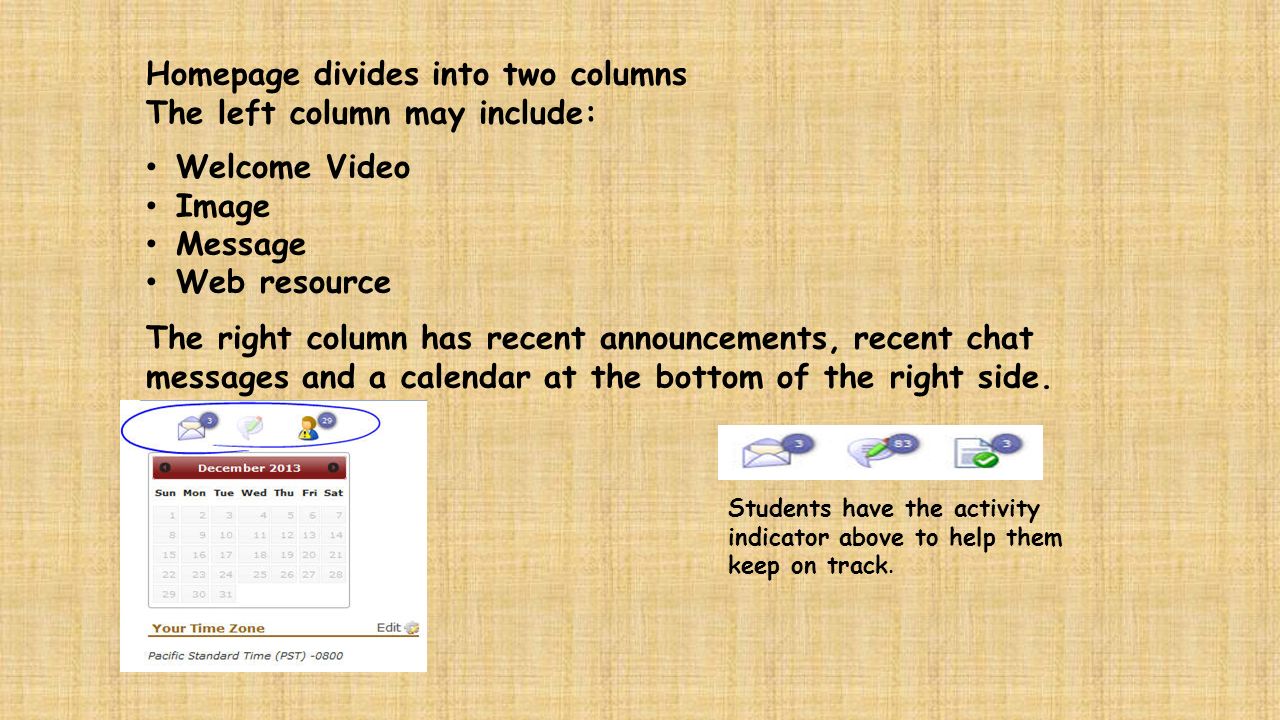
Homepage divides into two columns The left column may include: Welcome Video Image Message Web resource The right column has recent announcements, recent chat messages and a calendar at the bottom of the right side. Students have the activity indicator above to help them keep on track.

6
To add items >> Click on Add

7
Click on Upload a File Enter a title. Enter a release date (when you want it to appear in your Homepage). A file browser will appear. Select your picture off computer Double click on the picture you want to show in Preview mode and then click on Publish and it will show on the date you Picked. Tip: Save your images (recommended resolution is 72 pixels) for faster loading.
. A file browser will appear. Select your picture off computer Double click on the picture you want to show in Preview mode and then click on Publish and it will show on the date you Picked. Tip: Save your images (recommended resolution is 72 pixels) for faster loading..")
8
x After you title the picture Set the release date – today or in the future Bubble in Select or Upload a File Click Upload Browse for the picture you would like to post Click on the photo you want to save OR you can drag and drop the photo from your desktop

9
"Alternative Text". Add a short description of any image. (for decorative images that don't need a description, just type in two quote marks with no space between: "") In order to meet accessibility requirements, all images in your Etudes course site must have alternative text descriptions. Images include photographs, cartoons, figures, and charts. This is for the benefit of our students with low-vision who use screen-reader software. In other words, you need to provide a brief description that conveys meaning and significance of each image so that the student's screen-reader will tell the student what the image is all about since they can't see it themselves. Preview your file and click on Done to save the item as draft. Or, click on Publish to make it available in your Home on the specified date
 In order to meet accessibility requirements, all images in your Etudes course site must have alternative text descriptions. Images include photographs, cartoons, figures, and charts. This is for the benefit of our students with low-vision who use screen-reader software. In other words, you need to provide a brief description that conveys meaning and significance of each image so that the student s screen-reader will tell the student what the image is all about since they can t see it themselves. Preview your file and click on Done to save the item as draft. Or, click on Publish to make it available in your Home on the specified date.")
10
Add a YouTube Video Select the option to add a YouTube video. Enter a title. Enter a release date (when you want it to appear in your Home). Enter the ID of the video or the URL of the video. Click on the (?) icon for helpful tips on how to get the ID. Select the aspect radio for your video. Preview your video, and click on Done to save the item as draft. Or, click on Publish to make it available in your Home on the specified date.
. Enter the ID of the video or the URL of the video. Click on the ( ) icon for helpful tips on how to get the ID. Select the aspect radio for your video. Preview your video, and click on Done to save the item as draft. Or, click on Publish to make it available in your Home on the specified date..")
11
Author a Home Page Select the option to author an item. Enter a title. Enter a release date (when you want it to appear in your Home). The editor will appear.
. The editor will appear..")
12
You have the freedom to design an engaging page that includes images, links, and other media, and an informative message to greet your students. Another example is embedding other types of media with textual information around it. It could be that you want to post slides from Slide Share, Vimeo, YouTube, or another source. Click on the Embed Media icon of the editor and paste the embed code, and then add comments about it for your students. The possibilities of authoring with the editor are endless. Remember that this is not meant to be a lesson. The appropriate place for lessons is in Modules. It's meant to welcome students to the class, highlight a relevant theme for the week, motivate them, and things along these lines.

13
Once your page is authored, you can preview it just below the editor. Click on Done to save the item as draft. Or, click on Publish to make it available in your Home on the specified date. SELECT A WEB RESOURCE

14
Enter a title. Enter a release date (when you want it to appear in your Home). Enter the complete URL of your web resource, including the https://. Add a short description of the URL in the Alternative Text field. Add height in pixels for the display of the web page in your Home.

15
Home Page Management As you are adding items to your home, they are organized by status. Now Showing is the one displayed at your home page (green check). Coming Soon are items that are published and have a future release date. Not Published are draft items that you have created but have not yet published. Past Items are home page items that were displayed at one time, but others were posted after them.
. Coming Soon are items that are published and have a future release date. Not Published are draft items that you have created but have not yet published. Past Items are home page items that were displayed at one time, but others were posted after them..")
17
(NOTE: It is advised that you include links to secure resources with https addresses. For security reasons, browsers may not display web pages with http:// addresses to users within a secure server environment, like Etudes). Preview your web resource, and click on Done to save the item as draft. Or, click on Publish to make it available in your Home on the specified date. Home page items and their resources and dates get copied over to new sites with import from site. Home page items participate in the base date functionality. This site will help you with shrinking pictures: http://www.shrinkpictures.com/http://www.shrinkpictures.com/ OR Use the Paint feature on your computer by >>clicking on the Start link (lower left hand corner) click on Accessories and Paint will be under there and you click on the Resize link to change the setting on width & depth in Paint.
. Preview your web resource, and click on Done to save the item as draft. Or, click on Publish to make it available in your Home on the specified date. Home page items and their resources and dates get copied over to new sites with import from site. Home page items participate in the base date functionality. This site will help you with shrinking pictures: OR Use the Paint feature on your computer by >>clicking on the Start link (lower left hand corner) click on Accessories and Paint will be under there and you click on the Resize link to change the setting on width & depth in Paint..")
Similar presentations


 FrontPage 2002 Level I (Intro & Training)>")


 Help and.>")