Download presentation
Presentation is loading. Please wait.

1
Creating an Example Android App in Android Studio Activity lifecycle & UI Resources

2
The first step in the application development process is to create a new project within the Android Studio environment. Begin, therefore, by launching Android Studio so that the “Welcome to Android Studio” screen appears

3
Once this window appears, Android Studio is ready for a new project to be created. To create the new project, simply click on the Start a new Android Studio project option to display the first screen of the New Project wizard

4
Application Name :- the name of the mobile app from the end user perspective and is also the name that will be used when the completed application goes on sale in the Google Play store. Project Name:-The name of the project from the developers perceptive. It should be based on the reversed URL of your domain name followed by the name of the application. For example, if your domain is www.mycompany.com, and the application has been named AndroidSample, then the package name might be specified as follows:com.mycompany.androidsample Package name:-the logical namespace used to uniquely identify an app from the Android platform’s perceptive.

5
AndroidStudioProjects The Project location setting will default to a location in the folder named AndroidStudioProjects located in your home directory and may be changed by clicking on the button to the right of the text field containing the current path setting. Click Next to proceed. API 18: Android 4.3 (jelly bean On the form factors screen, enable the Phone and Tablet option and set the minimum SDK setting to API 18: Android 4.3 (jelly bean). The reason for selecting an older SDK release is that this ensures that the finished application will be able to run on the widest possible range of Android devices. The higher the minimum SDK selection, the more the application will be restricted to newer Android devices.
. The reason for selecting an older SDK release is that this ensures that the finished application will be able to run on the widest possible range of Android devices. The higher the minimum SDK selection, the more the application will be restricted to newer Android devices..")
6
This outlines the various SDK versions and API levels available for use and the percentage of Android devices in the marketplace on which the application will run if that SDK is used as the minimum level. A useful chart can be viewed by clicking on the Help me choose link. To help in the decision process, selecting an API level from the chart will display the features that are supported at that level.

8
Creating an Activity The next step is to define the type of initial activity that is to be created for the application. A range of different activity types is available when developing Android applications.

10
With the Blank Activity option selected, click Next. MainActivity On the final screen name the activity and title MainActivity.

11
Finally, click on Finish to initiate the project creation process.

12
Modifying the Example Application At this point, Android Studio has created a minimal example application project and opened the main project. Project tool window The newly created project and references to associated files are listed in the Project tool window located on the left hand side of the main project window. The Project tool window has a number of modes in which information can be displayed. By default, this panel will be in Android mode. This setting is controlled by the drop down menu at the top of the panel. If the panel is not currently in Android mode, click on this menu and switch to Android mode:

13
The example project created for us when we selected the option to create an activity consists of a user interface containing a label that will read “Hello World” when the application is executed.

14
The next step is to modify the user interface of our application so that it displays a larger text view object with a different message to the one provided for us by Android Studio. activity_main.xmlapp -> res -> layout in the project file hierarchy. The user interface design for our activity is stored in a file named activity_main.xml which, in turn, is located under app -> res -> layout in the project file hierarchy. Using the Project panel, locate this file as illustrated in Figure.

15
Once located, double click on the file to load it into the User Interface Designer tool which will appear in the center panel of the Android Studio main window:

22
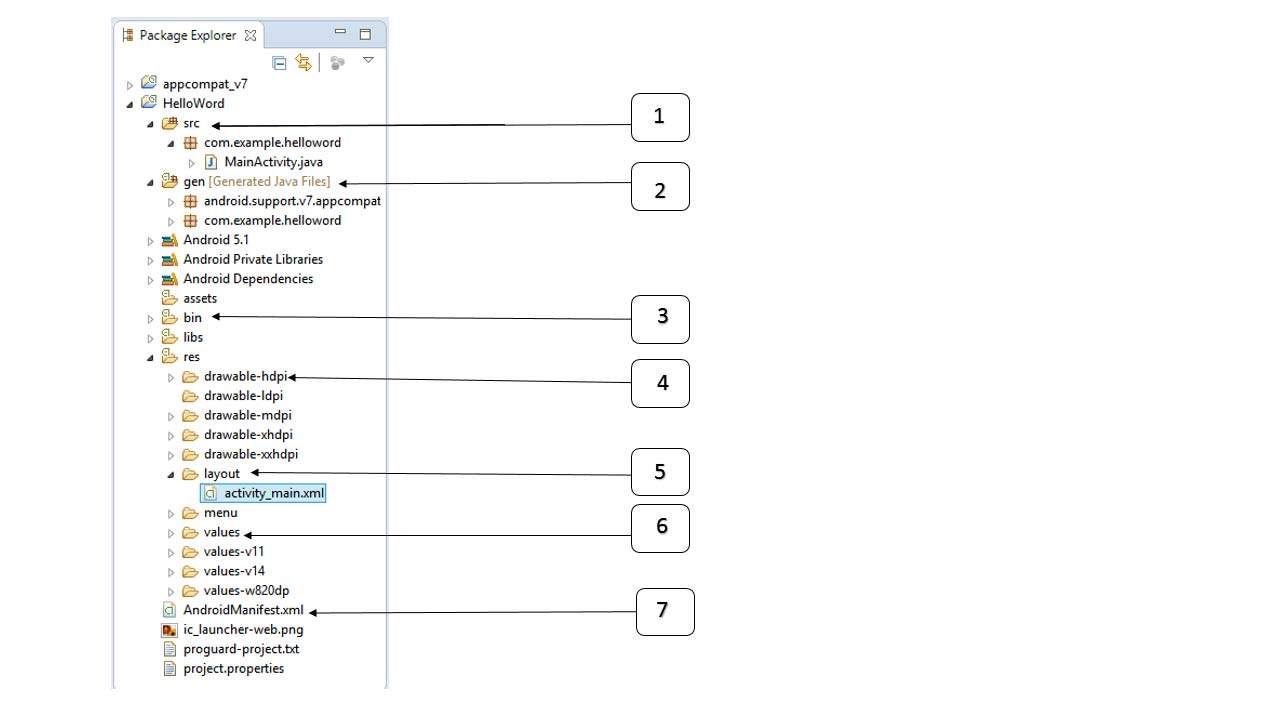
src This contains the.java source files for your project. By default, it includes anMainActivity.java source file having an activity class that runs when your app is launched using the app icon. gen This contains the.R file, a compiler-generated file that references all the resources found in your project. You should not modify this file. bin This folder contains the Android package files.apk built by the ADT during the build process and everything else needed to run an Android application. res/drawable-hdpi This is a directory for drawable objects that are designed for high-density screens.

23
res/layout This is a directory for files that define your app's user interface. res/values This is a directory for other various XML files that contain a collection of resources, such as strings and colours definitions. AndroidManifest.xml This is the manifest file which describes the fundamental characteristics of the app and defines each of its components.

Similar presentations


 Copyright 2015 by Janson Industries.>")
 Eclipse plug-in ▫Android SDK and.>")


>")


