Download presentation
Presentation is loading. Please wait.

1
Introduction to Using the Notebook 10 Software for SMART Board Day 2 LIVINGSTON PARISH PUBLIC SCHOOLS Facilitated by S. Waltman

2
Agenda Introductions and orientation Launching Notebook 10 and Using the Smartboard in Your Classroom Creating Your Own Notebook 10 Presentations: –Using the Capture feature to get material from your online textbook and teaching resources –Drawing and Labeling Your Own Figures –Using PowerPoints You’ve Already Created –Importing PowerPoints into Notebook 10 and improving them Practice Time: Creating Lesson Content That I Can Use Note: Lunch will be from12:45-1:15. We’ll be given the chance to call ahead for take-out orders.

3
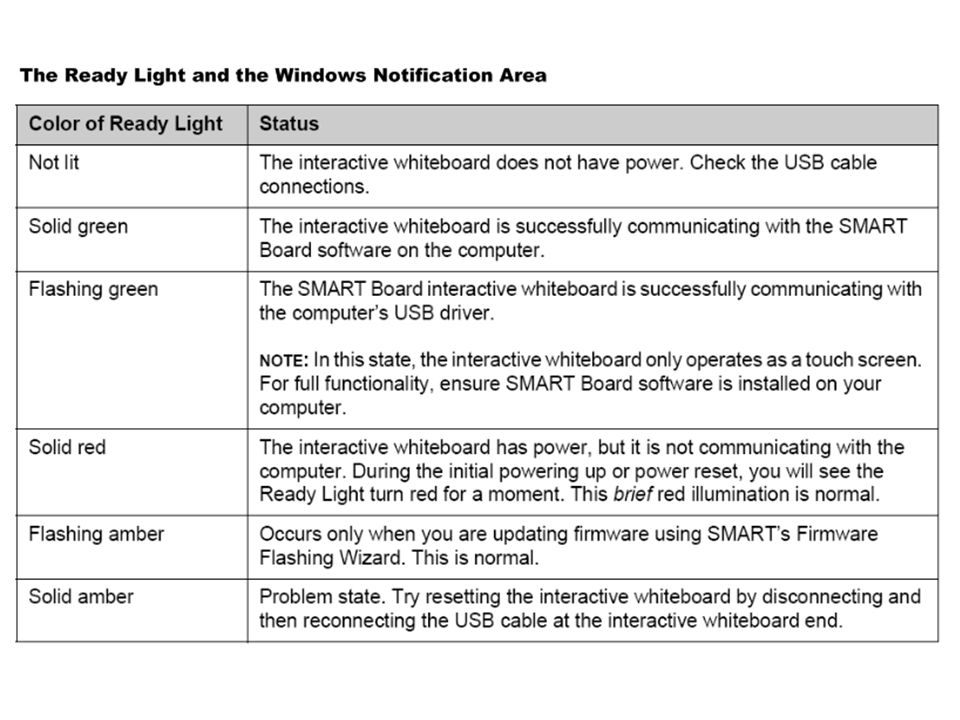
How does it work?

5
Launch the Software The “Welcome Center” pops up. Choose Orient.

6
Orient your Smartboard when you turn it on in each morning.

7
Click the Double Arrow to move these symbols to the other side.

8
Using the Toolbars

9
Pen colors Pick up a pen from the tray. Smatboard recognizes the LAST PEN COLOR YOU PICKED UP. If you are holding a pen, you can write on the Smartboard with your finger. The board will use the color you are holding.

10
Using your finger and writing with color the Top Toolbar Click the style you want, then write with your finger!

11
ERASING You have a choice of SMALL, MEDIUM, and LARGE erasers.

12
page back page forward new page delete Moving On in your presentation My favorite when just writing and teaching!

13
The CREATIVE PEN

14
The MAGIC PEN (disappearing ink)
")
15
The SHAPE Pen (For math teachers like me who cannot draw a straight line or a decent circle!)
")
16
Customizing the Colors

17
The floating toolbar

18
More floating toolbar

19
Customizing the Floating Tools Press the “GEARS” to customize anything on Smartboard.

20
Adding PENS Hold down the LEFT MOUSE button. Click on “PEN” Drag 3 more PENS to the floating toolbar. By default, these pens are also BLACK.

21
SET THE OTHER COLORS Let’s change the second pen to BLUE. 1.Click on the second pen. Click on the customize gear. 2.Click on line LINE STYLE 3.Click on the shade of BLUE you want. 4.Click SAVE TOOL PROPERTIES. Repeat this procedure to change the last two pens to the colors you want.

22
For Practice: Add a GREEN highlighter to the FLOATING TOOLBAR

23
Other things to consider adding: Screen Capture Toolbar Calculator

24
Hiding the Floating Toolbar Click on the Notebook 10 icon in the lower left corner. Click on “Hide Floating Tools”

25
Getting Floating Tools Back Click on the Notebook 10 icon in the lower left corner. Click on “Show Floating Tools”

26
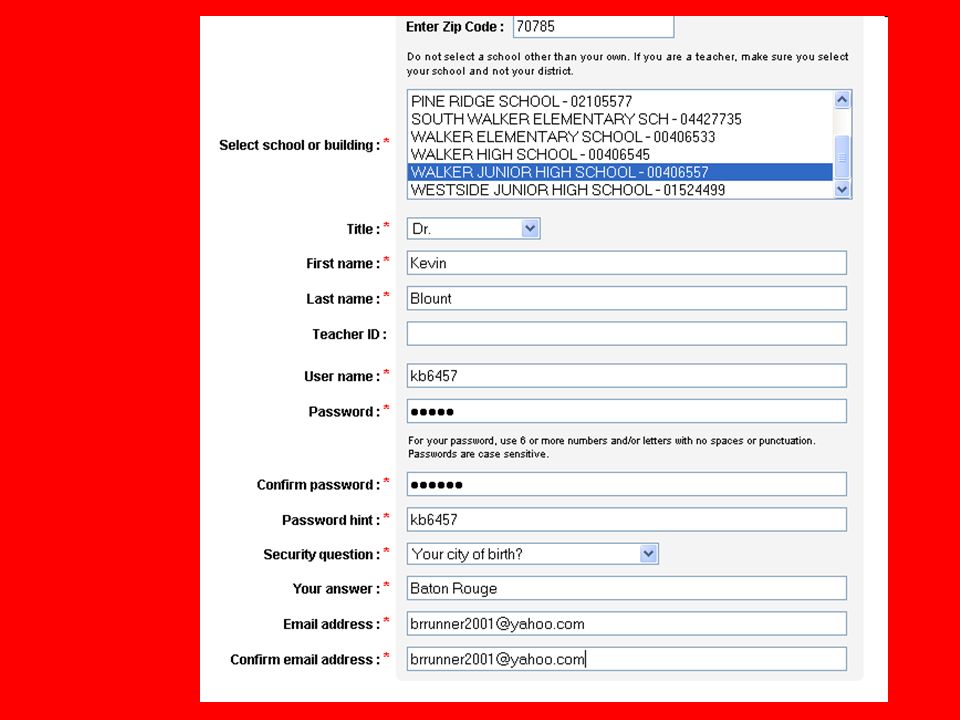
Using the textbook software Let’s register for our textbooks (if you haven’t done so yet) Grades 6-8 Go to PHSUCCESSNET.COM If you do not have an account, click REGISTER.
 Grades 6-8 Go to PHSUCCESSNET.COM If you do not have an account, click REGISTER.")
27
Enter the Access code Find access codes for ELEMENTARY BOOKS

29
RETURN TO phsuccessnet.com Log in Log in. Select the Student Edition or Worksheet Center. Let’s use the 7 th grade STUDENT EDITION in this example

30
Turn to PAGE 85

31
Click the FLOATING TOOLBAR. Click the CAPTURE BUTTON. A small capture window opens in the upper left. Click the first box. PUT A BOX AROUND QUESTION 31. GO BACK TO NOTEBOOK 10. NOTICE THAT THE WHOLE THING HAS BEEN CAPTURED TO YOUR SLIDE.

32
Click on the item. You can move it around. Use the circle in the LOWER LEFT corner to resize.

33
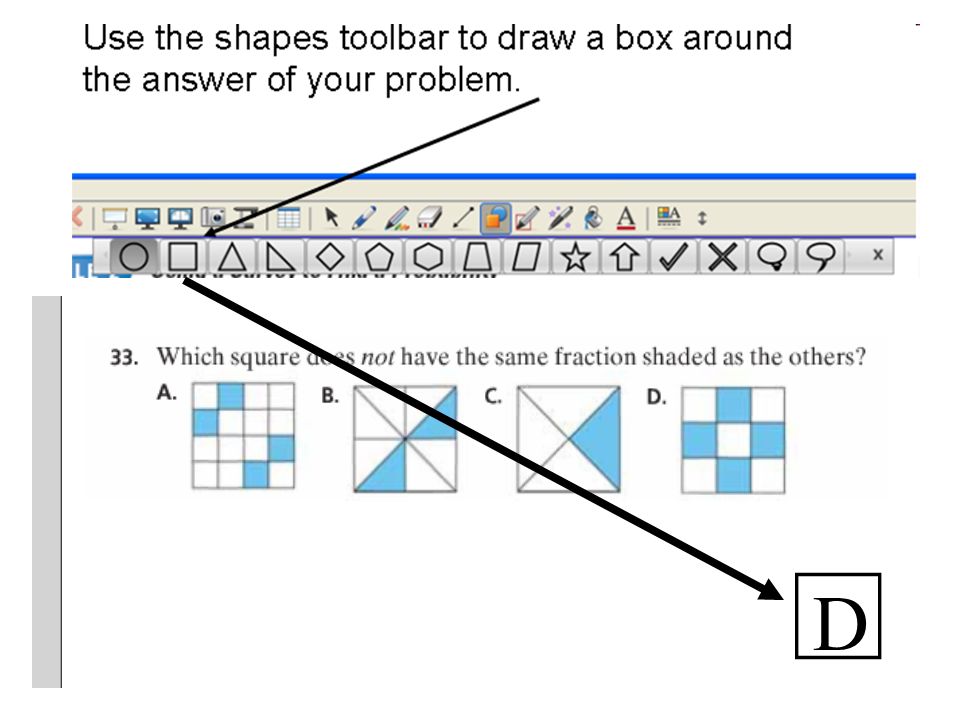
Type the answer, D. Use the lower left button to re-size.

35
Select the box, then click the drop down menu. Select properties. Fill your box with any color. Change the color of your line to match the color of your box. Animate your box to fade out when clicked.

36
Another one! Page 85 Let’s select Problem 31 for the class using the snapshot tool. Capture the instructions first! Capture the problem. Re-size if needed.

37
Now begin typing the answer.

38
Click away from the answer. Then click again to re-size.

39
Draw a rectangle around the answer. Click properties, Fill Effects, Object Animation.

40
Let’s practice on our own! Select a problem for your presentation, type the answer, choose properties!

41
Typing and Drawing on your own! Create a simple triangle and ask students to find the hypotenuse. Draw a right triangle first!

42
Type and drag the items to where you need them. Re-size as needed.

43
Let’s try one together.

44
Importing a PowerPoint— File, Import

45
Import works, but moves some things around. You will have to re- position.

46
Turning the pages Next Page Previous Page Arrows

47
You may have to and Re-Group items Right-Mouse, Grouping, Ungroup

48
Now you can click and drag the items

49
Try this one!

50
For a Better Effect, use the Area Fill Icon to color the answer’s rectangle! Fill Icon Double Click on the answer box to get a rectangle first.

51
If a button will not turn off, click the pointer button.

52
Your turn!! Work on Creating a Notebook 10 Lesson that you can use when you return to school. Email the lesson to the group. We will share these lessons in ____ minutes.

Similar presentations


 Updated by Angie Johnson (1/25/12)>")


 follow the hyperlinks to navigate to the specified Topic or Figure.>")


 Write on the screen (pen tools)>")
