Download presentation
Presentation is loading. Please wait.

1
Small Animal Care Michael Lavoie B.S. Middlesex Community College Veterinary Assistant Program October 2012

2
Breeds- Dogs American Kennel Club (AKC) 155 Breeds of dogs Seven categories –Working dogs –Sporting dogs –Hounds –Toys –Terriers –Nonsporting dogs –Herding dogs
 155 Breeds of dogs Seven categories –Working dogs –Sporting dogs –Hounds –Toys –Terriers –Nonsporting dogs –Herding dogs")
3
Breeds to Know- dog Golden Retriever Boxer Poodle Greyhound Great Dane Border Collie Labrador Retriever Airdale Chihuahua Dachshund

4
Golden Retriever

5
Poodle

6
Boxer

7
Greyhound

8
Great Dane

9
Border Collie

10
Labrador Retriever

11
Airedale

12
Chihuahua

13
Dachshund

14
Breeds- Cats Cat Fanciers’ Association (CFA) –Promotes the health and responsible breeding of cats 30 different breeds recognized US= over 70 million cats as pets Longhair or shorthair Miscellaneous breeds The domestic cat Variety of sizes (5-25 pounds)
 –Promotes the health and responsible breeding of cats 30 different breeds recognized US= over 70 million cats as pets Longhair or shorthair Miscellaneous breeds The domestic cat Variety of sizes (5-25 pounds)")
15
Breeds to know- cats Siamese Ragdoll Siberian Abyssinian Maine Coon Scottish Fold Persian Devon Rex Exotic Shorthair

16
Siamese

17
Ragdoll

18
Siberian

19
Abyssinian

20
Maine Coon

21
Scottish Fold

22
Persian

23
Devon Rex

24
Exotic Shorthair

25
Anal glands Scent glands Located on either side of the rectum Sacs that hold small amounts of fluids from a bowel movement Eventually fill and put pressure on the rectum Sometimes expressed during a bowel movement

26
Signs the anal glands need expression Scooting their rear on the floor Excessive licking at the rectum Discomfort in the rectal area Can be expressed internally or externally

27
Anal gland location Sacs located on either side of the rectum Located at 3 o’clock and 9 o’clock positions Odorous fluids

28
External anal gland expression Will need exam gloves, paper towels, soapy water or waterless shampoo Locate the sacs on either side of the rectum Gently apply pressure to the sac area by massaging the site using your thumb and pointer finger Sacs should press against each other and release the fluid *do not stand behind the dog *odorous fluid may project several feet Clean rectal area

29
Internal anal gland expression Performed by a veterinarian or veterinary technician Glands may become impacted (difficult to express due to thickening) Expression of the sacs via the inside of the rectum –Wear gloves with lubricated finger –Place finger just inside the rectum –Locate each sac separately and “milk” the contents out –Clean the rectal area
 Expression of the sacs via the inside of the rectum –Wear gloves with lubricated finger –Place finger just inside the rectum –Locate each sac separately and milk the contents out –Clean the rectal area")
30
Ear Cleaning- Dogs Ear cleaning and medicating can be messy so cover good clothes and work on a surface that is easy to clean. Most dogs do not like having their ears cleaned. Some dogs will happily sit in your lap or on a table while you clean or medicate their ears but many require some form of restraint.

31
Restraint One method to restrain the dog is to place her/him on a table. Stand on the side of the table opposite to the ear you are medicating; in the photograph the right ear is being medicated. Drape your right arm over the dog's shoulders. Wrap your left arm around the head and neck and use the finger tips of the left hand to push the ear flap back and up to expose the inner surface of the ear. If the dog tries to stand you can lean your body over them to keep them from rising.

32
If your dog is too wiggly, try laying him/her on his/her side. Reach over his/her neck with your left arm and firmly grasp the elbow of the leg closest to the table. Always hold the leg close to the elbow, NOT close to the toes. Keep your left elbow on his/her neck to prevent him/her from picking up his/her head. Use the fingers of your right hand to pull back the ear flap to expose the inner side of the ear.

33
The ear has 3 major parts: outer ear middle ear inner ear

34
The Outer Ear The outer ear consists of the ear flap (also called the pinna) which can be upright (a prick ear) or floppy. The ear flap funnels sound into the ear canal. Unlike humans that have a very short ear canal, dogs have a long narrow ear canal that makes almost a 90 degree bend as it travels to the deeper parts of the ear.

35
The middle ear The outer ear cannel is separated from the middle ear by a thin membrane called the eardrum or tympanic membrane. The ear drum is very fragile and can be damaged by ear disease or during ear cleaning. The middle ear consists of 3 small bones, an air filled cavity called the bulla and a thin tube (the eustachian tube) leading from the bulla to the back of the mouth.
 leading from the bulla to the back of the mouth..")
36
The inner ear The inner ear connects to the brain and contains nerves and centers for balance and hearing.

37
Ear Infections- cats vs. dogs Dogs have many more ear problems than cats. Dogs with heavy floppy ears have the most problems with ear infections. Some breeds have lots of hair in and around the ear canal which causes them to develop ear infections. Dogs that spend lots of time in the water also are prone to developing ear infections.

38
Additional anatomy The outer ear flap is usually covered with fur. If the ear is itchy, scratching may result in hair loss on the ear flap or at the base of the ear. Severe scratching may also lead to tears at the edges of the ear. Ear damage may lead to bleeding between the skin and cartilage of the ear flap; a hematoma. The ear flap is swollen, red and painful

39
The inner side of the ear should be a healthy pink color. A small amount of black discharge may be observed. Ear infections may result in: redness discharge odor head shaking ear scratching rubbing ears on the floor or other surfaces

40
Ear cleaning can be accomplished with the following supplies ear wash solution cotton balls a tweezers or hemostat to pluck hair q tips may be used if used properly

41
Other things to look out for when ear cleaning: If the "non-furred", inner side of the ear flap contains lots of fur at the opening to the ear canal, a few hairs at a time can be plucked. Lots of hair at the opening to the ear canal reduces air flow into the ear. Good air flow is important to maintaining a healthy ear. Some dogs that have this issue are poodles, bichons, schnauzers, etc.

42
Cleaning The ear wash solution is squeezed into the ear canal. A few drops of ear wash should be applied to the inside of the ear flap and then the tip of the ear wash bottle should be inserted a few millimeters into the ear canal, to place some of the wash solution down the ear canal. Be careful not to tightly force the tip of the bottle into the ear canal as forceful squeezing of the bottle with the bottle wedged into the ear canal could rupture the ear drum. The dog will usually shake its head as soon as the wash is inserted into the ear, shaking out much of the solution.

43
Massage the base of the ear to distribute the wash solution throughout the ear canal. Dogs usually like this part. You do this by massaging at the base of the ear as shown in the picture.

44
Use cotton balls to remove discharge from the inner side of the ear flap. You can also use q tips to clean the inner side of the ear flap BUT... DON'T stick q tips into the ear any further than you can see. Deep placement of a q tip can rupture the ear drum or can pack wax and other debris further into the ear canal, preventing medications from getting to the deeper parts of the ear canal.

45
Ear medications may contain several different drugs and may be ointments (pictured on the left and in insert) or drops (pictured on the right). Ear medications are most effective when placed in a clear ear. If they are placed on top of ear wax or other debris they will not be as effective. Your veterinarian will give you instructions, if cleaning is needed before ear medications are given.

46
Sometimes your veterinarian will recommend a thorough ear exam under sedation or anesthesia if: the dog will not allow cleaning awake it is suspected that a foreign body such as plant material is inside the ear canal the veterinarian needs to collect samples from the ear for cytology or culture

47
Dogs with chronic ear infections will benefit from anything that increases air flow into the ear canal. Ear flow can be improved by: plucking hairs from around the opening of the ear canal tying or taping ears together on top of the head If the infection is severe or involves the middle and inner ear, oral medications may also be prescribed. Surgery is sometimes necessary if the infection is in the middle ear.

48
Ear Cleaning- Cats Ear cleaning and medicating can be messy, so cover good clothes and work on a surface that is easy to clean. Most cats do not like having their ears cleaned.

49
Restraint To hold your cat in your lap to place ear medications, drape your left forearm across the cat's body to keep him/her in your lap. Hold the head with your left hand using your left thumb to press the ear flap against the head with the ear canal open. Hold the medication in your right hand or left hand dependent on which ear you are cleaning

50
Pilling a dog For medicines that can be taken with food, offer your dog a bit of soft cheese, such as American cheese, to see if he likes the flavor. If he gobbles up the cheese, try it again, but this time put the pill inside the cheese. Most dogs will swallow it whole and your problem is solved. If that doesn’t work, move to step 2.

51
Offer your dog a bit of peanut butter. Most dogs love the flavor spoon out about a tablespoon of peanut butter and bury the pill inside the mound of peanut butter. Put the "treat" on your finger and offer it to your dog. If this doesn’t work, go to step 3.

52
Make a "meatball" out of some favorite canned dog food. Squash the meat around the pill (if it is OK to take with food) and see if the dog will swallow it all. If he refuses, or spits out the pill, try making a game out of it and toss him the treat. If this doesn’t work, go to step four
 and see if the dog will swallow it all. If he refuses, or spits out the pill, try making a game out of it and toss him the treat. If this doesn’t work, go to step four.")
53
Hold the dog's upper jaw with your left thumb and index finger (if you are right-handed), tilting the head back and folding the gums over the upper teeth. With the right hand, hold the pill between the thumb and index finger. With the right middle finger, press down on the lower incisors (front teeth) to open the mouth. At the same time put your left thumb on the roof of the mouth. By gently pressing up on the roof of the mouth and down on the lower incisors, you will hold the mouth open
 to open the mouth. At the same time put your left thumb on the roof of the mouth. By gently pressing up on the roof of the mouth and down on the lower incisors, you will hold the mouth open.")
54
Drop the pill as far back on the tongue as possible, then quickly close the dog's mouth and rub its throat in a downward motion. This stimulates its swallowing reflex. Blowing on a dog's nose can also cause it to swallow. Offering your pet a drink of water afterwards is a good idea to help wash the pill down its throat.

55
Tips for pilling a dog –Talk calmly and quietly while you are pilling –Praise after the pill is given –Make it a pleasant event, never let it become a battle to give medicine –Relax when pilling your dog, they can sense anxiety

56
Pilling a cat Grab the cat from behind the face, making sure that your thumb and index are positioned on the maxillary joint. It is good if you can do this with the cat sitting on a high place, so you do not need to bend over.

57
Slowly, shift the cat’s head backwards, gently raising her mouth. She does not like it, but she does not object, either. Apply a slight pressure on her jaws, with your thumb and index (or middle finger). The mouth will still be closed.
. The mouth will still be closed..")
58
Gently sneak your middle or ring finger between her front teeth, and push down the bottom jaw. The cat has no power in it when her head is bent backwards, so she won’t bite back. Before attempting this, take the pill and hold it with your thumb and your index finger

59
Now, as the cat’s mouth is wide open, throw the pill as fast and as deep as you can inside. Try to aim the bottom of the throat, in order to avoid the contact of the pill with the tongue. Thus, the cat cannot detect the unpleasant taste, so she won’t spit the pill (yet!). Keep her mouth closed and gently rub her neck, until you feel that she swallowed.
. Keep her mouth closed and gently rub her neck, until you feel that she swallowed..")
60
Release the cat and watch her closely for about 10 seconds: if she licks her mouth, it means that she swallowed the pill. Nevertheless, look around her, because some cats are tricky: they pretend they swallowed, and when you don’t watch, they spit the pill which was all the time in their mouth Give her a nice treat, so she gets used that this is part of the ritual.

61
Trimming cats nails Notice the pink tissue (the quick) on the inside of the claw. Avoid the quick when you trim the claw; cutting into it will cause pain and bleeding Remove the sharp tip below the quick (away from the toe), clipping about halfway between the end of the quick and the tip of claw.
, clipping about halfway between the end of the quick and the tip of claw..")
62
To restrain a cat in your lap, use your forearms draped over the cat's neck and hind-end to keep the cat in your lap. The clipper is held in the right hand.

63
There are several styles of nail trimmers, including a guillotine type, a scissors cut, and a standard human fingernail clipper. Either the guillotine type or a human fingernail clipper are easiest to use in cats. The scissors-type is used if a toe nail is so long that it is curling in a circle. Long claws can grow into the toe pad.

64
Close you hand around the clipper to squeeze the handle which will move the cutting blade.

66
Cats have retractile claws so you need to gently squeeze the toe between thumb and forefinger to expose the claw.

67
The clipper should be placed perpendicular to the nail (cutting top to bottom).
.")
68
Light colored claws can be trimmed with one cut on each nail.

69
If the trimmer is placed parallel to the nail (cutting from side to side), the nail is crushed and may splinter.
, the nail is crushed and may splinter.")
70
The sharper the trimmer, the cleaner the cut. You can use a nail file to smooth the end of the nail after clipping

71
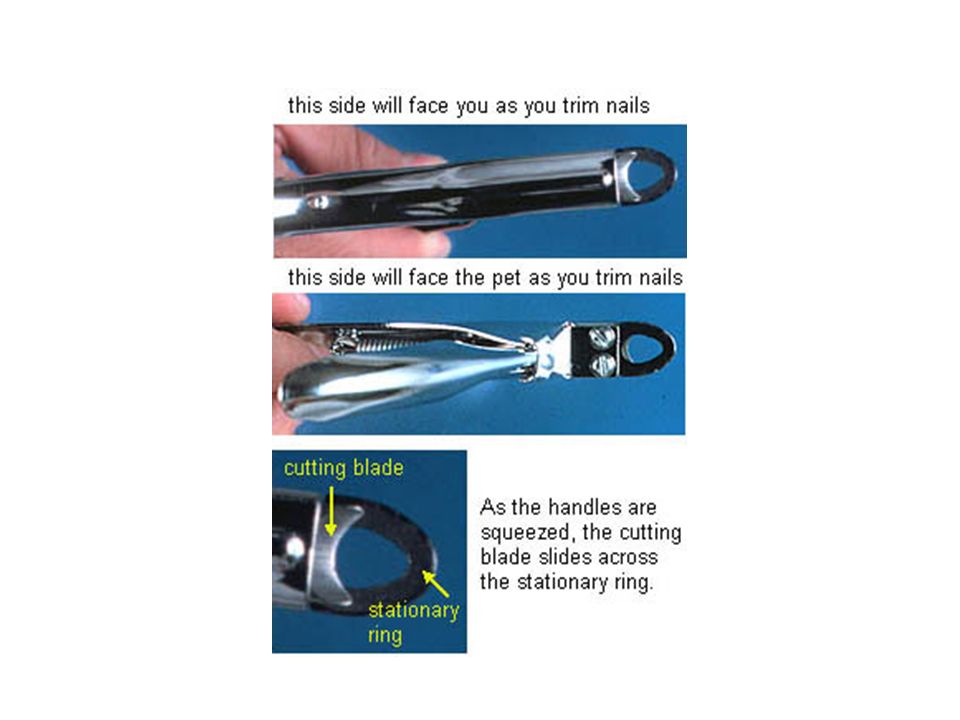
When using a guillotine type nail trimmer, the cutting blade (outlined in yellow) should be facing you, not the cat. The screws on the trimmer should be facing the cat. The nail should be cut from top to bottom, not side to side. The tip of the nail is placed in the hole in the trimmer and the handles are squeezed to advance the cutting blade through the nail. The handles of the trimmer can be held pointing toward the floor or ceiling, whichever is most comfortable for you.

72
Cats have a nail on the inner side of each foot called the dew claw. Remember to trim these as they are not worn down when the cat scratches and can grow in a circle, growing into the foot.

73
Trimming a dog’s nails One method to restrain the dog is to place her/him on a table. Stand on the side of the table opposite to the claws you are trimming. Drape your arms and upper body over the dog. When trimming the front claws, keep your left forearm over the neck to keep the dog from lifting its head. Hold the paw in your left hand and hold the trimmer in your right hand. If the dog tries to stand, lean your upper body over his/her shoulders to prevent him/her from rising.

74
If your dog is too wiggly, try laying him/her on his/her side. Use your right arm and upper body to keep the dog laying on his/her side. Hold the trimmer in your right hand. Use your left arm to keep the head on the table and use the left hand to hold the paw. It is easier to perform this procedure with a helper

75
The scissors-type is used to trim a toenail that is so long that it is curling in a circle. Long claws can grow into the toe-pad. This most often happens to dew claws, the claw on the inner side of the paw. Dew claws do not touch the ground so they are not worn down as the dog walks. The dew claw is attached to the leg by loose skin. The dew claw can usually be bent away from the leg so that you can fit a guillotine type trimmer over the tip of the dew claw.

76
Unlike cats, dogs do not have retractile claws. The color of the nail is determined by the color of the surrounding skin and hair. This dog has black claws on the brown paw and a mixture of white and black claws on the white paw. Always remember to trim the dew claws that are located on the inner surface of the paw.

77
Light colored claws are easier to cut than dark claws as the blood vessels and nerves that supply the toenail, called the quick, is easier to see.

78
You cannot see the quick on dark colored claws, making them more difficult to trim without cutting into the quick.

79
Cut dark colored claws in several small cuts to reduce the chance of cutting into the quick

80
If the toenail is cut too short, you can use a styptic pencil containing silver nitrate to stop blood flow, although many animals object to the styptic pencil as much, or more, than toenail cutting. The black end of the stick is held to the bleeding nail and gently rotated until bleeding stops. Even without any treatment the nail should stop bleeding in about 5 minutes or less.

82
Flea life cycle Collectively, all of the species of fleas are categorized under the order name of Siphonaptera. The cat flea, Ctenocephalides felix, is the most commonly found flea in the US and infests cats, dogs, humans, and other mammalian and avian hosts.

83
Fleas thrive in warm, moist environments and climates. The main flea food is blood from the host animal. Host animals are many species - cats, dogs, humans, etc. Fleas primarily utilize mammalian hosts (about 95%). Fleas can also infest avian species (about 5%).
. Fleas can also infest avian species (about 5%)..")
84
Flea saliva, like other biting skin parasites, contains an ingredient that softens, or "digests" the host's skin for easier penetration and feeding. Fleas have four main stages in their life cycle: egg, larva, pupa, and adult. The total flea life cycle can range from a couple weeks to several months, depending on environmental conditions.

85
Adult The adult flea is very flat side to side. There are hair-like bristles on the flea body and legs to aid in their navigation through pet hair. Fleas have 3 pairs of legs, the hindmost pair designed for jumping. Fleas are well known for their jumping abilities.

86
Adult fleas prefer to live on the animal and their diet consists of blood meals courtesy of the host animal. The female flea lays white, roundish eggs. The adult female flea can lay up to 50 eggs per day, 500-600 eggs over several months.

87
Egg The eggs are not sticky (like some parasites), and they usually fall off of the animal into the carpet, bedding, floorboards, and soil. When the flea egg hatches varies -- anywhere from two days to a few weeks, depending on environmental conditions. The larva emerges from the egg using a chitin tooth, a hard spine on the top of the head that disappears as the flea matures.

88
Larvae The larval stage actually has three developmental stages within this stage. Larvae are about 1/4" long, and semi- transparent white. They have small hairs along their body and actively move. They eat the feces of adult fleas (which is mostly dried blood) and other organic debris found in the carpet, bedding, and soil. the larval stage lasts about 5 to 18 days
 and other organic debris found in the carpet, bedding, and soil. the larval stage lasts about 5 to 18 days.")
89
Pupa The pupa is the last stage before adult. The adult flea can emerge from the cocoon as early as 3 to 5 days, or it can stay in the cocoon for a year or more, waiting for the right time to emerge. Stimuli such as warm ambient temperatures, high humidity, even the vibrations and carbon dioxide emitted from a passing animal will cause the flea to emerge from the cocoon faster.

90
Flea Control: Shampoos A shampoo, or "flea bath" is a good first attack on fleas for the pet that has large numbers of fleas visible on its body. Cats can be difficult to bathe. It is important to realize that a flea shampoo is not intended for lasting control. Shampoos are only effective for a day or less. They leave little residual chemical on the animal when properly used.

91
Flea Control: Flea Dips Flea dips are strong chemical rinses to rid animals not only of fleas, but mites and ticks as well. Dips last approximately 1-2 weeks. That is a lot of chemical residue to leave on an animal! Flea shampoos and dips are effective for adult fleas.

92
Flea Control: Flea Collars Flea collars work one of two ways - by emitting a toxic gas, and by being absorbed into the animal's subcutaneous fat layer. The toxic gas is usually only effective in the immediate area of the head and neck. This type of collar is best used in the vacuum cleaner bags to kill any fleas vacuumed up. The collars that absorb into the subcutaneous fat are much more effective. Flea collars are effective for adult fleas.

93
Flea Control: Flea Powders Flea powders and sprays offer short term (2-3 day) protection from fleas, and with some products, ticks and mites too. Powders and sprays have fallen out of favor recently with the newer spot-on treatments that are available. Most flea powders and sprays are only effective for adult fleas, some offer additional flea protection by inhibiting flea egg and larval development.

94
Flea Control: Spot on Treatments Common brand names include: Advantage (tm), Frontline®, and Bio-Spot® just to name a few. Please consult with your veterinarian for the best choice for your pet(s). These products are applied between the shoulder blades of the pet, and typically last about one month. Spot-on treatments are effective for adult fleas. Some include ingredients to inhibit the larva from emerging from the flea egg and some are active against larval development as well.
. These products are applied between the shoulder blades of the pet, and typically last about one month. Spot-on treatments are effective for adult fleas. Some include ingredients to inhibit the larva from emerging from the flea egg and some are active against larval development as well..")
95
Flea Control: Oral Medications Flea "pills", such as Sentinel® work by stopping the larva from emerging from the flea egg. Fleas ingest the blood of animals on these medications, and the female fleas then lay eggs that are unable to hatch. They do NOT kill adult fleas. These medications are essential to break the flea life cycle and stop the flea problem when used in conjunction with flea adulticide treatments.

96
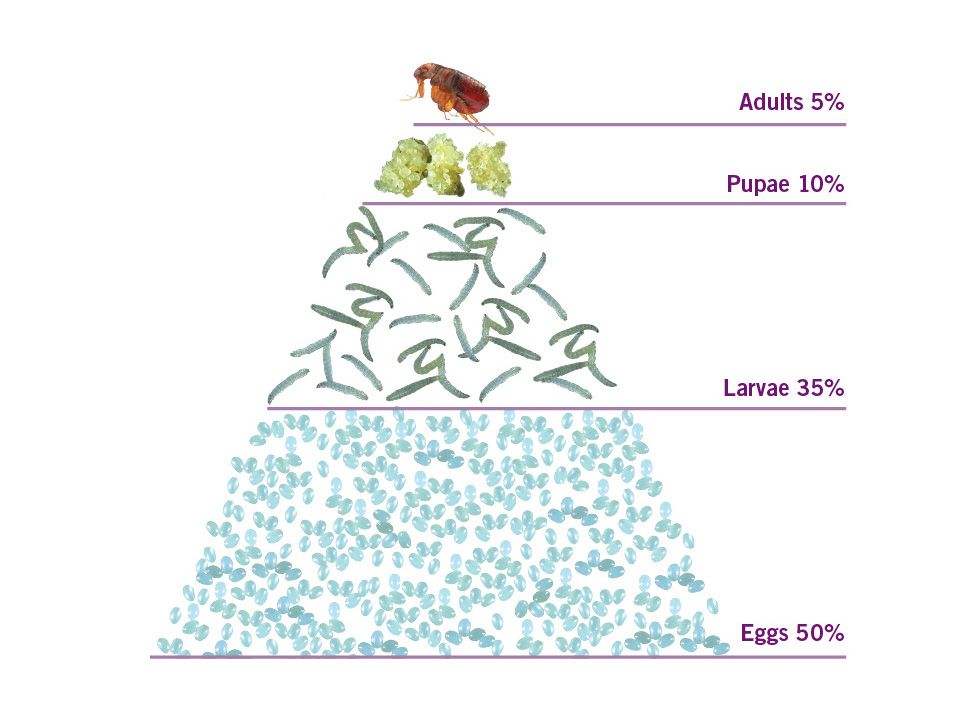
Flea Control for the House and Yard Only about 10% of the flea population (mainly the adults) are on your pet. The flea eggs, larvae, pupa, and the few adults that reside in the carpeting, bedding, and living areas make up approximately 90% of the flea population. Neglecting this population of fleas will ensure that the flea problem will continue and worsen over time.

97
Daily vacuuming - this is very important for overall flea eradication. This will pick up (and get rid of) adults, eggs, larvae and pupae before they develop. Putting a flea collar in the vacuum bag and emptying the bag frequently are also important; otherwise, the fleas will hatch, develop, and leave the vacuum to re-infest the living quarters. Dispose of the vacuum bag properly and frequently.
 adults, eggs, larvae and pupae before they develop. Putting a flea collar in the vacuum bag and emptying the bag frequently are also important; otherwise, the fleas will hatch, develop, and leave the vacuum to re-infest the living quarters. Dispose of the vacuum bag properly and frequently..")
98
Wash all bedding, clothing, and removable furniture covers.

99
Questions

Similar presentations


 No direct contact with skin (use tongs, paper towels, gloves etc…>")


