Download presentation
Presentation is loading. Please wait.

1
Bell Work – Vocabulary Add to your vocabulary sheets Chapter 7 Section 1 pages 182-184 Cell Theory Cell Compound Light Microscope Electron Microscope

2
Cell Theory and Microscope Introduction Chapter 7 Section 1

3
Cell Cell – basic structural and functional unit of all living organisms

4
What is a Theory A theory is the culmination of many scientific investigations drawing together all the current evidence concerning a substantial range of phenomena A scientific theory is the most powerful explanation scientists have to offer The possibility always remains that future evidence will cause a scientific theory to be revised or rejected. Cell Discovery and Theory Cellular Structure and Function Chapter 7 Sec. 1

5
The Cell Theory All organisms are composed of one or more cells. Cellular Structure and Function The cell is the basic unit of structure and organization of organisms. All cells come from preexisting cells.

6
Cell Discovery and Theory Cellular Structure and Function http://ed.ted.com/lessons/the-wacky-history-of-cell-theory

8
1880-1890 Louis Pasteur and Robert Koch, using compound microscopes, pioneered the study of bacteria 1939 Ernest Everett writes textbook Biology of the Cell Surface after years of studying the structure and function of cells 1970 Lynn Margulis, a microbiologist, proposes the idea that some organelles found in eukaryotes were once free-living prokaryotes 1981 The scanning tunneling microscope (STM) allows scientists to see individual atoms 2008 3-dimensional structured illumination microscopy combines a 3-D view, high resolution and multiple colors
 allows scientists to see individual atoms dimensional structured illumination microscopy combines a 3-D view, high resolution and multiple colors")
10
Light Microscopes Utilizes a series of glass lenses and visible light to magnify an image Magnifies images up to 1,000 times the actual size

11
Electron Microscopes Utilizes magnets to aim a beam of electrons at a cell to produce an image Magnifies images up to 500,000 times the actual size

12
Always carry with 2 hands Only use lens paper for cleaning Do not force knobs Always store covered The Light Microscope Guidelines for Use

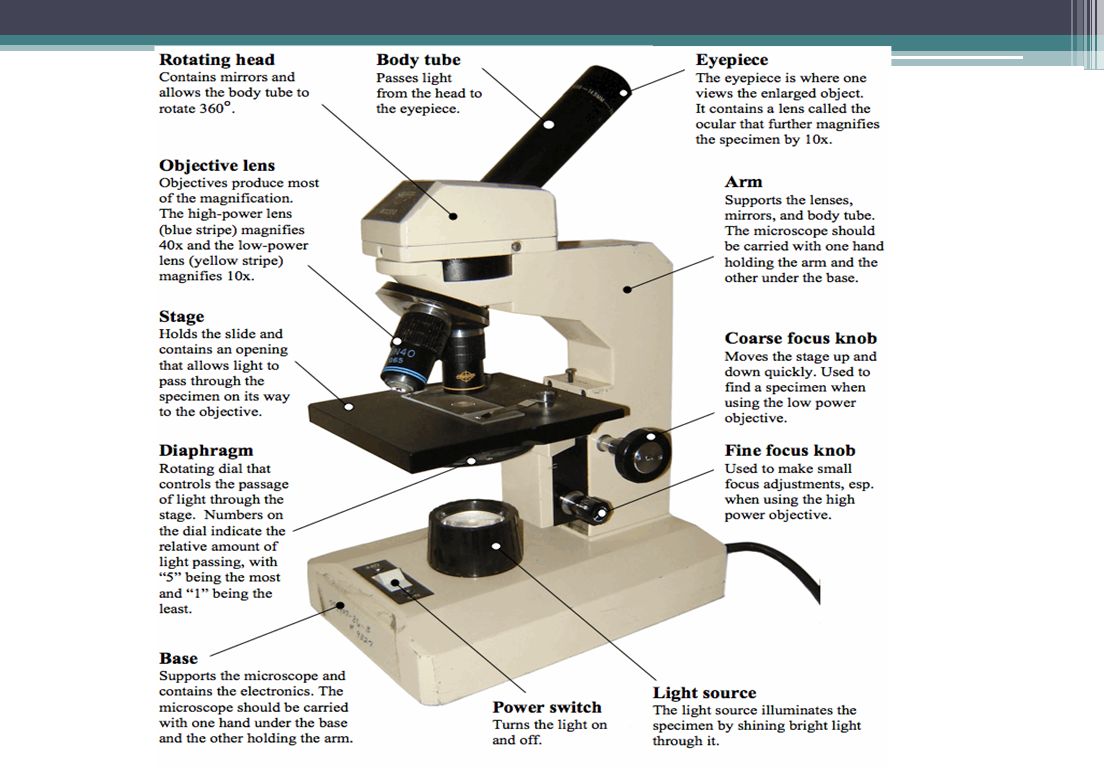
13
Eyepiece Body Tube Revolving Nosepiece Arm Objective Lens Stage Stage Clips Coarse Focus Fine Focus Base Diaphragm Light

14
Magnification Your microscope has 3 magnifications: Scanning, Low and High. Each objective will have written the magnification. In addition to this, the ocular lens (eyepiece) has a magnification. The total magnification is the ocular x objective
 has a magnification. The total magnification is the ocular x objective.")
15
What’s my power? To calculate the power of magnification, multiply the power of the ocular lens by the power of the objective. What are the powers of magnification for each of the objectives we have on our microscopes? Fill in the table on your worksheet.

16
Comparing Powers of Magnification We can see better details with higher the powers of magnification, but we cannot see as much of the image. Which of these images would be viewed at a higher power of magnification?

17
General Procedures 1. Make sure all backpacks and materials are out of the aisles and off the tops of desks. 2. Plug your microscope in to the outlet. 3. Store with cord wrapped around microscope and the scanning objective clicked into place. 4. Carry by the base and arm with both hands.

18
Focusing Specimens 1. Always start with the scanning objective. Odds are, you will be able to see something on this setting. Use the Coarse Knob to focus and then the fine adjustment knob until clear, image may be small at this magnification, but you won't be able to find it on the higher powers without this first step. Do not use stage clips, try moving the slide around until you find something.

19
2. Once you've focused on Scanning, switch to Low Power. Use the Coarse Adjustment Knob to refocus. Then use the Fine Adjustment Knob to make the image crystal clear. Again, if you haven't focused on this level, you will not be able to move to the next level. 3. Now switch to High Power. (If you have a thick slide, or a slide without a cover, do NOT use the high power objective). At this point, ONLY use the Fine Adjustment Knob to focus specimens. Recap 1. Scanning --> use coarse and fine knob 2. Low power --> use coarse and fine knob 3. High power --> use fine knob only DO NOT SKIP STEPS!!!!
. At this point, ONLY use the Fine Adjustment Knob to focus specimens. Recap 1. Scanning --> use coarse and fine knob 2. Low power --> use coarse and fine knob 3. High power --> use fine knob only DO NOT SKIP STEPS!!!!.")
20
Your slide MUST be focused on low power before attempting this step Click the nosepiece to the longest objective Do NOT use the Coarse Focusing Knob, this could crack the slide or the lens Use the Fine Focus Knob to bring the slide up

21
Drawing Specimens 1. Use pencil - you can erase and shade areas 2. All drawings should include clear and proper labels (and be large enough to view details). Drawings should be labeled with the specimen name and magnification. 3. Labels should be written on the outside of the circle. The circle indicates the viewing field as seen through the eyepiece, specimens should be drawn to scale - ie..if your specimen takes up the whole viewing field, make sure your drawing reflects that.
. Drawings should be labeled with the specimen name and magnification. 3. Labels should be written on the outside of the circle. The circle indicates the viewing field as seen through the eyepiece, specimens should be drawn to scale - ie..if your specimen takes up the whole viewing field, make sure your drawing reflects that..")
22
How to make a wet-mount slide … 1 – Get a clean slide and coverslip from your teacher. 2 – Place ONE drop of water in the middle of the slide. Don’t use too much or the water will run off the edge and make a mess! 3 – Place the edge of the cover slip on one side of the water drop. You do not need to use the stage clips when viewing wet-mount slides! 5 – Place the slide on the stage and view it first with the red-banded objective. Once you see the image, you can rotate the nosepiece to view the slide with the different objectives. 4 - Slowly lower the cover slip on top of the drop. Cover Slip Lower slowly

23
Troubleshooting Occasionally you may have trouble with working your microscope. Here are some common problems and solutions. 1. Image is too dark! Adjust the diaphragm, make sure your light is on. 2. There's a spot in my viewing field, even when I move the slide the spot stays in the same place! Your lens is dirty. Use lens paper, and only lens paper to carefully clean the objective and ocular lens. The ocular lens can be removed to clean the inside. The spot is probably a spec of dust. 3. I can't see anything under high power! Remember the steps, if you can't focus under scanning and then low power, you won't be able to focus anything under high power. Start at scanning and walk through the steps again. 4. Only half of my viewing field is lit, it looks like there's a half-moon in there! You probably don't have your objective fully clicked into place..

Similar presentations


 Arm Stage Coarse Adjustment Fine Adjustment.>")


 Arm Stage Coarse adjustment focus.>")


 Arm Stage Coarse Adjustment Fine Adjustment Always carry a microscope with one.>")
