Download presentation
Presentation is loading. Please wait.

1
How to Get The Most Out of Outlook 2003 Michele Schwartzman Division of Customer Support 301-594-6248 Summer 2006

2
Agenda NIH Policies E-mail Tips Organizing Email Modifying Your Global Address Listing Managing the calendar Managing contacts Managing personal folders Using Rules

3
Microsoft Outlook 2003 Setting up your Microsoft Outlook Services Personal Folders Archiving your Email Options Setting up your Auto Archive Mailbox Management Saving Attachments to Another Location Setting up the Automatic Emptying Option

4
NIH Policies Mailbox Limits Limits that are set for all NIH Employees using the NIH Central E-mail Services Excludes Helix, Codon, Internet Mail

5
Mailbox Limits > 100 megabytes Warning message will be sent stating the user has exceeded their limit and needs to reduce their mailbox size. Grace Period If the mailbox size is not reduced, eventually the user will be unable to send, but will still be able to receive e-mail.

6
Remote Access to Email Resources NIH Portal http://my.nih.gov Outlook Web Access https://owa.nih.gov

7
NIH Web Resource http://www.mail.nih.gov User Section Access to OWA site to check mail over the web Link to change your NIH domain/ e-mail password Popular Links Section Modifying your Mailbox and Domain Account AntiSpam

8
Has Your Contact Information Changed? Update NED To correct or update NED information: Go to http://ned.nih.govhttp://ned.nih.gov Select Update Your NED Record Login to the NIH Portal Submit Update

9
Mailbox Management Viewing and Sorting mailbox content Saving the email attachments to a file location on your hard drive or networked drive Deleting items in your “Sent Items” Deleting items from your “Deleted Items” folder will remove items from your mailbox permanently; however, there is a recovery method if within 48 hours.

10
Outlook Views Outlook has several ways to customize the way that you access folders and view mail The popular view at NIH is the Folder List Allows for navigation through several folders on one screen

11
Current View By clicking on View Arrange By, a list of possible views is available. These views facilitate the organization of mail messages in order to navigate through them more effectively.

12
Most commonly used views Messages The default that is used to see all messages Unread messages Shows only unread mail Messages with Auto Preview Shows each message as well as the first few lines of the body of an unread message

13
Inserting Flags for Follow Up In the Flag section of the message, left click to set the default red flag, or right-click to select a different color and follow up information.

14
Organize Tool

15
Find Options 1. On the Standard toolbar, click Find 2. In the Look for box, type the text you want to search 3. Click the Search In button to specify the folders you want to search (only current) 4. Click the Find Now button.
 4. Click the Find Now button..")
16
Find Results

17
Note: When the search is complete and no longer needed, press Clear so that all email will be visible again.

18
Saving Attachments to Another Location Select the email that contains the attachments Choose File Save Attachments Delete the attachment from the email by selecting it and press the Delete key.

19
Automatic Delete Items Go to Tools Options Choose the Other tab; Place a checkmark in: Empty the Deleted Items folder To be notified before emptying the Deleted Items folder, press the Advanced Options button Place a checkmark in Warn before permanently deleting items

20
Mailbox Cleanup From the menu bar, choose Tools Mailbox Cleanup. View the total size of your mailbox and of individual folders Find items that are older than a certain date to archive them View the size of your Deleted Items folder and empty it.

21
Manage Information At NIH we use Personal Folders to manage our active information Recommendation: Personal folders are located on the user’s network drive Pro: Reduces inbox size Con: Can become corrupt if too large

22
Creating Personal Folders Click on File, Outlook Data Management Click Add, then OK, then browse to a location on your network drive Type a name of your choice and click Create Then type a display name to match then OK You will now see a folder in your folder list that you can move and store messages

23
Create Personal Folders

25
Archiving Your Outlook E-Mail Messages Auto Archiving: This setting allows the user to schedule when an archiving will take place; Manual Archiving: The user can manually task the application to archive their email.

26
Archive vs. Personal Folders ArchivePersonal Folders Creates a *.pst Stored on a network drive Setup Automatic Moves

27
Setting Up AutoArchive Go to Tools Options Select the Other tab Click on the AutoArchive button.

28
Choosing Settings for AutoArchive How many days between archiving? Do you want to be prompted before AutoArchive? Do you want to delete email which is older than the number of days you are archiving?

29
Troubleshooting the Archive Option You will receive this error if you have changed the location of your archive file or an archive file is not present on your system.

30
Rules Set of conditions and actions for processing and organizing your e ‑ mail messages. Conditions identify messages for processing, and actions determine what kind of processing is performed.

31
Using Rules Assign categories to messages Setup Notification when important messages arrive Move messages to a folder from a specific person Color code messages

32
Using Rules You probably receive large volumes of mail from several different groups (work- related, personal, and junk mail), so you need some way to manage your messages. In Outlook 2002, you can use rules to sort and process your messages before you even look at them.

33
Most Commonly Used Rules Set up a notification, such as a message or a sound, when an important message arrives Move messages to a particular folder based on who sent them Redirect an e ‑ mail message to a person or distribution list Automatically reply to a certain type of message with a specific message you create Flag messages from a particular person.

34
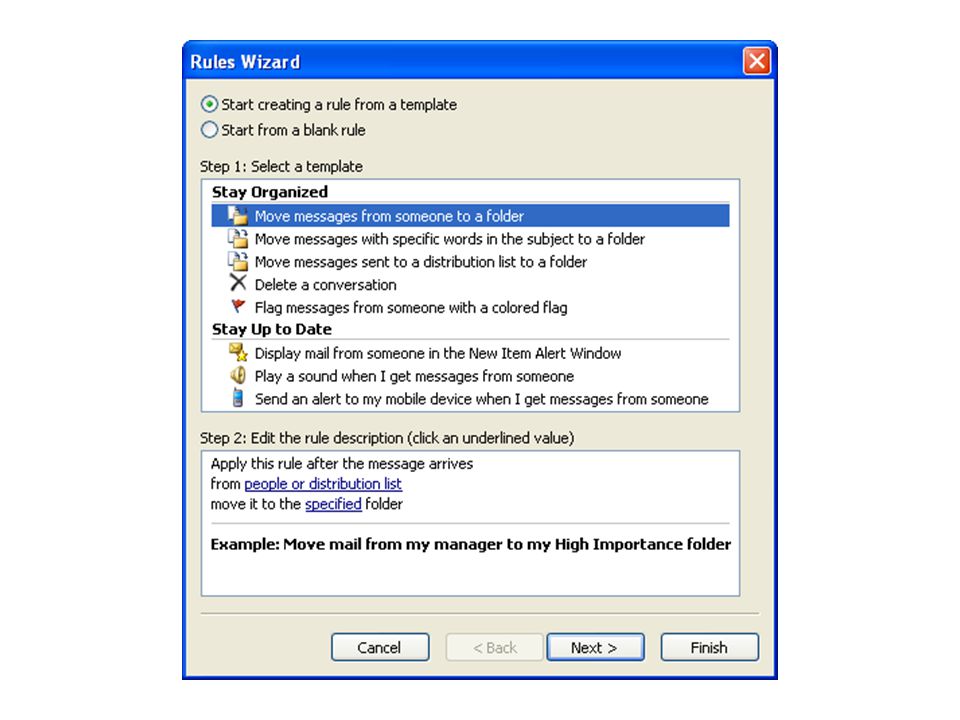
Rules Wizard The Rules Wizard leads you through three basic steps to create a rule to manage your messages: Selecting a condition Applying an action to the items returned by the condition Entering exceptions to the condition.

35
Creating a Rule 1. On the Tools menu, click Rules and Alerts. 2. In the Apply changes to this folder list, click the Inbox that you want. 3. Click New Rule. You will see a list of rules and a description of each rule 4. To use a template, click Start creating a rule from a template. 5. Choose the conditions and actions that you would like to have occur once those conditions are met.

38
Out of Office Assistant 1. Be sure that you are at the Inbox level 2. Tools Out of Office Assistant

39
Inserting NIH E-mail Addresses In the To: field type the employee’s name (first last) Press CTRL+k on the keyboard to check name. If multiple employees have the same name, a popup box will appear to select the correct one, otherwise the name will automatically be found and linked.

40
Creating Contacts On the File menu, select New Contact.

41
Adding a Contact from Email Right-click on a user in the From: field Choose Add to Contacts

42
Modifying Contact Options Tools Options On the Preferences tab, select the Contacts Options button

43
Managing Calendar Viewing Options Color Coding Appointments Modifying Calendar Options Using Free/Busy Time Feature Creating a Recurring Meeting Request

44
Viewing the Calendar Monthly Weekly Work Week Daily

45
Color Coding Appointments

46
Managing Calendar Options Creating Appointments Scheduling Meetings Recurring Free/Busy Time

47
Managing Calendar Options From the Tools menu, select Options Make sure that the Preferences tab is selected. Choose Calendar Options

48
Managing Calendar Options Free/Busy Time Within calendar options, choose the Free/Busy buttons.

49
Managing Calendar Options Viewing Free/Busy Time

50
In Closing… http://antispam.nih.gov http://www.mail.nih.gov

Similar presentations


 Mail ! Microsoft 2003 Exchange E-mail for VUSD Teachers.>")

 Mail ! Microsoft 2003 Exchange E-mail for VUSD Teachers.>")

 User Guide Horizon School Division #205.>")


 Holly Smythe, Instructional Designer, Ext 8451 Lonny Buinis, Instructional Designer, Ext 8306.>")
 for Collin College faculty and staff.>")
 is a web mail service of Microsoft Exchange; allow users to connect remotely via a Web browser OWA is used to access e-mail,>")


