Download presentation
Presentation is loading. Please wait.

1
Three Phases & Work Flow of the Performance Management Process 1. Plan: 1.Supervisor Enters Non-Supervisory Plan or 1.Supervisor Enters Supervisory Plan 2.Reviewer Concurs 3.Supervisor Reviews Concurrence 4.Employee Accepts Plan 2. Review and 3.Rating Processes: 1.Supervisor Enters review/rating 2.Reviewer Concurs 3.Supervisor Reviews concurrence 4.Employee Accepts review/rating

2
Work Flow of EmpowHR Performance Plan Process Phase 1, the Plan: 1.Supervisor Enters Plan 2.Reviewer Concurs 3.Supervisor Reviews Plan 4.Employee Accepts Plan

3
Contents of this EmpowHR Presentation 1.Supervisor Enters Non-Supervy Plan (Slides 3-43) 2.Supervisor Enters Supervisory Plan (44-79) 3.Reviewer Concurs (91-100) 4.Supervisor Reviews Plan (102-108) 5.Employee Accepts Plan (110-120) 6. Save Draft (33-34) 7. Print (36-41) 8. Copy from Previous Plan (81-90)
 7. Print (36-41) 8. Copy from Previous Plan (81-90).")
4
Enter Userid & Password then Click SIGN IN button If you forget your password but Know your id, click here to get A new password. You must have Already set up a reminder question And answer for this to work. Supervisor Enters Non-Supervisory Plan

5
Click Manager Self Service Note: EmpowHR will timeout and log you out after 22 minutes of no use

6
Click TASKS

7
Click PERFORMANCE

8
A list of your direct reports appears. The first example is a plan for a Non-supervisory employee. Click the NEW PLAN button for an employee

9
Enter the start date of the Performance/rating period with A four digit year. Click the ADD button

10
1.Enter Rating Scale = H 2.Verify the accuracy of the other information. 3.Click ELEMENTS & STANDARDS tab

11
Click the search icon to Select a performance Element from the table

12
The Pick Element Table is Displayed. OBF’s elements Begin with number 051. Supervisor’s elements are first Followed by non-supervisory Followed by job specific Elements.

13
Begin by clicking 056, the first of the non-supervisory elements. We’ll proceed to add each of the Four non-supervisory elements Then the elements specific to a GS-13 Accountant for a total Of seven elements. The system requires a minimum Of 4 elements and a max of 7

14
The 056 element template is dropped into the plan. Click the appropriate Critical Indicator Click + to add another element

15
A blank element box is Added. Click the search icon to select An element from the table. Note there are now two elements in the plan.

16
Select element 057

17
The 057 element template is dropped in to the plan. Click the appropriate Critical Indicator Click + to add another element

18
A blank element box is added Click the search icon to select An element from the table. Note there are now three elements in the plan.

19
Select element 058

20
The 058 element template is Dropped into the plan. Click the appropriate Critical Indicator Click + to add another element

21
A blank element box is added Click the search icon to select An element from the table. Note there are now four elements in the plan. Click the search icon to select Another element

22
Select element 059

23
The 059 element template is Dropped into the plan. Click the appropriate Critical Indicator Click + to add another element

24
A blank element box is Added. Note there are now five elements in the plan. Click the search icon to Select Another element

25
Select element 068 the Execution of Duties element For GS-13 Accountant

26
The 068 element template is Dropped into the plan. Click the appropriate Critical Indicator Click + to add another element

27
A blank element box is added Note there are now six elements in the plan. Click the search icon to select Another element

28
Select element 073 the Individual Contribution to Team element For GS-13 Accountant

29
The 073 element template is Dropped into the plan. Click the appropriate Critical Indicator There are no more Elements to add. Click the VIEW ALL link to See all elements on one Page and proof your work.

30
Use the scroll bar to scroll Up and down to see all Elements in the plan on One page.

31
You MUST click SAVE to save your work!! Clicking SAVE 1.Saves your plan 2.Checks the FINALIZED PLAN box on previous tab And Enters today’s date 3.sends an email to your Supervisor indicating that the plan is Ready for Their concurrence 4. Check accuracy of the reports to info 5. Formats the form for Printing

32
Scroll to the top and click the PERFORMANCE PLAN Tab to print a hard copy.

33
Alternatively, the SAVE DRAFT PLAN Button on the PERFORMANCE PLAN tab will save your Work if you are interrupted. This feature allows saving A draft without notifying The Reviewer the Plan is ready for their Concurrence. Also it does Not check reports to Information. If you get a Reports To error on SAVE, Use this button to save your Work. SAVE DRAFT

34
the SAVE DRAFT PLAN Button does not allow Printing the Draft Plan. Clicking SAVE DRAFT PLAN checks the Created Plan Box and adds the Date. SAVE DRAFT

35
SAVE button is on both tabs. Click SAVE only once! Clicking it sends an email to the Reviewer. Clicking SAVE checks the FINALIZED PLAN button and The CREATED PLAN button If not previously checked. And Adds the date

36
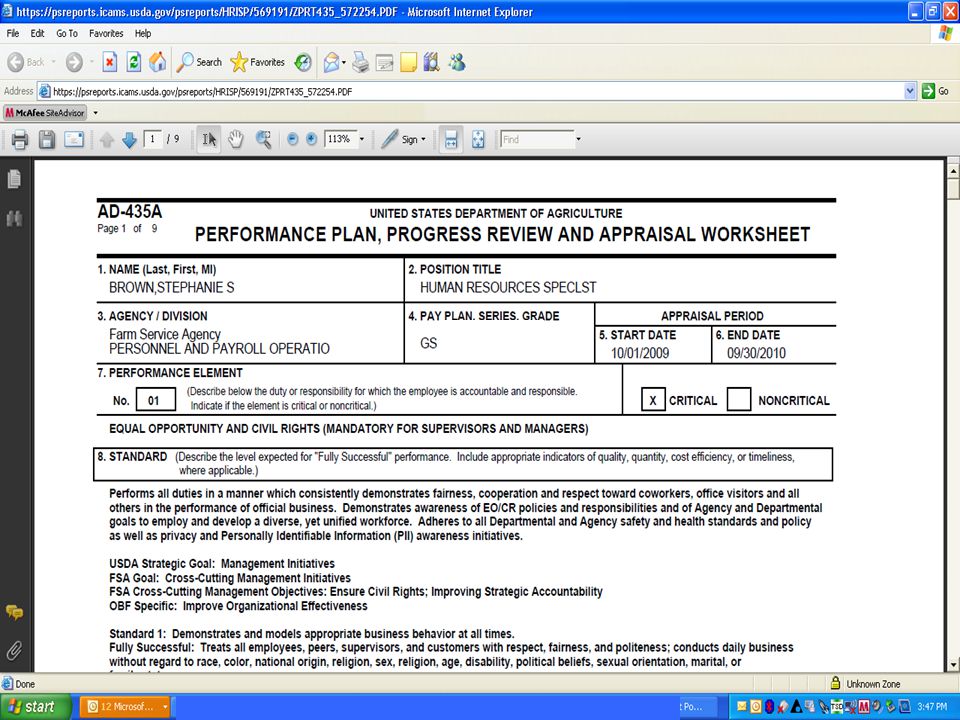
SAVE also formats the AD-435 for printing. You must click the SAVE Button before attempting to print. Do not try to print the AD-435 form until after Clicking the SAVE button. It Will not be formatted correctly To PRINT: Click Create Printable Form Button to print the AD-435

37
Click VIEW DOCUMENT button

38
Click OPEN to view The form

41
1.Click the Print Icon to print 2.To Exit, click the X in the Upper right corner

42
Click the link below to return To the list of employees and Enter another plan OR Click SIGN OUT to log off

43
To enter another plan, click The NEW PLAN button For the next employee Or SIGN OUT

44
Enter Userid & Password then Click SIGN IN button If you forget your password but Know your id, click here to get A new password. You must have Already set up a reminder question And answer for this to work. Supervisor Enters Supervisory Plan

45
Click Manager Self Service

46
Click TASKS

47
Click PERFORMANCE

48
A list of your direct reports appears. Click the NEW PLAN button for an employee

49
Enter the beginning date of the Rating period. Click ADD

50
Enter H for Rating Scale Verify the accuracy of the info Click ELEMENTS & STANDARDS Tab when done

51
The standard FSA text for the EEO will automatically fill the first element of the Plan. OBF’s text is different and must be Copied in its place. You will not be able to change the Element title because it is grayed out but you will be able To change the text below it. Here’s how:

52
To do this, we will copy the OBF EEO element Text from the table of elements into the second element In the plan, then cut and paste it into The first element in the plan. Then we will over Write what is in the 2 nd element of the Plan with the text from OBF element #051 from the table. Here are the steps: Click the search icon to pick an Element from the table

53
Begin with the first OBF element

54
All of OBF’s elements are visible Here. The OBF EEO element for Supervisors Is #054. Click it.

55
It is dropped into Element #2 of the plan. Note the Standard FSA EEO element text Is still loaded in element #1. We Are going to overwrite it with this OBF text.

56
Click VIEW ALL to see both Elements.

57
All of the elements appear on one Screen. Block and copy the text in the 2 nd Standards box.

58
Block the text in the first Standards Box. Left click and select PASTE to Paste OBF’s EEO text into the 1 st Standards box. We just overwrote The standard FSA EEO text with The OBF EEO text. Edit the text As you wish. But the same OBF EEO text is now in the plan in the first two Standards boxes. We need to over Write the 2 nd standard with another OBF element.

59
Now we are going to over write What we copied into the 2 nd perfor- Mance element. Click the search icon on the 2 nd Performance measure.

60
Select #052, the first supervisory element

61
It is copied into the plan. Edit the Text as you wish. Select a critical indicator Click the + to add another element

62
A blank element is added to the plan Click the search icon to select Another element

63
Select the 2 nd supervisory element by clicking on it.

64
It is copied into the plan. Select a Critical Indicator Click the + to add another blank Element into the plan

65
Another blank element is added. Click the search icon to select the 4 th element from the table.

66
Click on the next element

67
The element is added to the plan. Select a critical indicator Click the + to add another element

68
Another blank element is added Click the search icon to add the Element text from the table

69
Click the next supervisory Element in the table

70
It is dropped into the plan Select a Critical Indicator Use the scroll bar to scroll to the top And check your work

71
Click the Performance Plan tab

72
Click the SAVE button. You MUST Save your work.

73
Clicking the SAVE button 1.Saves Your work 2. Checks both boxes inside the Supervisor’s box 3.Adds today’s date 4.Checks the accuracy of the reports to data 5. Formats the AD-435 for printing

74
To print the AD-435 : Click the CREATE PRINTABLE FORM button. Print the Plan

75
Click View Document

76
Click OPEN and the plan will appear

79
Click the print icon to print Click the X upper right to exit

80
Click this link to enter another plan Or SIGNOUT to exit

81
Create Plan Using COPY PLAN FROM PREVIOUS button Enter Userid & Password then Click SIGN IN button

82
Click Manager Self Service > Tasks > Performance > Performance Plan button

83
Click the NEW PLAN button For the employee

84
1. Enter the starting date of the review period 2. Click the ADD button

85
1.Enter the letter H for the Rating Scale 2.Verify the accuracy of the info on the screen 3. Click the ELEMENTS & STANDARDS Tab at the top

86
The elements and standards Screen appears containing A blank element. 1.Click the COPY PLAN FROM PREVIOUS button 2.Then click the VIEW ALL link

87
All of the elements and stds From the previous plan are Copied into this new plan. Notice the plan now contains 6 elements

88
Use the scroll bar to Scroll to the bottom Click SAVE here or click PREVIOUS TAB button And save from other tab

89
Click the SAVE button. This Will 1.save your work 2.Check employee and your reports to info 3. Format the form for printing 4. Send email notice to the reviewer to concur Do not try to print the AD-435 form until after Clicking the SAVE button Click Create Printable Form Button to print the AD-435 Click here to return to the list Of employees

90
Click on NEW PLAN for The next employee Or SIGN OUT

91
Reviewer Concurs with Plan Enter Userid & Password then Click SIGN IN button

92
Click WORKLIST

93
Click WORKLIST DETAILS

94
After a few minutes it appears. Click the drop down box and select SUPERVISOR CREATED EMP PLAN

95
Only the actions meeting that criteria appear. Click in the blue link for the employee’s record

96
The plan appears Verify the accuracy of the Info on the screen. To review the plan, click the elements and Standards tab

97
Review the Elements & Standards. You can Edit the elements if Desired. Then click the Performance Plan tab to return

98
1.Check the CONCURRED Box inside the Reviewer’s box. The date will appear 2.Click SAVE. You must Save your work! 3.Click Create Printable Form button to print the Plan 4.Click this link to return To the list of employees or SIGN OUT OR If you did not review the Elements & Stds, you can Click the BACK button at The top left to return to The employee list.

99
If you did review The elements, And clicked the Return link, you will Be returned here. To get to the Same list of Employees, click The box next to the Supervisor’s name

100
Click the box Next to the Employee’s name To concur with A plan and Continue in this manner to concur With all plans

101
Supervisor Reviews Plan after Reviewer Concurred Enter Userid & Password then Click SIGN IN button

102
Click Manager Self Service Tasks Performance Performance Plan

103
Click EXISTING PLAN Button for the employee

104
Click on the plan Of interest

105
Check the Reviewer Box. Make sure Reviewer Concurred with the plan And that there is a Date. The employee must Not accept their pan until reviewer concurs. You can click the Create Printable Form button if you want a hard copy Click tab to check Elements and Stds

106
Review the elements for Changes by Reviewer Click Performance Plan Tab to return when you Have completed Your review.

107
You have completed Your review. To review The next employee’s plan, Click this link OR Signout

108
If you wish to review Plans of other Employees, click the EXISTING PLAN Button for the Employee and Continue as before

109
Employee Reviews and Accepts Plan Enter Userid & password

110
Click Employee Self Service > Tasks > Performance > Existing Plan

111
1.Check that there is a date In the Reviewer box. If there is no date, inform your supervisor that concurrence by the Reviewer is required before you can accept Your plan. Do not accept or refuse your plan if there is no reviewer date 2.Click the Elements & Standards tab to review them

112
retu Click the VIEW ALL link To see all of the elements On one screen. Use the Scroll bar to scroll through them Review each of the Elements and click the Performance Plan tab When done.

113
1. In the Employee box, click The Viewed/Discussed Plan OR Refused to Sign box Today’s date will appear. 2. Click SAVE. You MUST Save your work! 3. Click Create Printable Form button to print hard Copy. Print only after clicking SAVE OR SIGN OUT

114
Click VIEW DOCUMENT To print plan

115
Click OPEN to view The form

117
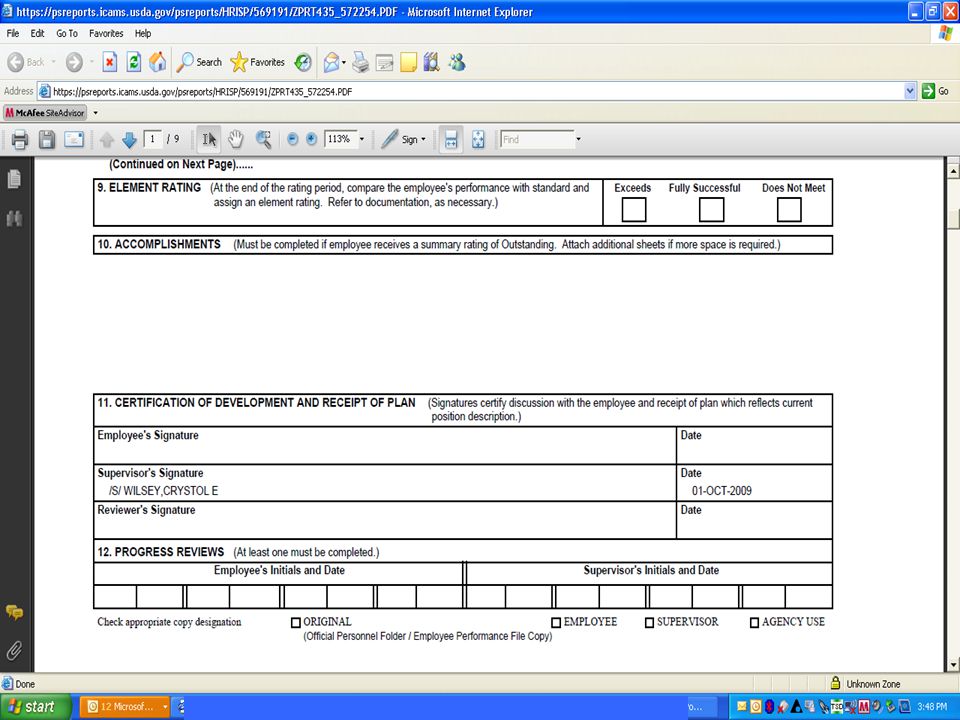
1.Verify there are three electronic signatures Below for all three in the chain of command 2.Click the print icon to print a hard copy 3.Click the X in the upper right Corner to exit.

118
Click SIGN OUT And you are done!

119
Work Flow of EmpowHR Performance Plan Process 1.Supervisor Enters Plan 2.Reviewer Concurs 3.Supervisor Reviews Plan 4.Employee Accepts Plan

Similar presentations


. MODULE 4.5 PubMed/How to Use MY NCBI Instructions - This part of the: course is a PowerPoint demonstration intended to introduce.>")
. MODULE 4.5 PubMed/How to Use MY NCBI Instructions - This part of the: course is a PowerPoint demonstration intended to introduce.>")


.>")
>")


 872-3539.>")


 TOOLS, then (2) MACROS, then (3) SECURITY.>")


