Download presentation
Presentation is loading. Please wait.

1
EMT 100 Patient Assessment

2
Vital Signs *SIGNS OF LIFE*

3
Pulse Is the heart rate expressed in beats per minute

4
Radial Artery Palpation

5
Carotid Artery Palpation

6
Normal Pulse Values Adult – 60-100 Children – 80-100 Infants – 100-140

7
Rapid Weak Pulse May Be A Sign Of Shock!

8
Respiration Expressed in breaths per minute Each breath consists of an inspiration and an expiration Look, Listen, and Feel!

9
Normal Respiration Rates Adults = 12-20 Children = 20-40 Infants = 30-50

10
Rapid And Shallow Respirations May Be A Sign Of Shock!

11
Temperature Normal = 98.6F or 37C Warm, dry skin

12
Cool, Clammy Skin May Be A Sign Of Shock!

13
Skin Color Pale, white ashen appearance, ie Pallor, may be a sign of shock! Bluish, gray skin, ie Cyanosis, shows poor oxygenation of the blood Yellowish-orange skin, ie Jaundice, may be a sign of liver disease or blood disease

14
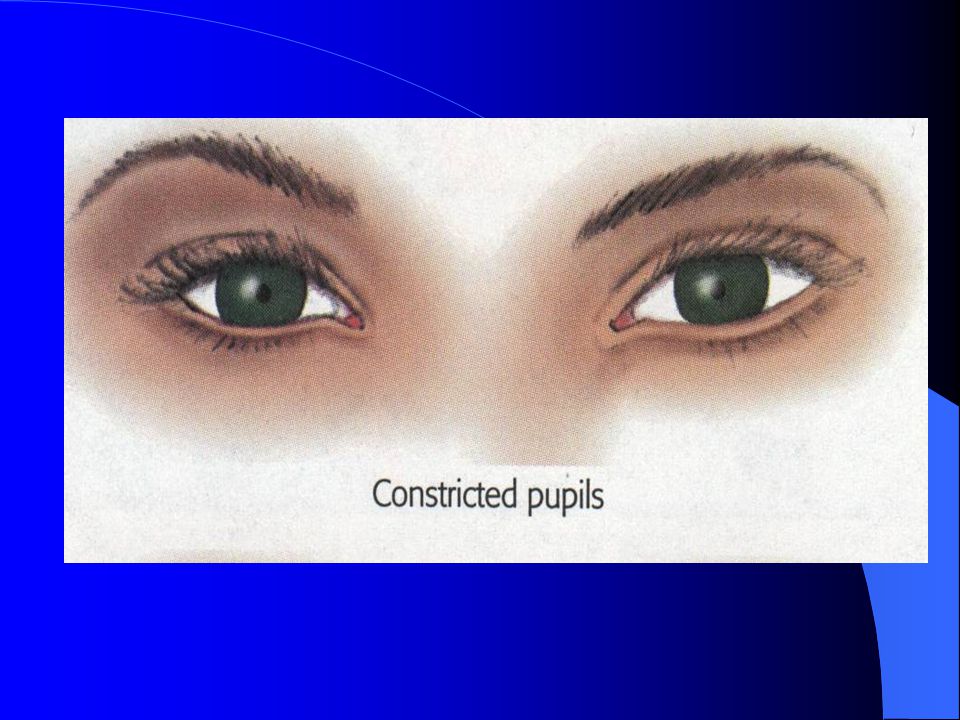
Pupils Normally are the same size and react equally to light

18
Level of Consciousness (LOC) assessed by asking: Who are you? (Orientation to self) What were you doing? (Orientation to situation) Where are you ? (Orientation to place) What day of the week is it? (Orientation to time)
 What were you doing. (Orientation to situation) Where are you . (Orientation to place) What day of the week is it. (Orientation to time).")
19
LOC continued Questions must be asked in this order May need to assess every few minutes As patients become disoriented, they lose the ability to answer the questions in the reverse order that they are asked

20
Psychological Concerns Extremely aberrant behavior by the patient may be a manifestation of illness or injury

21
Psychological Concerns (continued) Be in control Be supportive Be honest
 Be in control Be supportive Be honest")
22
Golden Rule Treat each patient the way you would want to be treated if you were the patient!

23
Patient Assessment Sequence Perform scene size-up. Perform primary assessment. Obtain SAMPLE History. Secondary assessment—head to toe exam. Perform on-going re-assessment.

24
Step I: Scene Size-up Maintain body substance isolation. Maintain scene safety. Determine mechanism of injury or nature of illness. Determine need for additional resources.

25
Step II: Perform Primary Assessment Look for Life- Threatening Conditions Form general impression of patient. Assess responsiveness. Check airway. Check breathing. Check circulation.

26
Primary Assessment: Assess Responsiveness AVPU Scale A Alert V Verbal P Pain U Unresponsive

27
Primary Assessment: Check Patient’s Airway Head tilt–chin lift technique – The tongue is the most common cause of obstruction in an unconscious person Jaw-thrust technique Inspect mouth Insert airway if needed

28
Primary Assessment: Check Patient’s Breathing If conscious: – Check rate and quality. – Check for any difficulty. If unconscious: – Look, listen, and feel for breathing. – Start rescue breathing, if needed.

29
Primary Assessment: Check Patient’s Circulation Check carotid or radial pulse. Check for severe bleeding. Check skin color and temperature: – Pale - decreased circulation – Flushed - excess circulation – Yellow - liver problems

30
Step III: Patient’s Medical History S Signs/Symptoms (Chief Complaint) A Allergies M Medications P Pertinent, past medical history L Last oral intake E Events associated with or leading to the injury or onset of illness
 A Allergies M Medications P Pertinent, past medical history L Last oral intake E Events associated with or leading to the injury or onset of illness")
31
Step IV: Seconday Assessment - Physical Examination Check patient from head to toe for non-life-threatening conditions. Purpose of exam is to locate and begin initial management of injury or illness.

32
Physical Exam: Examine the Patient from Head to Toe Look and feel for signs of injury: Deformity Open injuries Tenderness Swelling Search all areas of body in a clear, concise, consistent format.

33
Examine Patient’s Head and Eyes Examine head: – Use both hands. – Do not move patient’s head. – Remove eyeglasses. – Remove wigs if necessary. Examine eyes: – Cover one eye for 5 seconds. – Watch for pupil contraction.

34
Examine Patient’s Neck and Chest Examine neck: – Examine each side; check for pain. –Check neck veins. –Check for a medical identification tag.

35
Examine Patient’s Chest Examine chest: – Check for pain on inhalation/exhalation. – Look for signs of difficult breathing. – Note injuries, bleeding, or abnormal, unequal, or painful movement. – Check for collarbone or rib fractures.

36
Examine Patient’s Abdomen Look for signs of external bleeding, penetrating injuries, or protruding parts. Check for stomach rigidity or swelling. Check for soiled clothing. Check genital area for external injuries.

37
Examine Patient’s Pelvis Examine pelvis: – Check for obvious bruising, bleeding, or swelling. – Check for pain if no pain has been reported. Examine back: – Stabilize head and neck and log-roll – Check one side of the back at a time.

38
Examine the Extremities Observe the extremity. Examine for tenderness. Check for movement. Check for sensation. Assess the circulatory status.

39
Step V: On-going Reassessment Monitor patient’s vital signs: – Every 5 minutes if unstable. – Every 15 minutes if stable. Maintain an open airway. Monitor breathing and pulse. Monitor skin color and temperature.

40
It is time for lab! Check and record the radial/carotid pulse and the respirations of 5 fellow students

41
Primary Survey Looks for life-threatening conditions!

42
Determine whether victim is conscious or unconscious, then check: Airway Breathing Circulation Hemorrhage Shock

43
Secondary Survey Is a head to toe survey that looks for other injuries/problems

44
Secondary Survey (cont.) Neck Skull Face, Nose, and Mouth Chest and Lungs Abdomen Pelvis, Genitals, Incontinence Extremities Back and Buttocks Reassure!
 Neck Skull Face, Nose, and Mouth Chest and Lungs Abdomen Pelvis, Genitals, Incontinence Extremities Back and Buttocks Reassure!")
45
Don’t Overlook: Situation Bystanders, Family or Friends Medications and Medical History Wallet Cards Vial of Life Med-Alert Tags

Similar presentations