Download presentation
Presentation is loading. Please wait.

1
www.foreverhotwater.comwww.foreverhotwater.com www.comfortableheatingsolutions.com © 2007 Rinnai Corporation www.rinnai.us © 2011 Rinnai Corporation 1 Rinnai Training Program #201103 072211 Rinnai ENERGYSAVER ® Direct Vent Wall Furnace Service Fundamentals The Rinnai Direct Vent Wall Furnace Product Knowledge (201101) and Installation (201102) Presentations are a required prerequisite.
 and Installation (201102) Presentations are a required prerequisite.")
2
www.foreverhotwater.comwww.foreverhotwater.com www.comfortableheatingsolutions.com © 2007 Rinnai Corporation www.rinnai.us © 2011 Rinnai Corporation The following course is approved for NATE continuing education hours (CEH’s) This course will earn the following CEH’s: Warm Air Heating-Gas-Installer – 2 hours Warm Air Heating-Gas-Service – 3 hours If you require credit for NATE, please notify the instructor at this time Rinnai ENERGYSAVER ® Direct Vent Wall Furnace Service Fundamentals
 This course will earn the following CEH’s: Warm Air Heating-Gas-Installer – 2 hours Warm Air Heating-Gas-Service – 3 hours If you require credit for NATE, please notify the instructor at this time Rinnai ENERGYSAVER ® Direct Vent Wall Furnace Service Fundamentals")
3
www.foreverhotwater.comwww.foreverhotwater.com www.comfortableheatingsolutions.com © 2007 Rinnai Corporation www.rinnai.us © 2011 Rinnai Corporation Rinnai Service and Support (800-621-9419) www.rinnai.uswww.rinnai.us – For extensive product, sales, and service information. Of Note—a comprehensive documents library is available at the sales/service link. Website registration is required for access. Rinnai America’s phone support structure consists of the following departments: CRC – Consumer Response Center – Fielding general calls, consumer questions, etc. Available in office from 8 a.m. to 8 p.m. EST, Monday - Friday Parts and Warranty Department – Fielding parts orders and warranty issues Available in office from 8 a.m. to 5 p.m. EST, Monday – Friday Technical Support Department– Fielding technical issues related to the function of all Rinnai Products Available in office from 8 a.m. to 8 p.m. EST, Monday – Friday AND 24/7/365 on call support for technicians who are at the service location. A dedicated service line is available for technicians and installers:1-888-RINNAIS (888.746.6247) PLEASE DO NOT GIVE THIS NUMBER TO CONSUMERS. Engineering / Applications Department – Fielding issues related to product applications including sizing Available in office from 8 a.m. to 5 p.m. EST. (The engineering dept does not size heating appliance applications—an industry accepted Btu heat loss calculation must be performed by the installer) 3
 PLEASE DO NOT GIVE THIS NUMBER TO CONSUMERS. Engineering / Applications Department – Fielding issues related to product applications including sizing Available in office from 8 a.m. to 5 p.m. EST. (The engineering dept does not size heating appliance applications—an industry accepted Btu heat loss calculation must be performed by the installer) 3.")
4
www.foreverhotwater.comwww.foreverhotwater.com www.comfortableheatingsolutions.com © 2007 Rinnai Corporation www.rinnai.us © 2011 Rinnai Corporation EX17C EX22C ES38 EX08C EX11C Product Model Numbers and Specifications NEW MODELS PREVIOUS MODELSCFM* MAX POWER* DECIBELS* INPUT BTU RANGE* AFUE (Efficiency)* EX08CES08, RHFE 201 FA55.5-82.041-42 W27-36dB3,000-8,000 NG/LP NG-82% LP 83% EX11CES11, RHFE 263 FAII69.3-102.544-47 W31-38dB 5,500-11,000 NG 5,700-11,000 LP NG-81% LP-82% EX17C ES17, RHFE 431 FAIII EX17, RHFE 431 WTA 111.3-137.840-46 W33-38dB8,200-16,700 NG/LP NG-81% LP-82% EX22C ES22, RHFE 556 FAIII EX22, RHFE 556 WTA 111.3-162.752 W32-42dB 8,200-21,500NG 8,200-20,700 LP NG-81% LP-82% ES38RHFE 1004 FA203.4-360.6121 W37-47dBA 10,500-38,400 NG 10,500-36,500 LP NG-80.6% LP-82% Ensure the correct part number is identified for service / parts support *Current model specifications-previous models may slightly vary All models available in beige EX22(C) and ES38 models are also available in white. WhiteBeige 4

5
www.foreverhotwater.comwww.foreverhotwater.com www.comfortableheatingsolutions.com © 2007 Rinnai Corporation www.rinnai.us © 2011 Rinnai Corporation Model Number & Serial Number (located on both sides of the product) 5 Product Model Numbers and Specifications 2008 and older: The model number is located at the top of each side of the product. The serial number on older product is located on the bottom of both sides of the product. 2010 and newer: The serial number will be in the following format: YM-FT-XXXXX Y=Year, M=Month, F=Factory of production, T=Type of product, X=production number 2009 and newer: The serial number is still located on both sides but in the same label as the model and easier to read. It is also located on the rear of the unit

6
www.foreverhotwater.comwww.foreverhotwater.com www.comfortableheatingsolutions.com © 2007 Rinnai Corporation www.rinnai.us © 2011 Rinnai Corporation 1.Combustion fan purges heat chamber, PCB verifies fan rotation 2.Ignition spark begins 3.When sensing electrode detects spark, gas valve assembly opens 4.Ignition occurs and heat exchanger warms 5.Spark stops as flame rod & PCB verify flame 6.When heat exchanger is warm enough, convection room blower circulates warm air into the structure. 7.When filled, the humidifier tray ensures the air is not too dry (if needed) 8.Thermistor & PCB determine gas and fan settings 9.When temperature set point is reached, if needed, gas valves close & combustion fan stops. Convection fan continues to run to cool down unit. 10.When temperature drops, process starts over ENERGYSAVER ® Direct Vent Furnaces Operation Sequence Spark and sensing electrodes PCB Humidifier Tray Heat Exchanger Combustion Fan ThermistorPOVSV1 & 2Convection FanFlame RodConcentric Termination 6
 8.Thermistor & PCB determine gas and fan settings 9.When temperature set point is reached, if needed, gas valves close & combustion fan stops. Convection fan continues to run to cool down unit. 10.When temperature drops, process starts over ENERGYSAVER ® Direct Vent Furnaces Operation Sequence Spark and sensing electrodes PCB Humidifier Tray Heat Exchanger Combustion Fan ThermistorPOVSV1 & 2Convection FanFlame RodConcentric Termination 6.")
7
www.foreverhotwater.comwww.foreverhotwater.com www.comfortableheatingsolutions.com © 2007 Rinnai Corporation www.rinnai.us © 2011 Rinnai Corporation Primary Service Tools 3/16” Allen Wrench For service, troubleshooting, and component replacement, the following primary service tools will be needed (other tools could be needed on occasion) Digital Multimeter (Volt/Ohm Meter) Screw Driver Dual Port Manometer U-Tube or #2 Phillips Head (magnetic) 7
 Digital Multimeter (Volt/Ohm Meter) Screw Driver Dual Port Manometer U-Tube or #2 Phillips Head (magnetic) 7")
8
www.foreverhotwater.comwww.foreverhotwater.com www.comfortableheatingsolutions.com © 2007 Rinnai Corporation www.rinnai.us © 2011 Rinnai Corporation The following procedures are for the RHFE 431 / 556 models manufactured 2008 or earlier Service procedures for other models will vary C-Series model disassembly is in Appendix A of this presentation Please stay with the presentation PRODUCT DISASSEMBLY AND COMPONENT REVIEW 8

9
www.foreverhotwater.comwww.foreverhotwater.com www.comfortableheatingsolutions.com © 2007 Rinnai Corporation www.rinnai.us © 2011 Rinnai Corporation 1.Remove toe kick from bottom front of unit Disassembly / Component Review 2.Slide the humidifier tray from bottom left of unit— tray will release 1 2 9

10
www.foreverhotwater.comwww.foreverhotwater.com www.comfortableheatingsolutions.com © 2007 Rinnai Corporation www.rinnai.us © 2011 Rinnai Corporation Cover Removal 1.Remove 8 screws from the lower front panel 2.Pull out on the bottom of the panel and the top will drop down from slots 3.Inside of cover has valuable information including the wiring diagram 1 3 10

11
www.foreverhotwater.comwww.foreverhotwater.com www.comfortableheatingsolutions.com © 2007 Rinnai Corporation www.rinnai.us © 2011 Rinnai Corporation 1.Remove the top 2 control panel screws 2.Disconnect control wiring from PCB 3.Pull forward, then up on top panel to remove 1 2 Control Panel Removal 11

12
www.foreverhotwater.comwww.foreverhotwater.com www.comfortableheatingsolutions.com © 2007 Rinnai Corporation www.rinnai.us © 2011 Rinnai Corporation PC Board Removal 1.Isolate unit from power and gas 2.Remove all wires from PCB. All connectors to PCB have a release point on the Molex. Remove grounding wire from inner panel 3.Remove two screws on left of PCB assembly 4.Lift up on PCB and unhook tabs on right side freeing PCB from unit 2 3 4 12

13
www.foreverhotwater.comwww.foreverhotwater.com www.comfortableheatingsolutions.com © 2007 Rinnai Corporation www.rinnai.us © 2011 Rinnai Corporation 1.Remove the ground screw and wire. 2.Remove the four screws on the inducer motor plate. 3.Note the indicator marks in the 5:00 o’clock position for alignment. 2 3 1 13 Combustion Fan Removal

14
www.foreverhotwater.comwww.foreverhotwater.com www.comfortableheatingsolutions.com © 2007 Rinnai Corporation www.rinnai.us © 2011 Rinnai Corporation Inside Panel Removal 1.Remove thermal overheat fuse by pulling up on bracket. Fuse opens at 314° F 2.Open fuse harness clamps to release wires 3.Remove ground wire from panel. NOTE: Unit will not operate with this wire disconnected from unit 4.Remove 6 screws to remove inside panel 4 3 2 1 14

15
www.foreverhotwater.comwww.foreverhotwater.com www.comfortableheatingsolutions.com © 2007 Rinnai Corporation www.rinnai.us © 2011 Rinnai Corporation Sparker (remove this plate to see/clean flame rod) Flame rod ( Easiest way to clean is through sparker opening) Over heat bimetals one on the front & one on the back ( 266° F degrees) Over heat bimetal 194°F degrees Spark Sensing (This is not a flame rod) Filter light thermistor (install flat in the 3:00 position) 266°F bimetal behind this plate All bimetals are in series with thermal fuse. Any open or break on this circuit causes an overheat code Flame rod disconnect for measuring current 15 Safety Component Review

16
www.foreverhotwater.comwww.foreverhotwater.com www.comfortableheatingsolutions.com © 2007 Rinnai Corporation www.rinnai.us © 2011 Rinnai Corporation Convection Fan Removal 16 1.Remove 2 screws on left of assembly 2.Remove 2 screws on right of assembly 3.Remove 2 screws below assembly (behind heat exchanger) 4.To remove motor from assembly loosen set screw on motor shaft and remove the 4 screws holding the motor to the housing 5.The tangential wheel design is quieter in comparison to a centrifugal style blower 1 2 3 4
 4.To remove motor from assembly loosen set screw on motor shaft and remove the 4 screws holding the motor to the housing 5.The tangential wheel design is quieter in comparison to a centrifugal style blower")
17
www.foreverhotwater.comwww.foreverhotwater.com www.comfortableheatingsolutions.com © 2007 Rinnai Corporation www.rinnai.us © 2011 Rinnai Corporation Spark Igniter module Transformer 1.Remove two screws and ground wire 2.Bottom tray that houses spark module and transformer will come free 3.To remove transformer only: remove single screw securing transformer to tray. Note tab fitted into slot on rear of transformer 4.Spark module operation: 1.85-110VAC is applied to the module from the PCB via the blue and red wires. 2.Voltage is stepped up at the module and applied in the burner via the black wire. 3.If the spark occurs correctly, the voltage is returned to the module via the white wire. 4.Voltage is returned to the PCB via the gray and orange wires thus allowing the gas valve to open. Spark Module / Transformer Review 1 3 17

18
www.foreverhotwater.comwww.foreverhotwater.com www.comfortableheatingsolutions.com © 2007 Rinnai Corporation www.rinnai.us © 2011 Rinnai Corporation GAS FLOW SV-1 SV-2 POV Gas Valve Assembly Removal 1.To remove, remove two screws on back of unit (ensure correct screws are removed) 2.Remove single screw at gas tubing 3.Note gasket and o-ring where assembly connects 4.NOTE: POV screw should only be adjusted during replacement or under Rinnai direction 5.Ensure gas valve assembly is installed before completing next slide 1 2 4 3 18
 2.Remove single screw at gas tubing 3.Note gasket and o-ring where assembly connects 4.NOTE: POV screw should only be adjusted during replacement or under Rinnai direction 5.Ensure gas valve assembly is installed before completing next slide")
19
www.foreverhotwater.comwww.foreverhotwater.com www.comfortableheatingsolutions.com © 2007 Rinnai Corporation www.rinnai.us © 2011 Rinnai Corporation Gas Manifold Removal 1.Ensure 194° F bimetal bracket is removed first 2.Remove two screws holding manifold 3.Gently swing manifold out for access to venture openings and orifices. NOTE: There is an o-ring where gas tubing connects with manifold. 4.Upon reassembly, ensure alignment pins are seated correctly 5.For nuisance flame related errors, carefully burn-out venture openings with a propane torch and blow out crystallized remnants with high air pressure. This will ensure no spider webs have settled in openings. 2 3 4 4 19

20
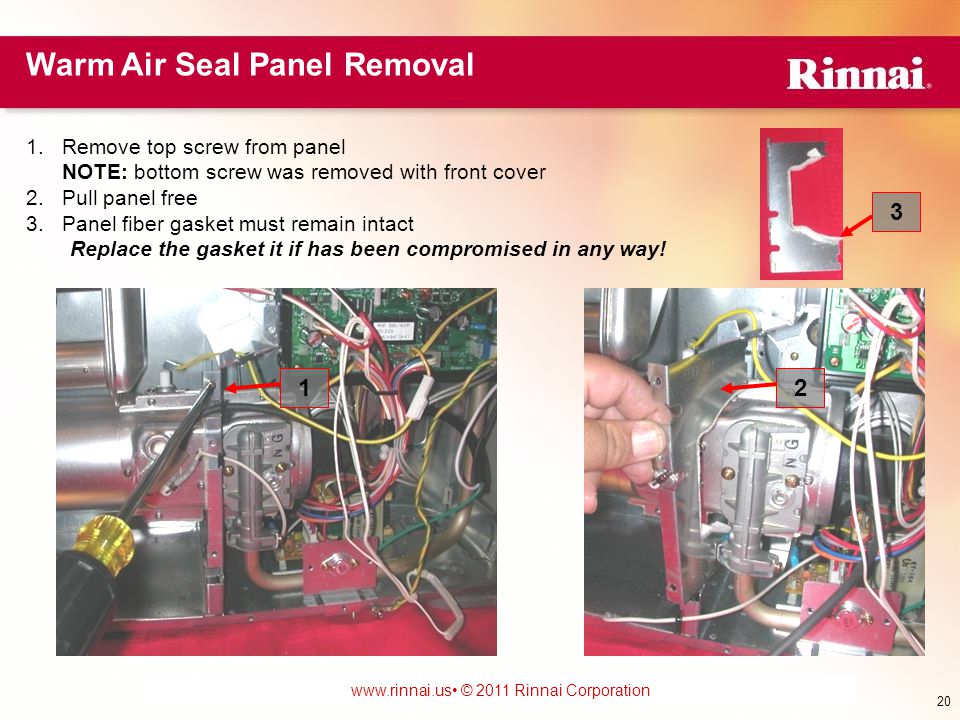
www.foreverhotwater.comwww.foreverhotwater.com www.comfortableheatingsolutions.com © 2007 Rinnai Corporation www.rinnai.us © 2011 Rinnai Corporation Warm Air Seal Panel Removal 1.Remove top screw from panel NOTE: bottom screw was removed with front cover 2.Pull panel free 3.Panel fiber gasket must remain intact Replace the gasket it if has been compromised in any way! 3 12 20
21
www.foreverhotwater.comwww.foreverhotwater.com www.comfortableheatingsolutions.com © 2007 Rinnai Corporation www.rinnai.us © 2011 Rinnai Corporation Burner Box and Cover Plate Removal 1.Remove six screws on cover plate 2.NOTE: If the burner box and cover are removed, their fiber gaskets MUST be replaced with new gaskets. This is the gasket that should be replaced under the Retrofit Program. 3.Burner box will slide out of heat exchanger 4.Burner box can be separated from cover by removing two front screws 1 1 4 3 2 21

22
www.foreverhotwater.comwww.foreverhotwater.com www.comfortableheatingsolutions.com © 2007 Rinnai Corporation www.rinnai.us © 2011 Rinnai Corporation Burner Box Disassembly Burner box can be disassembled for inspection (this is rare) 1.Remove single screw on back of burner 2.Remove plate on back of burner 3.Individual burners will come free. 4.NOTE: burner with flame capture plate must be installed in top of box. This ensures flame rod is capturing the flame correctly. 1 2 3 4 22

23
www.foreverhotwater.comwww.foreverhotwater.com www.comfortableheatingsolutions.com © 2007 Rinnai Corporation www.rinnai.us © 2011 Rinnai Corporation 23 1.Remove front cover, inside panel, warm air seal panel, and burner box assembly, and flame rod, and if needed, convection fan assembly 2.Remove two screws on right of heat exchanger 3.Remove single screw behind overheat bimetal and filter thermistor 4.Remove two screws behind right side of heat exchanger 5.Remove single screw attaching rubber boot to heat exchanger Heat Exchanger Removal 2 3 4 5

24
www.foreverhotwater.comwww.foreverhotwater.com www.comfortableheatingsolutions.com © 2007 Rinnai Corporation www.rinnai.us © 2011 Rinnai Corporation The stainless steel heat exchanger and aluminized steel are formed to a bellows style to reduce expansion noise and to provide a larger surface area for efficiency. 24 Heat Exchanger Removal 1.Remove the three screws holding the exhaust elbow to the unit. 2.NOTE the “0” ring inside the elbow. 1

25
www.foreverhotwater.comwww.foreverhotwater.com www.comfortableheatingsolutions.com © 2007 Rinnai Corporation www.rinnai.us © 2011 Rinnai Corporation KEY POINTS FOR TROUBLESHOOTING HOW TO PHOTOS DIFFERENT MODEL SPECIFICS RE-ASSEMBLE THE UNITS NOW Leave the front cover off of the unit 25

26
www.foreverhotwater.comwww.foreverhotwater.com www.comfortableheatingsolutions.com © 2007 Rinnai Corporation www.rinnai.us © 2011 Rinnai Corporation For metering values for models 2008 or older, reference Rinnai’s Direct Vent Heater Service Manual ENSURE YOU ARE READING THE CORRECT PAGE! Electrical Metering Verifying electrical values of individual components is not common but when necessary, must be conducted correctly and safely. Verifying incoming supply voltage is the most common metering need in the field— especially during installation. Key points when troubleshooting electrical values: Ensure volt meter probes are solidly contacting metal Apply probes to the back of Molex connections when possible to prevent possible damage to connection points Know your meter and how to set it for each type of measurement Ω= Ohms or resistance VAC or V~ = AC voltage Always set meter to next highest value from range (as listed in manual) When measuring resistance, ensure the component is disconnected from the circuit AND power is removed. When measuring a solenoid’s resistance, place the meter probes on the solenoid’s lugs (connection points) with the wires disconnected from. A correct resistance reading from a solenoid or transformer coil is not a guarantee that the component is good as the windings can open under load. An incorrect value is a very good indication that the component is bad though. K = X1000; ex. 6KΩ =6000 Ohms VDC or V- = DC voltage µ = X.001; ex. 6µA =0.006 Amps or 6 microamps A=amps (ensure meter is set to DC current for flame rod measurements) 26
 When measuring resistance, ensure the component is disconnected from the circuit AND power is removed. When measuring a solenoid’s resistance, place the meter probes on the solenoid’s lugs (connection points) with the wires disconnected from. A correct resistance reading from a solenoid or transformer coil is not a guarantee that the component is good as the windings can open under load. An incorrect value is a very good indication that the component is bad though. K = X1000; ex. 6KΩ =6000 Ohms VDC or V- = DC voltage µ = X.001; ex. 6µA =0.006 Amps or 6 microamps A=amps (ensure meter is set to DC current for flame rod measurements) 26.")
27
www.foreverhotwater.comwww.foreverhotwater.com www.comfortableheatingsolutions.com © 2007 Rinnai Corporation www.rinnai.us © 2011 Rinnai Corporation Electrical Metering LAB EXERCISE 1.Measure Incoming Voltage 1.At receptacle or extension cord 2.At primary of transformer 2.Measure various transformer secondary points (voltage / resistance) 3.Measure Continuity of safety circuit at various 1.At PCB connection point 2.If desired, at bottom bimetal 4.Measure Resistance of Solenoids 1.Measure POV 2.Measure SV1 and SV2 1.Is the value half of specification? 5.To measure flame rod current connect meter in series at flame rod Molex connector (yellow wire)— see service manual. Ensure meter is set correctly! 27
— see service manual. Ensure meter is set correctly. 27.")
28
www.foreverhotwater.comwww.foreverhotwater.com www.comfortableheatingsolutions.com © 2007 Rinnai Corporation www.rinnai.us © 2011 Rinnai Corporation Control Panel Review (C-Series models) Child Safety Lock Temperature Control and Display- Display will enter a power saving dimmer mode during normal operation Restricted Filter Indicator Operation Lamp Green = standby Solid red = when flame is present Flashing red = fault code is present Economy Feature Setback Feature Timer and Clock Setup Override Temporarily bypasses timers EX08C, 11C, 17C, 22C MODELS Temperature Control and Display Room temp lamp stays on Room temp displays only when adjusted ES38 MODELS Economy Feature Timer 1 and 2 Note: While off, pressing Timer 1 and 2 together will change the display from F° to C° Function Lock - Pressing both arrows will engage 28
 Child Safety Lock Temperature Control and Display- Display will enter a power saving dimmer mode during normal operation Restricted Filter Indicator Operation Lamp Green = standby Solid red = when flame is present Flashing red = fault code is present Economy Feature Setback Feature Timer and Clock Setup Override Temporarily bypasses timers EX08C, 11C, 17C, 22C MODELS Temperature Control and Display Room temp lamp stays on Room temp displays only when adjusted ES38 MODELS Economy Feature Timer 1 and 2 Note: While off, pressing Timer 1 and 2 together will change the display from F° to C° Function Lock - Pressing both arrows will engage 28")
29
www.foreverhotwater.comwww.foreverhotwater.com www.comfortableheatingsolutions.com © 2007 Rinnai Corporation www.rinnai.us © 2011 Rinnai Corporation EX17, EX22 MODELS ES08, ES11, ES17, ES22 MODELS Child Safety (Function) Lock Temperature Control and Display Room temp lamp stays on Room temp displays only when adjusted Restricted Filter Indicator Operation Lamp Green = standby Solid red = when flame is present Flashing red = fault code is present Economy Feature Economy/Frost features 7-day / 4-event timer features Override - temporarily bypasses timers Auto feature - Engages timers Function Lock - Pressing both arrows will engage Temperature Range of all Controls FahrenheitL (approx. 55)6062646668707274767880H (approx. 95) CelsiusL (approx. 13)1617181920212223242526H (approx. 35) Previous Model Control Panel Review 29
 H (approx. 95) CelsiusL (approx. 13) H (approx. 35) Previous Model Control Panel Review 29.")
30
www.foreverhotwater.comwww.foreverhotwater.com www.comfortableheatingsolutions.com © 2007 Rinnai Corporation www.rinnai.us © 2011 Rinnai Corporation 431FA, 431FAII, 431FAIII, 556FA, 556FAIII CONTROL Previous Model Control Panel Review 30 Temperature Control and Display Set temp lamp stays on Room temp flashes NOTE: Temperature displays in 4°F increments; however, at 0.6F or higher, the next temperature LED will illuminate. Example: a room temperature of 76.6°F will display at 80°F Restricted Filter Indicator Operation Lamp Green = standby Solid red = when flame is present Flashing red = error code is present Economy Feature Child Safety Lock

31
www.foreverhotwater.comwww.foreverhotwater.com www.comfortableheatingsolutions.com © 2007 Rinnai Corporation www.rinnai.us © 2011 Rinnai Corporation MAINTENANCE CODE DIAGNOSTICS All current model direct vent furnaces have maintenance codes that can post if the unit isn’t operating to specification In addition to an error code on the display, the flame indication lamp must be flashing Models with analog displays will flash a series of LED’s to indicate the code The last nine error codes can be retrieved from each unit by pressing the Economy and Up/Down Temperature buttons together while the unit is OFF Refer to the model’s owner’s / installation manual or service manual for more information 31

32
www.foreverhotwater.comwww.foreverhotwater.com www.comfortableheatingsolutions.com © 2007 Rinnai Corporation www.rinnai.us © 2011 Rinnai Corporation Maintenance Codes ANALOG CODE DIGITAL CODE PROBABLE CAUSECOMMENTS LO-HIPF Power FailureCheck power supply 6011 Ignition FailureFlame current does not reach 1.0 microamp within the given time after solenoid opens LO12 Flame FailureFlame current remains below 1.0 microamp for 3 seconds during combustion 6814 Overheat Safety DeviceBimetals or thermal fuse has activated HI16 Over temperature cut offRoom temperature is sensed as being above 104°F for longer than 10 minutes 72 7631 Room temp thermistor disconnectionRoom temperature thermistor open circuit 76 8032 Room temperature thermistor short circuitRoom temperature thermistor wire shorted or touching bare metal 64 68 7233 High limit thermistor disconnectionHigh limit thermistor open circuit 68 72 7634 High limit thermistor short circuitHigh limit thermistor shorted or touching bare metal LO 60 6453 Abnormal spark sensed Sparker not OFF within 20 seconds at time of ignition; 1 st spark sense not within 2 seconds; 2 nd spark sense not within 1 second after solenoid valve opens 60 64 6861 Abnormal combustion fan motor rpmFan speed not achieved within time or goes over speed NA62 Convection fan failureEnsure convection fan can turn freely (C-Series Models Only) 64 6870 ON/OFF switch failureON/OFF switch connects continuously for more than 15 seconds LO 6071 Solenoid valve checkSolenoid valve(s) (SV1 & SV2) signal and response signal are different 8072 Flame rod failurePCB fails to sense microamps within 20 seconds 72 76 80 HI73 Communication failureData transfer within PCB fails NA49 Pressure sensor disconnect or breakdownCheck sensor connection to PCB & hoses to blower motor 60 64 68 72 7699 Flue block or venting disconnectCheck intake and exhaust inside and outside for blockage or freezing 32 Operation intervention is required for all codes EXCEPT a code 11 (2009 models and newer).
 ON/OFF switch failureON/OFF switch connects continuously for more than 15 seconds LO 6071 Solenoid valve checkSolenoid valve(s) (SV1 & SV2) signal and response signal are different 8072 Flame rod failurePCB fails to sense microamps within 20 seconds HI73 Communication failureData transfer within PCB fails NA49 Pressure sensor disconnect or breakdownCheck sensor connection to PCB & hoses to blower motor Flue block or venting disconnectCheck intake and exhaust inside and outside for blockage or freezing 32 Operation intervention is required for all codes EXCEPT a code 11 (2009 models and newer).")
33
www.foreverhotwater.comwww.foreverhotwater.com www.comfortableheatingsolutions.com © 2007 Rinnai Corporation www.rinnai.us © 2011 Rinnai Corporation A=LO 60 64 D=53 A=60 64 68 D=61 A=68 D=14 D= DIGITAL A= ANALOG OH= OVERHEAT SC= SHORT CIRC. DC= DISCONNECT A=LO 60 D=71 A=HI or 64 68 72 or 68 72 76 D=16 or 33 or 34 A=72 76 or 76 80 D=31 or 32 A=60 64 68 D=61 A=68 D=14 3 AMP FUSE- NO OPERATION A=LO-HI D=PF A=L0 or 80 D=12 or 72 A=64 68 D=70 Maintenance Codes For component level wiring diagrams, reference Rinnai’s Direct Vent Heater Service Manual ENSURE YOU ARE READING THE CORRECT PAGE! 33

34
www.foreverhotwater.comwww.foreverhotwater.com www.comfortableheatingsolutions.com © 2007 Rinnai Corporation www.rinnai.us © 2011 Rinnai Corporation Conversion kits are available for each model: –Older models included the kit with the product –Opposite gas type rating plate –Opposite gas type orifices –Primary and secondary air dampers (model dependent) –Instructions for conversion including gas pressure settings Gas pressure must be verified if one of the following occur: –The gas valve is replaced –The PCB is replaced –The model’s gas type is converted Gas pressure setting instructions are in the Direct Vent Service Manual and the unit’s conversion instructions Gas Pressure Settings / Gas Conversion 34
 –Instructions for conversion including gas pressure settings Gas pressure must be verified if one of the following occur: –The gas valve is replaced –The PCB is replaced –The model’s gas type is converted Gas pressure setting instructions are in the Direct Vent Service Manual and the unit’s conversion instructions Gas Pressure Settings / Gas Conversion 34")
35
www.foreverhotwater.comwww.foreverhotwater.com www.comfortableheatingsolutions.com © 2007 Rinnai Corporation www.rinnai.us © 2011 Rinnai Corporation Gas Pressure Settings / Gas Conversion Remove the manifold and the burner damper screw. NOTE: The burner cover does not have to be removed for conversion. Remove the primary air damper Remove the secondary air damper. Note the tab orientation Replace the orifices Gas Pressure is set from the PCB. Follow each model’s conversion procedure 201 / 263 / 431 / 556 Gas Conversion NOTE: Gas Conversion for the 1004 is different. See each model’s conversion procedure! 35

36
www.foreverhotwater.comwww.foreverhotwater.com www.comfortableheatingsolutions.com © 2007 Rinnai Corporation www.rinnai.us © 2011 Rinnai Corporation Fault Code Flag Function “FF” C-Series models have the ability to allow the service technician to insert an “FF” in to the bank of fault codes. This creates a flag of when the technician was present It can be used after a routine maintenance or to note when a service call was made in relation to the fault codes within the bank. To insert “FF” into the bank, with the unit off, press the “Economy” button on the control panel and the PCB test button at the same time. “FF” will then be the most recent fault code This cannot be erased after inserted

37
www.foreverhotwater.comwww.foreverhotwater.com www.comfortableheatingsolutions.com © 2007 Rinnai Corporation www.rinnai.us © 2011 Rinnai Corporation Thermistor Calibration C-Series models have the ability to adjust or calibrate the thermistor This can be helpful particularly when another thermostat is in close proximity—to ensure the values match if needed To adjust the thermistor, with the unit off, press the PCB test button twice A number between -12 and +12 will appear—0 is the factory setting Each increment is equal to 0.6°F (0.33°C). Use the following chart to adjust to a specific value Press the PCB test button once again to record the new value A value of : Will make the control panel room temp read higher by: A value of : Will make the control panel room temp read lower by: -127.2°F (4.0°C)127.2°F (4.0°C) -116.6°F (3.66°C)116.6°F (3.66°C) -106.0°F (3.33°C)106.0°F (3.33°C) -95.4°F (3.0°C)9 -84.8°F (2.66°C)8 -74.2°F (2.33°C)7 -63.6°F (2.0°C)6 -53.0°F (1.66°C)5 -42.4°F (1.33°C)4 -31.8°F (1.0°C)3 -21.2°F (0.66°C)2 0.6°F (0.33°C)1 A negative value will make the room temp read higher A positive value will make the room temp read lower
127.2°F (4.0°C) °F (3.66°C)116.6°F (3.66°C) °F (3.33°C)106.0°F (3.33°C) -95.4°F (3.0°C) °F (2.66°C) °F (2.33°C) °F (2.0°C) °F (1.66°C) °F (1.33°C) °F (1.0°C) °F (0.66°C)2 0.6°F (0.33°C)1 A negative value will make the room temp read higher A positive value will make the room temp read lower.")
38
www.foreverhotwater.comwww.foreverhotwater.com www.comfortableheatingsolutions.com © 2007 Rinnai Corporation www.rinnai.us © 2011 Rinnai Corporation Convection Fan Overrun Time The convection fan will run for a predetermined amount of time to allow the heat exchanger to cool down appropriately This time is based upon the stage of combustion the unit is operating in when post purge begins (either due to a satisfied thermistor or power off) If a fault code 14 is present, the convection fan will run 255 seconds regardless of the combustion stage NOTE : The combustion fan slowly ramps down and off immediately when the gas valve closes Number of Seconds for Convection Fan Post Purge Time EX08CEX11CEX17CEX22CES38 Within the first 40 seconds of ignition120 60 Combustion Stage – 1210 140 Combustion Stage – 2210 150 Combustion Stage – 3210 170 Combustion Stage – 4210 180 Combustion Stage – 5210 190 Combustion Stage – 6210 255200 Combustion Stage – 7255 210255210
 If a fault code 14 is present, the convection fan will run 255 seconds regardless of the combustion stage NOTE : The combustion fan slowly ramps down and off immediately when the gas valve closes Number of Seconds for Convection Fan Post Purge Time EX08CEX11CEX17CEX22CES38 Within the first 40 seconds of ignition Combustion Stage – Combustion Stage – Combustion Stage – Combustion Stage – Combustion Stage – Combustion Stage – Combustion Stage –")
39
www.foreverhotwater.comwww.foreverhotwater.com www.comfortableheatingsolutions.com © 2007 Rinnai Corporation www.rinnai.us © 2011 Rinnai Corporation - SPECIAL NOTES - EX08, EX11, and EX38 Models

40
www.foreverhotwater.comwww.foreverhotwater.com www.comfortableheatingsolutions.com © 2007 Rinnai Corporation www.rinnai.us © 2011 Rinnai Corporation When the ignition sequence starts, the PCB must first see feedback from the combustion fan proving it is turning at the correct speed AND the pressure sensor must be in the correct position to prove adequate air is moving through the vent system. If not, the unit will not continue the ignition sequence. When the ignition sequence occurs, the PCB must sense the ignition spark in the correct location before the gas valve will open. If not, the unit will not allow gas to flow and the ignition sequence will cease. There are two main solenoid gas valves in series for redundancy. (SV1 and SV2). During non-operation both are closed. For a leak to occur, both would have to fail. Even then, as this is sealed combustion, gas would move through the sealed heat exchanger and out the exhaust vent. There are three burners. Each has its own flame rod. If gas is being allowed to one of these burners, the PCB must receive the correct feedback from that burner’s flame rod to ensure the flame is of the correct characteristic. If the flame is not adequate, operation will immediately cease. For the unit to stage into high fire and allow gas to the two rear burners, SV3 (solenoid valve 3) must open. Once it does, the rear flame rods must detect flame within a set amount of time or operation will cease. SV 1 & 2 Combustion Fan Pressure Sensor SV 3 RHFE 1004 / ES38 Overview 40
. During non-operation both are closed. For a leak to occur, both would have to fail. Even then, as this is sealed combustion, gas would move through the sealed heat exchanger and out the exhaust vent. There are three burners. Each has its own flame rod. If gas is being allowed to one of these burners, the PCB must receive the correct feedback from that burner’s flame rod to ensure the flame is of the correct characteristic. If the flame is not adequate, operation will immediately cease. For the unit to stage into high fire and allow gas to the two rear burners, SV3 (solenoid valve 3) must open. Once it does, the rear flame rods must detect flame within a set amount of time or operation will cease. SV 1 & 2 Combustion Fan Pressure Sensor SV 3 RHFE 1004 / ES38 Overview 40.")
41
www.foreverhotwater.comwww.foreverhotwater.com www.comfortableheatingsolutions.com © 2007 Rinnai Corporation www.rinnai.us © 2011 Rinnai Corporation Overheat bimetal sensor (opens at 149°F) Overheat Thermistor (217°F will cause filter lamp to illuminate / 226°F will cause error code 14) Low fire thermal fuses (opens at 315°F) Sparker and spark sensing electrodes Front burner flame rod (low fire) Blue wire to left rear burner flame rod Red wire to right rear burner flame rod RHFE 1004 / ES38 Overview High fire and convection fan thermal fuses (opens at 378°F) 41
 Overheat Thermistor (217°F will cause filter lamp to illuminate / 226°F will cause error code 14) Low fire thermal fuses (opens at 315°F) Sparker and spark sensing electrodes Front burner flame rod (low fire) Blue wire to left rear burner flame rod Red wire to right rear burner flame rod RHFE 1004 / ES38 Overview High fire and convection fan thermal fuses (opens at 378°F) 41")
42
www.foreverhotwater.comwww.foreverhotwater.com www.comfortableheatingsolutions.com © 2007 Rinnai Corporation www.rinnai.us © 2011 Rinnai Corporation 1.These units use the same basic sequence of operation as the 17/22 series 2.The primary difference is the manifold: only two orifices instead of four PCB Combustion Fan (behind PCB) Manifold RHFE 201,263 / 08,11 Series Overview Convection Fan Overheat bimetal (opens at 194°F) Overheat thermal fuse (opens at 421°F) Overheat Thermistor behind panel (203°F=dirty filter / 221°F=Code 14) Overheat bimetal behind panel (opens at 263°F) 42 Gas Valve Assembly Pressure Sensor
 Manifold RHFE 201,263 / 08,11 Series Overview Convection Fan Overheat bimetal (opens at 194°F) Overheat thermal fuse (opens at 421°F) Overheat Thermistor behind panel (203°F=dirty filter / 221°F=Code 14) Overheat bimetal behind panel (opens at 263°F) 42 Gas Valve Assembly Pressure Sensor")
43
www.foreverhotwater.comwww.foreverhotwater.com www.comfortableheatingsolutions.com © 2007 Rinnai Corporation www.rinnai.us © 2011 Rinnai Corporation The following procedures are for EX17C / EX22C Service Procedures for other models will vary Please stay with the presentation APPENDIX A PRODUCT DISASSEMBLY AND COMPONENT REVIEW

44
www.foreverhotwater.comwww.foreverhotwater.com www.comfortableheatingsolutions.com © 2007 Rinnai Corporation www.rinnai.us © 2011 Rinnai Corporation 1.Remove toe kick from bottom front of unit Disassembly / Component Review 2.Slide the humidifier tray from bottom left of unit—tray will release 1 2 44

45
www.foreverhotwater.comwww.foreverhotwater.com www.comfortableheatingsolutions.com © 2007 Rinnai Corporation www.rinnai.us © 2011 Rinnai Corporation Cover Removal 3.Inside of cover has valuable information including the wiring diagram 1 3 45 2 1.Remove 5 screws from the louver plate 2.Slide the front panel up to free side and top tabs

46
www.foreverhotwater.comwww.foreverhotwater.com www.comfortableheatingsolutions.com © 2007 Rinnai Corporation www.rinnai.us © 2011 Rinnai Corporation 1.Remove the top 5 control panel screws 2.Note the plastic alignment piece on the center screw 3.Disconnect control wiring from PCB 4.Pull forward, then up on top panel to remove 5.Control panel has plastic cover underneath it to protect the PCB from spills on top of unit 1 4 Control Panel Removal 46 5 3 2

47
www.foreverhotwater.comwww.foreverhotwater.com www.comfortableheatingsolutions.com © 2007 Rinnai Corporation www.rinnai.us © 2011 Rinnai Corporation 1.Beginning in 2009, all models use a pressure sensor to ensure proper air movement through the burner, heat exchanger, and vent system 2.The pressure sensor snaps in the PCB case. It is not included with a replacement PCB. It should be moved to the new PCB’s casing when replacing 3.The black tube connects on the front of the PCB 4.The clear tube connects on the back of the PCB 5.On the back of the unit, these tubes connect to the intake of the vent system—the black hose connection is labeled, “BLK” 47 Pressure Sensor 6.NOTE: Do not confuse the gas valve pressure balancing tube connection with the pressure sensor connections 7.Due to this pressure sensor, the vent- length termination block (on previous units) is no longer needed 2 3 4 5 6 7 On 2008 models and older
 is no longer needed On 2008 models and older.")
48
www.foreverhotwater.comwww.foreverhotwater.com www.comfortableheatingsolutions.com © 2007 Rinnai Corporation www.rinnai.us © 2011 Rinnai Corporation PC Board Removal 1.Isolate unit from power and gas 2.Remove all wires from PCB. All connectors to PCB have a release point on the Molex 3.Remove grounding wires from right 4.Remove two screws on right of PCB assembly 5.Lift up on PCB and unhook tab on left side freeing PCB from unit 5 3 4 48

49
www.foreverhotwater.comwww.foreverhotwater.com www.comfortableheatingsolutions.com © 2007 Rinnai Corporation www.rinnai.us © 2011 Rinnai Corporation 1.2010 models do not have a grounding wire on the combustion fan 2.Remove the four screws on the inducer motor plate 3.Note the indicator marks in the 5:00 o’clock position for alignment 4.2010 models now have a Molex connector on the combustion fan 2 3 49 Combustion Fan Removal 4

50
www.foreverhotwater.comwww.foreverhotwater.com www.comfortableheatingsolutions.com © 2007 Rinnai Corporation www.rinnai.us © 2011 Rinnai Corporation Inside Panel Removal 1.Disconnect thermal overheat fuse Molex connector. Fuse opens at 421°F. 2.Remove 8 screws to remove inside panel 3.Ensure the panel seats in all tabs upon reassembly 2 50 3 1

51
www.foreverhotwater.comwww.foreverhotwater.com www.comfortableheatingsolutions.com © 2007 Rinnai Corporation www.rinnai.us © 2011 Rinnai Corporation Sparker (remove this plate to see/clean flame rod) Flame rod (Easiest way to clean is through sparker opening) Over heat bimetals one on the front & one on the back (front opens at 266° F ) Spark Sensing (This is not a flame rod) Filter light thermistor (install flat in the 3:00 position) 17 Series-180°F will illuminate filter light 22 Series-183°F will illuminate filter light 17 or 22 Series-198°F will cause code 14 overheat All bimetals are in series with the thermal fuse assembly. Any open or break on this circuit causes an overheat code. NOTE: 2010 models do not have the 194°F bimetal below the PCB Flame rod disconnect for measuring current 51 Safety Component Review Remove 2 screws to access bimetal behind this plate (opens at 185°F)
.")
52
www.foreverhotwater.comwww.foreverhotwater.com www.comfortableheatingsolutions.com © 2007 Rinnai Corporation www.rinnai.us © 2011 Rinnai Corporation 1.The flame rod now has a single screw accessible from the front. 2.The flame rod is now held by a plate. Plate has two tabs at the back that MUST seat in slots on heat exchanger. 3.The sparker and spark sensing connections are now the same. Interchanging these wires should not affect performance 4.The sparker and spark sensing wires are both white 52 Safety Component Review 12 3

53
www.foreverhotwater.comwww.foreverhotwater.com www.comfortableheatingsolutions.com © 2007 Rinnai Corporation www.rinnai.us © 2011 Rinnai Corporation Convection Fan Removal 53 1.2010 models now have a feedback signal returning to the PCB. Should an inadequate fan speed be detected, the unit could post a fault code 62. 2.The tangential wheel design is quieter in comparison to a centrifugal style blower 1

54
www.foreverhotwater.comwww.foreverhotwater.com www.comfortableheatingsolutions.com © 2007 Rinnai Corporation www.rinnai.us © 2011 Rinnai Corporation Convection Fan Removal 54 1.After removing control panel (previous slide), remove 2 screws securing left panel to frame. Slide panel forward to remove. 2.IMPORTANT: ensure all alignment tabs are seated correctly upon reassembly 3.Behind panel is a single screw securing left side of fan to frame 4.Three screws secure the fan on the right side 5.To remove motor from assembly loosen set screw on motor shaft and remove the 4 screws holding the motor to the housing 3 4 2 1 2 Convection fan and left panel tabs must realign correctly! 5

55
www.foreverhotwater.comwww.foreverhotwater.com www.comfortableheatingsolutions.com © 2007 Rinnai Corporation www.rinnai.us © 2011 Rinnai Corporation 1.Ensure all power, gas and grounding screws are removed 2.The spark module is now in the PCB casing. Spark Module / Transformer Review 1 4 55 3 3.To remove, release the two tabs securing the module sub PCB 4.To remove the transformer, remove single screw securing transformer to frame. Note tab fitted into slot on rear of transformer. 5.Spark module operation: a)85-110VAC is applied to the module from the PCB via the blue and red wires. b)Voltage is stepped up at the module and applied in the burner via the white wire depending on model. c)If the spark occurs correctly, the voltage is returned to the module via the white wire. d)Voltage is returned to the PCB via the gray and orange wires thus allowing the gas valve to open.
85-110VAC is applied to the module from the PCB via the blue and red wires. b)Voltage is stepped up at the module and applied in the burner via the white wire depending on model. c)If the spark occurs correctly, the voltage is returned to the module via the white wire. d)Voltage is returned to the PCB via the gray and orange wires thus allowing the gas valve to open..")
56
www.foreverhotwater.comwww.foreverhotwater.com www.comfortableheatingsolutions.com © 2007 Rinnai Corporation www.rinnai.us © 2011 Rinnai Corporation GAS FLOW SV-2 SV-1 POV Gas Valve Assembly Removal 1.Turn off power and gas supply. Disconnect gas supply if needed. 2.To remove, remove 4 screws on back of unit (ensure correct screws are removed) 3.Remove single screw at gas tubing. Remove tube, ensure o-ring is intact. 4.Note gasket and o-ring where assembly connects 5.NOTE: POV screw should only be adjusted during replacement or under Rinnai direction 6.2010 models: SV1 and SV2 no longer share a wire harness 2 3 5 56 ◄ ◄ ◄
 3.Remove single screw at gas tubing. Remove tube, ensure o-ring is intact. 4.Note gasket and o-ring where assembly connects 5.NOTE: POV screw should only be adjusted during replacement or under Rinnai direction models: SV1 and SV2 no longer share a wire harness ◄ ◄ ◄.")
57
www.foreverhotwater.comwww.foreverhotwater.com www.comfortableheatingsolutions.com © 2007 Rinnai Corporation www.rinnai.us © 2011 Rinnai Corporation Gas Manifold Removal 1.Remove single screw and gas tube from manifold (2010 model manifold plates will not “swing out” as previous models). Ensure o-ring remains on tube and is intact. 2.Remove two screws holding manifold 3.Gently pull manifold out for access to venture openings and orifices 4.Upon reassembly, ensure alignment pins are seated correctly 5.For nuisance flame related errors, carefully burn-out venture openings with a propane torch and blow out crystallized remnants with high air pressure. This will ensure no spider webs have settled in openings. Also ensure tube is clear. 2 1 4 57

58
www.foreverhotwater.comwww.foreverhotwater.com www.comfortableheatingsolutions.com © 2007 Rinnai Corporation www.rinnai.us © 2011 Rinnai Corporation Warm Air Seal Panel Removal 1.Remove 2 screws from panel. NOTE: Prior to 2010, bottom screw was removed with front cover. 2.Pull panel free 3.Panel fiber gasket must remain intact. Replace if the gasket has been compromised in any way. 3 1 2 58

59
www.foreverhotwater.comwww.foreverhotwater.com www.comfortableheatingsolutions.com © 2007 Rinnai Corporation www.rinnai.us © 2011 Rinnai Corporation Burner Box and Cover Plate Removal 1.Remove manifold plate (previous slide) 2.Remove four screws on cover plate (models prior to 2009 had six screws) 3.NOTE: If the burner box and cover are removed, their fiber gaskets MUST be replaced with new gaskets. This is the gasket that should be replaced under the Retrofit Program (2000-2007 models only). 4.Burner box will slide out of heat exchanger 5.Burner box can be separated from cover by removing two front screws 1 14 3 2 59
. 4.Burner box will slide out of heat exchanger 5.Burner box can be separated from cover by removing two front screws")
60
www.foreverhotwater.comwww.foreverhotwater.com www.comfortableheatingsolutions.com © 2007 Rinnai Corporation www.rinnai.us © 2011 Rinnai Corporation Burner Box Disassembly Burner box can be disassembled for inspection (this is rare) 1. Remove single screw on back of burner 2. Remove plate on back of burner 3. Individual burners will come free. 4. NOTE: burner with flame capture plate must be installed in top of box. This ensures flame rod is capturing the flame correctly. 2009 and newer models do not have this plate. 1 2 3 4 60

61
www.foreverhotwater.comwww.foreverhotwater.com www.comfortableheatingsolutions.com © 2007 Rinnai Corporation www.rinnai.us © 2011 Rinnai Corporation 61 1.Remove front cover, inside panel, warm air seal panel, and burner box assembly, flame rod, and, if needed, convection fan assembly 2.Remove two screws on left of heat exchanger (2010 model screws are toward the front) 3.Remove single screw behind overheat bimetal and filter thermistor 4.Remove two screws behind right side of heat exchanger 5.Remove single screw attaching rubber boot to heat exchanger Heat Exchanger Removal 2 3 5 4
 3.Remove single screw behind overheat bimetal and filter thermistor 4.Remove two screws behind right side of heat exchanger 5.Remove single screw attaching rubber boot to heat exchanger Heat Exchanger Removal")
62
www.foreverhotwater.comwww.foreverhotwater.com www.comfortableheatingsolutions.com © 2007 Rinnai Corporation www.rinnai.us © 2011 Rinnai Corporation 62 Heat Exchanger Removal (continued) 1.Remove the three screws holding the exhaust elbow to the unit. NOTE: Ensure the O-ring inside the elbow is intact 2.NOTE: The mini-condensate tray on the top portion of the heat exchanger is to prevent condensation dripping on the burner box cover and gasket. This condensation can occasionally develop on the exterior of the heat exchanger. 1 The heat exchanger made of stainless steel and aluminized steel are formed to a bellows style to reduce expansion noise and to provide a larger surface area for efficiency 2

63
www.foreverhotwater.comwww.foreverhotwater.com www.comfortableheatingsolutions.com © 2007 Rinnai Corporation www.rinnai.us © 2011 Rinnai Corporation For metering values for models 2008 and earlier, reference Rinnai’s Direct Vent Heater Service Manual ENSURE YOU ARE READING THE CORRECT PAGE! Electrical Metering Verifying electrical values of individual components is not common but when necessary, must be conducted correctly and safely. Verifying incoming supply voltage is the most common metering need in the field— especially during installation. Key points when troubleshooting electrical values: Ensure volt meter probes are solidly contacting metal Apply probes to the back of Molex connections when possible to prevent possible damage to connection points Know your meter and how to set it for each type of measurement Ω= Ohms or resistance VAC or V~ = AC voltage Always set meter to next highest value from range (as listed in manual) When measuring resistance, ensure the component is disconnected from the circuit AND power is removed. When measuring a solenoid’s resistance, place the meter probes on the solenoid’s lugs (connection points) with the wires disconnected from. A correct resistance reading from a solenoid or transformer coil is not a guarantee that the component is good as the windings can open under load. An incorrect value is a very good indication that the component is bad though. K = X1000; ex. 6KΩ =6000 Ohms VDC or V- = DC voltage µ = X.001; ex. 6µA =0.006 Amps or 6 microamps A=amps (ensure meter is set to DC current for flame rod measurements) 63
 When measuring resistance, ensure the component is disconnected from the circuit AND power is removed. When measuring a solenoid’s resistance, place the meter probes on the solenoid’s lugs (connection points) with the wires disconnected from. A correct resistance reading from a solenoid or transformer coil is not a guarantee that the component is good as the windings can open under load. An incorrect value is a very good indication that the component is bad though. K = X1000; ex. 6KΩ =6000 Ohms VDC or V- = DC voltage µ = X.001; ex. 6µA =0.006 Amps or 6 microamps A=amps (ensure meter is set to DC current for flame rod measurements) 63.")
64
www.foreverhotwater.comwww.foreverhotwater.com www.comfortableheatingsolutions.com © 2007 Rinnai Corporation www.rinnai.us © 2011 Rinnai Corporation Electrical Metering (C-Series Models) LAB EXERCISE 1.Measure incoming voltage a)At receptacle or extension cord (108-132 VAC) b)At primary of transformer: Gray-Gray = 108-132 VAC 2.Measure resistance of transformer secondary points a)Gray-Gray = 5-20Ω b)Red-Red = 0.5-2.0Ω c)Brown-Brown = 1-5Ω d)Black-Yellow = 150-350Ω 3.Measure continuity of safety circuit at various a)At PCB connection point b)If desired, at bimetals 4.Measure resistance of solenoids a)POV: Red-White = 60-90Ω b)SV1: Black-Yellow = 1.5-2.5KΩ c)SV2: Black-White = 1.5-2.5KΩ 5.To measure flame rod current connect meter in series at flame rod Molex connector (yellow wire) Current should measure greater than 1.0μA (DC current) 64
 LAB EXERCISE 1.Measure incoming voltage a)At receptacle or extension cord ( VAC) b)At primary of transformer: Gray-Gray = VAC 2.Measure resistance of transformer secondary points a)Gray-Gray = 5-20Ω b)Red-Red = Ω c)Brown-Brown = 1-5Ω d)Black-Yellow = Ω 3.Measure continuity of safety circuit at various a)At PCB connection point b)If desired, at bimetals 4.Measure resistance of solenoids a)POV: Red-White = 60-90Ω b)SV1: Black-Yellow = KΩ c)SV2: Black-White = KΩ 5.To measure flame rod current connect meter in series at flame rod Molex connector (yellow wire) Current should measure greater than 1.0μA (DC current) 64")
65
www.foreverhotwater.comwww.foreverhotwater.com www.comfortableheatingsolutions.com © 2007 Rinnai Corporation www.rinnai.us © 2011 Rinnai Corporation MODEL CHANGE QUICK REFERENCE GUIDE APPENDIX B 65

66
www.foreverhotwater.comwww.foreverhotwater.com www.comfortableheatingsolutions.com © 2007 Rinnai Corporation www.rinnai.us © 2011 Rinnai Corporation 66 MODEL NUMBER CHANGESAFUE CHANGES 2008 Model2009 Model2010 ModelModel #Gas TypePrv AFUENew AFUE RHFE-201RFAES08EX08C NG80.60%82% LP83.40%83% RHFE-263RFAES11EX11C NG80%81% LP80%82% RHFE-431RFAES17 EX17C NG80%81% RHFE-431RWTAEX17LP80.80%82% RHFE-556RFAES22 EX22C EX22C / W NG80.60%81% RHFE-556RWTAEX22 RHFE-556RWTA-WEX22WEX22CWLP81%82% RHFE-1004RFAES38 ES38 / W NG80.60% RHFE-1004RFA-WES38W LP82% Physical Specifications Model NumberDimensions (W x H x D)Weight*Notes RHFE-201RFA 16 3/4" x 26 5/8" x 9 7/8"39 The EX08C and EX11C have the same dimensions and weight ES08 EX08C18 1/4" x 27 3/8" x 10 1/8"46 RHFE-263RFA 16 3/4" x 26 5/8" x 9 7/8"37 ES11 EX11C18 1/4" x 27 3/8" x 10 1/8"46 RHFE-431RFA(WTA) 29 1/2" x 21 13/16" x 9 7/8" 51 The EX17C and EX22C (W) have the same dimensions and weight ES17, EX1753 EX17C29 7/8" x 22 7/8" x 10 1/8"57 RHFE-556RFA(WTA)† 29 1/2" x 21 13/16" x 9 7/8" 51 ES22, EX2253 EX22C29 7/8" x 22 7/8" x 10 1/8"57 RHFE-1004RFA† 36 5/8" x 26 3/8" x 13"90No Changes * Product weight ES38† Includes white models Quick Reference Guide
Weight*Notes RHFE-201RFA 16 3/4 x 26 5/8 x 9 7/8 39 The EX08C and EX11C have the same dimensions and weight ES08 EX08C18 1/4 x 27 3/8 x 10 1/8 46 RHFE-263RFA 16 3/4 x 26 5/8 x 9 7/8 37 ES11 EX11C18 1/4 x 27 3/8 x 10 1/8 46 RHFE-431RFA(WTA) 29 1/2 x 21 13/16 x 9 7/8 51 The EX17C and EX22C (W) have the same dimensions and weight ES17, EX1753 EX17C29 7/8 x 22 7/8 x 10 1/8 57 RHFE-556RFA(WTA)† 29 1/2 x 21 13/16 x 9 7/8 51 ES22, EX2253 EX22C29 7/8 x 22 7/8 x 10 1/8 57 RHFE-1004RFA† 36 5/8 x 26 3/8 x 13 90No Changes * Product weight ES38† Includes white models Quick Reference Guide")
67
www.foreverhotwater.comwww.foreverhotwater.com www.comfortableheatingsolutions.com © 2007 Rinnai Corporation www.rinnai.us © 2011 Rinnai Corporation 67 ENERGYSAVER MODEL SPECIFICATIONS - PRODUCT COMPARISON SpecificationsRHFE Models R Series Models C Series Models Cabinet Design ES08, ES11, ES17, EX17, ES22, EX22(W), ES38(W) EX08C, EX11C, EX17C, and EX22C(W) ES38(W) does not change Control Panel ES08, ES11, ES17, ES22 EX08C, EX11C, EX17C, and EX22C EX17, EX22(W) ES38 does not change - not C series Packaging - Label Changes Cartons were color coded by model and gas type - label includes model number and serial number Gas type and model numbers are now located on label - cartons no longer color coded Quick Reference Guide
, ES38(W) EX08C, EX11C, EX17C, and EX22C(W) ES38(W) does not change Control Panel ES08, ES11, ES17, ES22 EX08C, EX11C, EX17C, and EX22C EX17, EX22(W) ES38 does not change - not C series Packaging - Label Changes Cartons were color coded by model and gas type - label includes model number and serial number Gas type and model numbers are now located on label - cartons no longer color coded Quick Reference Guide")
68
www.foreverhotwater.comwww.foreverhotwater.com www.comfortableheatingsolutions.com © 2007 Rinnai Corporation www.rinnai.us © 2011 Rinnai Corporation 68 ENERGYSAVER MODEL SPECIFICATIONS - PRODUCT COMPARISON (continued) SpecificationsRHFE ModelsR Series ModelsC Series Models Warranty10 Yr HEX - Prorated 10 Yr HEX - NOT prorated (purchased on 4/1/10 or later - all models) DimensionsSee chart WeightSee chart Restart Function (power and gas outage)NoYes AFUESee chart Manual Shut-offIntegrated shutoff1/2" valve included Conversion KitIn Box As Accessory Beeping Indicator for Restricted FilterNoYes Standby Power < 1 WattNo Yes Temperature SettingsF° and C° from PCB F° and C° from Control Panel Installation Template Paper Template in Box - doesn’t work with C series models On Outside of Box - doesn’t work with previous models TimersWeekly - WTA Models Only Daily - C Series Models Only High Altitude2000'Up to 10,200' Setback FunctionNo Yes (includes frost protection) Display DimmerNo Yes Combustion and Convection fan validationCombustion Fan Only Both - new code 62 for convection fan related issues FOT-201N/A New extension kit - replaces FOT-190 and includes intake hose Maximum Temperature SettingSpecial Order - or from PCBFrom Control Panel Quick Reference Guide
 SpecificationsRHFE ModelsR Series ModelsC Series Models Warranty10 Yr HEX - Prorated 10 Yr HEX - NOT prorated (purchased on 4/1/10 or later - all models) DimensionsSee chart WeightSee chart Restart Function (power and gas outage)NoYes AFUESee chart Manual Shut-offIntegrated shutoff1/2 valve included Conversion KitIn Box As Accessory Beeping Indicator for Restricted FilterNoYes Standby Power < 1 WattNo Yes Temperature SettingsF° and C° from PCB F° and C° from Control Panel Installation Template Paper Template in Box - doesn’t work with C series models On Outside of Box - doesn’t work with previous models TimersWeekly - WTA Models Only Daily - C Series Models Only High Altitude2000 Up to 10,200 Setback FunctionNo Yes (includes frost protection) Display DimmerNo Yes Combustion and Convection fan validationCombustion Fan Only Both - new code 62 for convection fan related issues FOT-201N/A New extension kit - replaces FOT-190 and includes intake hose Maximum Temperature SettingSpecial Order - or from PCBFrom Control Panel Quick Reference Guide")
69
www.foreverhotwater.comwww.foreverhotwater.com www.comfortableheatingsolutions.com © 2007 Rinnai Corporation www.rinnai.us © 2011 Rinnai Corporation 69 ENERGYSAVER Major Technical Differences SpecificationsRHFE ModelsR Series ModelsC Series Models Convection fan feedback signal (to ensure proper operation) No Yes Pressure Sensor (to ensure proper operation) No*Yes Long vent terminal and jumper (17/22 series only) Yes*No No (No longer needed due to addition of pressure sensor) Flame Rod Assembly (17/22 series only)Screw accessible from top of assemblyScrew accessible from front of assembly Thermistor CalibrationNo Yes Ability to insert a flag into the error code bank (FF code) No Yes Plastic tray under control panel for accidental spills (to protect PCB, etc) No Yes Gas valve pressure balancing tube (17/22 series only) No*Yes Yes (To ensure pressure balance between vent and gas valve) Gas valve-to-manifold interconnection tubeConnects to bottom of gas valveConnect to front of gas valve PCB Differences (17/22 series only)DIP switches and test buttons*No DIP switches; Single test button for all settings Number of overheat bimetals (17/22 series only) 3*3 2 (PCB bimetal eliminated due to redundancy) Activation temp of overheat safety components (front bimetal(s) are unchanged; rear bimetals are on 17/22 series only Thermal fuse: 314°F Rear HEX bimetal: 266°F Thermal fuse: 421°F Rear HEX bimetal: 185°F The location of these components were altered creating the need to alter the activation temperature *These changes were implemented on the 08/11 series several years ago Quick Reference Guide
 No Yes Pressure Sensor (to ensure proper operation) No*Yes Long vent terminal and jumper (17/22 series only) Yes*No No (No longer needed due to addition of pressure sensor) Flame Rod Assembly (17/22 series only)Screw accessible from top of assemblyScrew accessible from front of assembly Thermistor CalibrationNo Yes Ability to insert a flag into the error code bank (FF code) No Yes Plastic tray under control panel for accidental spills (to protect PCB, etc) No Yes Gas valve pressure balancing tube (17/22 series only) No*Yes Yes (To ensure pressure balance between vent and gas valve) Gas valve-to-manifold interconnection tubeConnects to bottom of gas valveConnect to front of gas valve PCB Differences (17/22 series only)DIP switches and test buttons*No DIP switches; Single test button for all settings Number of overheat bimetals (17/22 series only) 3*3 2 (PCB bimetal eliminated due to redundancy) Activation temp of overheat safety components (front bimetal(s) are unchanged; rear bimetals are on 17/22 series only Thermal fuse: 314°F Rear HEX bimetal: 266°F Thermal fuse: 421°F Rear HEX bimetal: 185°F The location of these components were altered creating the need to alter the activation temperature *These changes were implemented on the 08/11 series several years ago Quick Reference Guide")
70
www.foreverhotwater.comwww.foreverhotwater.com www.comfortableheatingsolutions.com © 2007 Rinnai Corporation www.rinnai.us © 2011 Rinnai Corporation 2000 - 2008 RETROFIT PROGRAM APPENDIX C 70

71
www.foreverhotwater.comwww.foreverhotwater.com www.comfortableheatingsolutions.com © 2007 Rinnai Corporation www.rinnai.us © 2011 Rinnai Corporation RHFE 556 /431 DV Furnace Retrofit Program MODELS AFFECTED: RHFE 431 FAIII RHFE 431WTA RHFE 556 FAIII RHFE 556 WTA What is this program about? There is a potential safety issue with two specific (previously manufactured) models of the Direct Vent Furnace products (Model RHFE 431 and RHFE 556 manufactured 2000-2007). Under certain rare circumstances a gasket used to seal between the burner cover plate assembly and the heat exchanger may not perform as intended, resulting in the potential for release of trace amounts of carbon monoxide into the space being heated by the product. While there have been no reports of serious injury or death, as part of Rinnai’s continuing effort to ensure a safe and efficient product for our customers, we are implementing a Voluntary Corrective Action Plan to locate and retrofit affected product with a different gasket and burner cover plate. Because this issue presents a potential safety concern, Rinnai voluntarily reported the matter to the Consumer Product Safety Commission (CPSC). CPSC monitored the program’s inception and rapid progress; and, has recently closed their portion of oversight. Rinnai will of course continue to be proactive in retrofitting as many products as possible at our expense. Please contact Rinnai customer service (800-621-9419) for more information.
 models of the Direct Vent Furnace products (Model RHFE 431 and RHFE 556 manufactured ). Under certain rare circumstances a gasket used to seal between the burner cover plate assembly and the heat exchanger may not perform as intended, resulting in the potential for release of trace amounts of carbon monoxide into the space being heated by the product. While there have been no reports of serious injury or death, as part of Rinnai’s continuing effort to ensure a safe and efficient product for our customers, we are implementing a Voluntary Corrective Action Plan to locate and retrofit affected product with a different gasket and burner cover plate. Because this issue presents a potential safety concern, Rinnai voluntarily reported the matter to the Consumer Product Safety Commission (CPSC). CPSC monitored the program’s inception and rapid progress; and, has recently closed their portion of oversight. Rinnai will of course continue to be proactive in retrofitting as many products as possible at our expense. Please contact Rinnai customer service ( ) for more information..")
72
www.foreverhotwater.comwww.foreverhotwater.com www.comfortableheatingsolutions.com © 2007 Rinnai Corporation www.rinnai.us © 2011 Rinnai Corporation RHFE 750 ETRA DIRECT VENT FIREPLACE APPENDIX D 72

73
www.foreverhotwater.comwww.foreverhotwater.com www.comfortableheatingsolutions.com © 2007 Rinnai Corporation www.rinnai.us © 2011 Rinnai Corporation Direct Vent Fireplace Features Now the modulating technology of Rinnai’s Direct Vent Furnace is available as an attractive fireplace 3 Speed convection fan for even heat distribution Integrated zero clearance box Unique and versatile power flue technology with various venting options Up to 33 feet of venting allowed Vertical and horizontal terminations available Ability to vent downward for terminations lower than fireplace (crawlspace, lower floor, etc) Interchangeable fascia’s—Plasma, Shine, Midnight, and Classic Push button electronic ignition Full feature remote control Thermostat control Pre-programmed flame function Set and forget dual timer Child lock Preheat and memory function Energy saving auto-off function Comprehensive safety features Double Glass front reduces heat on outer glass Approved for mobile home use
 Interchangeable fascia’s—Plasma, Shine, Midnight, and Classic Push button electronic ignition Full feature remote control Thermostat control Pre-programmed flame function Set and forget dual timer Child lock Preheat and memory function Energy saving auto-off function Comprehensive safety features Double Glass front reduces heat on outer glass Approved for mobile home use")
74
www.foreverhotwater.comwww.foreverhotwater.com www.comfortableheatingsolutions.com © 2007 Rinnai Corporation www.rinnai.us © 2011 Rinnai Corporation Radius Silver R2702 Radius Black R2703 Flat Metal Stainless Steel R2701Flat Metal Black R2700 Direct Vent Fireplace Selectable Front Fascias

75
www.foreverhotwater.comwww.foreverhotwater.com www.comfortableheatingsolutions.com © 2007 Rinnai Corporation www.rinnai.us © 2011 Rinnai Corporation Model Number RHFE-750ETRA-N (Natural Gas) RHFE-750ETRA-P (Propane Gas) AFUE79%Up to 83% Gas rate input (Btu/hr) Low-11,000 High-29,000High-28,000 Gas rate output (Btu/hr) Low-8,635Low-8,855 High-21,900High-21,840 Minimum gas supply pressure4.3” (109 mm) W.C.9.8” W.C. (249 mm) Maximum gas supply pressure10.5” (267 mm) W.C.13” (330 mm) W.C. Electrical connection120 VAC, 60 Hz Gas connectionFlex line: 3/8” flare nut; ball valve; 1/2” female X 3/8” flare Ignition systemElectronic spark ignition Exhaust systemForced combustion, forced convection Temperature settings60°-80° F in 2° increments (16°-26°C in 1° increments) Temperature controlElectronic thermistor Warm air outletBottom front louvers Weight150 lbs WarrantyAll parts: 2 years from date of purchase Product Model Numbers and Specifications
 Maximum gas supply pressure10.5 (267 mm) W.C.13 (330 mm) W.C. Electrical connection120 VAC, 60 Hz Gas connectionFlex line: 3/8 flare nut; ball valve; 1/2 female X 3/8 flare Ignition systemElectronic spark ignition Exhaust systemForced combustion, forced convection Temperature settings60°-80° F in 2° increments (16°-26°C in 1° increments) Temperature controlElectronic thermistor Warm air outletBottom front louvers Weight150 lbs WarrantyAll parts: 2 years from date of purchase Product Model Numbers and Specifications.")
76
www.foreverhotwater.comwww.foreverhotwater.com www.comfortableheatingsolutions.com © 2007 Rinnai Corporation www.rinnai.us © 2011 Rinnai Corporation RINNAI DIRECT VENT TECHNOLOGY PLEASE CONTACT TECHNICAL SUPPORT FOR ANY QUESTIONS OR ISSUES 76 Rinnai Training Program #201103 072211

Similar presentations


>")


/40GXC(Q) Service Training Sizes 18 and 24K.>")


 4Mechanical Air Leak- Down 4Mechanical Air Leak- Up 4Electronic Drift- Up/ Down 4Load Cell Operation 4Understanding.>")