Download presentation
Presentation is loading. Please wait.

1
Scheduling Discoverer Reports Scheduling Standard Reports Printing & Re-printing Standard Reports Focus on Reports Session 2 To print: Right click Choose “Print” Change option “Print What?” from “slides” to “note pages” Click ok

2
Using Discoverer Workbook Scheduler

3
Why Schedule Discoverer Reports? Reports can be run ahead of time and ready for you when you need them. You do not need to be logged on to Discoverer while scheduled reports run. If you are logged on to Discoverer, scheduled reports run in the background. The actual report results are stored.

5
Click Schedule

7
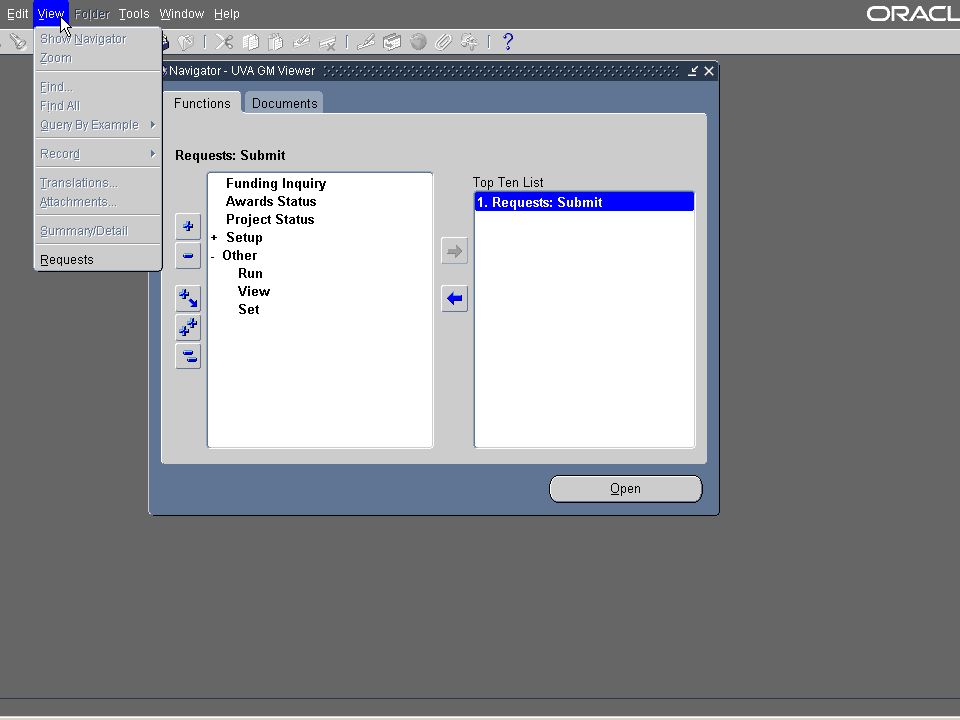
Highlight the report you wish to run and click “Schedule”.

9
1. Click the worksheets that you want to run, or click “Select All” 2. Enter the time (between 7:00 am and 6:00 pm) Note: The default is the current time. 3. Enter the date Note: The default is the current date. 4. Choose Repeat Option, (Choose “Never” if you need to change parameters before running each time.)
 Note: The default is the current time. 3. Enter the date Note: The default is the current date. 4. Choose Repeat Option, (Choose Never if you need to change parameters before running each time.).")
10
Minute(s) Hour(s) Day(s) Week(s) Month(s) Year(s) 4. Choose “Never” as Repeat Option, if you need to change parameters before running each month. 5. Click Next

11
1. All scheduled workbooks must have a unique name. If you don’t change it here, Discoverer will prompt you when you leave this screen and make the name unique for you. 2. Click Finish

12
Note: If you didn’t uniquely name the scheduled report, Discoverer will prompt you with the this message. Click Yes.

13
1. Enter parameter(s) 2. Click Finish
 2. Click Finish")
14
The Scheduling Manager form is returned showing your report with a status of “Scheduled”. You may click Schedule to continue scheduling other workbooks, or Close to exit Scheduling Manager.

15
Check the status of your scheduled report. It is ready to be viewed if the status is “Report Ready”. To open the report you can either: Double click on the report Or Highlight the report and click Open Note: If the report is still running, you will need to click the Refresh key to see any status change, or click the Close key and come back at a later time.

16
Do you want to query the database for the most recent data? If you choose “No” then you will see the results from the scheduled workbook. B Do you want to open the results for this sheet? If you click no the sheet will be empty A One of these dialog boxes will appear when you open your scheduled workbooks. Read Carefully before clicking yes or no.

17
Your results are immediately displayed and you may print or extract to Excel as desired.

18
Highlight the report results you wish to delete and Click Delete.

19
Click Yes

20
The report results are deleted and no longer show in the Scheduling Manager Window.

21
Scheduling Standard Reports

33
System Printing

34
Printing and Re-Printing Standard Reports

35
Two types of printing are available from the Integrated System 1) System printing, and 2) Windows Application Program Interface (API) printing
 System printing, and 2) Windows Application Program Interface (API) printing")
37
To reprint to a System Printer, Select: Report - Tools - Reprint/Republish

39
Windows API printing From the View Requests screen: 1.Click View Output, and you will see the report, with a menu bar across top. 2.Go to File menu, and select Print, and you will see the Print screen. 3.Select Properties. 4.On the Finishing tab, click on picture so shows landscape position (horizontal). 5.On the Effect tab, enter 85 in the % of normal size box. 6.Click OK. 7.Click OK.
. 5.On the Effect tab, enter 85 in the % of normal size box. 6.Click OK. 7.Click OK..")
Similar presentations


 Store data in databases Database is a collection of table.>")

 with Excel.>")
 with Excel>")


 The content of Excel screen. (2) The Excel ribbon. (3) How to create new workbooks. (4) Excel.>")


