Download presentation
Presentation is loading. Please wait.

1
How to Build a Tree Stump Cache Original Idea by Cedar Bend Gang

2
Necessary Tools Caulking gun Scoring Knife Electric Knife Power Saw (Jigsaw, Table Saw, etc.)
")
3
Components Watertight Container 1 ” x 4 ” or 1 ” x 6 ” Board Liquid Nails ® Insulation foam Bondo ® Tree Bark (from the same type of tree – DO NOT MIX!) Moss (can be purchased at Wal-Mart ® ) Log Cross-Section Chunks of Rotted Wood (from an actual fallen log ’ s end) (Optional)
 Moss (can be purchased at Wal-Mart ® ) Log Cross-Section Chunks of Rotted Wood (from an actual fallen log ’ s end) (Optional)")
4
Step 1 Ensure watertight container has a lid that may be opened without needing to grab it by the sides (e.g. screw top, handle or knob in lid [may be added], etc.). Measure the length of the container.
. Measure the length of the container..")
5
Step 1

6
Step 2 Cut the board into lengths, allowing at least 2 ” longer than the container (this will ensure the container is off the ground to prevent moisture damage). Then cut the board sections into slats, ensuring the slats are random widths and tapered at random angles to present an organic appearance when emplaced.

7
Step 2

8
Step 3 Score one edge (the edge to make contact with the container) of each slat. Using Liquid Nails ®, glue the slats onto the container so that there is an approximately 2 ” gap between the lid of the container and the end of the slats (this will become the bottom of the cache).
..")
9
Step 3

10
Uniform appearance around the circumference is not desired here; you are building the frame of the stump and an uneven surface is more natural in appearance. Placing the slats so that the bottom (extended) end is wider (hence the tapering) presents the appearance of a wider root structure on the “ stump. ”
 end is wider (hence the tapering) presents the appearance of a wider root structure on the stump. .")
11
Step 3

13
Also glue the log cross-section onto the bottom of the container (the top of the cache) using Liquid Nails ®.
 using Liquid Nails ®.")
14
Step 3

15
Step 4 Once this is set (follow directions for drying/setting on the Liquid Nails ® [allow overnight]), use the insulation foam to fill the gaps and coat the entire stump (as unevenly as you ’ d like; remember we are going for the “ natural ” look) with 1 ” – 1.5 ” of foam and allow it dry/set in accordance with the directions (about 4 hours).
![Step 4 Once this is set (follow directions for drying/setting on the Liquid Nails ® [allow overnight]), use the insulation foam to fill the gaps and coat the entire stump (as unevenly as you ’ d like; remember we are going for the natural look) with 1 – 1.5 of foam and allow it dry/set in accordance with the directions (about 4 hours).](http://images.slideplayer.com/13/3924959/slides/slide_15.jpg "Step 4 Once this is set (follow directions for drying/setting on the Liquid Nails ® [allow overnight]), use the insulation foam to fill the gaps and coat the entire stump (as unevenly as you ’ d like; remember we are going for the natural look) with 1 – 1.5 of foam and allow it dry/set in accordance with the directions (about 4 hours).")
16
Step 4

18
Using an electric knife, carve the foam into a more natural shape.

19
Step 4

21
Step 5 Apply Bondo ® to the entire outer surface of the foam, to include the bottom (hollowed, with the lid) edge. Allow setting in accordance with directions (30 minutes to 1 hour).
..")
22
Step 6 Using Liquid Nails ®, arrange the bits of tree bark in a puzzle pattern onto the Bondo ®. Ensure the bark extends over the cross-section to present a natural look. Also glue any wood chunks to the cross-section to give the appearance of a naturally fallen tree (unless a “ chopped-down ” look is desired). Allow setting.
. Allow setting..")
23
Step 6

26
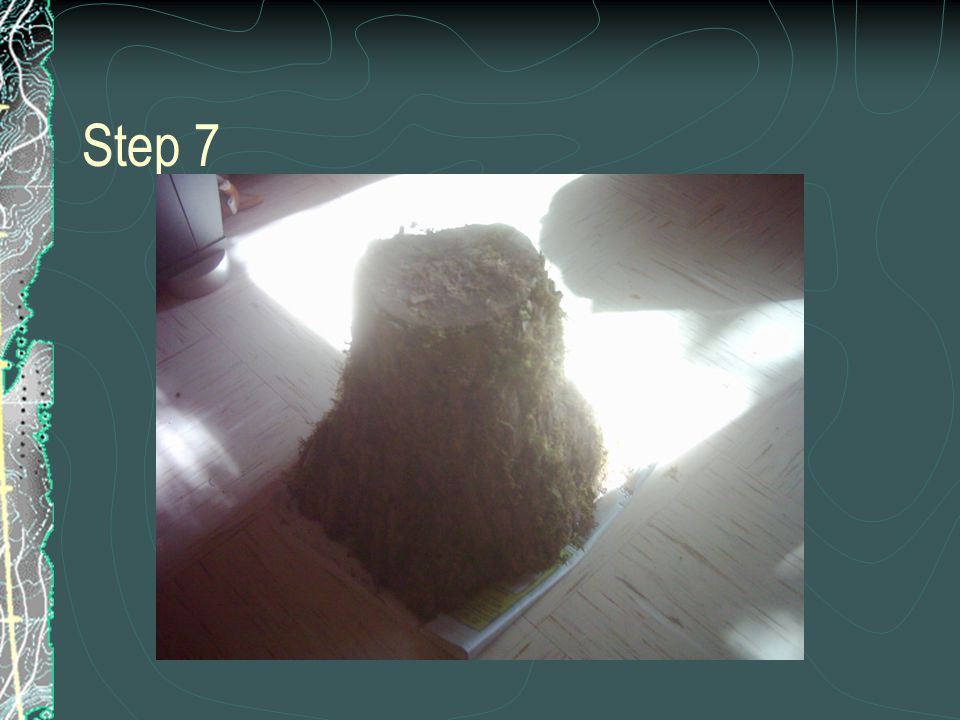
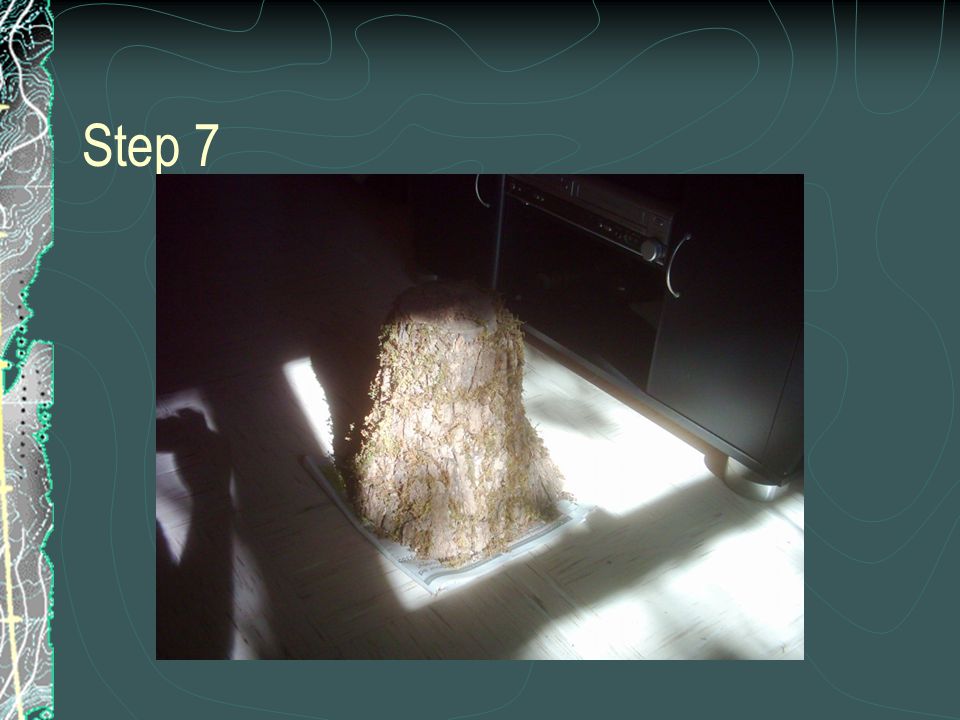
Step 7 Finally, using small amounts of Liquid Nails ®, glue moss in between the cracks of the bark and the chunks in the top to fill the gaps.

27
Step 7

31
Step 8 When all is dried and set, gently rub the moss to eliminate excess. Then fill and place your cache!

32
Step 8

34
Credits Original Idea by Cedar Creek Gang PowerPoint by Brian

Similar presentations


What is the best kind of clamp to use when gluing wood edge to edge? A.Spring clamp B.Bar clamp C.C clamp D.Hand screw clamp.>")


