Download presentation
Presentation is loading. Please wait.

2
What is a Rehab II Volunteer? 40 or more hours as a Rehab 1 Completed Rehab 1 Shadowing and Skills Checklist You are still expected to feed and clean outside birds but after this class you will also be able to: Prep indoor food and treatments Grab and handle for treatments Change paper in indoor kennels Prepare a fecal sample

3
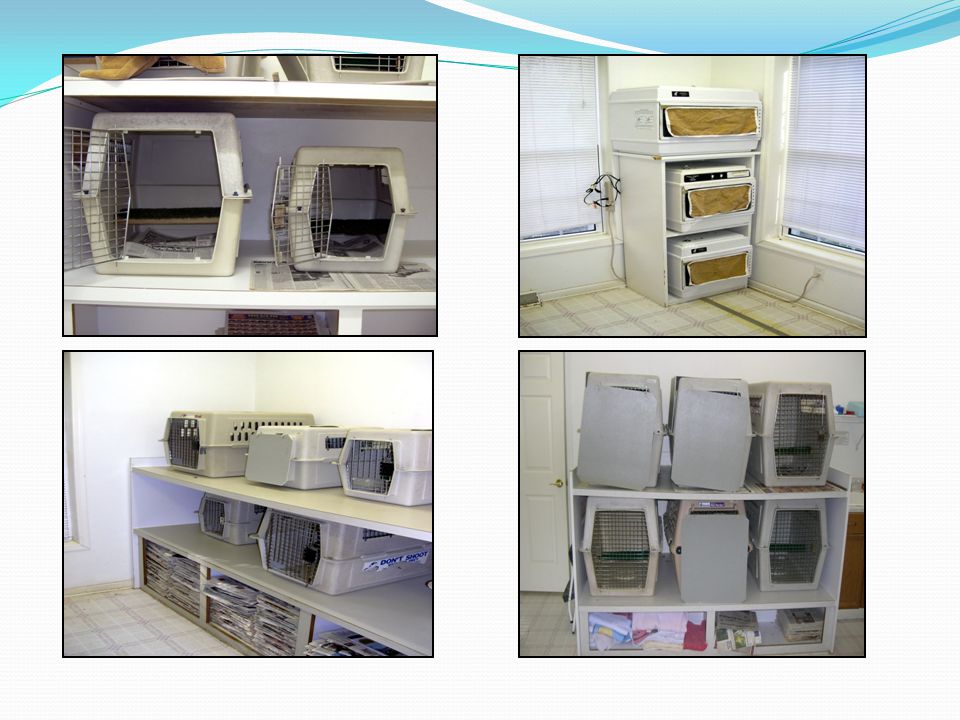
Indoor Housing: Kennel Sizes 500P –BAEA, GOEA, OSPR 400P – RTHA, RSHA, BDOW, GHOW 200P – Used for COHA, MIKI and occasionally SSHA 100P – AMKE, EASO, MERL

5
Incubators Occasionally birds will require supplemental heat. The most common method of supplementing heat is using an incubator.

6
Cleaning Indoor Water Bowls Clean SID (Usually in AM) Two options : Clean as you go: scrub dish with Rely- on, rinse well, fill ~2/3 with water and place in the appropriate location on the kennel door OR replace each dish with a clean one, collect all dirty dishes in sink until the end of the shift, then clean all of them (same cleaning method as above)
 Two options : Clean as you go: scrub dish with Rely- on, rinse well, fill ~2/3 with water and place in the appropriate location on the kennel door OR replace each dish with a clean one, collect all dirty dishes in sink until the end of the shift, then clean all of them (same cleaning method as above)")
7
Water Dishes Keep in mind the height of the bird Place water dish higher for hawks Place water in normal position for owls

8
Changing Paper Paper is changed SID Prepare paper ahead of time The number of sheets vary according to species Never use half sheets on top NO color paper (that way, blood or other bodily fluids will be visible) Roll the paper so it will roll out flat when placed in the kennel Keep one gloved hand in front of you while the other gloved hand pulls out dirty paper Be on alert for signs of problems
 Roll the paper so it will roll out flat when placed in the kennel Keep one gloved hand in front of you while the other gloved hand pulls out dirty paper Be on alert for signs of problems")
9
Towels Towels are changed SID Towels are used for babies and adult birds that are unable to stand or perch Never use towels with holes or strings! Very dangerous!

10
Towels If a bird cannot perch, a towel may be laid flat in the bottom of the kennel Sometimes a doughnut or pillow is needed for birds that cannot stand. Place bird on it’s chest on the pillow

11
Mutes

12
Feeding Frenzy! where mice and rats are on the menu every night Carefully read treatment sheet and follow instructions. Frequently, food is medicated with vitamins, calcium or antibiotics. Inject liquid meds into the abdomen of the mouse. Cut open mice that need ground pills.

13
Injecting Mice

14
Tablet and pills If it is cage food, Tabs must be finely ground with mortar and pestle. Cut mouse open and pour powder inside.

15
Force Feed Food Prep Many birds require force feeding and cage food For example the instructions will read: 10-15g m ff and 20- 25g m in cage Weigh out 2 separate piles and lay tweezers on the ff portion. Pills can be placed inside force-feed whole.

16
Food and Treatment Prep If the bird is getting FF, supplements and medications must be placed in the FF portion-Not the cage food. PO medications must be left in the syringe on the plate. Clean tweezers and PO syringes must be used for each bird. Rinse dirty PO syringes and tweezers in hot water and soak in Virosan.

17
Fluid Prep Birds frequently need PO (by mouth), and/or SQ fluids (subcutaneous). LRS is the most common fluid replacement used.

18
PO Fluid Prep PO fluids are given using a clean PO syringe and feeding tube. Fill syringe with the LRS bag labeled “PO”. Place syringe on plate. Rinse dirty syringes and tubes in warm water and soak in virosan.

19
SQ Fluid Prep SQ fluids are given using a sterile syringe. Remove syringe from autoclave container and attach a 23Ga needle. Draw fluids from LRS bag labeled “SQ” Place syringe on plate with the needle attached. Place used syringes in container next to autoclave in the lab. Place used needles in sharps container.

20
Catering to the Bird Place food where the bird is. Make sure food is of appropriate size. Follow instructions and stay in weight ranges.

21
Leftovers Always look for and record LOs. Make sure to note on chart if LOs were out of bird’s reach or inedible. Frequent LOs may indicate a problem. Bring it to the attention of staff or leave a note in the chart to begin force-feeding if the bird has not eaten for 3 times in a row.

22
Keeping Records Read feeding instructions thoroughly. If you have any questions at all…ask! Write comments about anything – everything is important. Is the bird lethargic, not bearing weight on one foot, wing droop, bloody, holding an eye closed?

23
Caring for Baby Raptors Babies are cared for differently than adults The baby boom is generally in the spring and summer except for BNOWs.

24
Imprinting Avoid imprinting Never Ever talk to babies Use Camouflage and feeding puppet Handle only when necessary.

25
Babies Unlike adults, babies should always have LOs. Dark mice are preferred to “teach” babies what to look for in the wild.

26
Babies Food must be cut up for babies until they are big enough to rip and tear food alone. Babies must pass mouse school before release.

27
Grabbing Birds Read the treatment sheet! Know the bird’s injuries and behavior! Prepare beforehand Know your bird! Grabbing vs. Cleaning Gloves

28
Getting a bird out of a Kennel Why grab? Weighing, examinations, treatments medications, and moving. Use one hand to grab, the other to shield your face and block the door. Don’t hesitate, restrain as soon as possible, the less struggle the better.

29
Most Large Birds Most larger birds can be grabbed safely by their legs. Both legs should be held tightly in between your thumb, forefinger and middle finger of one hand. The wings and body should be controlled by your other hand.

30
The Little Guys Use the smallest gloves that fit your hand well. Be wary! They may be small, but their often quick, too! Grab the entire bird with one hand, wings and body. Don’t grab a small bird’s feet, tail feathers can be damaged easily.

31
Vulture Grabs! Watch out! They vomit! Always BODY grab Restraint of the head is the primary concern. Be careful of large wingspan

32
Eagles Staff or experienced eagle handler assistance is mandatory when working with ANY eagle. Adequate hand, arm and upper body strength is a must. Experience with vultures and cranky GHOW momma’s a plus. Special Kevlar lined gloves are designated for the eagles.

33
Baby Grabs Always body grab anything downy! Bones are not yet calcified and can break or bend easily. Rule of thumb: Flighted = Maturity = Strong bones When in doubt, body grab.

34
Handling Birds ALWAYS maintain control of the bird’s feet! This is the most important thing to remember when handling Raptors! Raptors are wild animals and will always try to defend themselves. Occasionally exchange of the legs is necessary, but use clear communication when doing so.

35
Handling When on an exam table, the bird should be placed on his back for most treatments. SQ fluids are given in the back, so the bird should be placed on his chest in this case.

36
Handling Keep the bird’s head covered with a hood or towel to reduce visual stress. Lightly place one hand on the birds chest to prevent him from sitting up but do not push down on their chest as they will not be able to breathe.

37
Weighing Adult birds are weighed in a wrapper. Excessively large birds should be weighed in an open wrapper where the head and feet are exposed. Placing birds in previously tared (zeroed) boxes is ideal for orphans or when moving patients outside.
 boxes is ideal for orphans or when moving patients outside..")
38
Handling for Force-feeding Food is pushed down past the tongue and into the throat (or crop) of the bird to prevent regurgitation. Make sure food is cut to appropriate size for bird’s mouth. The handler should hold the bird upright and at a comfortable level for the force feeder.

39
Handling for Fluids PO fluids: Bird must be held upright. SQ fluids: lay bird on it’s back or

40
Cleanliness is Courtesy Refill empty pill bottles, medications and vitamins. Wipe down the counters immediately after finishing treatments or food preparation. Food should go in the refrigerator when not in use. Clean all of the dishes and instruments you used in the Wash Room with soap and then place in the Virosan containers to soak. Return wrappers and gloves to their appropriate homes.

41
Thank You!!! Questions?

Similar presentations


 Locate mature flowering plants of desired.>")


 Safety—developing habits to avoid accidents and keep people healthy—Most kitchen.>")


