Download presentation
Presentation is loading. Please wait.

1
Tree Planting MMXI

2
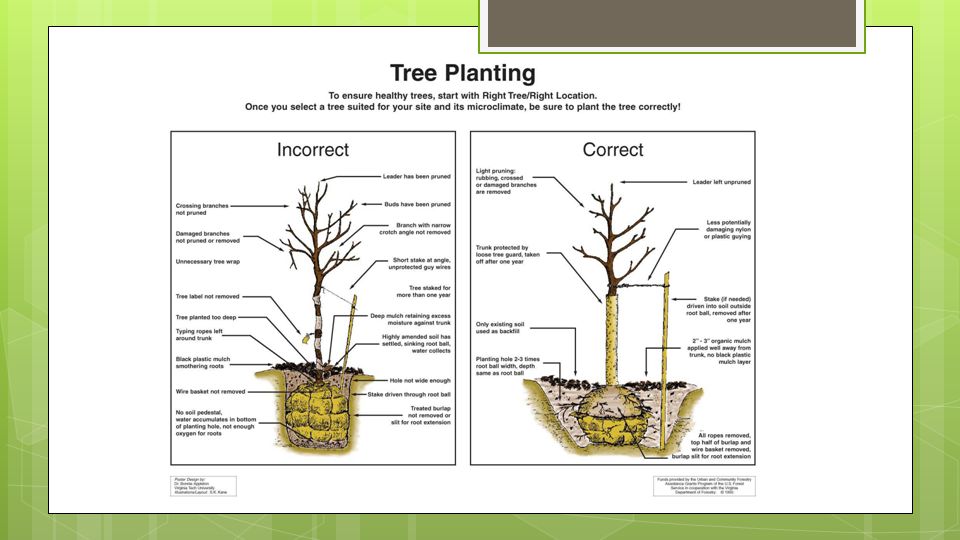
Dig a shallow hole Dig a shallow, broad planting hole. Make the hole wide, as much as three times the diameter of the root ball but only as deep as the root ball. It is important to make the hole wide because the roots on the newly establishing tree must push through surrounding soil in order to establish. On most planting sites in new developments, the existing soils have been compacted and are unsuitable for healthy root growth. Breaking up the soil in a large area around the tree provides the newly emerging roots room to expand into loose soil to hasten establishment.

3
Identify the trunk flare
The trunk flare is where the roots spread at the base of the tree. This point should be partially visible after the tree has been planted (see diagram). If the trunk flare is not partially visible, you may have to remove some soil from the top of the root ball. Find it so you can determine how deep the hole needs to be for proper planting.
. If the trunk flare is not partially visible, you may have to remove some soil from the top of the root ball. Find it so you can determine how deep the hole needs to be for proper planting.")
4
Remove tree container Remove tree container for containerized trees. Carefully cutting down the sides of the container may make this easier. Inspect the root ball for circling roots and cut or remove them. Expose the trunk flare, if necessary.

5
Place the tree at the proper height
Before placing the tree in the hole, check to see that the hole has been dug to the proper depth and no more. The majority of the roots on the newly planted tree will develop in the top 12 inches of soil. If the tree is planted too deeply, new roots will have difficulty developing because of a lack of oxygen. It is better to plant the tree a little high, 2 to 3 inches above the base of the trunk flare, than to plant it at or below the original growing level. This planting level will allow for some settling (see diagram). To avoid damage when setting the tree in the hole, always lift the tree by the root ball and never by the trunk.
. To avoid damage when setting the tree in the hole, always lift the tree by the root ball and never by the trunk.")
6
Straighten the tree in the hole
Before you begin backfilling, have someone view the tree from several directions to confirm that the tree is straight. Once you begin backfilling, it is difficult to reposition the tree.

7
Fill the hole gently but firmly
Fill the hole about one-third full and gently but firmly pack the soil around the base of the root ball. Then, if the root ball is wrapped, cut and remove any fabric, plastic, string, and wire from around the trunk and root ball to facilitate growth (see diagram). Be careful not to damage the trunk or roots in the process.
. Be careful not to damage the trunk or roots in the process.")
8
Stake the tree Stake the tree, if necessary. If the tree is grown and dug properly at the nursery, staking for support will not be necessary in most home landscape situations. Studies have shown that trees establish more quickly and develop stronger trunk and root systems if they are not staked at the time of planting. However, protective staking may be required on sites where lawn mower damage, vandalism, or windy conditions are concerns. If staking is necessary for support, there are three methods to choose among: staking, guying, and ball stabilizing. One of the most common methods is staking. With this method, two stakes used in conjunction with a wide, flexible tie material on the lower half of the tree will hold the tree upright, provide flexibility, and minimize injury to the trunk (see diagram). Remove support staking and ties after the first year of growth.
. Remove support staking and ties after the first year of growth.")
9
Mulch the base of the tree
Mulch is simply organic matter applied to the area at the base of the tree. It acts as a blanket to hold moisture, it moderates soil temperature extremes, and it reduces competition from grass and weeds. Some good choices are leaf litter, pine straw, shredded bark, peat moss, or composted wood chips. A 2- to 4-inch layer is ideal. More than 4 inches may cause a problem with oxygen and moisture levels. When placing mulch, be sure that the actual trunk of the tree is not covered. Doing so may cause decay of the living bark at the base of the tree. A mulch-free area, 1 to 2 inches wide at the base of the tree, is sufficient to avoid moist bark conditions and prevent decay.

10
Provide follow-up care
Keep the soil moist but not soaked; overwatering causes leaves to turn yellow or fall off. Water trees at least once a week, barring rain, and more frequently during hot weather. When the soil is dry below the surface of the mulch, it is time to water. Continue until mid-fall, tapering off for lower temperatures that require less-frequent watering. Other follow-up care may include minor pruning of branches damaged during the planting process. Prune sparingly immediately after planting and wait to begin necessary corrective pruning until after a full season of growth in the new location.

14
Most shrubs are sold as container-grown plants and a small percent of shrubs are sold as ball and burlap (B&B) plants. When purchasing a container-grown plant, make sure that the plant is not root-bound (a condition when the plant has stayed in the container too long and the soil ball is composed of a solid mass of roots that often encircle the root-ball (see photo). You can plant a container-grown plant most of the year but the best time to plant is in the spring and fall.
. You can plant a container-grown plant most of the year but the best time to plant is in the spring and fall..")
Similar presentations


 stock properly.>")
