Download presentation
Presentation is loading. Please wait.

1
Manlius Fire Department Annual SCBA & RIT Pak Familiarization Drill
SCOTT 4.5 Airpack Manlius Fire Department Annual SCBA & RIT Pak Familiarization Drill

2
TERMINAL LEARNING OBJECTIVES
OBJECTIVE: Given the Scott 4.5 SCBA, firefighters will be able to identify the parts and functions of the SCBA and RIT Pak and use the SCBA and RIT Pak as described in the Scott User Manual OBJECTIVE: Given the Scott 4.5 SCBA, firefighters will be able to properly donn the SCBA and mask as described in the Scott User Manual. OBJECTIVE: Given the Scott 4.5 SCBA, firefighters will be able to safely connect the RIC connection as described in the Scott User Manual OBJECTIVE: Given the Scott 4.5 SCBA and a RIT Pak or another Scott SCBA, firefighters will be able to identify several methods of providing supplemental air to a downed firefighter.

3
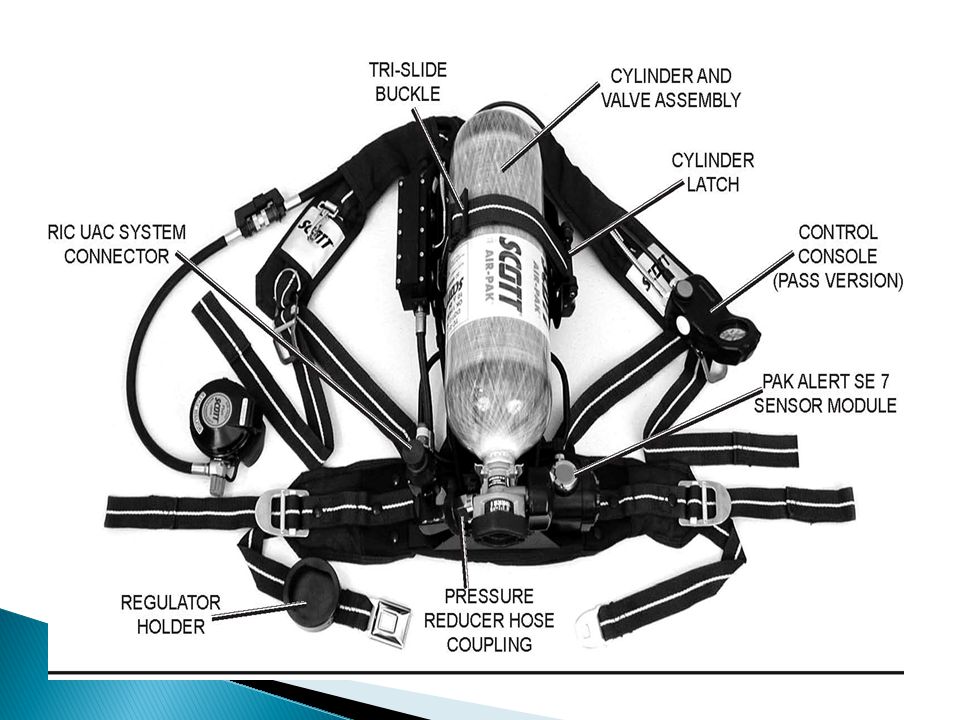
Parts Familiarization

5
CYLINDER Carbon fiber 4500 PSI
Refill at 4000 PSI “30 Minute” rated, but not really intended to last this long. Depends on a number of factors.

6
BACKPACK AND STRAPS Tri-slide cylinder buckle Cylinder latch
Kevlar straps Quick-release parachute buckles Regulator holder Inspection Tears and burns Chemical exposure

7
INTEGRATED PASS “PAK-ALERT SE” Air activated Requires 6 AA batteries
Opening cylinder 3 audible chirps Green light Requires 6 AA batteries Low battery – single audible chirp every 2 seconds / no green light

8
INTEGRATED PASS Manual alarm Auto alarm Front of PASS Red button
Full alarm on depression Auto alarm Motionless for 20 seconds Pre-alarm Ascending / Descending tone 1 Red light flash /second Full-alarm 12 Seconds after pre-alarm Continuous tones w/ red lights

9
INTEGRATED PASS Reset button De-activation of full-alarm
Yellow button Side of PASS De-activation of full-alarm Press reset button twice slowly De-activation of PASS Turn off cylinder Vent residual pressure from regulator Two tone chirp

10
REGULATOR VIBRALERT alarm Air saver/Donning switch Purge Valve
25% of cylinder pressure Air actuated vibration Re-circulates into mask Air saver/Donning switch Purge Valve Integrated HUD

11
REGULATOR Inspection Hose and rubber Quick connect Cleanliness
Cuts Tears Cracking Quick connect Dirt Debris Cleanliness Purge valve Smooth ½ turn

12
Heads Up Display After initialization, the rectangular indicator lights will show the level of the air supply in the cylinder as follows: FULL: 2 green lights glowing near the center of the display THREE-QUARTERS: single green light glowing. ONE-HALF: yellow light flashing slowly at once a second. ONE-QUARTER cylinder end of service time indicator is indicated by the red light at the far left flashing rapidly at ten times a second. When this warning light is flashing rapidly, the user must leave the hazardous atmosphere immediately.

13
HEADS-UP DISPLAY (HUD)
Visual display of SCBA air status Series of lights indicate pressure Full - 2 green 75% - 1 green 50% - 1 yellow slow flashing 25% - 1 red rapid flashing

14
How to Don AV 3000 Mask Adjust the head straps to their full outward position. Hold the facepiece in one hand and hold the head harness by the strap at the base of the head net. Place the facepiece on the face with chin properly located in the chin pocket while pulling the head harness over the top of the head. Verify that no hair or clothing is interfering with the face to facepiece seal. 12 A Tighten the neck straps by pulling the two lower strap ends toward the rear of the head. 12 B

15
Donning mask… Stroke the head harness net down the back of the head using one or both hands. Verify that the head harness is lying flat against the back of the head. Retighten the neck straps. 12C Tighten the two temple straps. Adjust the temple straps by pulling the two temple strap ends toward the back of the head. Over-tightening may cause discomfort. 12D Retighten the neck straps if required.

17
Attaching Regulator Fully depress the center of the air saver/donning switch on top of regulator and release. The breathing regulator is equipped with an air aver/donning switch to prevent the rapid loss of air supply when the cylinder valve is open and the facepiece is removed from the face or the regulator is removed from the facepiece.

18
Attaching Regulator If the regulator is not attached to the facepiece, proceed as follows: Verify that the regulator gasket is not damaged and is in place around the outlet port of the regulator. Align the two flats of the regulator outlet port with the corre sponding flats in the facepiece port (the red purge valve on the regulator will be in the 12 o’clock position). insert the regulator into the facepiece port. Rotate the regulator counterclockwise (as viewed from inside of facepiece) until the red purge valve knob is on the left side of the facepiece. The lock tab on the regulator will lock into the facepiece retainer with a “click.” when the lock tab is properly engaged, the regulator will not rotate.
. insert the regulator into the facepiece port. Rotate the regulator counterclockwise (as viewed from inside of facepiece) until the red purge valve knob is on the left side of the facepiece. The lock tab on the regulator will lock into the facepiece retainer with a click. when the lock tab is properly engaged, the regulator will not rotate.")
19
Attaching Regulator Slowly open cylinder valve fully by turning the valve knob counterclockwise until it stops (approximately 2 1/2 full turns of the knob).
.")
20
Attaching Regulator Observe the operation of the alarms:
The VIB RALERT end of service indicator alarm will actuate and then stop. The HEADS-UP DI SPLAY shall initialize for twenty (20) seconds and then display the cylinder level. The PAK ALERT SE 7 distress alarm will actuate when the cylinder valve is opened and will sound three quick audible chirps accompanied by a green flashing on the PAK ALERT SE 7 control console
 seconds and then display the cylinder level. The PAK ALERT SE 7 distress alarm will actuate when the cylinder valve is opened and will sound three quick audible chirps accompanied by a green flashing on the PAK ALERT SE 7 control console.")
21
Attaching Regulator If the air saver/donning switch has not been depressed prior to opening the cylinder valve, the VIB RALERT Alarm will not actuate due to the air flowing freely on the facepiece. With facepiece sealed to face, inhale sharply.

22
Always check the facepiece seal, the system seal, and the operation of the end of service alarms using the following procedure: Completely close the cylinder valve by pushing in on the cylinder valve and rotating it clockwise. Breathe on respirator. As the air pressure falls in the respirator, one or more of the end of service indicator alarms will actuate. Immediately on actuation of any end of service indicator alarm, hold breath momentarily and make certain that the Vibralert and heads up display both actuate (rapid clicking of the Vibralert Alarm, rapid flashing of the heads up display red light.

23
Resume breathing on the respirator until all air stops flowing from the breathing regulator.
NEGATIVE PRESSURE LEAK TEST: Inhale slowly and hold breath momentarily. No leakage of air shall be detected into the facepiece and the facepiece shall be drawn slightly to the face. Open cylinder valve and breathe normally. If installed, the electronic end of service time indicator will continue briefly then stop.

24
Use in Standby mode The respirator may be donned and worn in "Standby," so that it is ready for use. This means the respirator is in place on the user’s body with the shoulder straps properly adjusted and the waist belt buckled, but the facepiece is not donned (sealed to the face) and the respirator is not being used.
 and the respirator is not being used.")
25
Keep the facepiece ready for use either of two ways:
Leave the cylinder valve fully open and verify that the air saver/donning switch is depressed. Remove the facepiece but leave the regulator attached to the facepiece. Keep the facepiece ready for use either of two ways: Hang the facepiece from the snap clip on the left shoulder pad, Hang the facepiece from the optional neck strap. NOTE DO NOT LET THE FACEPIECE HANG LOOSE WI THOUT SECURING IT AS NOTED ABOVE.

26
The regulator can be detached from the facepiece until needed
The regulator can be detached from the facepiece until needed. To detach the regulator from the facepiece: Place your right hand over the cover with your thumb on the lock tab. Pull the lock tab toward the cover and rotate the regulator ¼ turn clockwise (viewed from inside of facepiece). W hen the red purge valve is in the 12 o’clock position remove regulator from the facepiece. The regulator can be stored in the optional regulator holder on the waist belt.
. W hen the red purge valve is in the 12 o’clock position remove regulator from the facepiece. The regulator can be stored in the optional regulator holder on the waist belt.")
27
EBSS – DUAL MANIFOLD EBSS – Emergency Breathing Support System
Introduction of air from outside source Ladder air system RIT Bag Another SCBA (buddy breathing) On left side waist belt In snap pouch
 On left side waist belt. In snap pouch.")
28
EBSS – DUAL MANIFOLD Male and Female coupling 3 foot hose
Quick disconnect Supply or receive 3 foot hose Dual protective cover

29
EBSS – DUAL MANIFOLD Extended Duration air supply (aerial ops)
Use male coupling Operates as open-circuit, pressure demand Emergency Breathing (Buddy breathing) Used for escape only Utilizes highest pressure bottle One bottle can be turned off to conserve air Can “Daisy-Chain” up to 3 users Will not provide enough air for >3
 Used for escape only. Utilizes highest pressure bottle. One bottle can be turned off to conserve air. Can Daisy-Chain up to 3 users. Will not provide enough air for >3.")
30
RIC UAC – RAPID INTERVENTION UNIVERSAL AIR CONNECTION
FOR EMERGENCY USE ONLY! Permits emergency replenishment of air Not a quick charge

31
WARNING!!! Utilizing RIC UAC for emergency air replenishment of a structurally compromised cylinder will result in an over pressurization explosion.

32
SCOTT RIT PAK

33
SCOTT RIT PAK 1 Carbon Fiber 4500 PSI / 60 Min. Cylinder
Cylinder caddy w/ carrying handle Av-3000Face piece Regulator w/ quick disconnect

34
SCOTT RIT PAK 1 High Pressure hose w/ UAC connection
Pressure reducer block 5’ low pressure hose and fittings

35
CYLINDER CADDY Divided bag Exterior pouch Cylinder storage
Low pressure hose and mask/regulator Exterior pouch High pressure UAC

36
High Pressure Universal Air Connection (“UAC”)
FOR EMERGENCY USE ONLY!!!

37
RIC Connection

38
HIGH PRESSURE UAC 5’ high pressure hose Air directly from bottle
Side Pocket of Pack Air directly from bottle UAC – Universal Air Connection w/ cap

39
RIC UAC – RAPID INTERVENTION UNIVERSAL AIR CONNECTION
Permits emergency replenishment of air Not a quick charge Within 6” of neck of bottle on all NFPA (2002) compliant SCBA’s
 compliant SCBA’s.")
40
OPERATION OF UAC Ensure RIT cylinder valve is fully open
Extend high pressure UAC hose Remove protective cap Ensure SCBA cylinder valve is fully open

41
OPERATION OF UAC Locate UAC on receiving SCBA Remove protective cap
Align and push – UAC will self-lock Connection will self lock Cylinder pressures will equalize

42
TERMINATION OF UAC Pull back UAC collar and pull UAC from SCBA
Turn off RIT cylinder Replace protective cap Press center of cap to vent residual pressure

43
TERMINATION OF UAC WARNING!!!
DO NOT attempt to vent pressure without cap on. This will inject high pressure air into skin.

44
LOW PRESSURE HOSE 5’ HOSE 2 Connections AV-3000 face piece Regulator
EBSS – Air from highest pressure cylinder Schrader Double male adapter for female EBSS AV-3000 face piece Same mask as issue Regulator Quick disconnect

45
OPERATION OF LOW PRESSURE HOSE
Examples of when RIT low pressure hose should be used FF low on air Failure of mask Failure of regulator Failure of SCBA Structural compromise of cylinder

46
OPERATION OF LOW PRESSURE HOSE
Multiple Options EBSS to EBSS EBSS to regulator EBSS and regulator to mask EBSS, regulator and mask Rescue operations

47
OPERATION OF LOW PRESSURE HOSE
EBSS to EBSS Align EBSS and push Coupling self locks Air from highest pressure cylinder Can turn off SCBA cylinder to conserve air Will not hot charge SCBA

48
OPERATION OF LOW PRESSURE HOSE
EBSS to regulator Turn on RIT cylinder Disconnect coupling from SCBA Align coupling with EBSS and push

49
OPERATION OF LOW PRESSURE HOSE
EBSS and regulator to mask Align coupling with EBSS and push Turn on RIT cylinder Remove regulator from SCBA Replace with RIT regulator

50
OPERATION OF LOW PRESSURE HOSE
EBSS, regulator and mask Align coupling with EBSS and push No electrical connection No HUD Turn on RIT cylinder Remove regulator and mask from FF Replace with RIT regulator and mask

51
OPERATION OF LOW PRESSURE HOSE
Rescue operations Align coupling with EBSS and push Turn on RIT cylinder Place mask on civilian

52
OPERATION OF LOW PRESSURE HOSE
NOTICE: RIT PAK(s) are for OUR Safety RIT PAKs should only be used for civilian rescue if a RIT teams have been established with dedicated RIT PAK(s).
 are for OUR Safety. RIT PAKs should only be used for civilian rescue if a RIT teams have been established with dedicated RIT PAK(s).")
53
Cleaning Respirators must be cleaned after every use
We use a solution to clean the mask We are not cleaning them as frequently as we need to. They carry carcinogenic remnants of fires.

Similar presentations


 to power the HeartMate II or XVE LVAS and optional Display Module or System Monitor, prepare the.>")


 INSTRUCTIONS FOR USE Preventive Medicine Industrial Hygiene Service.>")


2/P Overvest Chemical Biological Radiological.>")


 COMPLIANT LT MICHAEL BOEHLKE>")


