Download presentation
Presentation is loading. Please wait.

1
Khaled A. Al-Utaibi alutaibi@uoh.edu.sa
8086 Bus Design Khaled A. Al-Utaibi

2
Agenda 8086 Bus System Design Buffering and Latching 8086 Bus System
Bus Timing Bus Write Cycle Read Cycle Ready and Wait States 8086 Bus System Design Objective Requirements Procedure

3
Buffering and Latching
Before starting with 8086 bus system design, one needs to understand the following concepts: (1) Fan-out limitations of logic gates (2) Buffering (3) Latching
 Fan-out limitations of logic gates. (2) Buffering. (3) Latching.")
4
Buffering and Latching Fan-out Limitations
If the output of some gate A is connected to the input of another gate B, gate A is said to be driving gate, while gate B is said to be the load gate. The fan-out of a gate is the largest number of gate inputs this gate can drive. The fan-out for TTL is 10 loads. The fan-out for CMOS is 8 loads A B Driver Gate Load Gate

5
Buffering and Latching High-Drive Buffers
A buffer is a single input single output gate that provides the necessary drive capability which allows driving larger loads.

6
Buffering and Latching Tri-State Buffer
The outputs of 2 logic gates can not be directly connected because this causes a short circuit that results in huge current flow may result in damaging the circuit The solution to this problem is to use tri-state buffers. A tri-state buffer is a special gate with 3 states controlled by an enable input (E) : Logic 0 (Low Voltage), Logic 1 (High Voltage), and Hi-Impedance (Open Circuit)
 : Logic 0 (Low Voltage), Logic 1 (High Voltage), and. Hi-Impedance (Open Circuit)")
7
Buffering and Latching Bidirectional Buffers
74LS245 3-State Bidirectional Octal Buffers:

8
Buffering and Latching Unidirectional Buffers
74LS244 3-State Unidirectional Octal Buffers:

9
Buffering and Latching Simple D-Latch
The D-Latch is a memory device which can store one bit of data for as long as the device is powered. The D-Latch has one data input (D), one control input (C) and one data output (Q/Q’). When C = 0, the output Q keeps its value (No Change) When C = 1, the output Q follows the input D (Q = D)
, one control input (C) and one data output (Q/Q’). When C = 0, the output Q keeps its value (No Change) When C = 1, the output Q follows the input D (Q = D)")
10
Buffering and Latching D-Latches with Tri-State Buffers
74LS374 3-State Octal D-Type Transparent Latches :

11
8086 Bus System The 8086 has three buses
(1) Address Bus: provides memory and I/O with the memory address or the I/O port number (2) Data Bus: transfers data between the microprocessor and the memory and I/O (3) Control Bus: provides control signals to the memory
 Address Bus: provides memory and I/O with the memory address or the I/O port number. (2) Data Bus: transfers data between the microprocessor and the memory and I/O. (3) Control Bus: provides control signals to the memory.")
12
8086 Bus Timing 8086 access memory and I/O devices in periods called bus cycles. Each cycle equals 4 system-clocking periods (T states). If the clock is operated at 5 MHz, one 8086 bus cycle is complete in 800 ns.

13
8086 Bus Write Cycle

14
8086 Bus Read Cycle

15
8086 Ready and Wait States The READY input causes wait states for slower memory and I/O components. A wait state (Tw) is an extra clocking period inserted between T2 and T3. The READY input is sampled (checked) at the end of T2 and in the middle of Tw. If READY is a logic 0 at the end of T2, then T3 is delayed and Tw is inserted between T2 and T3 READY is next sampled at the middle of Tw to determine if the next state is Tw or T3. The READY signal is synchronized with clock using the 8284A clock generator.
 is an extra clocking period inserted between T2 and T3. The READY input is sampled (checked) at the end of T2 and in the middle of Tw. If READY is a logic 0 at the end of T2, then T3 is delayed and Tw is inserted between T2 and T3. READY is next sampled at the middle of Tw to determine if the next state is Tw or T3. The READY signal is synchronized with clock using the 8284A clock generator.")
16
8086 Bus System Design Objective
Objective: to provide the system the three main buses required to access memory and I/O devices (1) Address Bus (2) Data Bus (3) Control Bus
 Address Bus. (2) Data Bus. (3) Control Bus.")
17
8086 Bus System Design Requirements
Requirements: bus design must satisfy two main requirements (1) Bus Buffering: the system must be buffered if the number of devices interfaced to it is more than its fan-out (2) Bus Demultiplexing (Latching): All time multiplexed lines of the processor must be first demultiplexed (latched) to split address, data, status and control lines before interfacing them to memory and I/O devices.
 Bus Buffering: the system must be buffered if the number of devices interfaced to it is more than its fan-out. (2) Bus Demultiplexing (Latching): All time multiplexed lines of the processor must be first demultiplexed (latched) to split address, data, status and control lines before interfacing them to memory and I/O devices.")
18
8086 Bus System Design Procedure
Designing a bus system involves the following steps: (1) Identify input, output and input/output pins of the processor. Note that only output and input/output pins are considered for designing the bus system (i.e. input pins are not part of the bus system). (2) Identify time multiplexed pins of the processor. These pins need to be demultiplexed. (3) Use latches to demultiplex time multiplexed pins. (4) Use buffers to buffer all data, address and control lines to be connected to memory and I/O devices. Latched lines are already buffered. Input/output lines require bidirectional buffers Output lines require unidirectional buffers
 Identify input, output and input/output pins of the processor. Note that only output and input/output pins are considered for designing the bus system (i.e. input pins are not part of the bus system). (2) Identify time multiplexed pins of the processor. These pins need to be demultiplexed. (3) Use latches to demultiplex time multiplexed pins. (4) Use buffers to buffer all data, address and control lines to be connected to memory and I/O devices. Latched lines are already buffered. Input/output lines require bidirectional buffers. Output lines require unidirectional buffers.")
19
8086 Bus System Design Procedure Example
Design a fully buffered and de-multiplexed bus system for a minimum mode 8086-based microcomputer system.

20
8086 Bus System Design Procedure (1) Identify Inputs, Inputs/Outputs & Outputs
Inputs: these are not part of bus system design VCC GND NMI INTR CLK RESET READY TEST’ HOLD MN/MX’

21
8086 Bus System Design Procedure (1) Identify Inputs, Inputs/Outputs & Outputs
A16/S3 A17/S4 A18/S5 A19/S6 RD’ HOLDA (not required, why?) WR’ M/IO’ DT/R’ DEN’ ALE INTA’ (not required, why?)
 WR’ M/IO’ DT/R’ DEN’ ALE. INTA’ (not required, why )")
22
8086 Bus System Design Procedure (1) Identify Inputs, Inputs/Outputs & Outputs
AD0-AD15

23
8086 Bus System Design Procedure (2) Identify Time Multiplexed Pins
AD0-AD15 A16/S3-A19/S6 BHE’/S7

24
8086 Bus System Design Procedure (3) Latching (Demultiplexing) Multiplexed Lines
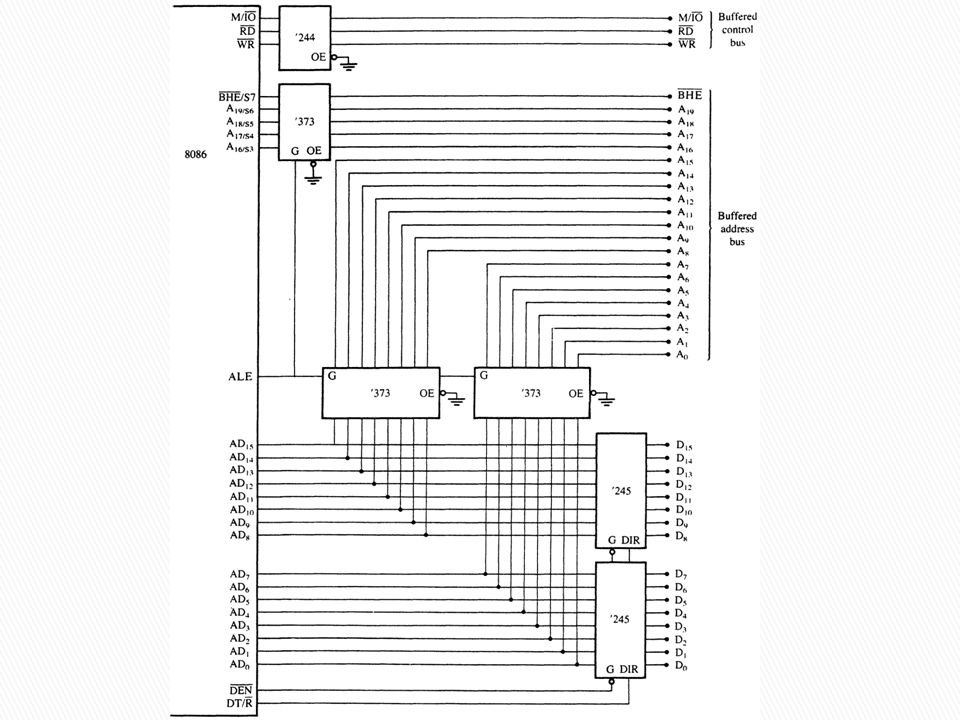
As shown in Step(2), the 8086 has 21 multiplexed lines: AD0-AD15 A16/S3-A19/S6 BHE’/S7 To latch (demultiplex) these lines using 74LS373 octal latches, we need 21/8 = 3 chips. The input controls of the 74LS373 octal latches should be connected as follows : Output Control (OE’) connected to GND (Why?) Latch Enable (G’) connected to ALE (Why?)
, the 8086 has 21 multiplexed lines: AD0-AD15. A16/S3-A19/S6. BHE’/S7. To latch (demultiplex) these lines using 74LS373 octal latches, we need 21/8 = 3 chips. The input controls of the 74LS373 octal latches should be connected as follows : Output Control (OE’) connected to GND (Why ) Latch Enable (G’) connected to ALE (Why )")
26
8086 Bus System Design Procedure (4) Buffering Address, Data & Control Lines
The data lines D15-D0 should buffered using bidirectional buffers (74LS245). Why? We have 16 data lines. So, we need 16/8 = 2 chips. The Buffer Enable (G’) should be connected to DEN’ (Why?) The Direction Control (DIR) should be connected to DT/R’ (Why?) The Control Lines M/IO’, RD’ and WR’ should be buffered using unidirectional buffers (74LS244). Why? The Buffer Enable (G’) should be connected to GND (Why?)
. Why We have 16 data lines. So, we need 16/8 = 2 chips. The Buffer Enable (G’) should be connected to DEN’ (Why ) The Direction Control (DIR) should be connected to DT/R’ (Why ) The Control Lines M/IO’, RD’ and WR’ should be buffered using unidirectional buffers (74LS244). Why The Buffer Enable (G’) should be connected to GND (Why )")
27
8086 Bus System Design Procedure (4) Buffering Address, Data & Control Lines
Since address lines A19-A0 & BHE’ are latched using 74LS373 octal latches, they are already buffered. The following control lines are will not be buffered: DT/R’ & DEN’ because they are will not be connected to memory or I/O devices. HOLDA because the direct memory access is not supported by our system. INTA’ because interrupts are not supported by our system.

Similar presentations

>")


![8086 [2] Ahad. Internal! External? 8086 vs 8088 16_bit Data Bus 20_bit Address 8_bit Data Bus 20_bit Address 8088 8086 Only external bus of 8088 is.](/11/3255261/big_thumb.jpg "8086 [2] Ahad. Internal! External? 8086 vs 8088 16_bit Data Bus 20_bit Address 8_bit Data Bus 20_bit Address 8088 8086 Only external bus of 8088 is.>")


 Lecturer: Hui.>")

 Peripherals (IO) Data Bus Control Bus Address Bus Keyboard Monitor Printer.>")
 : input signal which synchronize the internal and external operations of the microprocessor.>")
 8086 microprocessor Internal registers Making of Memory address.>")


