Download presentation
Presentation is loading. Please wait.

1
www.planet.com.tw Application Guide For Mesh AP – MAP-3120 How to setup the Mesh APs for Central Management? How to start up the Management Software for the Mesh APs? F/W: 3.1.4 S/W: 2.3

2
www.planet.com.tw Page 2 of 14 Preface This guide help to configure the MAP-3120 / MAP- 3100 to work with the Mesh Network Management Software (NMS) The Management Software (NMS) is a very powerful utility that help to central manage your Mesh APs in your network MAP-2000 series is not supported at this NMS version
 The Management Software (NMS) is a very powerful utility that help to central manage your Mesh APs in your network MAP-2000 series is not supported at this NMS version")
3
www.planet.com.tw Page 3 of 14 Topics Network Hypothesis NMS Install Mesh AP Setup Start up NMS for Management Advance Settings

4
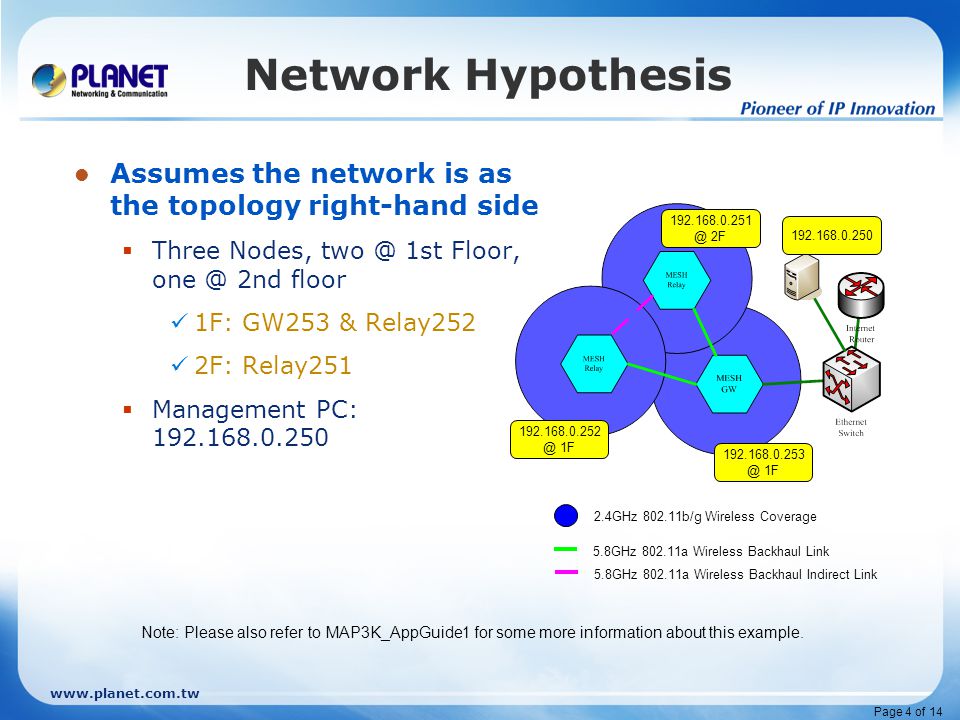
www.planet.com.tw Page 4 of 14 Network Hypothesis Assumes the network is as the topology right-hand side Three Nodes, two @ 1st Floor, one @ 2nd floor 1F: GW253 & Relay252 2F: Relay251 Management PC: 192.168.0.250 192.168.0.251 @ 2F 192.168.0.252 @ 1F 192.168.0.253 @ 1F 2.4GHz 802.11b/g Wireless Coverage 5.8GHz 802.11a Wireless Backhaul Link 5.8GHz 802.11a Wireless Backhaul Indirect Link Note: Please also refer to MAP3K_AppGuide1 for some more information about this example. 192.168.0.250
5
www.planet.com.tw Page 5 of 14 Insert the CD-ROM to the Management PC System Requirements: Windows 2000 /2003 P4 above CPU 200MB above free HDD space Run the setup program from the CD-ROM After the Installation, there should create a link in “START” PLANET Mesh Tools -> PLANET Mesh Network Management Tools NMS Install

6
www.planet.com.tw Page 6 of 14 Start up the Web page of each AP nodes Management -> NMS Address Click on “New Entry” button Key in the Management PC’s IP Address Mesh AP Setup Click on NMS Address to bring out the Listing page Click on New Entry and Key in the IP Address. i.e.192.168.0.250 Save the changes and Reboot to make the settings take effect Hint: Only add the Manage PC’s IP address to this list can MAP knows whom to reply the request from NMS installed manage PC. The settings here can apply to both MAP- 3100 (Layer 2/3 model) and MAP- 3120 (Layer 2 model)
 and MAP (Layer 2 model).")
7
www.planet.com.tw Page 7 of 14 Startup the NMS Start up the program and Create a new map NMS Default Startup Screen Click on File to Create Map Hint: Please choose Layer- 2 Map. Layer-2 Map can work with both MAP- 3120 and MAP-3100. As for SNMP Map. SNMP Map is designed for MAP- 3100 (Layer 3 mode) Click on Layer-2 Map Key in the name of this map and “OK”
 Click on Layer-2 Map Key in the name of this map and OK .")
8
www.planet.com.tw Page 8 of 14 Startup the NMS Start up the Listen Port Click on Initial Port With in 1 min, all the Mesh Nodes listened from the Network will shown here! Drag & Drop the nodes to a proper location Then click on Lock to fix the nodes Hint: Tilt now, the NMS is startup and running.

9
www.planet.com.tw Page 9 of 14 Introduce the NMS Screen After double click on the node. Here shows the Node’s Information And here shows the corresponded nodes’ RSSI value Click on Play button Here shows the attached Wireless Client’s Information.

10
www.planet.com.tw Page 10 of 14 Advanced Settings Background Image Import Images so it will be more clear to know where the node is. Of course! It also can be.. Images that captured and imported from Google map.

11
www.planet.com.tw Page 11 of 14 Advanced Settings Save Map or Save Map as… Save map so that the next time start up NMS the setting can be bring back easily. Hint: Please remember to click on initial port if you use open MAP next time. Otherwise, NMS will not get the information from those nodes.

12
www.planet.com.tw Page 12 of 14 Advanced Settings Performance Analysis Here have a very useful tools to analyze your Mesh Network. Node Listing Here. For example, now it is Relay252 RSSI Analyze. Now, red line is the strength for Gateway. Blue line for the strength for Relay251 Client Analyze The receive strength of the attached Wireless Clients

13
www.planet.com.tw Page 13 of 14 Advanced Settings AP Configure Mouse on the node and right click. Hint: By default the community will be: SNMPv2c Read only: public Read/Write: private Select AP Configurator Key in “private” and Proceed Hint: With AP Configurator, you can do all the settings just the same through Web Browser. So, with AP Configurator, you don’t need to memorize the IP address of each node then turn on the browser page one by one.

14
www.planet.com.tw Page 14 of 14 Summary The NMS is a tool that can help to manage your Mesh network in a very easy way Especially, if you got more then three nodes in this example. It is very suitable for mass configuration and installation For more information about the NMS setting and management, please refer to the user guide as well

Similar presentations


 and software games written.>")


